

By Joe Wilson.
This tutorial will get you up to speed with Marmoset Toolbag’s baker. From the technical to the artistic, follow along as we shed light on numerous subjects to enable you to quickly and easily solve common problems and optimize your art content for fabulously fresh bakes.
Toolbag Setup
This section covers all of the best and most interesting buttons, sliders, and features that Toolbag’s baking tools have to offer. Read below to learn where to find them, what they do, and how to leverage their power to produce stunning bakes.
About The Baker
Toolbag utilizes the power of your GPU (video card) to create super fast bakes. Toolbag’s baking tools are not only fast, they’re smart too! When making adjustments to local areas of your mesh, it will rebake only the affected area, resulting in a near-instantaneous update to the previewed result. The baker has been designed with artists in mind, and tools like bake groups, offset and skew painting, and real-time preview combine to create an exceptionally intuitive and efficient baking workflow.
Toolbag’s powerful GPU rendering engine is capable of handling very high resolution meshes, well into the millions of polygons when used with modern video cards. Toolbag has no polygon limit, however, performance depends on the specific GPU that you’re using.
Getting Started
Follow along with the video to get familiar with Toolbag’s baking workflow, and read below for an in-depth explanation of some of the key features.
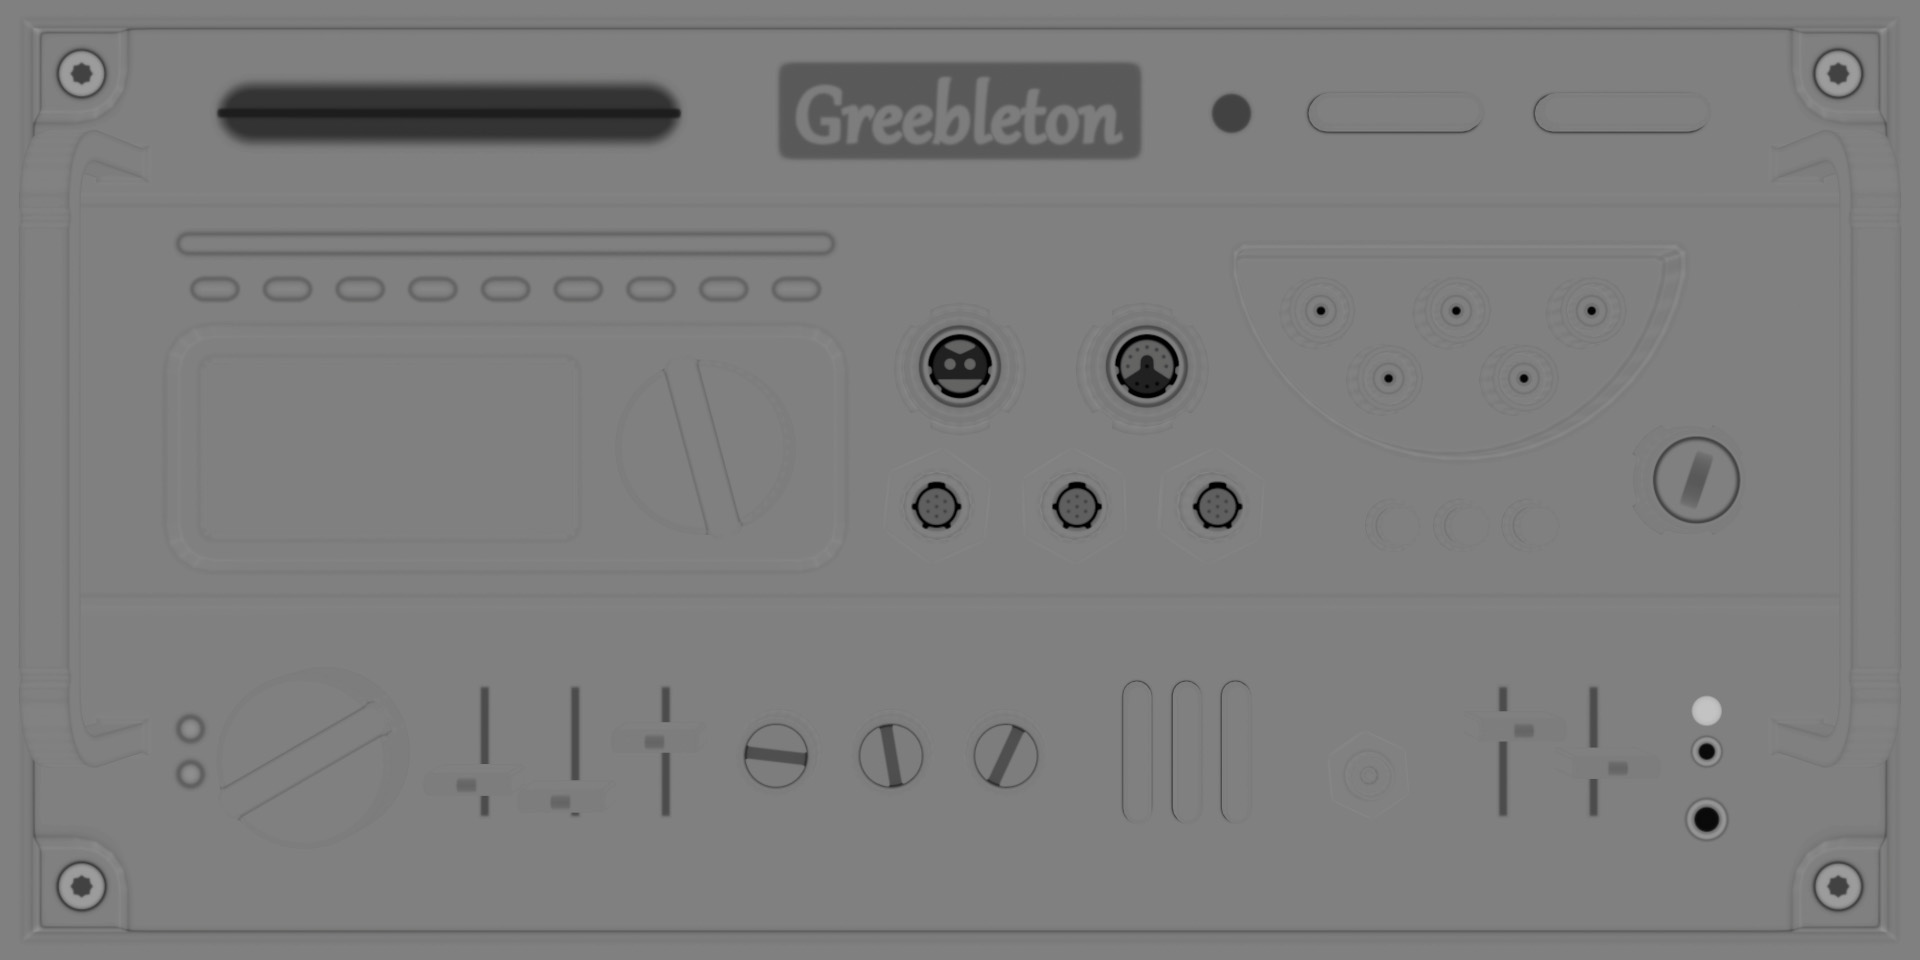
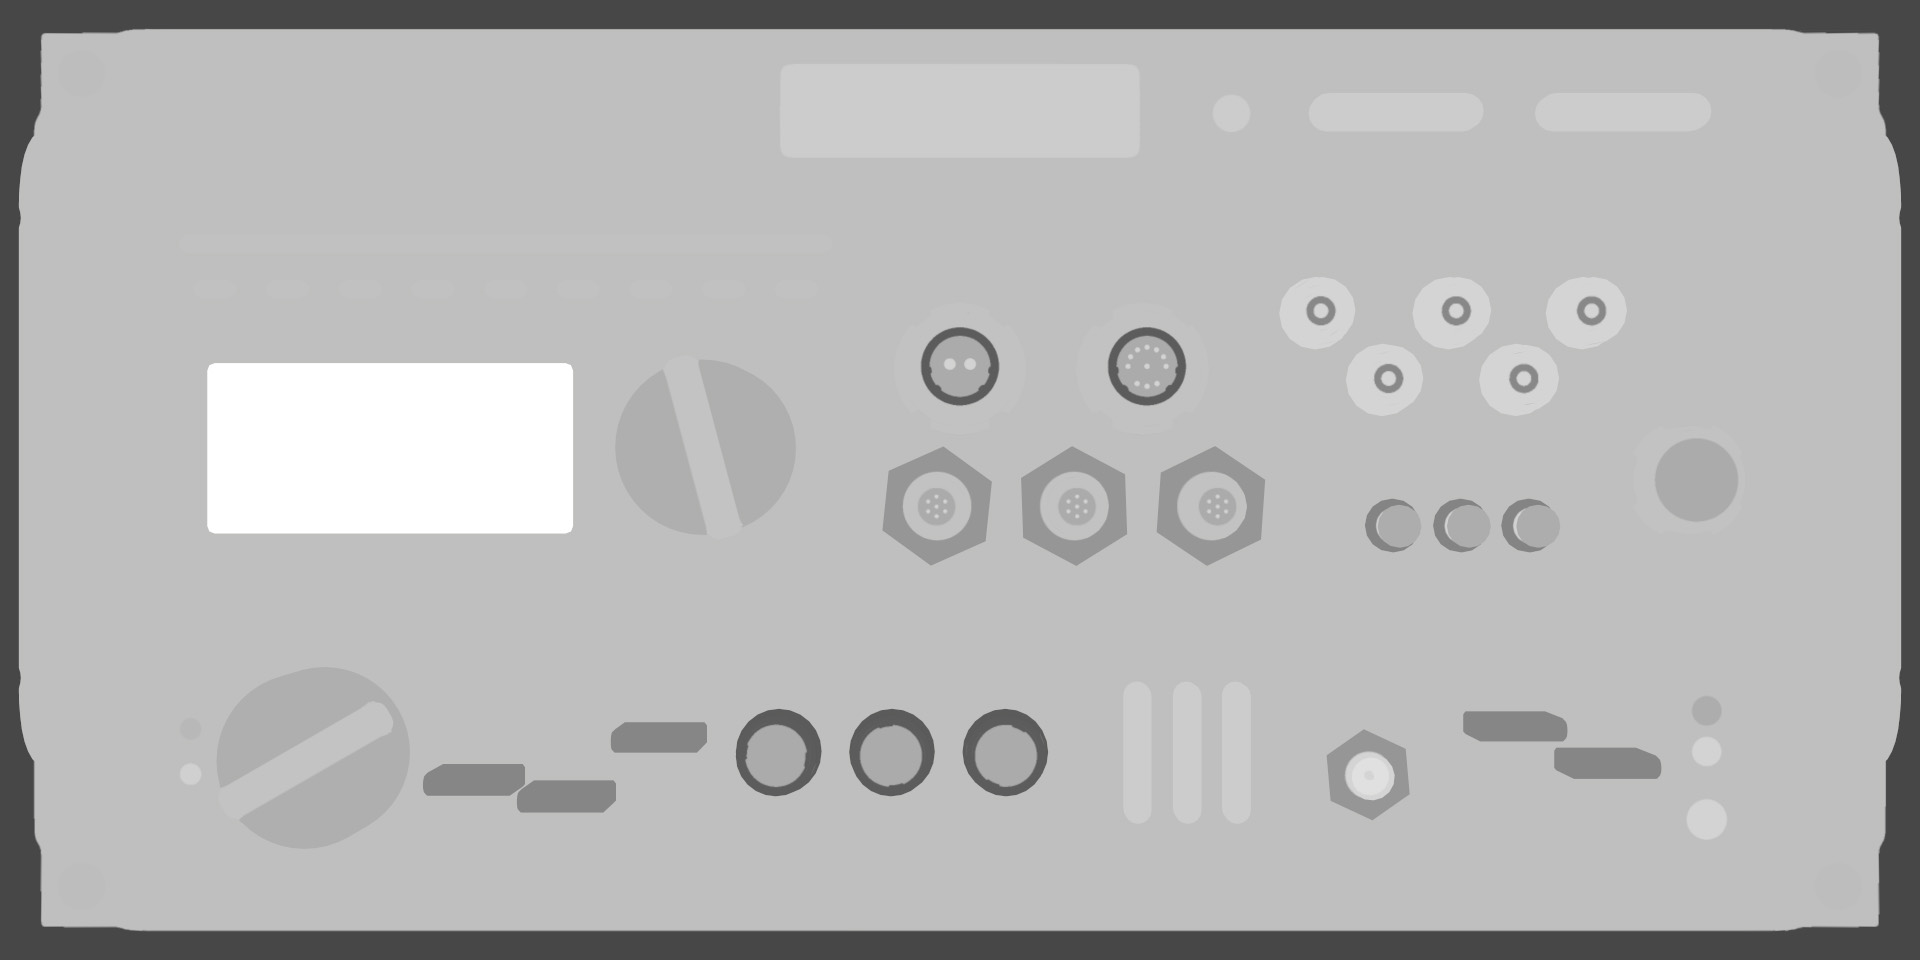
Top Bar
A number of useful buttons live in the top bar of the Baker object properties. The Bake button bakes your outputs and saves them to disk, and to the right is the New Bake Group button. The H and L buttons toggle visibility for all of the High and Low slots respectively. The P button creates a preview material which is applied to your low poly object(s), with temporary maps automatically assigned so you can quickly preview your bake. When enabling more outputs, be sure to click the material preview button again to see the additional maps.
Geometry Settings
You can find various global mesh settings in the Geometry tab. Use Hidden Meshes determines whether objects hidden in the outliner will contribute to the baked result. When enabled, Ignore Transforms will assume all meshes are positioned at 0,0,0. This can be helpful if you want to move your low poly meshes off to the side for preview while retaining full baking functionality. Smooth Cage determines whether to average the cage normals or use the low poly’s vertex normals for the projection direction. Ignore Back Faces ensures that faces of the high poly mesh which point away from the baker will not be recorded. The Quick Loader lives here too, and can be used by pressing the folder tree icon.
Output Settings
Set your resolution with the Size setting. Images up to 8192×8192 pixels are supported. Samples determines the quality of the anti-aliasing. Format defines the bit-depth, or how much precision the file is saved with. Higher bit depths will result in larger files. The Multi-Layer PSD option will save your outputs into a single, layered PSD. Material property outputs such as albedo, gloss and specular will be saved into layer groups with layer masks automatically applied for each high poly material.
Padding determines how far to extend the baked content past the UV borders. Our padding algorithm is designed to provide enough padding to avoid mip-mapping problems and automagically adjusts to your resolution, which is why there is no explicit pixel value option. The moderate setting should be enough for most uses, and the extreme setting should fill out most of the empty space in the UV layout.
Bake Groups
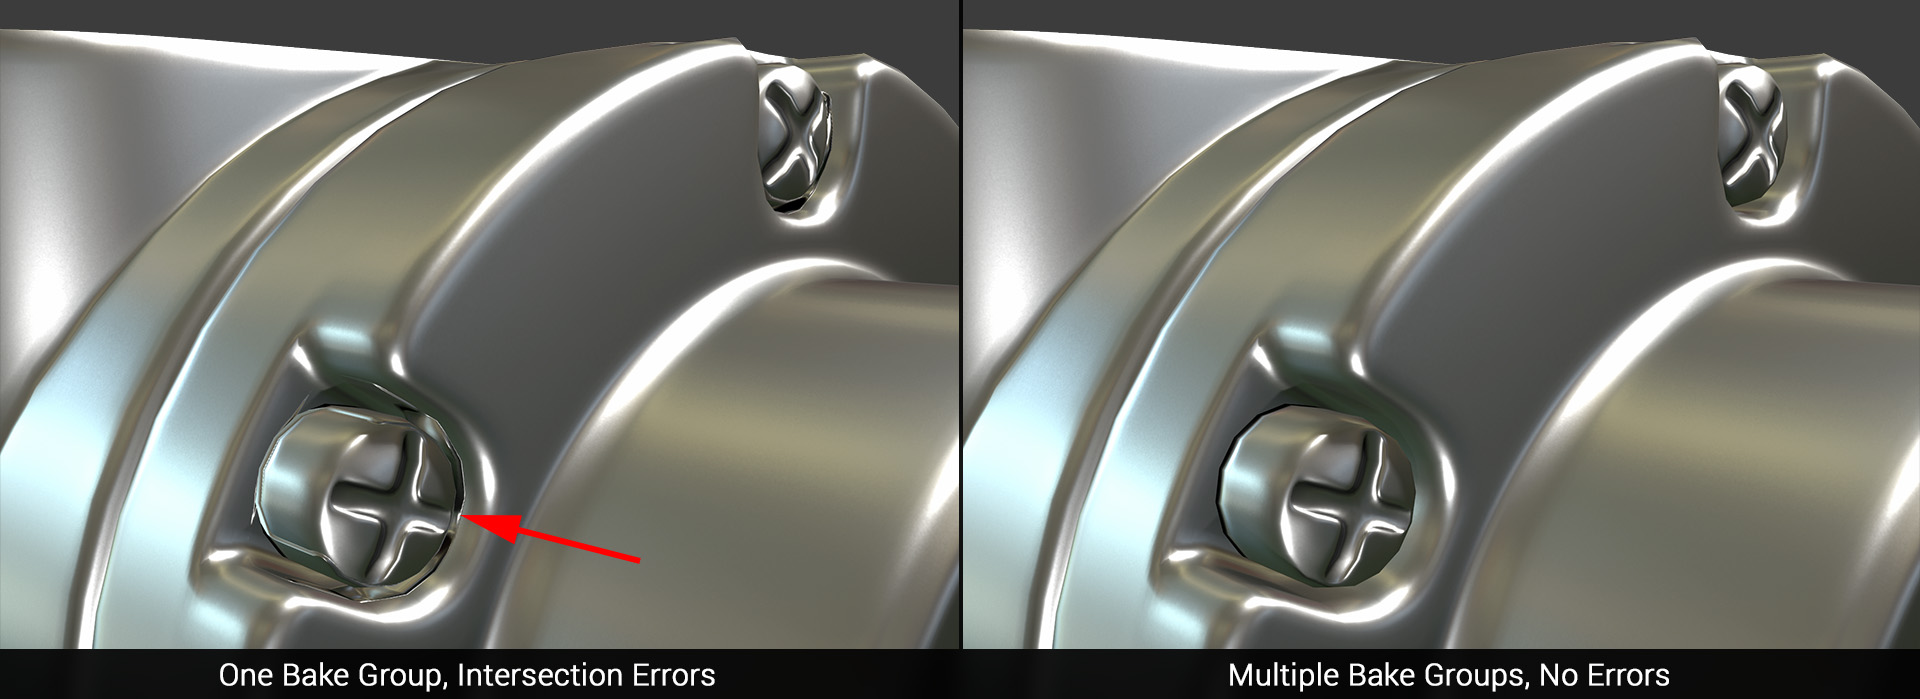
Bake Groups are special folders that have slots for high and low poly meshes, and can be used to isolate different elements of your model to prevent errors at intersection points. You can use as many or as few groups as you like.
Quick Loader
The Quick Loader reads object names from your mesh file and automatically sets up Bake Groups using the following naming conventions:
Syntax: _<high/low>_
determines the name of the mesh, such as mymesh1 or gun_barrel. Everything before <high/low> will be read as the object name. <high/low> determines whether the object will be sorted into the high or low poly slot, such as mymesh1_high and mymesh1_low. is a flag that can be used to sort many separate elements into one group. Everything after <high/low> will be treated as a variation. The names are not case sensitive, so you can mix and match object_HIGH with object_low.
For example, Myobject1_high, Myobject1_high_bolt, and Myobject1_low will be added to a new bake group called Myobject1, while Myobject2_high, and Myobject2_low will be added to a bake group called Myobject2.
Projection Tools
Toolbag’s baker features innovative tools for controlling the projection distance and direction of the cage by painting directly in the viewport. The cage and skew settings are stored per bake group. If you need more control over a specific object or element, separate it into a new group. If your mesh file is reloaded, cage and skew settings are retained where possible, so your changes will be saved as long as the UVs do not change (in which case you will want to clear the maps).
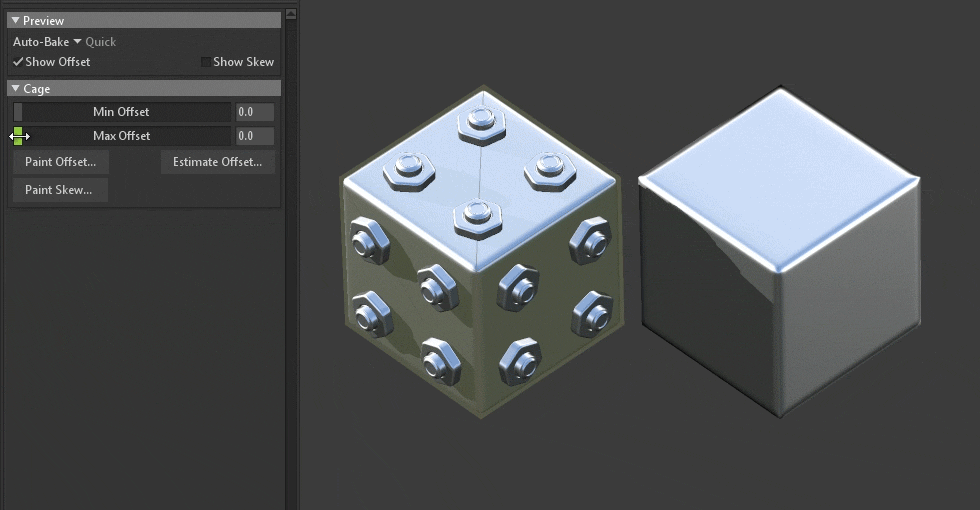
Offset
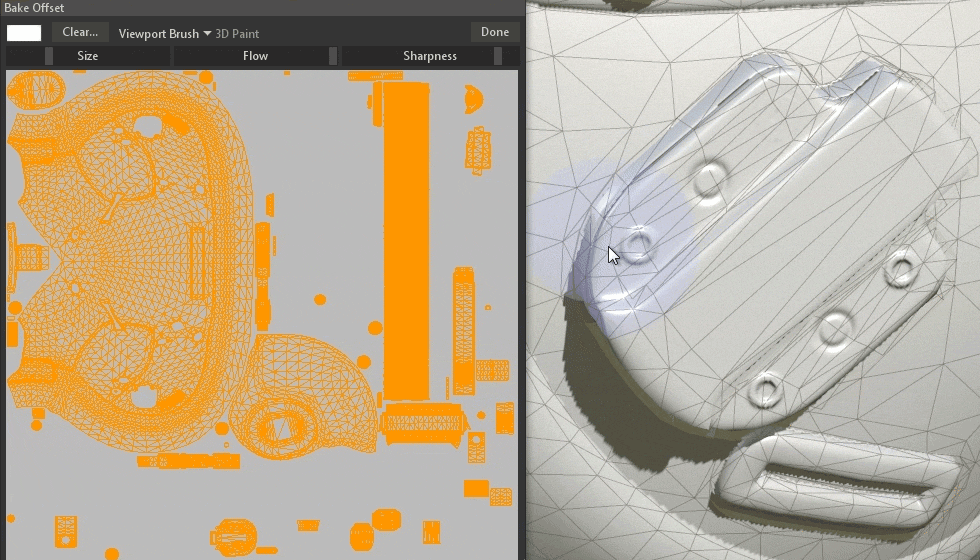
The Min and Max Offset values correspond to the minimum (black) and maximum (white) extension points of the offset map. Click Paint Offset to open the offset map editor. By default the offset map is set to an even gray to provide room to sculpt the cage in both directions.
Before you start painting, set the sliders to the minimum and maximum values so that your high poly mesh fits fully inside. This will ensure that the range of the offset map is suitable. Once you’ve set your base values, you can click Estimate Offset, which will calculate a best guess based on the shape of your low poly mesh.
Skew
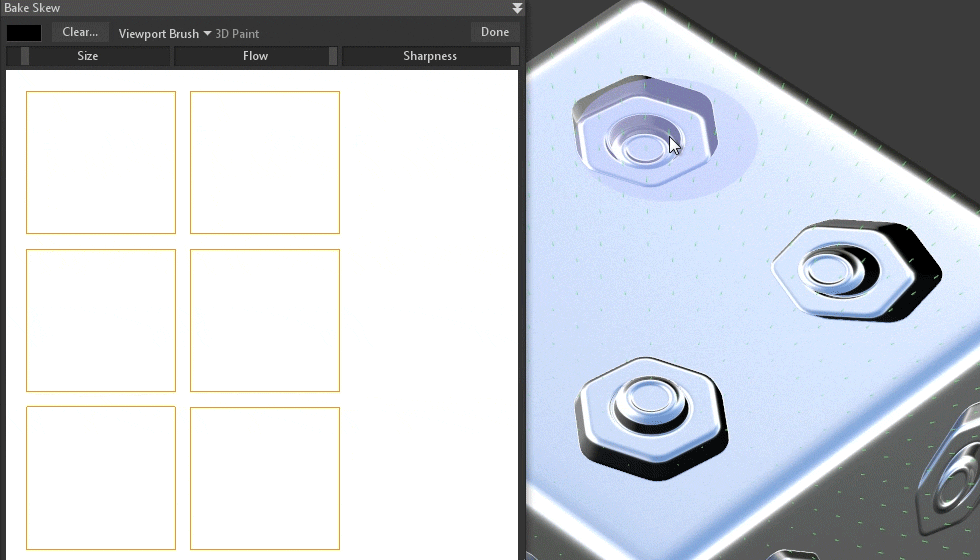
Click Paint Skew to correct details which have been recorded poorly due to an off-axis projection direction. Skew maps work by creating a per-pixel blend between the face normals of the low poly mesh and the cage normals. Skew painting allows you to massage the direction to fix projection errors. Black corresponds to full skew correction, while white corresponds to no correction.
Painting
Offset and skew maps can be painted in both 2D and 3D. The painting tools use Photoshop style hotkeys for the brush: [ and ] for Size, Ctrl + [ and ] for Sharpness, and 1-0 for Flow. Hold Ctrl to invert the color and paint in the opposite direction. 3D painting only works on areas of your model which have UVs in the 0-1 range. The offset and skew maps use a fixed 512×512 texture.
Now that you’re familiar with the finer points of the baking in Toolbag, jump to the next section to learn more about the various maps that you can create.
Map Types
This section contains examples and helpful information for each of the image output types.
Surface
Normals
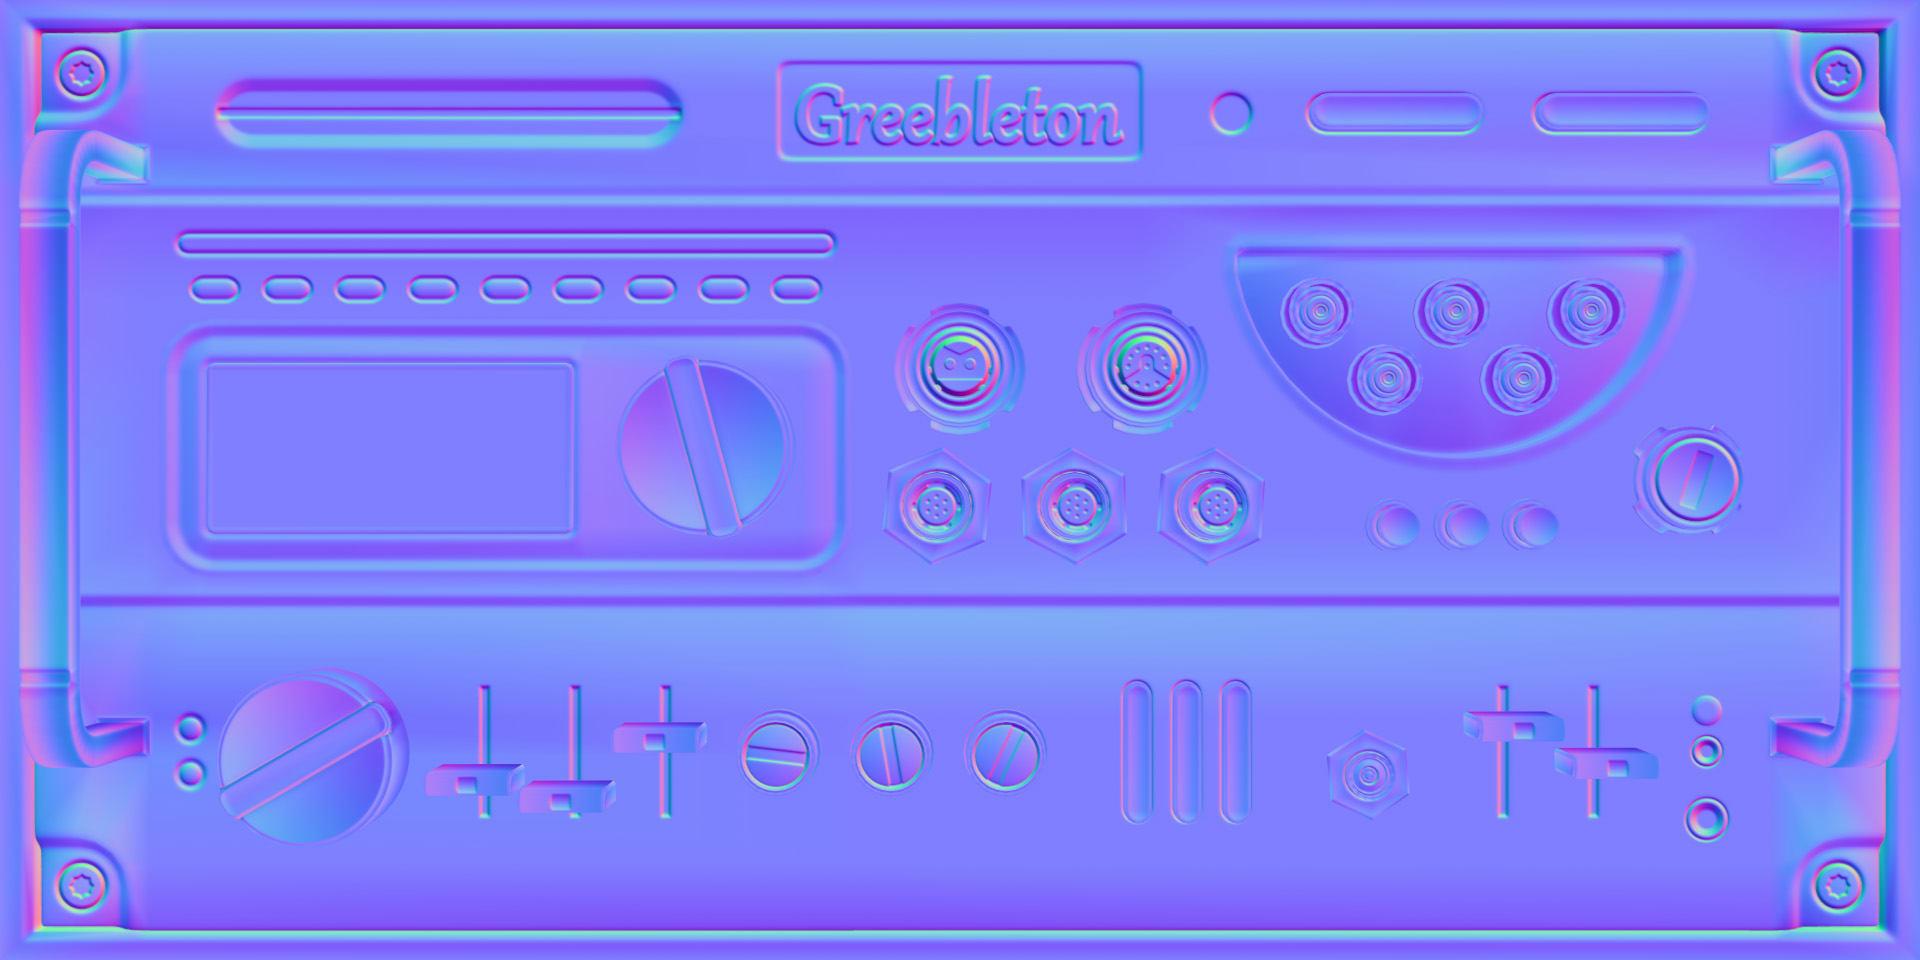
The Normals output will bake a tangent space normal map. There are options to flip the red (X), green (Y), and blue (Z) channels, as well as a setting to toggle dithering.
Normals (Object)

The Normals (Object) output will bake an object space normal map. Object space normal maps are not commonly used in game or film assets, but are an excellent source for generating directional masks for your textures, for instance adding a layer of dust to the top of your object.
Height
The Height output will bake a height or displacement map. The inner and outer distance settings determine the minimum and maximum distances (in scene units) that will be recorded. If you have detail that extends 2 units in, and 5 units out, you would set these values to -2 and 5 respectively. To ensure that your zero point is 50%, set the min and max values proportionally, for instance, -5 and 5.
Position

The Position output, otherwise known as a gradient map, will bake the position of your mesh in the X, Y and Z channels to the RGB channels of the image. A position map is good source for generating texture masks as well, for instance creating a gradient in color or saturation from the bottom to the top of your asset.
Curvature
The Curvature output will bake both convexity and concavity maps. By default the curvature map is baked with the grayscale style where concave details are brighter while convex shapes are darker. Curvature maps are useful for generating masks for scratches, recessed dirt, and other effects.
Concavity
The Concavity output, also known as cavity, bakes a map of the concave surfaces, or cracks and pits. Concavity maps are useful for masking ambient light or generating texture effects such as dirt, dust and grime.
Convexity
The Concavity output bakes a map of the convex surfaces, or sharp edges. Convexity maps are useful for generating texture effects such as scratched edges.
Thickness
The Thickness output, also known as transmission, bakes a map based on the thickness of the high poly mesh. Thinner areas create bright values while thicker areas are dark.
Bent Normals

The Bent Normals output generates a normal map which has ambient occlusion baked into the normal vector data. Bent Normals maps can be used to simulate complex lighting with certain shaders.
Bent Normals (Object)
The Bent Normals (Object) output bakes a bent normals map in object space rather than tangent space.
LIGHTING
Ambient Occlusion
The Ambient Occlusion (AO) output will bake light occlusion from the high poly source. AO can be used in many shaders to provide ambient shadows, or as a source to generate masks for texturing. An AO map can be especially useful for dust or dirt effects.
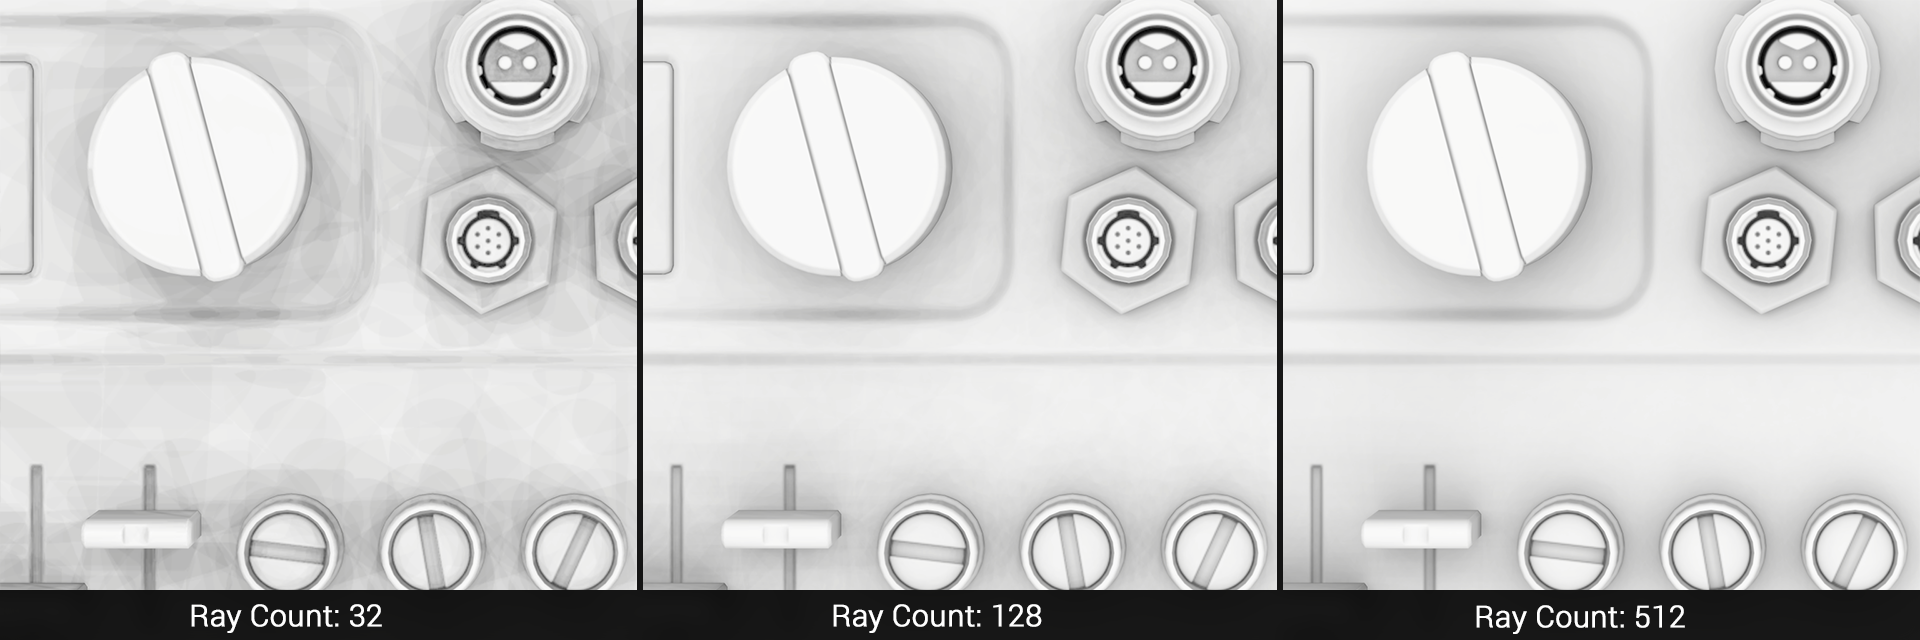
The Ray Count setting determines the quality of the AO. More rays will result in smoother AO, but slower bakes. The default setting of 256 provides medium quality, values from 512+ will result in high quality, and values under 256 can be useful for quick test bakes.
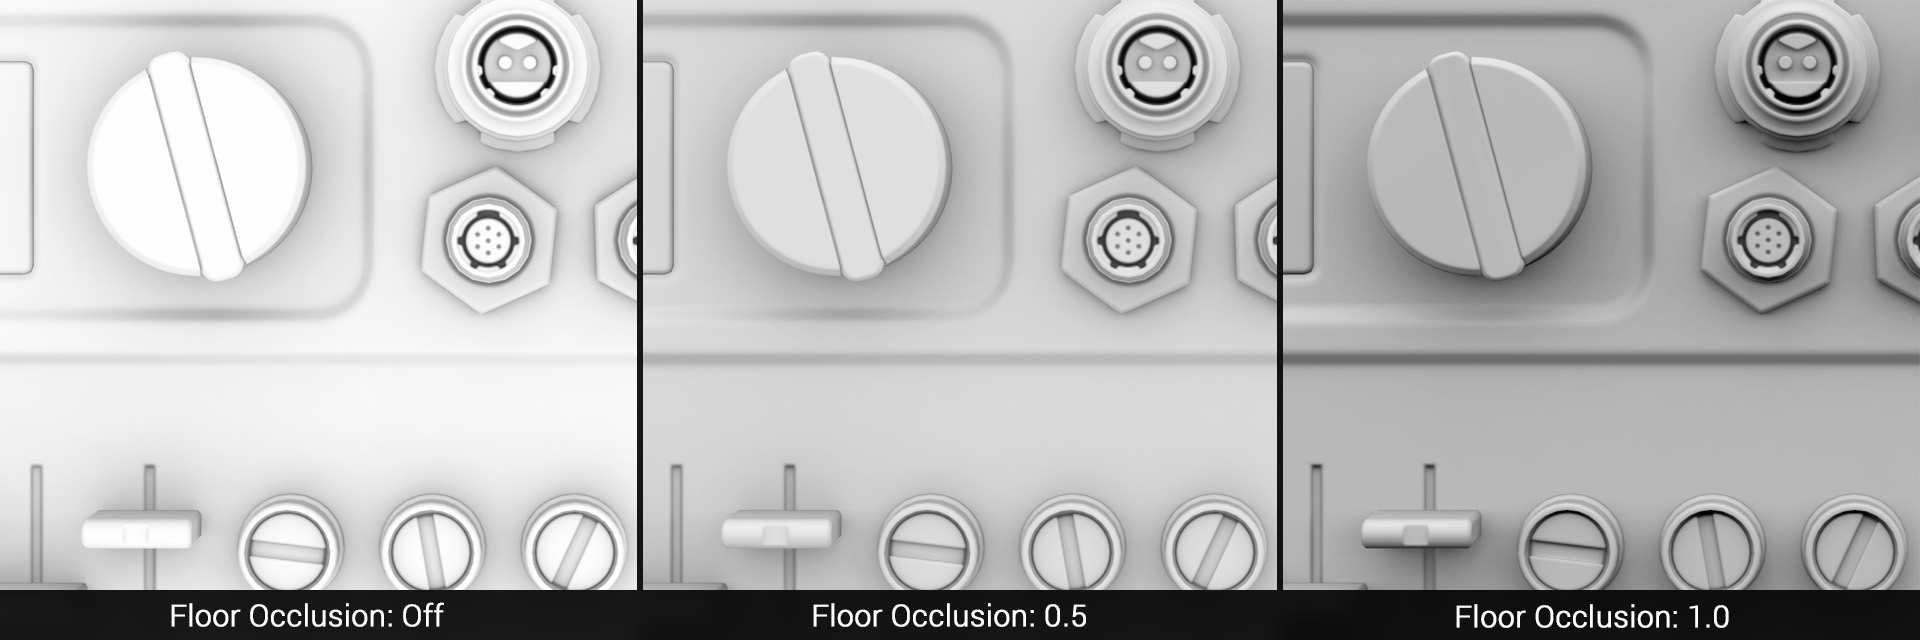
The Floor Occlusion setting adds additional occlusion to downward facing areas. Floor occlusion can help to add directional AO, which is typically most useful for static objects.
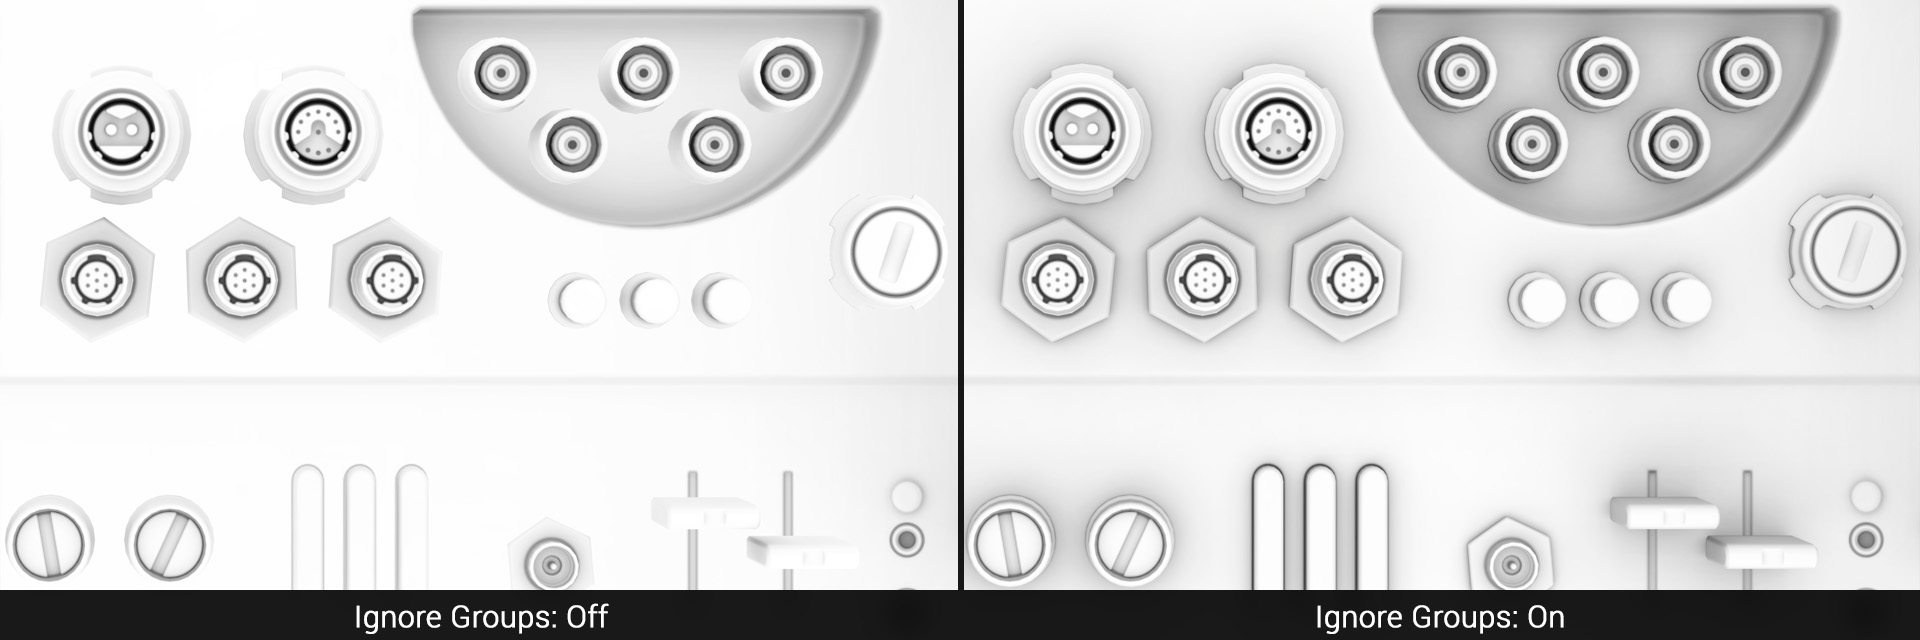
The Ignore Groups option will cast AO between different bake groups. This helps to ground the various parts of complex objects. If you have certain elements that are removable or animate, a scope or magazine on a gun, you can move these bake groups off to the side so they will not receive group to group AO.
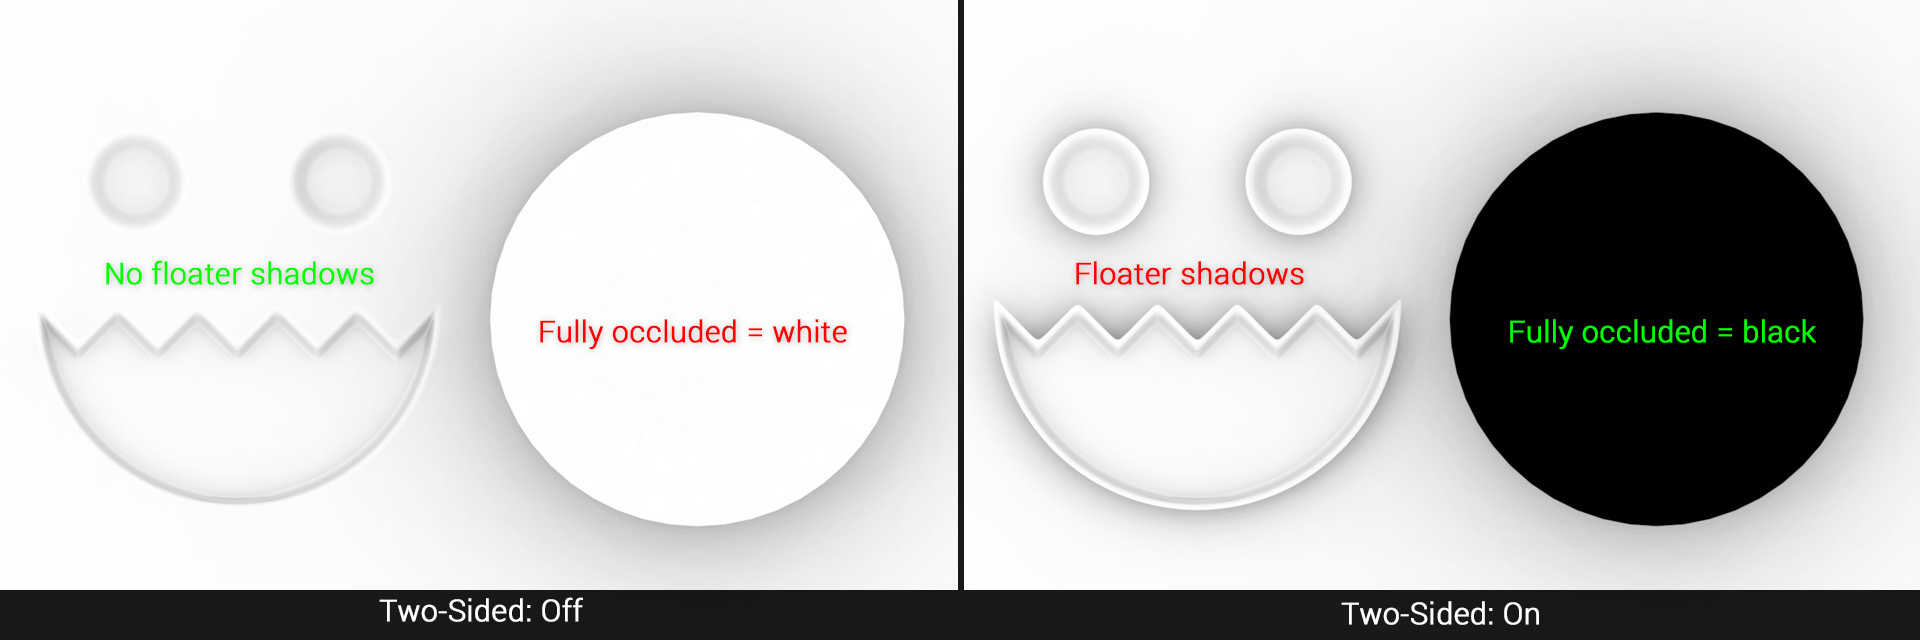
The Two-Sided option will cast AO from the back side faces of high poly objects. This is desirable for accurately capturing AO around object intersections, but will cause shadows around floating geometry. For complex assets it may be a good idea to bake two maps, with this setting on and off, and composite them in your image editor.
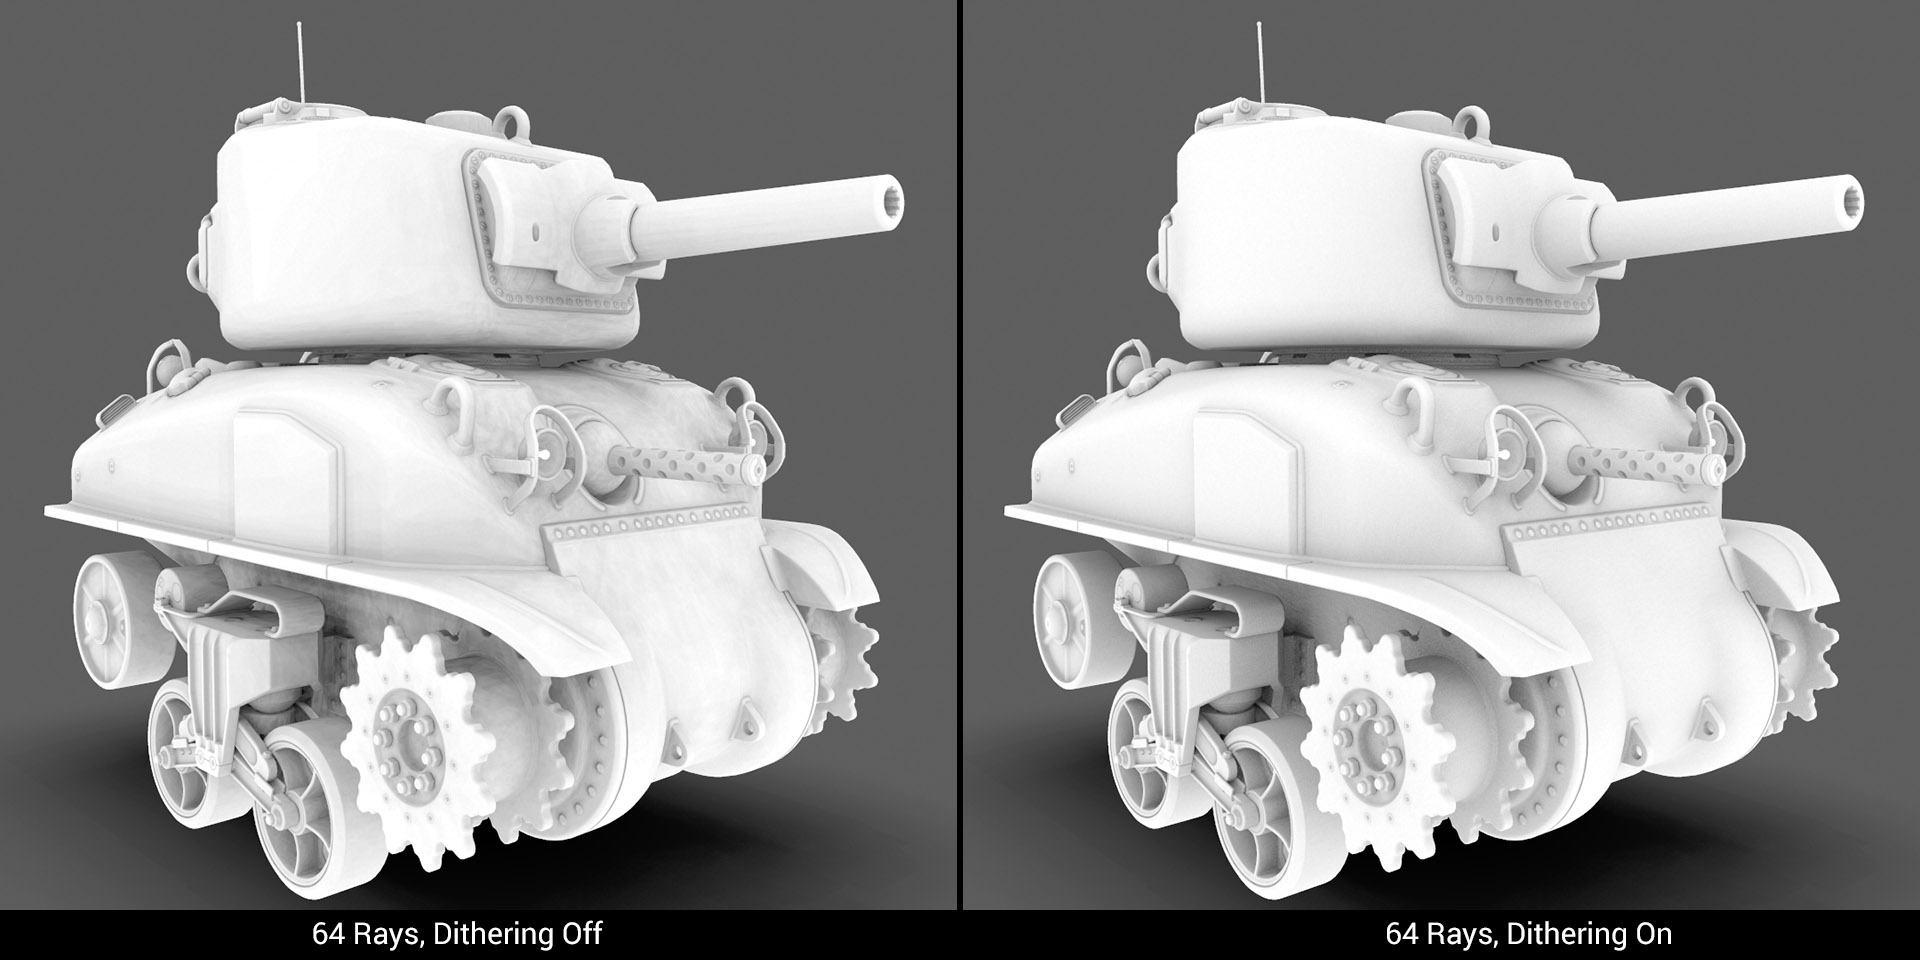
The Dither option adds a small amount of noise to combat banding articles. When Dither is enabled, lower rays can generally be used while producing a superior bake.
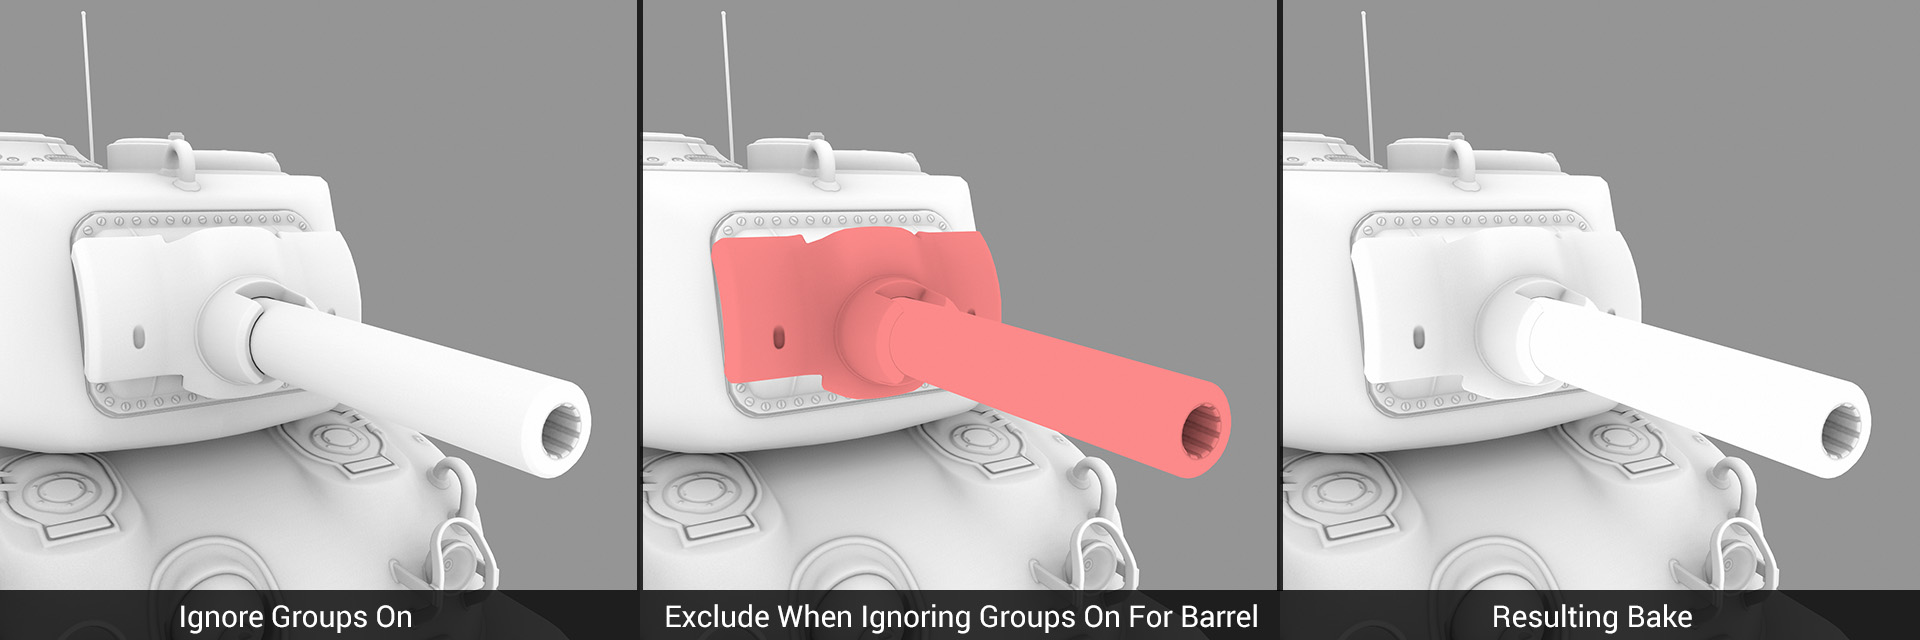
The Exclude When Ignoring Groups option allows you to disable Ignore Groups for certain Bake Groups. This is especially useful if you have moving parts, for instance, a gun with a bolt or magazine that will be animated. Simply enable Exclude When Ignoring Groups in the Bake Group’s Low settings to make sure AO is not cast or received from other groups.
Diffuse Lighting
The Diffuse Lighting output bakes the lighting and shadows from the Sky Light and direct lights in the scene. The material properties are defined by the material(s) applied to the high poly mesh(es).
Specular Lighting
The Specular Lighting output bakes the specular reflections and shadows from the Sky Light and direct lights in the scene. The material properties are defined by the material(s) applied to the high poly mesh(es). Specular lighting is a camera-dependant effect and will not render for the backside of your model.
Complete Lighting
The Complete Lighting output bakes the material colors, diffuse lighting, shadows, and specular reflections from your scene. The material properties are defined by the material(s) applied to the high poly mesh(es).
IDS & MASKS
Material ID
The Material ID output bakes a unique color for each material assigned to your high poly objects. The color is automatically applied, and the colors are picked so that they are as different as possible from the other colors. If you need specific material ID colors, you can apply the colors to the albedo of your high poly object’s materials, and bake an Albedo map.
Group ID
The Group ID output bakes a unique color for each material group.
Object ID
The Object ID output bakes a unique color for each material object.
UV ID
The UV ID output bakes a unique color for each UV island.
Wireframe
The wireframe output bakes a map representing the low poly mesh’s UV layout.
Alpha
The Alpha output bakes a map of the holes in the high poly mesh.
Material
Albedo
The Albedo output bakes the albedo value (this works with a simple color value, an image input, or both) from the high poly material(s).
Specular
The Specular output bakes the specular value (this works with a simple color value, an image input, or both) from the high poly material(s).
Gloss
The Gloss output bakes the gloss value (this works with a simple color value, an image input, or both) from the high poly material(s).
Albedo (Metalness)
The Albedo output bakes a color map suitable for use with the metalness workflow, from the high poly material(s).
Roughness
The Roughness output bakes the roughness value from the high poly material(s).
Metalness
The Metalness output bakes the metalness value from the high poly material(s). If your materials do not have metalness inputs, metalness content will be generated automatically. There is a Metalness Threshold setting to fine to fine tune this conversion, which does not apply if the source materials use the metalness workflow.
Vertex Color
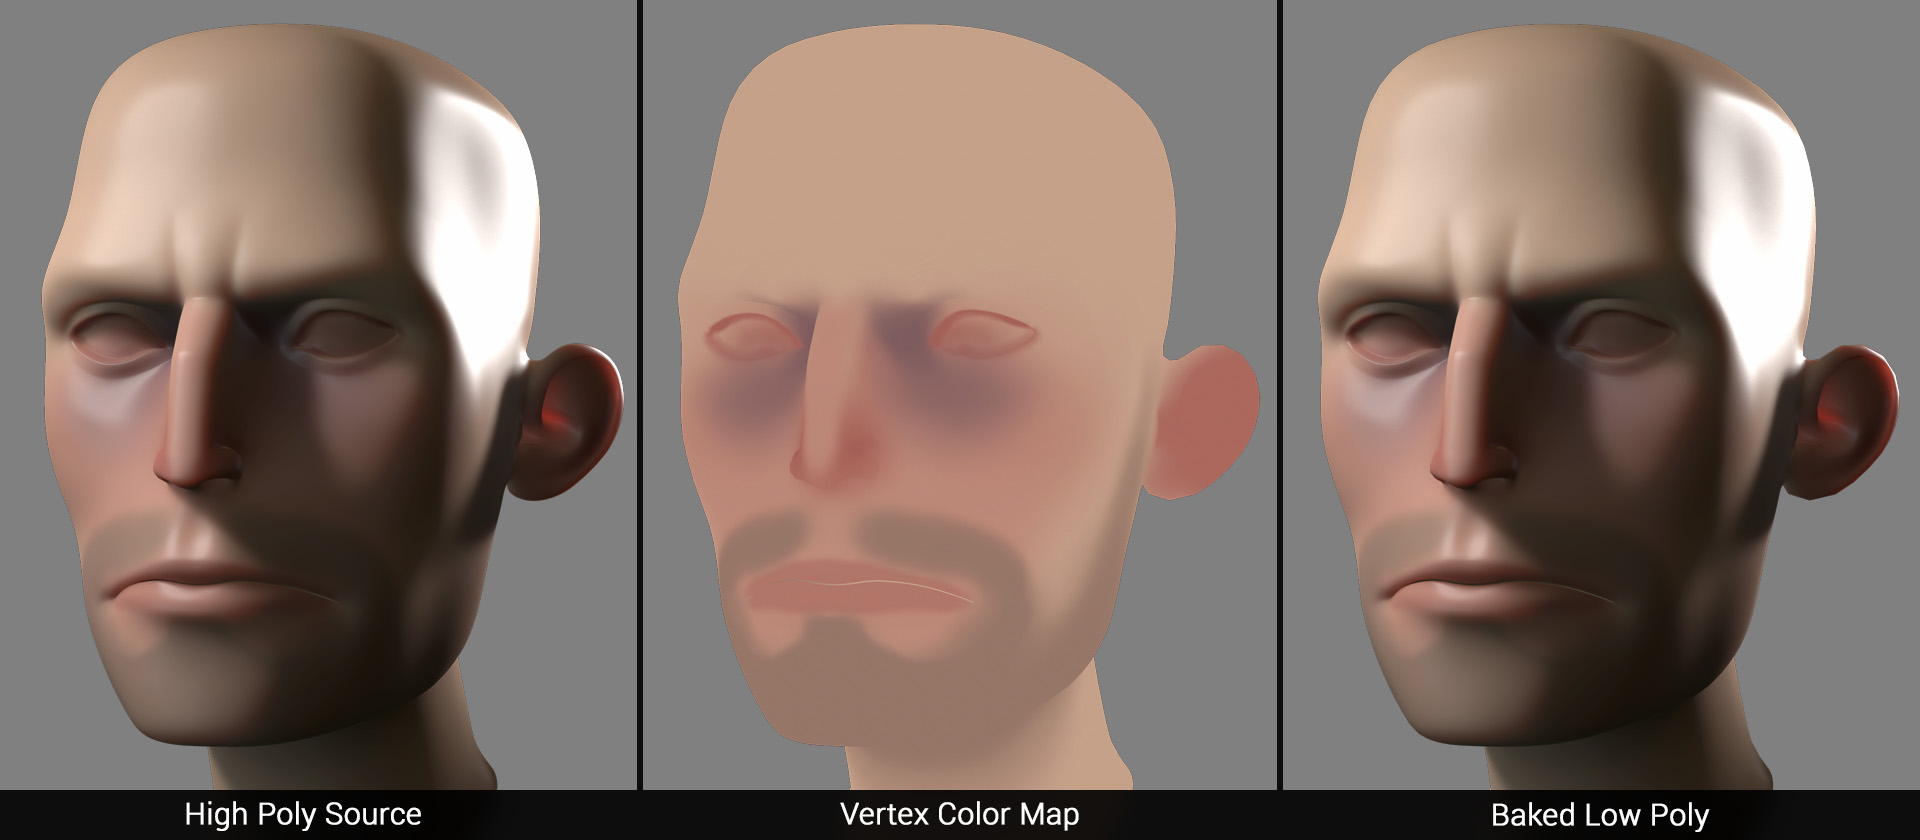
Featured art by Xavier Coelho-Kostolny
The Vertex Color output will bake vertex color or zBrush polypaint data to an image.
Transparency
The Transparency output bakes a map based on the transparency values set in the high poly material(s).
Emissive

The Emissive output bakes a map based on the emissive values set in the high poly material(s).
Now that you’ve got firm grip on the types of content that the Toolbag can produce, hop to the next section to learn more about the basics of normal mapping and how to troubleshoot common problems.
Baking Basics
This section covers the essential topics that you’ll need to understand to get started. From the basics of baking through more advanced topics like tangent spaces, this segment will give you a solid foundation to build on.
What is Baking?
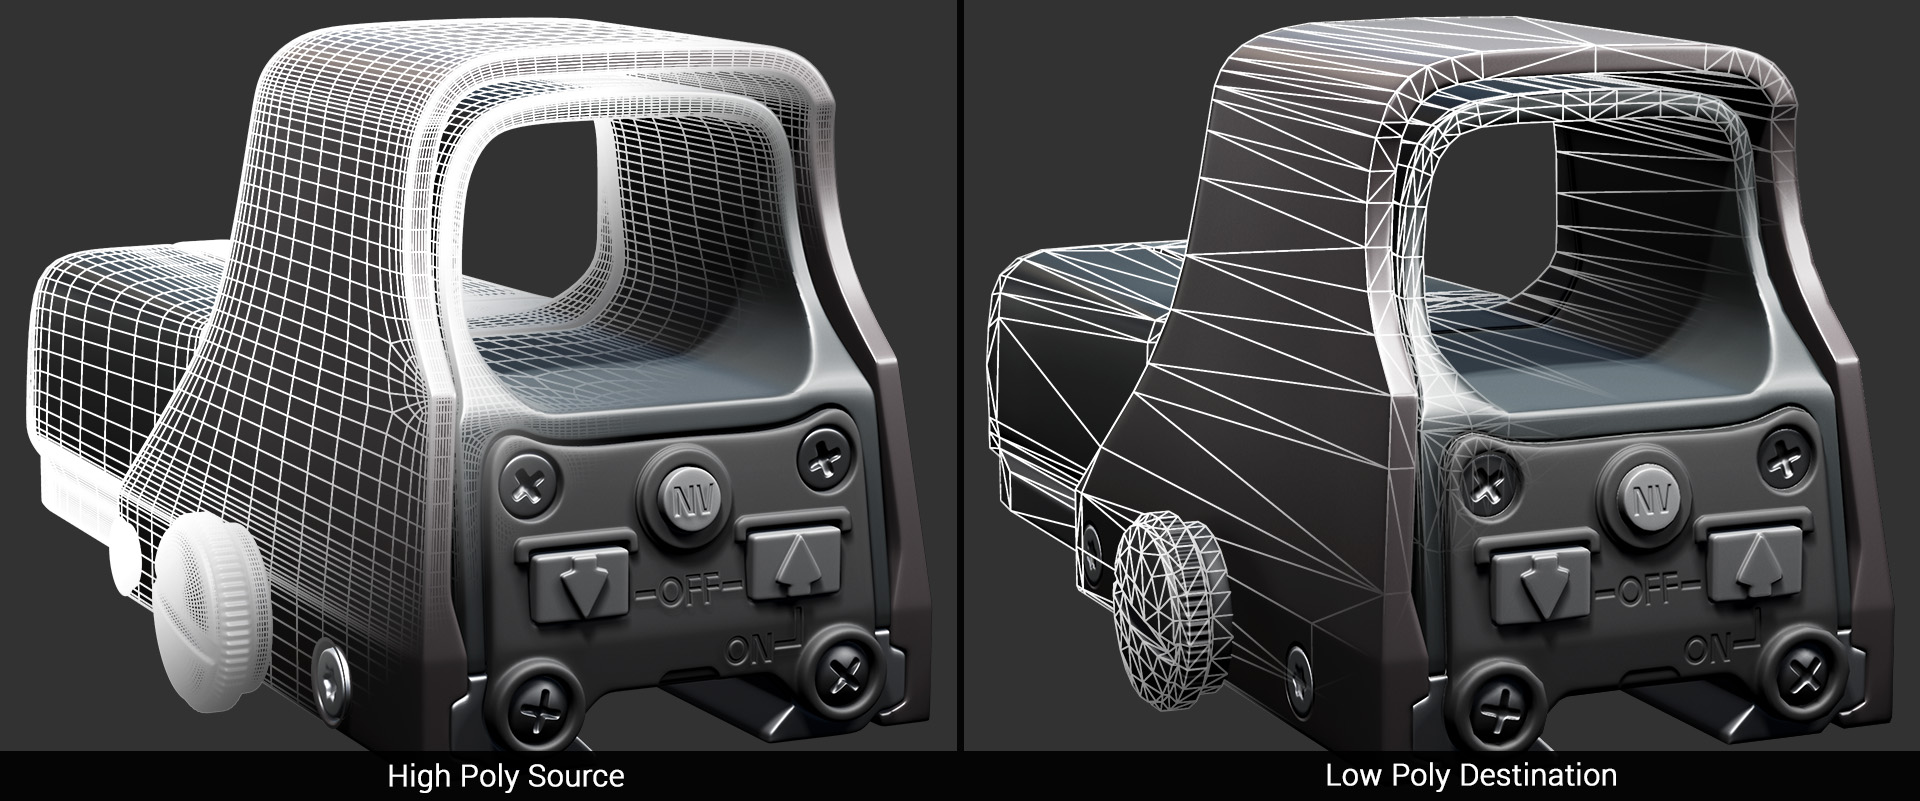
Baking is a process that involves transferring the material properties from a source mesh to destination mesh. Generally, baking involves projecting content from a high poly (high resolution) mesh to a low poly (low resolution) mesh, but it can also mean transferring content from one mesh to another with different topology or UVs. To bake, you’ll need to make sure that your destination mesh has UVs. However, UVs are not required for the source mesh, unless it has materials with texture maps that will contribute to the bake.
Baking is commonly used to capture detailed surfaces from objects that are otherwise too dense or resource heavy to be used directly in games, film, or other types of visual media.
What Can Toolbag Bake?
Toolbag can bake an array of common image map types such as normal, ambient occlusion, curvature, height, and more. Check out the map types section to see the full list of supported maps and learn more about each output.
What Are Normal Maps?
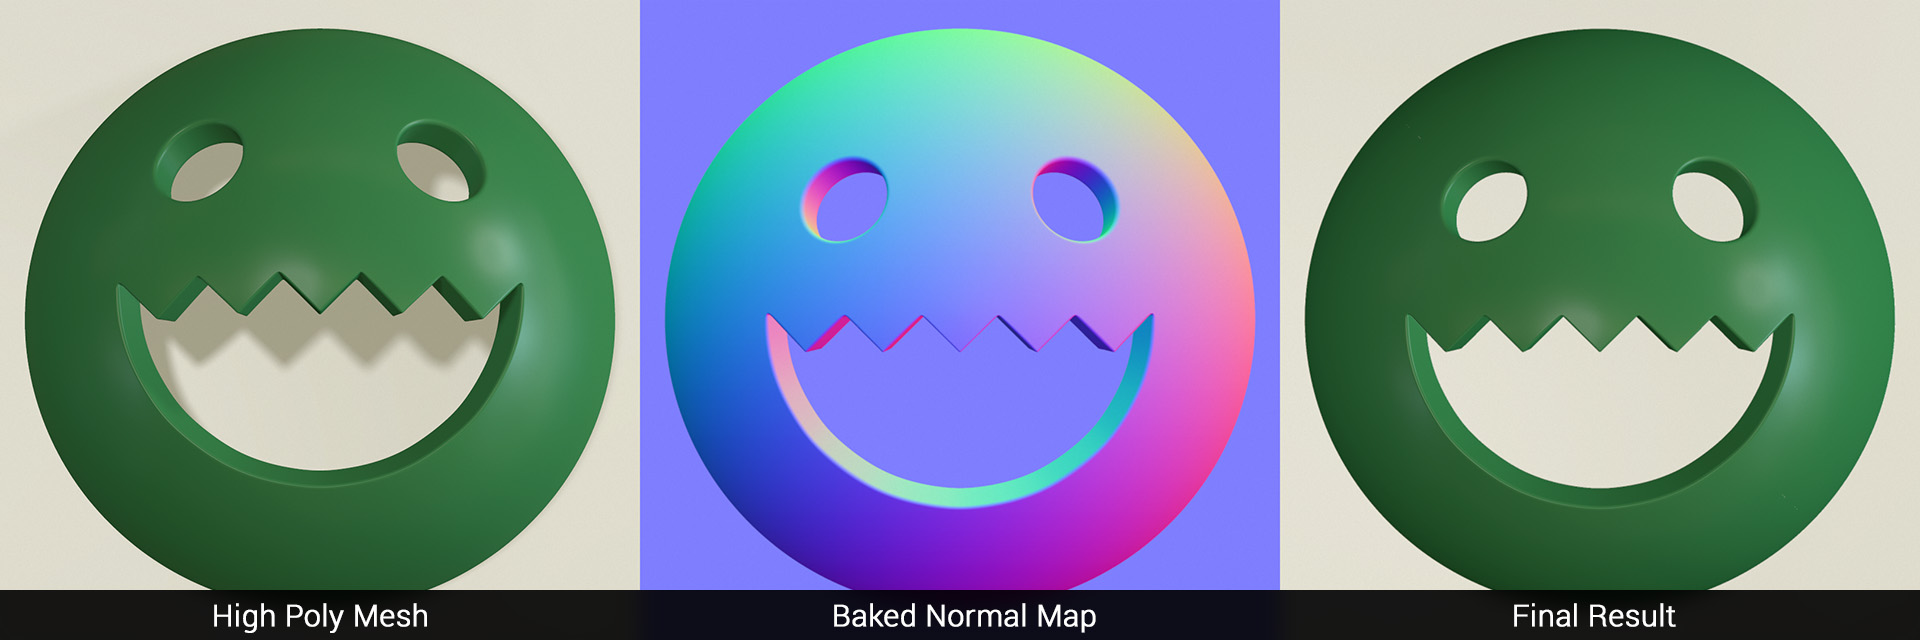
In the most basic sense, a normal map is a texture where each pixel represents the normal, or direction, of the surface. Normal maps can be used to mimic detailed surfaces with meshes that have relatively low amounts of geometry. To bake a normal map, the surface detail from a high poly mesh must be projected onto a low poly mesh.
How Does Projection Work?
To bake texture maps, the geometry from the high poly source mesh is projected (ray traced) onto the low poly mesh. The best way to visualize this is to imagine a camera looking at the high poly and capturing the direction of the surface for every pixel in the normal map. To make sure the projection does not hit the wrong elements, a cage, or projection mesh must be set up to limit the distance of the projection. For each pixel, the angle of the camera is set by the normal direction of the cage.
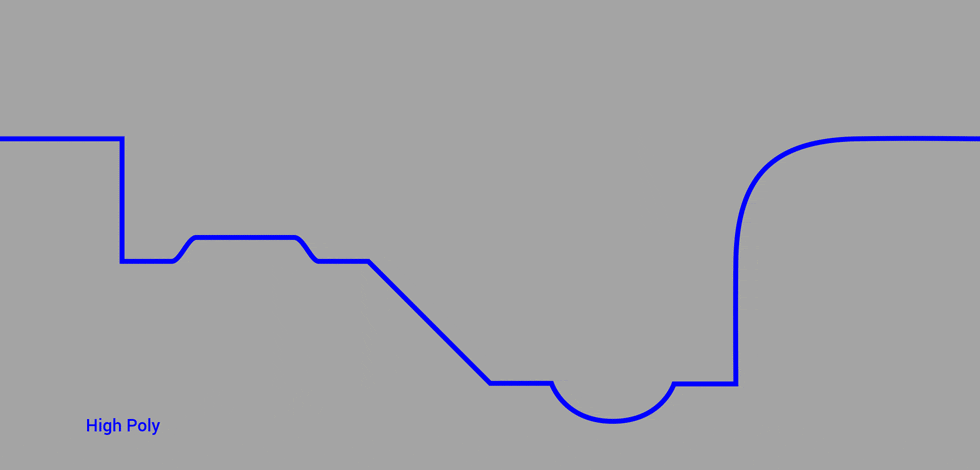
What Is A Cage?
A cage is essentially a copy of your low poly that expands outward to enclose the high poly. Generally, it’s best for the cage to extend just far enough to cover the highest points of the high poly. If the cage extends too far, it can cause problems with complex meshes that have overlaps or tight corners.
Types of Cages
There are two types of cages, smoothed, and unsmoothed. In Toolbag 3, you can set the cage type in the Geometry settings of the Baker object.
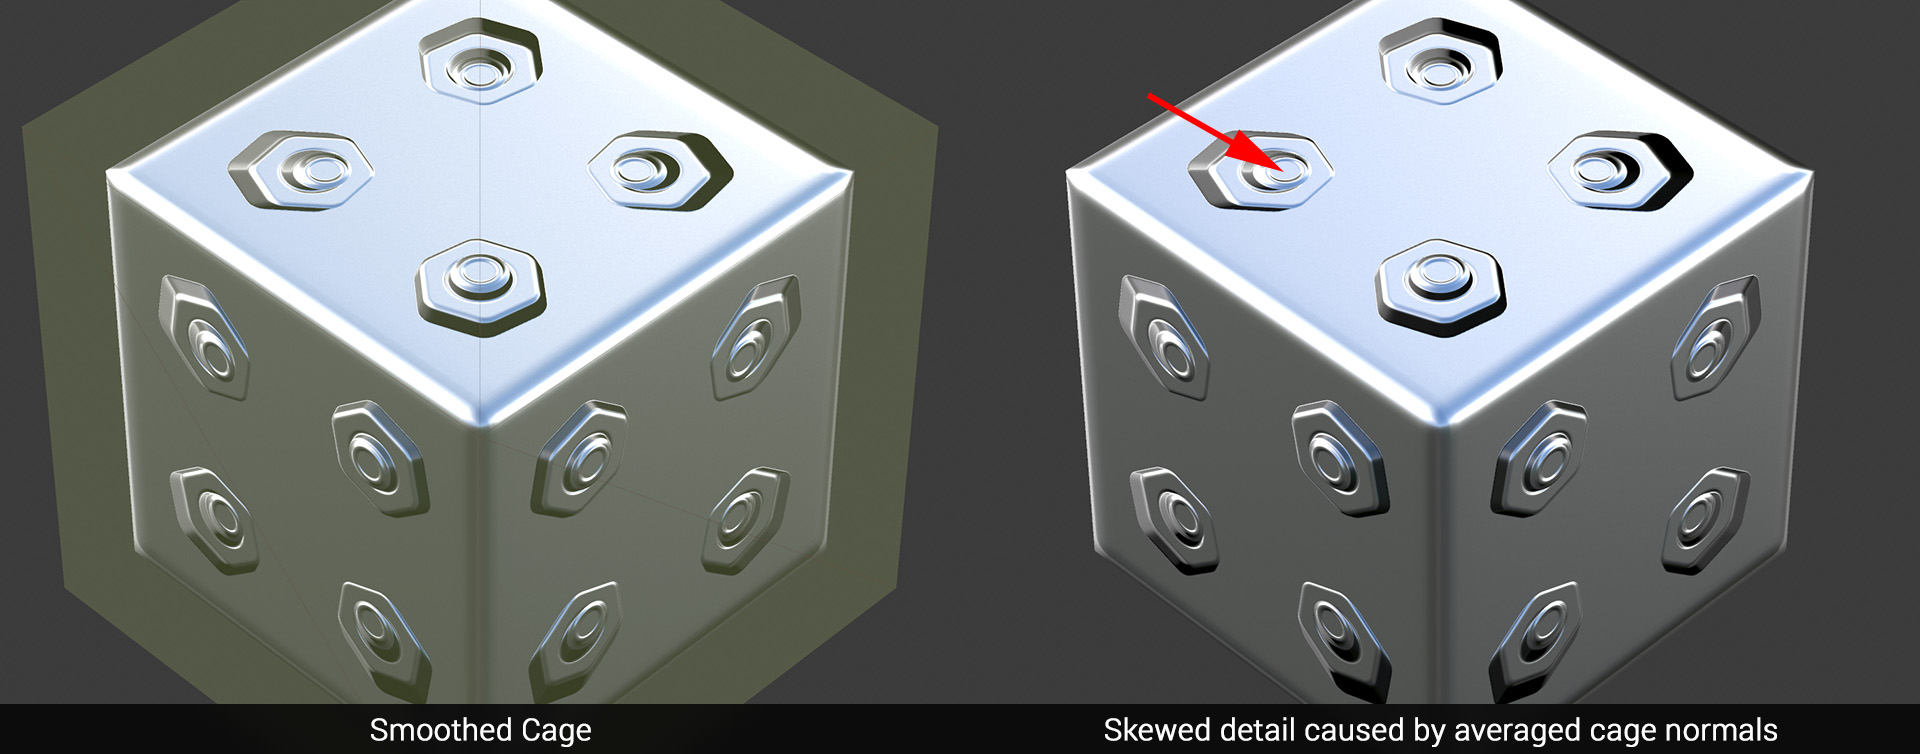
A smoothed (or averaged) cage ignores the low poly mesh normals when determining the projection direction. Smoothing the cage is essential to ensure that the baked result is seamless, with no gaps in the projection along hard edges. This type of cage is recommended for most purposes.
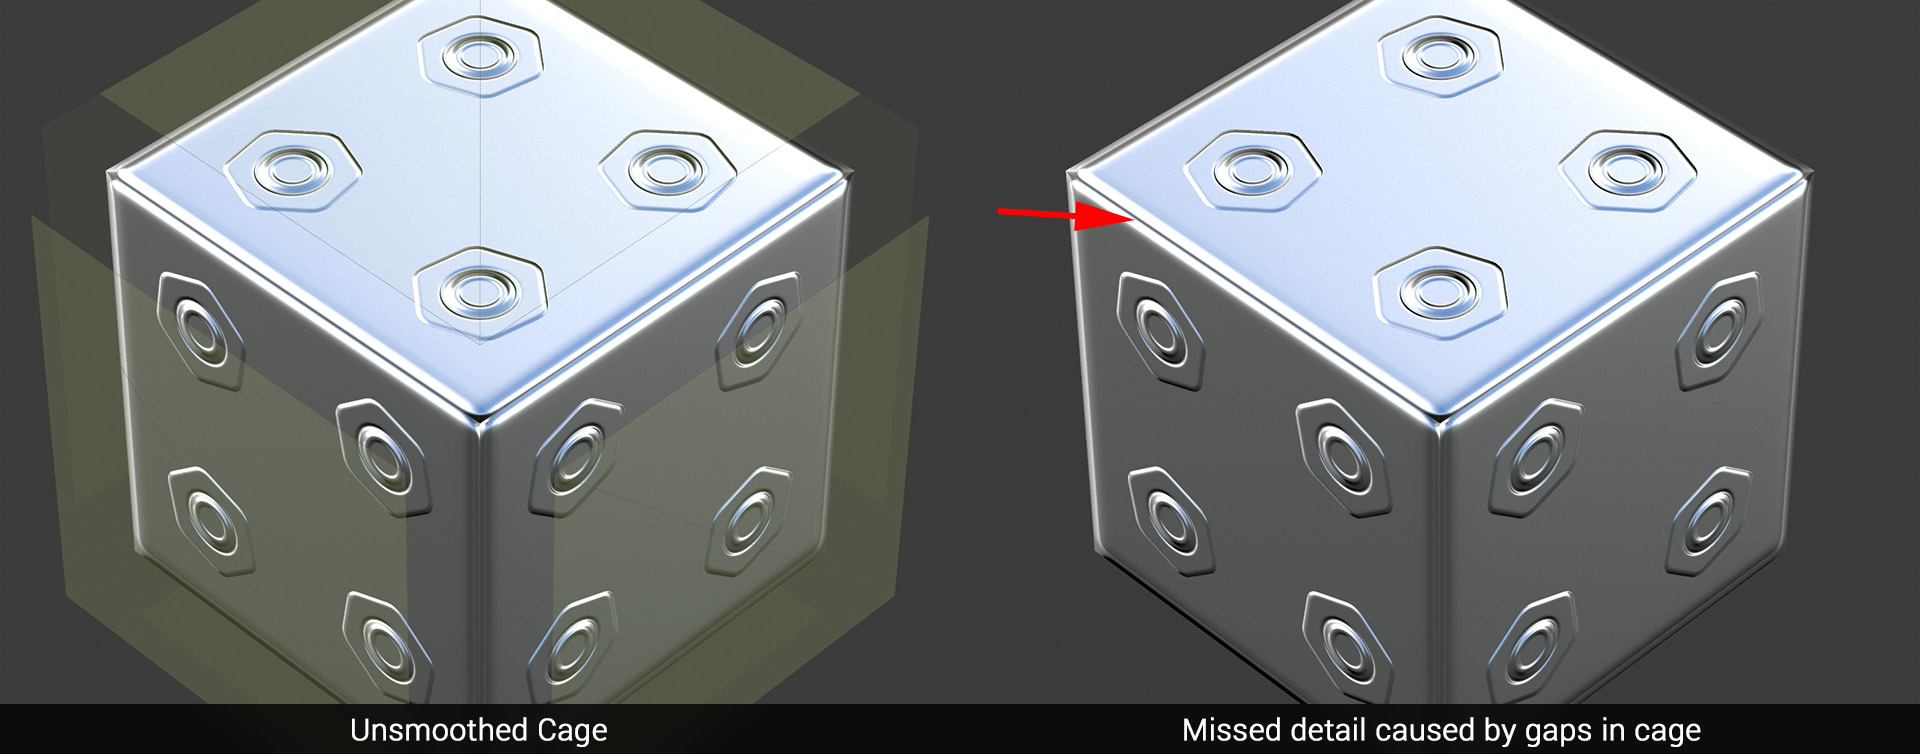
An unsmoothed cage uses the explicit mesh normals of the low poly for projection. This method results in gaps or seams at hard edge borders and is generally not recommended. The main benefit of this method is that it can result in less skewed detail. However, Toolbag’s skew painting tool can clean up skewed problems with ease.
Tangent Basis
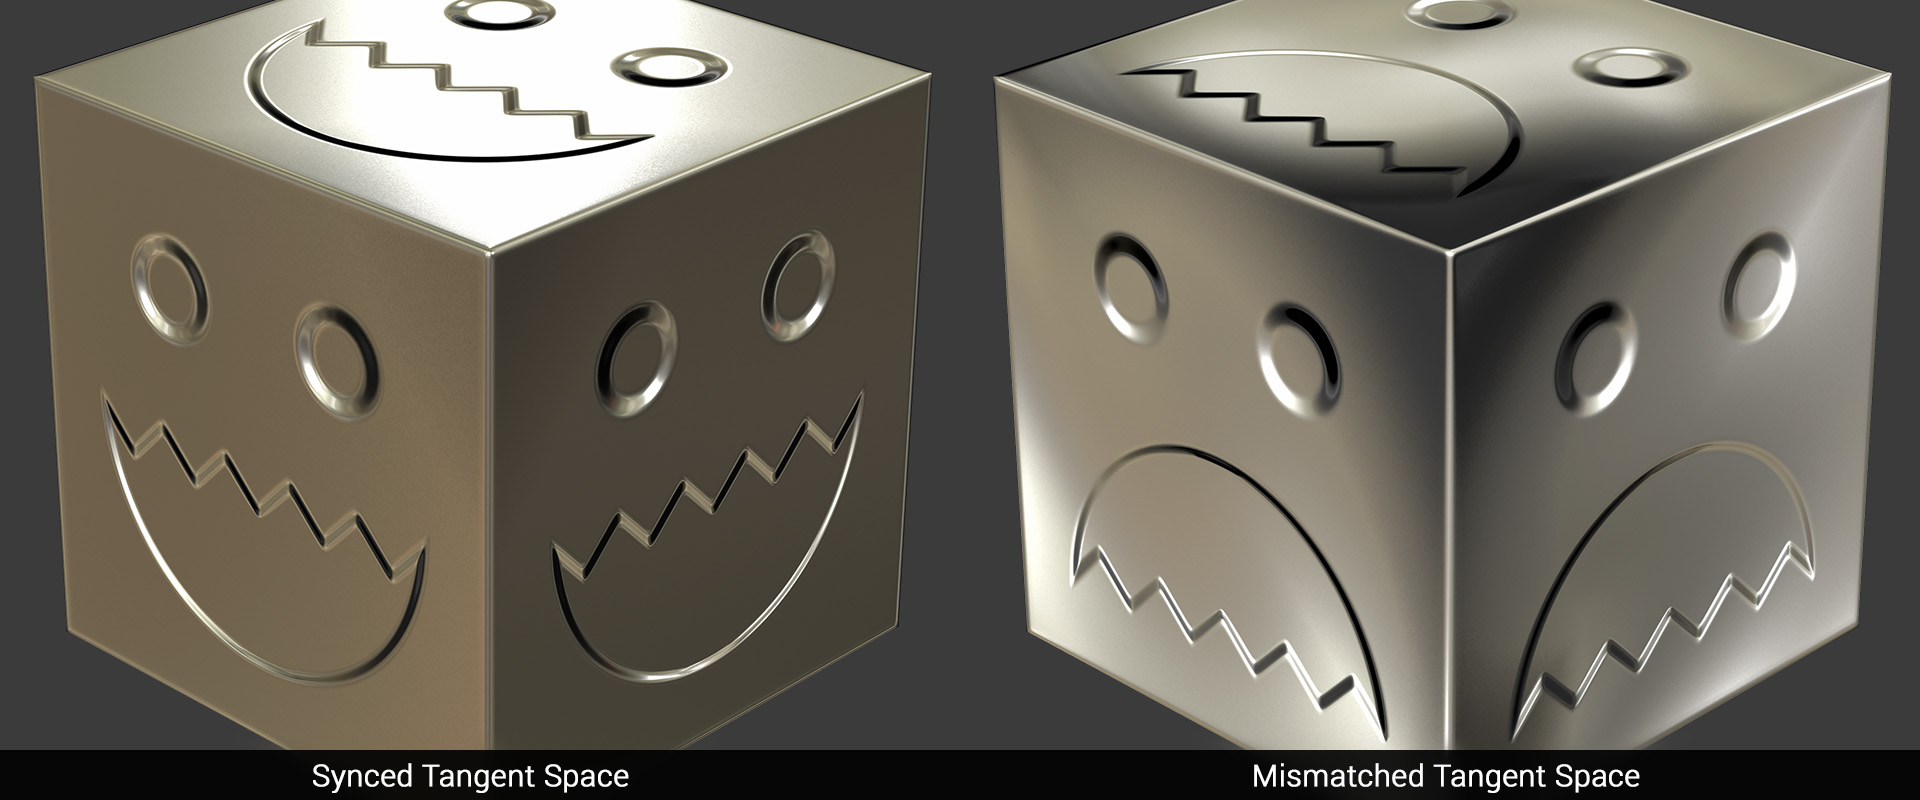
Most systems that render with normal maps make use of a tangent space, which is a system of coordinates that specifies the orientation of the surface at each point on the model. Tangent spaces are defined by the tangent, bitangent, and normal vectors at each vertex of the mesh. Normal maps contain RGB values that correspond to XYZ coordinates within this space. The exact orientation of tangent space vectors is therefore of vital importance both during baking (when a normal map is created), and rendering (when a normal map is used). If different tangent spaces are used in each step, the orientation of the normals in the map will no longer match those of the original model, and potentially serious shading artifacts will result.
There are various implementations of tangent space normal mapping in different 3D applications and game engines. To make sure that your asset shades correctly, remember to bake your normal map with the same tangent space that your renderer uses. If you’re not sure which tangent space to use, Mikk / xNormal is a good choice, as that is what Unity, the Unreal engine, and a variety of other applications use.
When baking in Toolbag, the tangent space that your mesh is currently set to is what will be used. Use the Tangent Space dropdown in the mesh properties to set the tangent space. You can also set the default tangent space by going to Edit-> Preferences -> Content -> Default Tangent Space (note: this setting will apply to newly imported meshes, not the meshes currently in your scene).
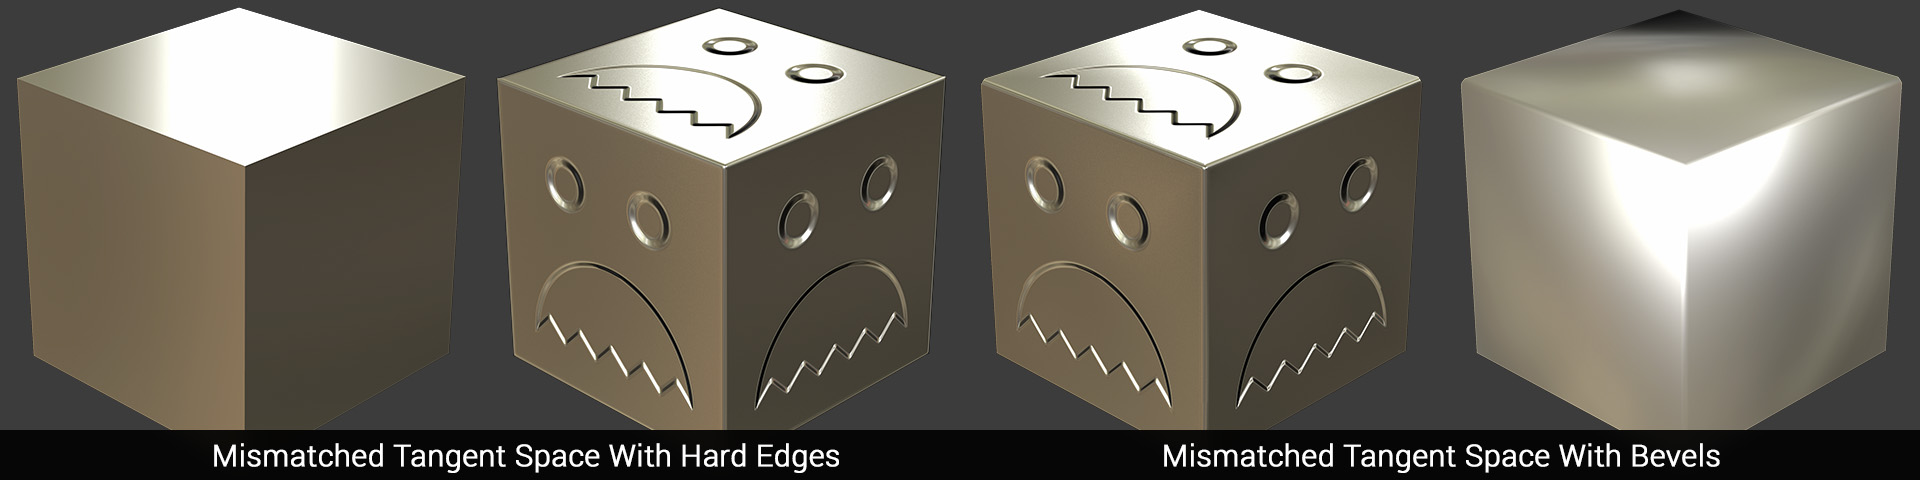
If you don’t have a synced baking workflow, for instance if you don’t know the tangent space that your renderer uses, or if the tangent space that you need is not supported, be sure to keep that in mind when creating your low poly mesh. Generally, this means adding bevels and/or hard edges to ensure that the shading errors are not as extreme.
Handedness
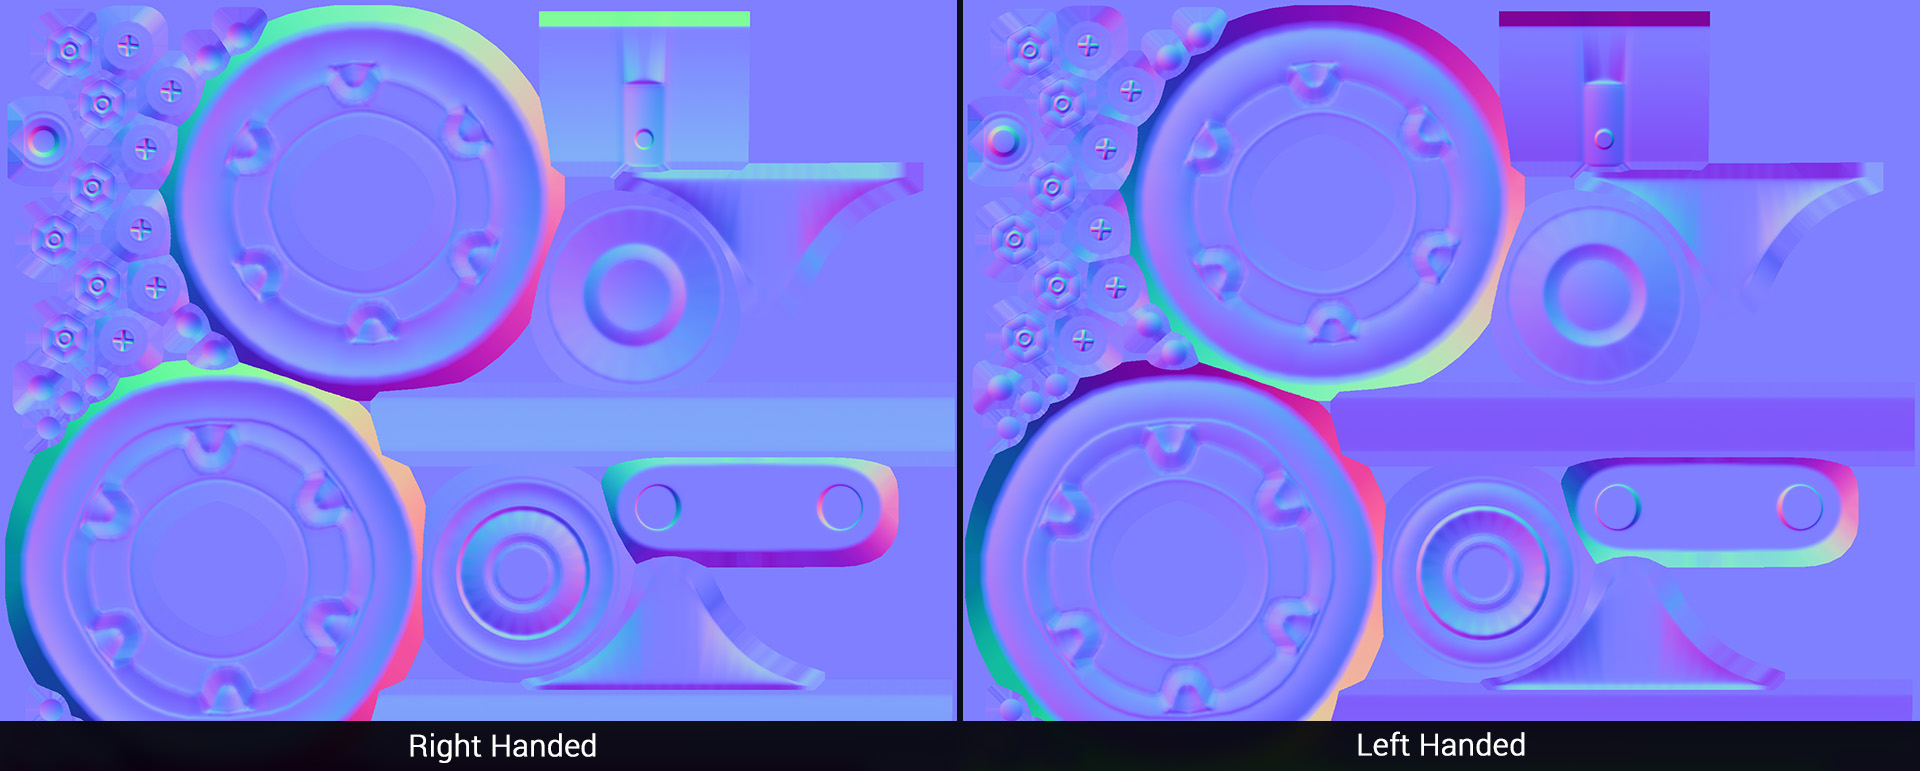
Handedness, or the orientation of the Y axis or green channel of the normal map can be problematic. When it comes to debugging normal map problems, handedness is perhaps the most common issue that artists face. Whether you’re having trouble getting your normal map to display correctly in Toolbag, or you’re seeing errors in your Toolbag baked normal map in your target renderer, verifying that your handedness is set correctly is a good place to start.
Various 3D applications and game engines use either right handedness (Y+) or left handedness (Y-). Right handedness is sometimes referred to as OpenGL or Maya style, while left handedness is referred to as DirectX or 3DS Max style. Similar to tangent space, it’s important to make sure that you’re using the same handedness when baking and when rendering your asset.
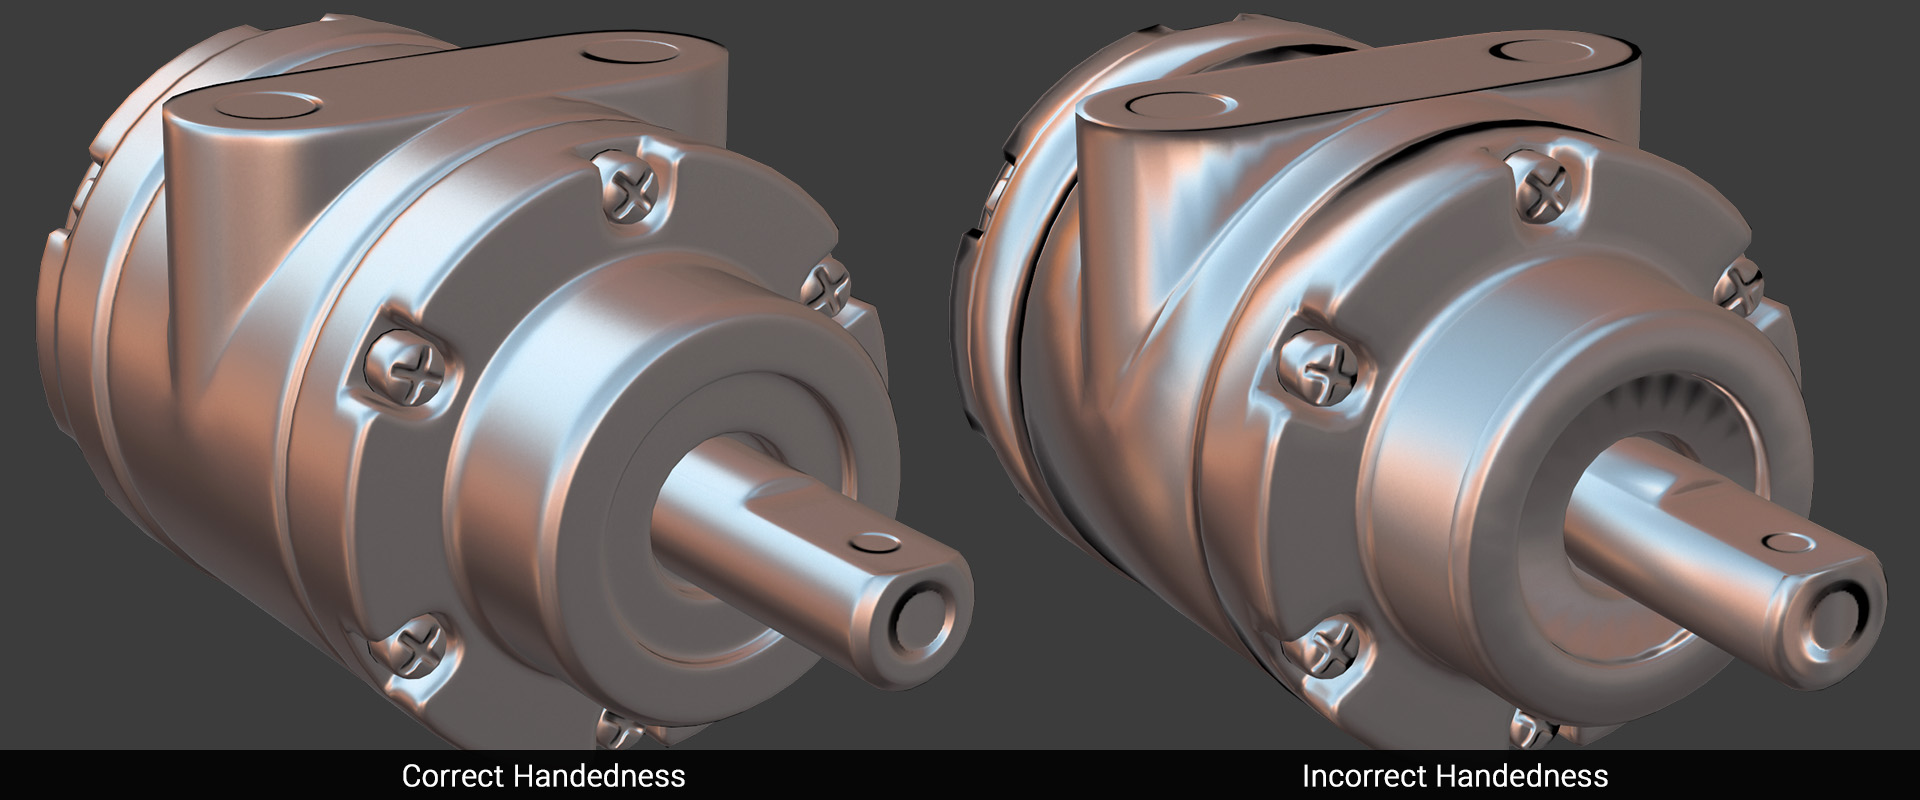
In Toolbag, handedness is automatically determined by your tangent space setting. However, handedness can be overridden via the normal map settings in the Baker object by clicking the Flip Y checkbox. Handedness can be overridden for display purposes in the material editor. You can invert the green channel of your normal map in an image editing application to flip the handedness too.
Now that you’ve got a solid grasp of the basics, head to the next section to learn about the technical aspects of baking.
Best Results
This section is filled with tips and tricks to turn you into a baking wizard, Harry. Learn how your high and low poly construction, uvs, and some key settings affect your bakes.
Slopes and Bevels
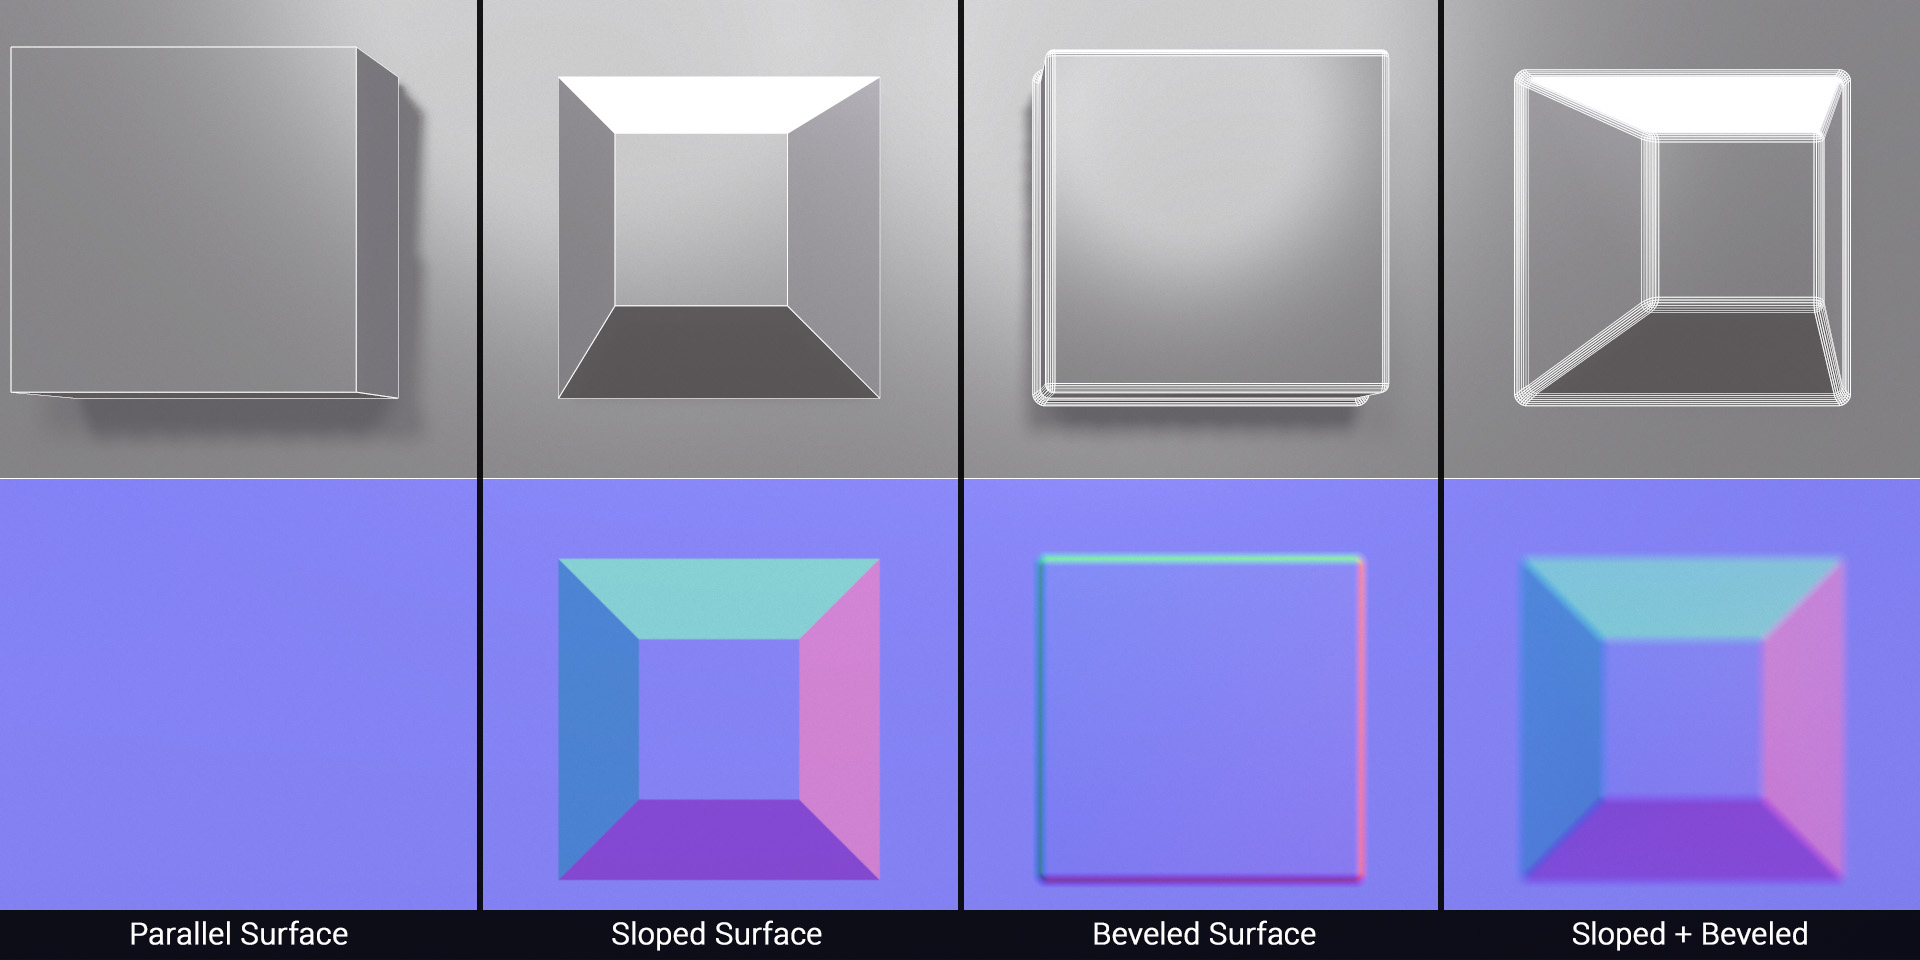
When the baker projects information from the high poly to the low poly for a normal map, it only sees changes in direction, not depth. Thus, faces which are completely parallel will not record information. To make sure your geometric detail gets baked, you can use slopes, bevels, or both.
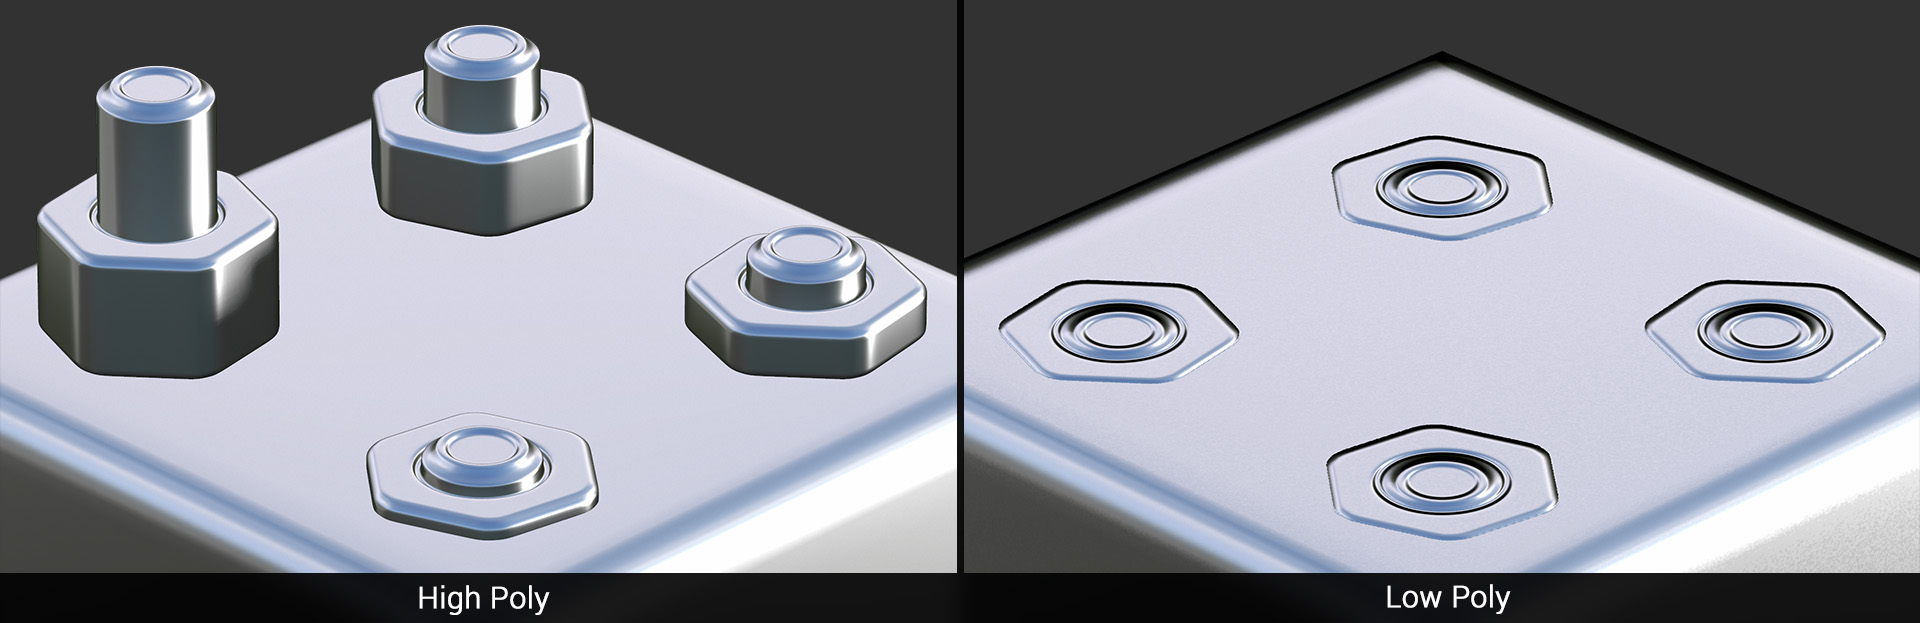
Similarly, the distance an element sticks out from the base surface won’t alter the resulting normal map. Shortening the depth of details like bolts can enable you to create a cage with a more manageable offset distance.
Floaters
You can float details on top of the surface to create the illusion of complex indented detail. This saves time and can make your high poly mesh a lot easier to work with. The primary drawback to using floaters is that outputs which depend on distance, such as height or position, may not produce desirable results.
Detail Size
When it comes to fine detail, it’s important to keep in mind the size of your object, viewing distance, and resolution of your texture. Details smaller than 1 pixel will not be recorded properly, so it’s best to maintain a consistent, minimum size for bevels and other fine structures. Additionally, If your model will be seen from a distance, it can be a good idea to exaggerate bevels to ensure readability.
In addition to ensuring your detail is captured, beveled edges catch specular highlights and generally look nice. Most real world objects have rounded edges, though you may want to exaggerate your bevels depending on the size of your object and the expected viewing distance to retain readability.
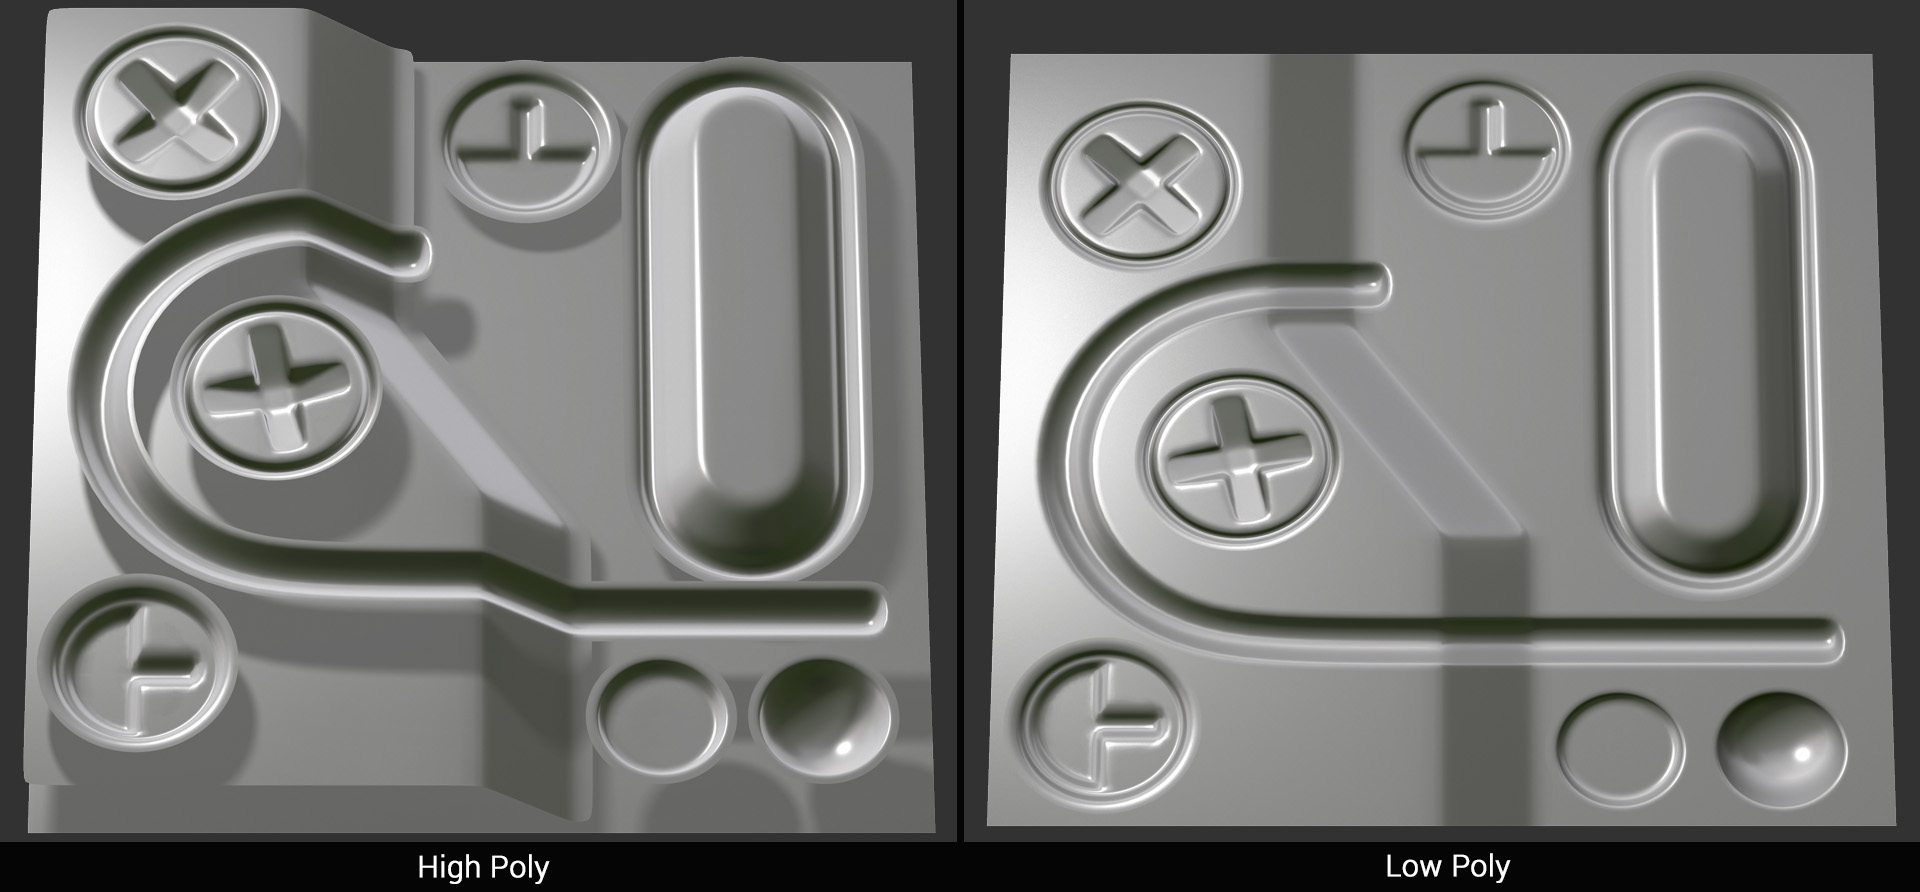
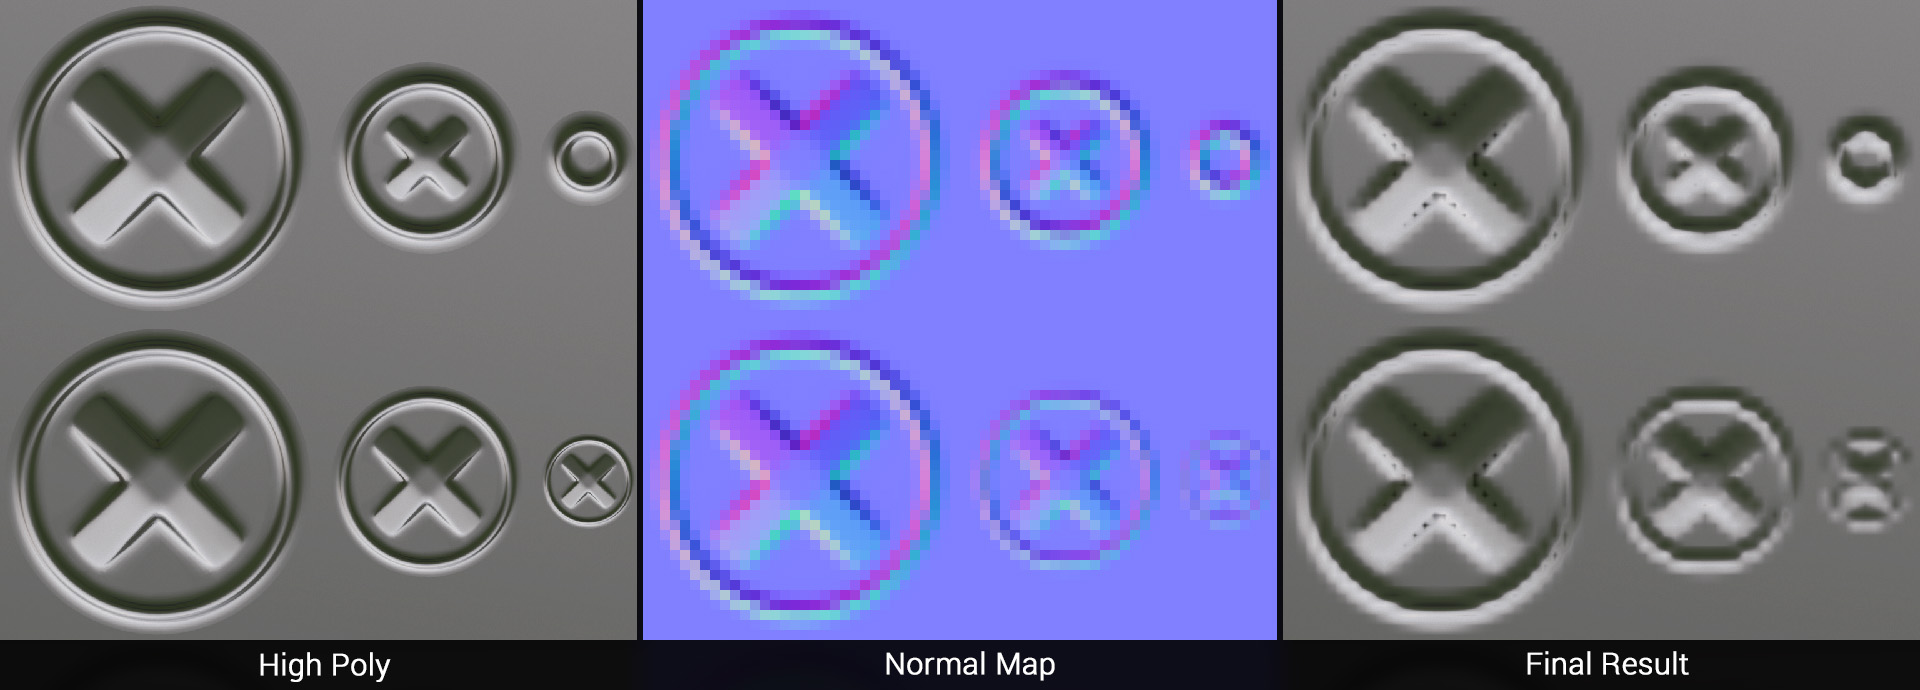
Hard Edges and UVs
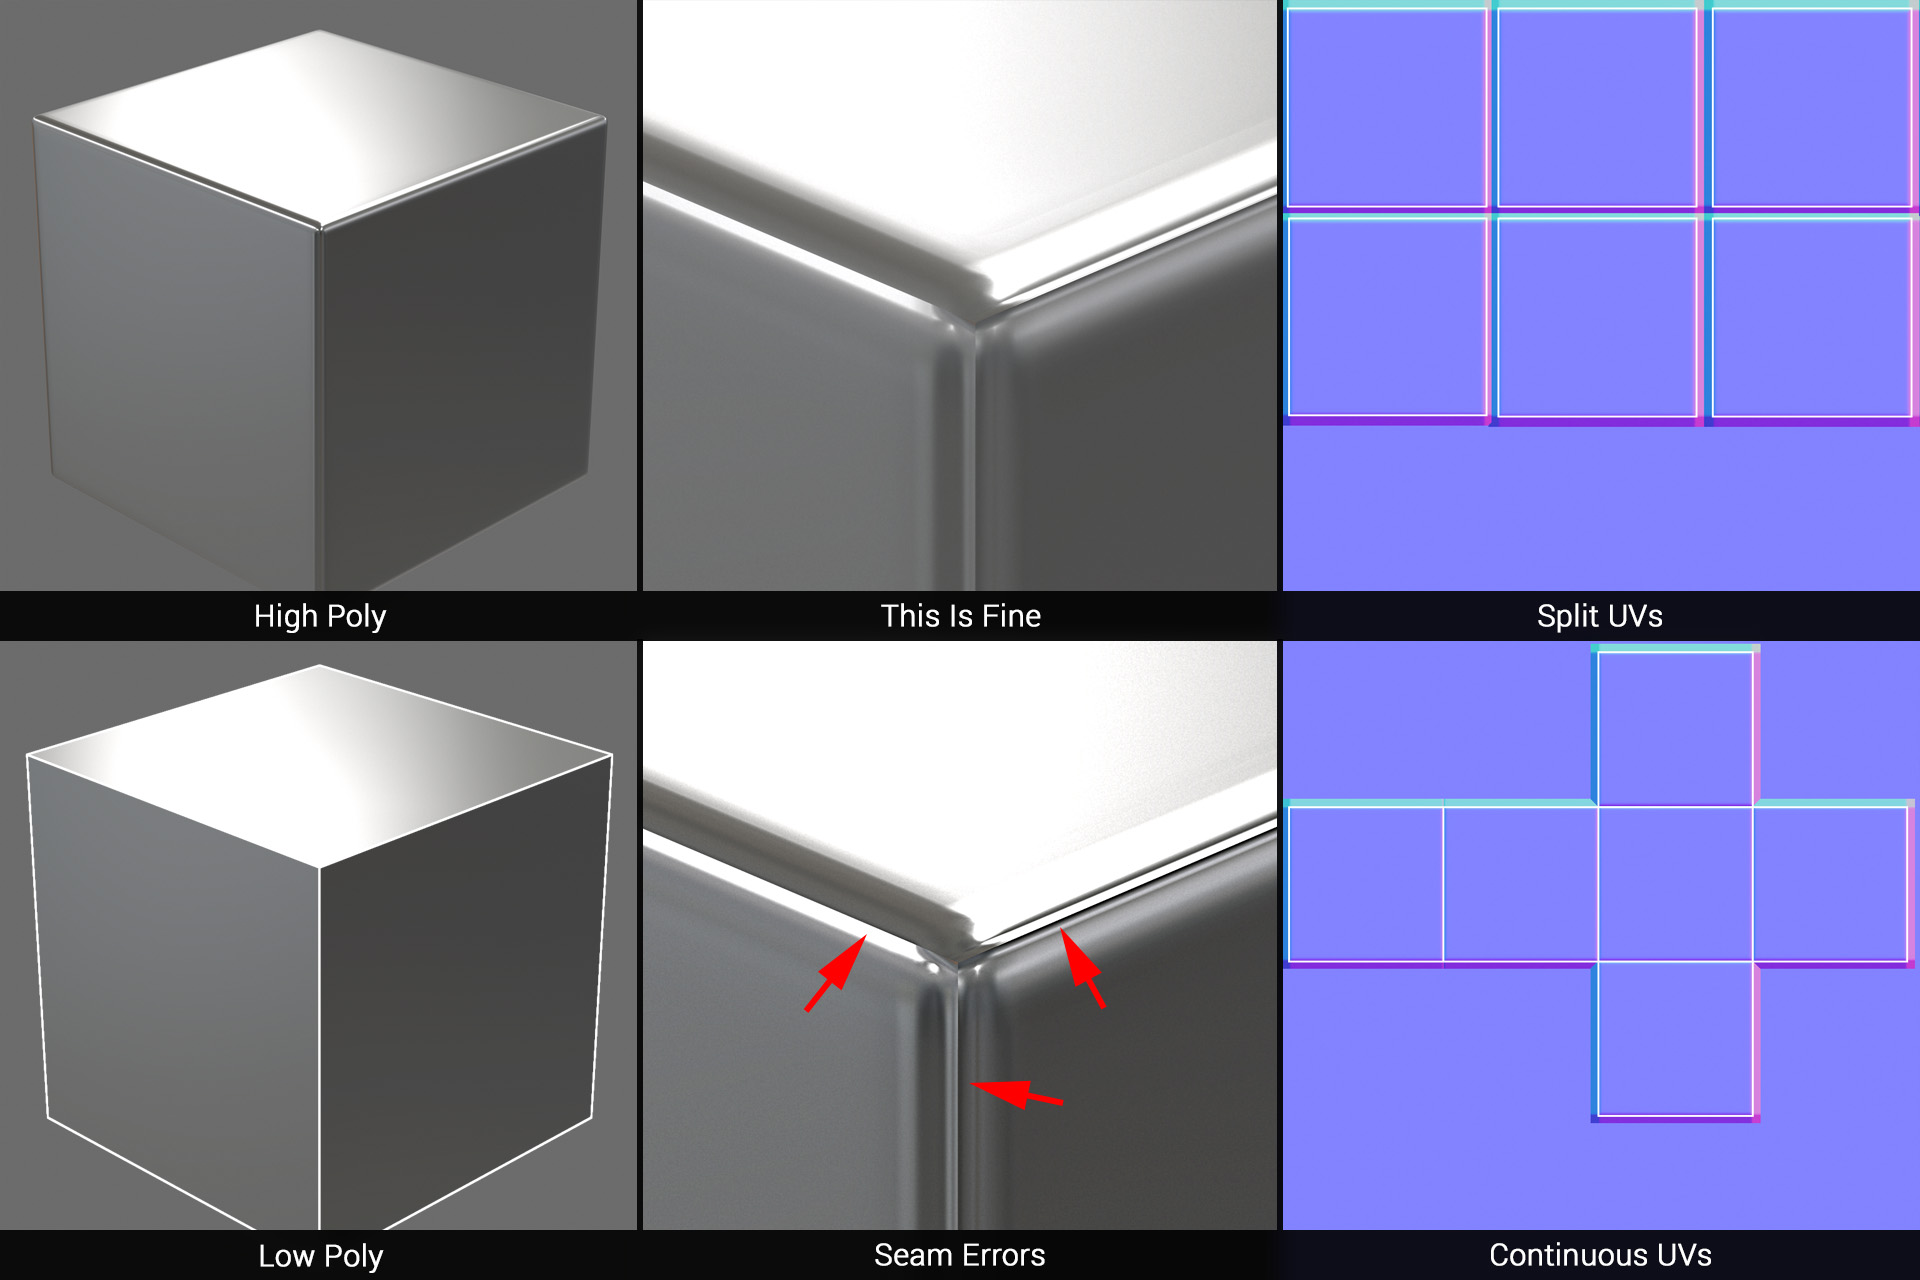
When using hard edges (or smoothing groups), it’s important to ensure that you break apart your UV islands along all hard edge borders. If you use hard edges but do not split your uvs, you will get seam artifacts as each face will try to bake onto the hard edge line.
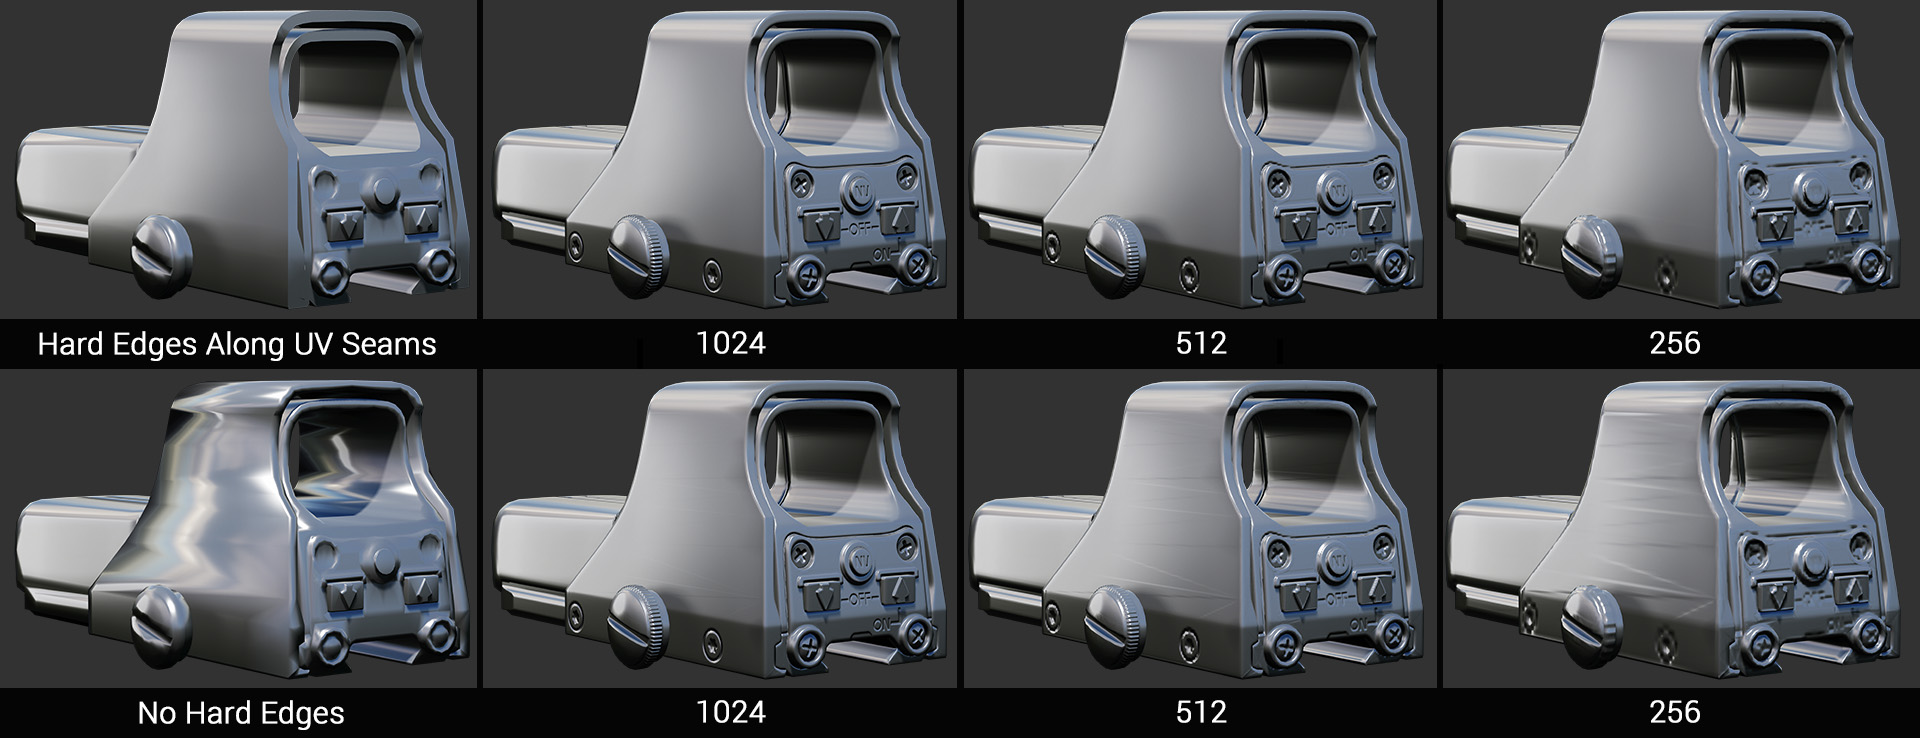
While It is not necessary to use hard edges along all uv borders, it can be beneficial to do so, especially with hard surface assets. Using hard edges at UV seams can create less extreme smoothing on the low poly, which means that the resulting bake will hold up better at lower resolutions or mip map levels, and when applied to LOD meshes. Pay close attention to the thin lines on the above image: while a synced workflow can compensate for extreme shading, lack of resolution can result in errors along triangle borders of the low poly.
Low Poly Size
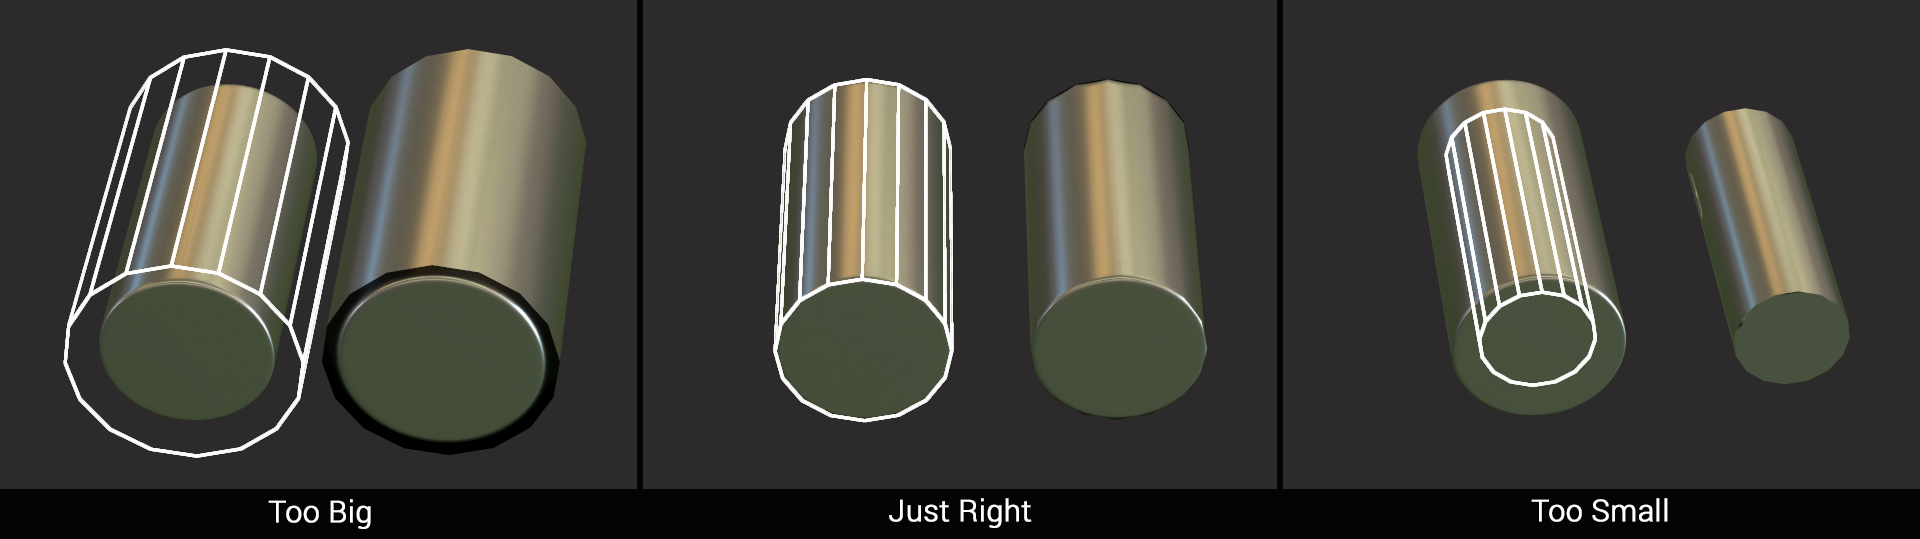
Make sure that your low poly is as close in size to your high poly as possible. If your low poly is too big or too small, projection errors can occur. Don’t worry about fully encompassing the high poly with the low poly, that is what the cage is for.
The Right Number Of Sides
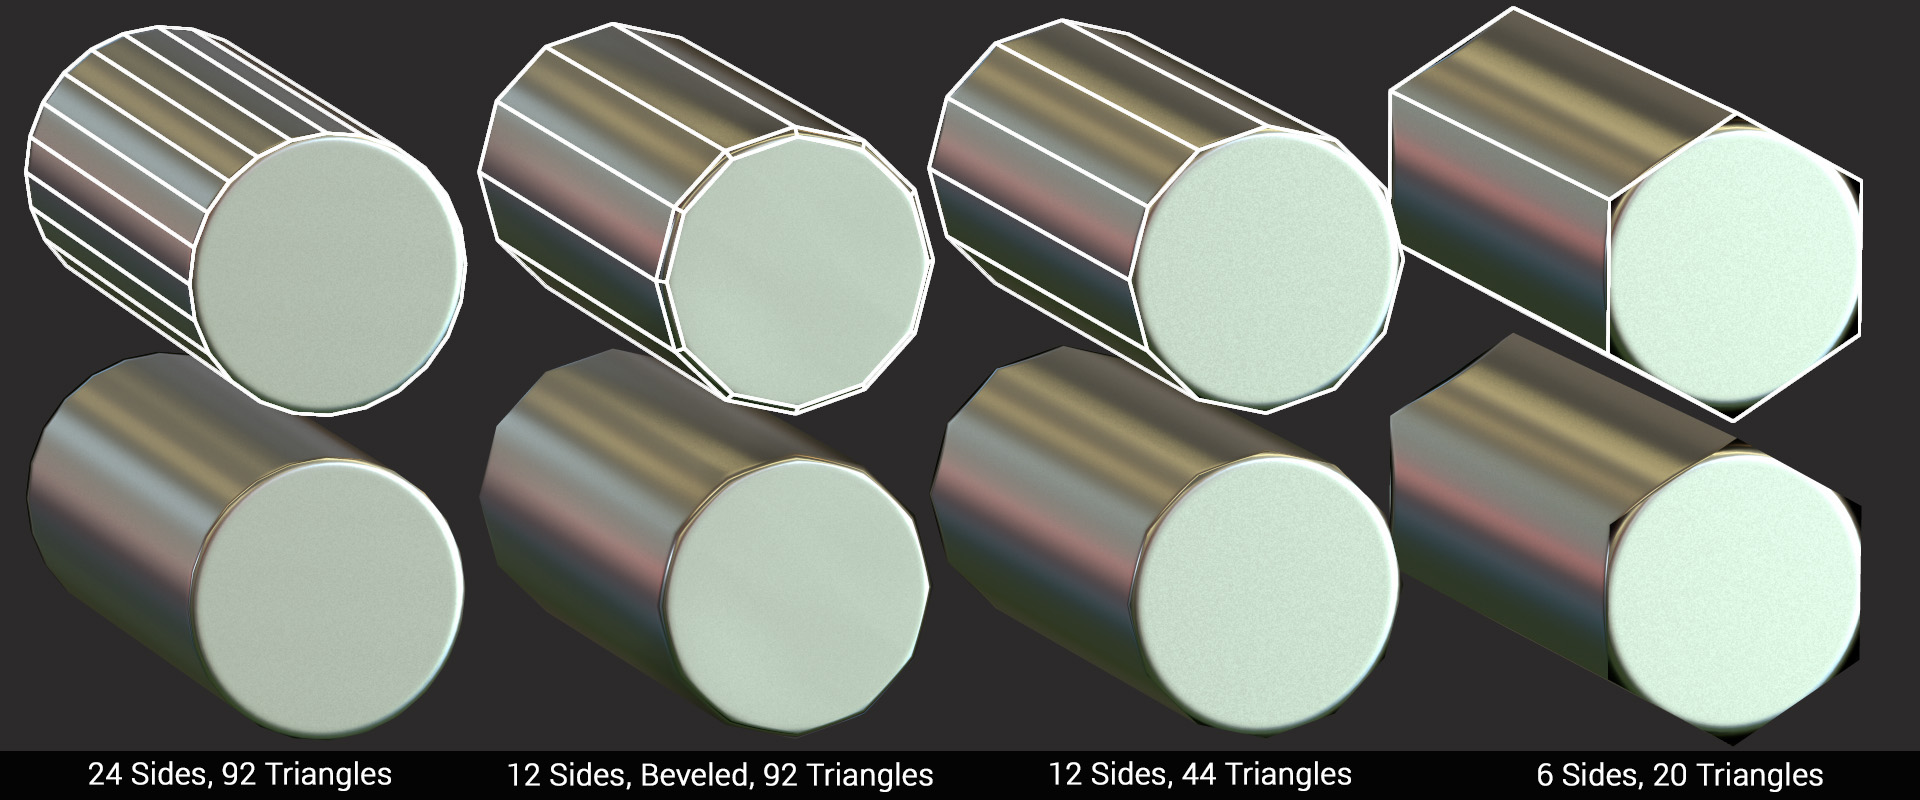
Matching the the curvature of the high poly is important, while normal maps can easily represent fine detail, they can’t alter the silhouette. Using an appropriate number of sides for curved surfaces reduces waviness and makes your asset look better in general. Bevels can help combat waviness to a certain degree, but increasing the number of sides tends to be more effective.
Cap The Gaps
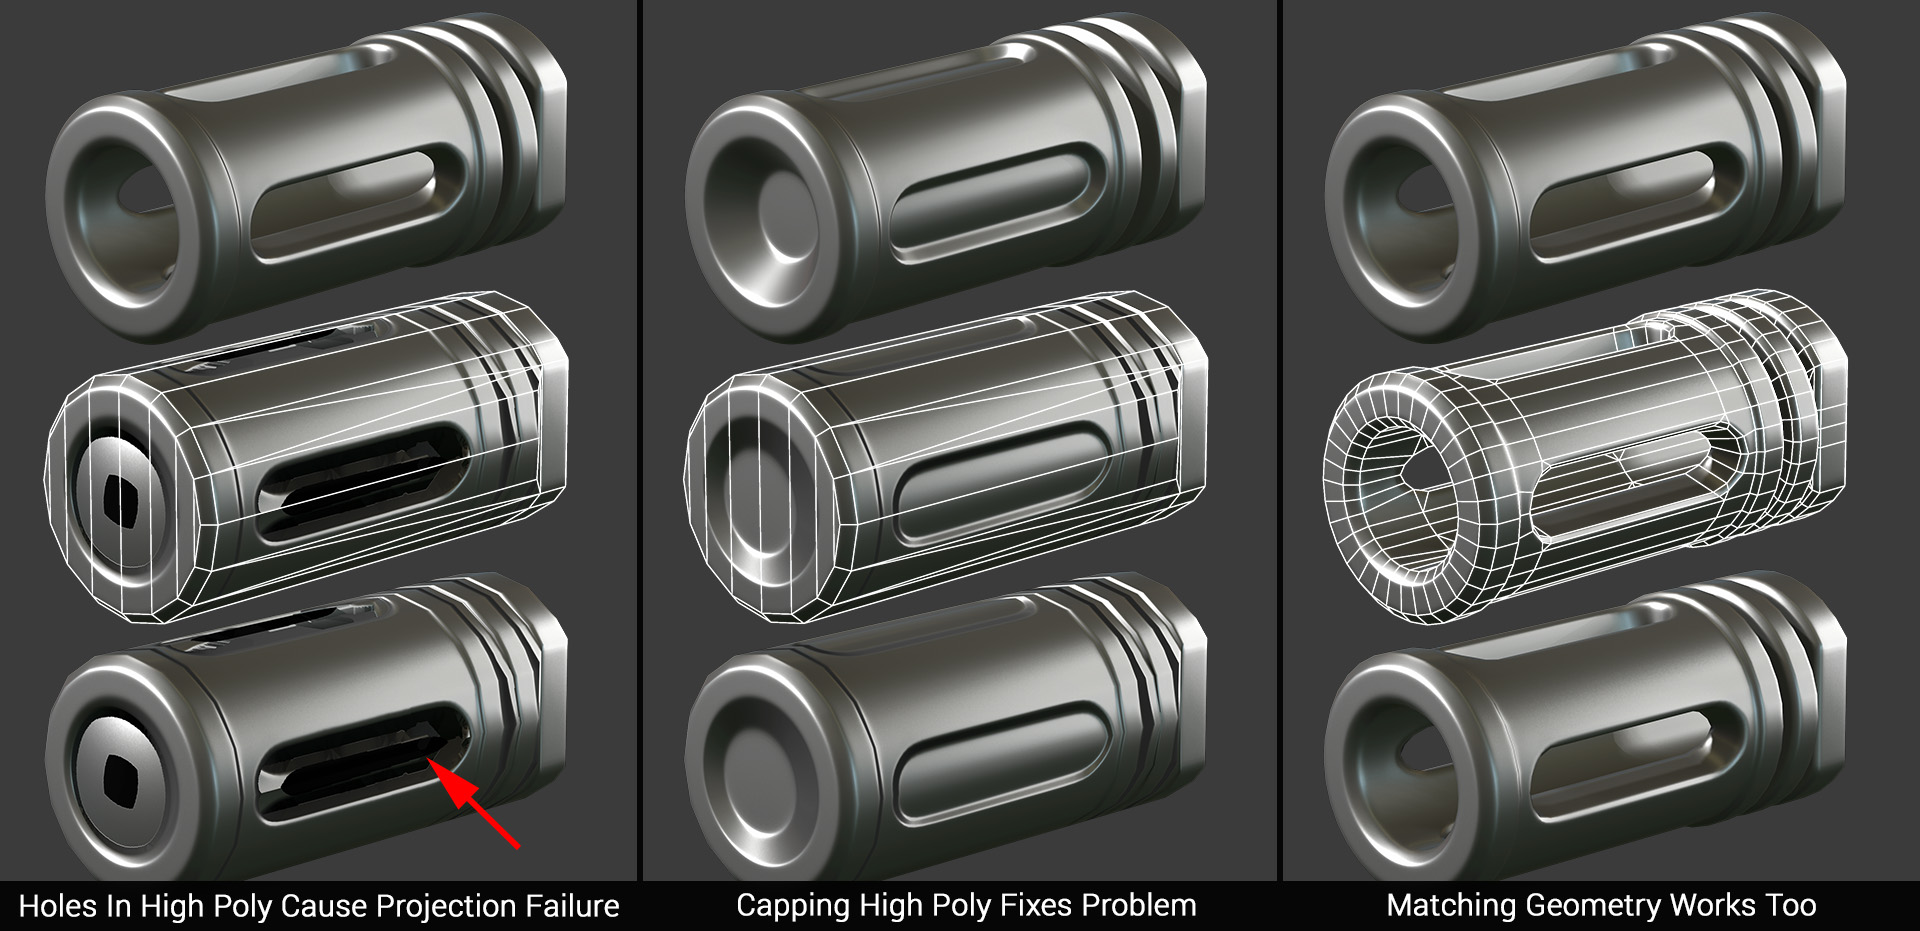
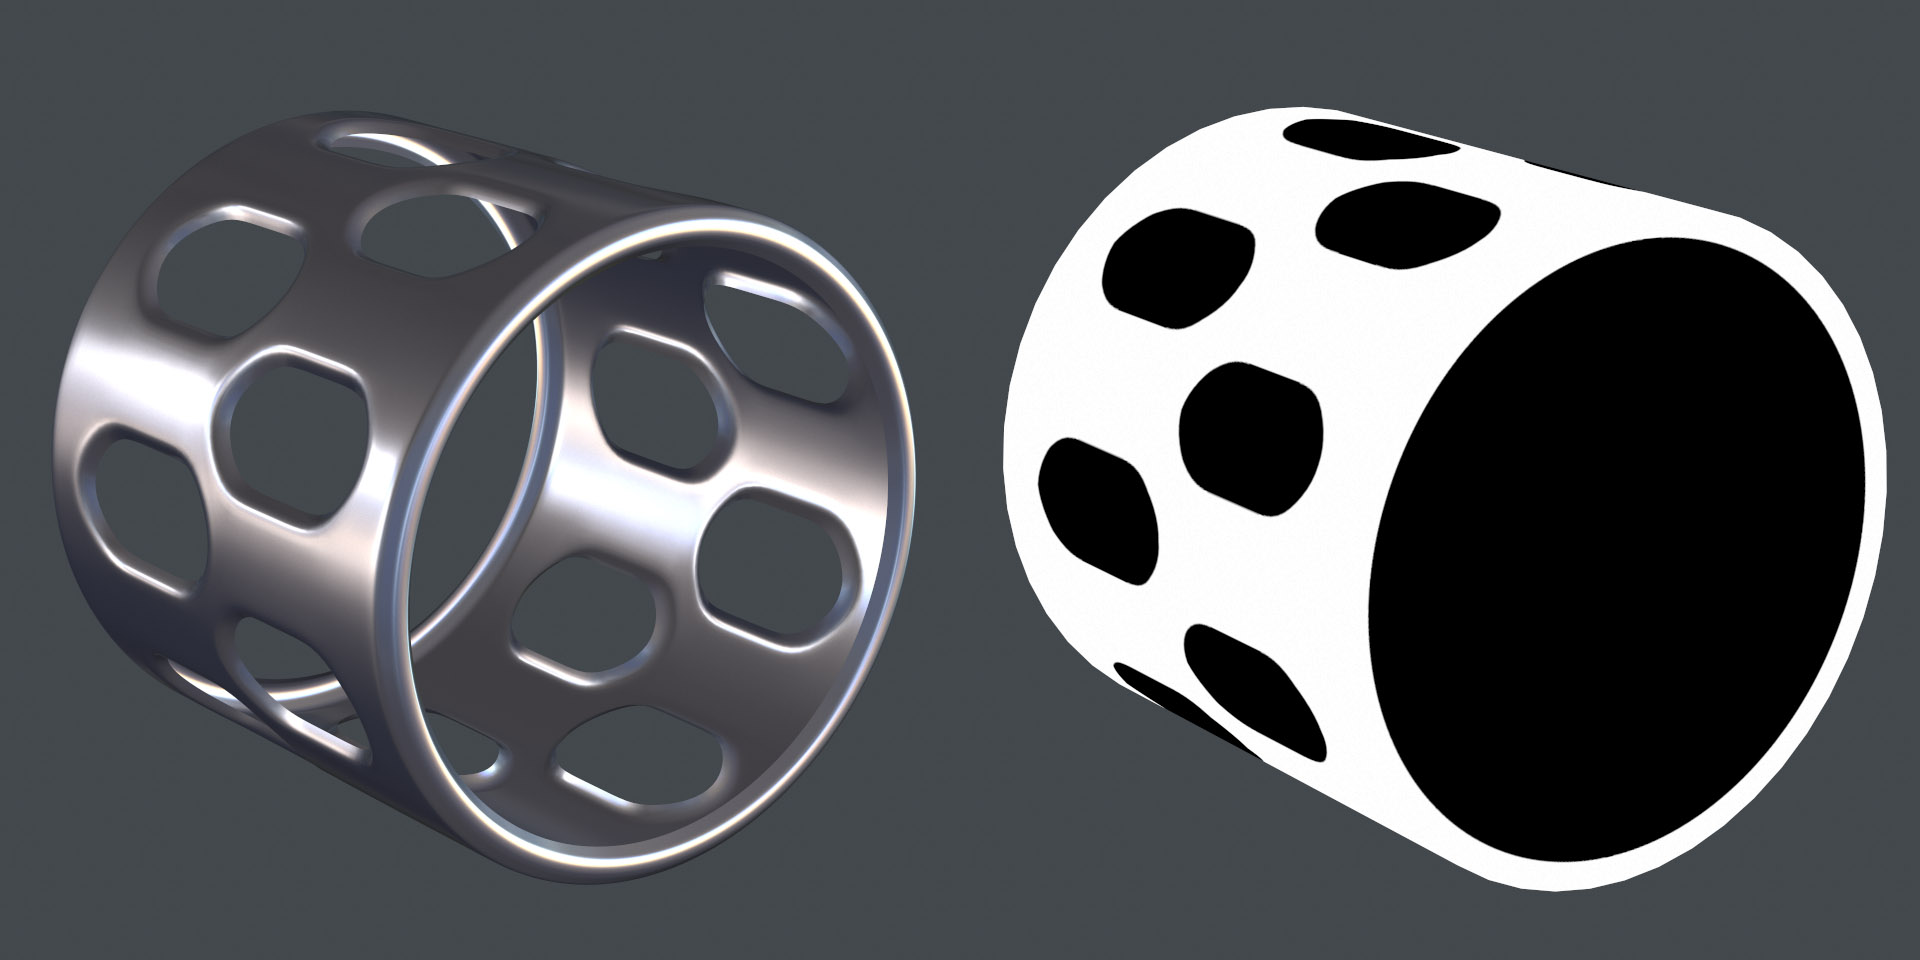
Holes in the high poly can result in errors, as the Baker is unable to hit a sensible surface. There are two solutions here, one is to cap the holes in your high poly, which is generally the way to go if you’ve got a low polygon budget. The other solution is to match the shape of the high poly more accurately, in this case modeling the holes into the low poly as well.
Triangulation and X-Shaped Errors
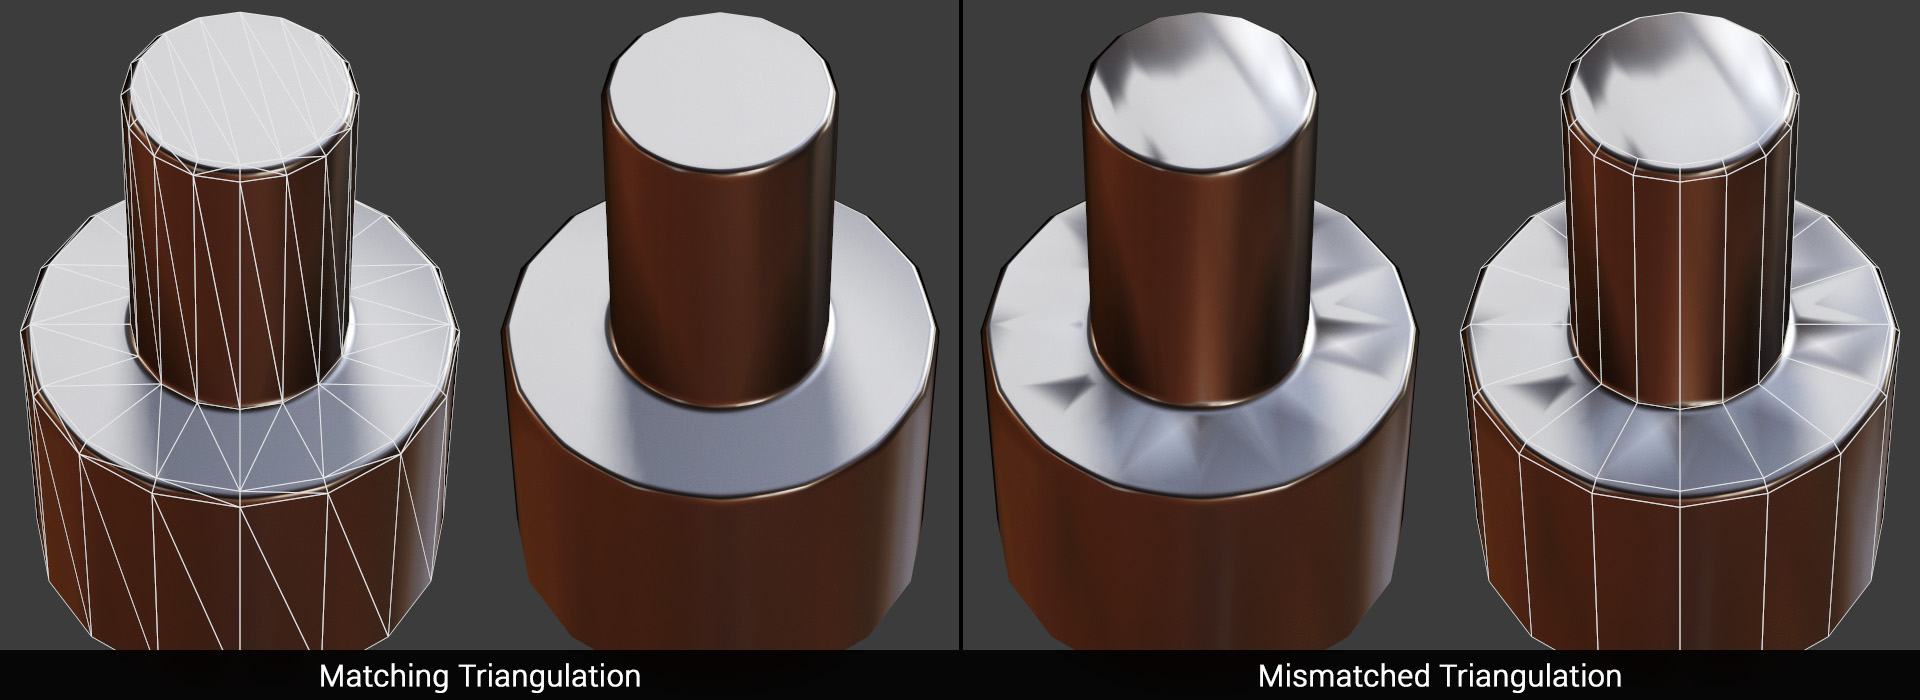
Make sure to triangulate your mesh before importing it into Toolbag. If your mesh is not triangulated the internal edges of quads and n-gons may vary between applications, resulting in a triangulation mismatch which causes x-shaped smoothing errors. This is essentially a type of tangent space mismatch, as variance in the edge direction can cause the tangent basis to differ.
If you are using Maya, you may want to lock the mesh normals first, as the mesh normals change upon triangulation.
Banding, Bit Depth and Dithering
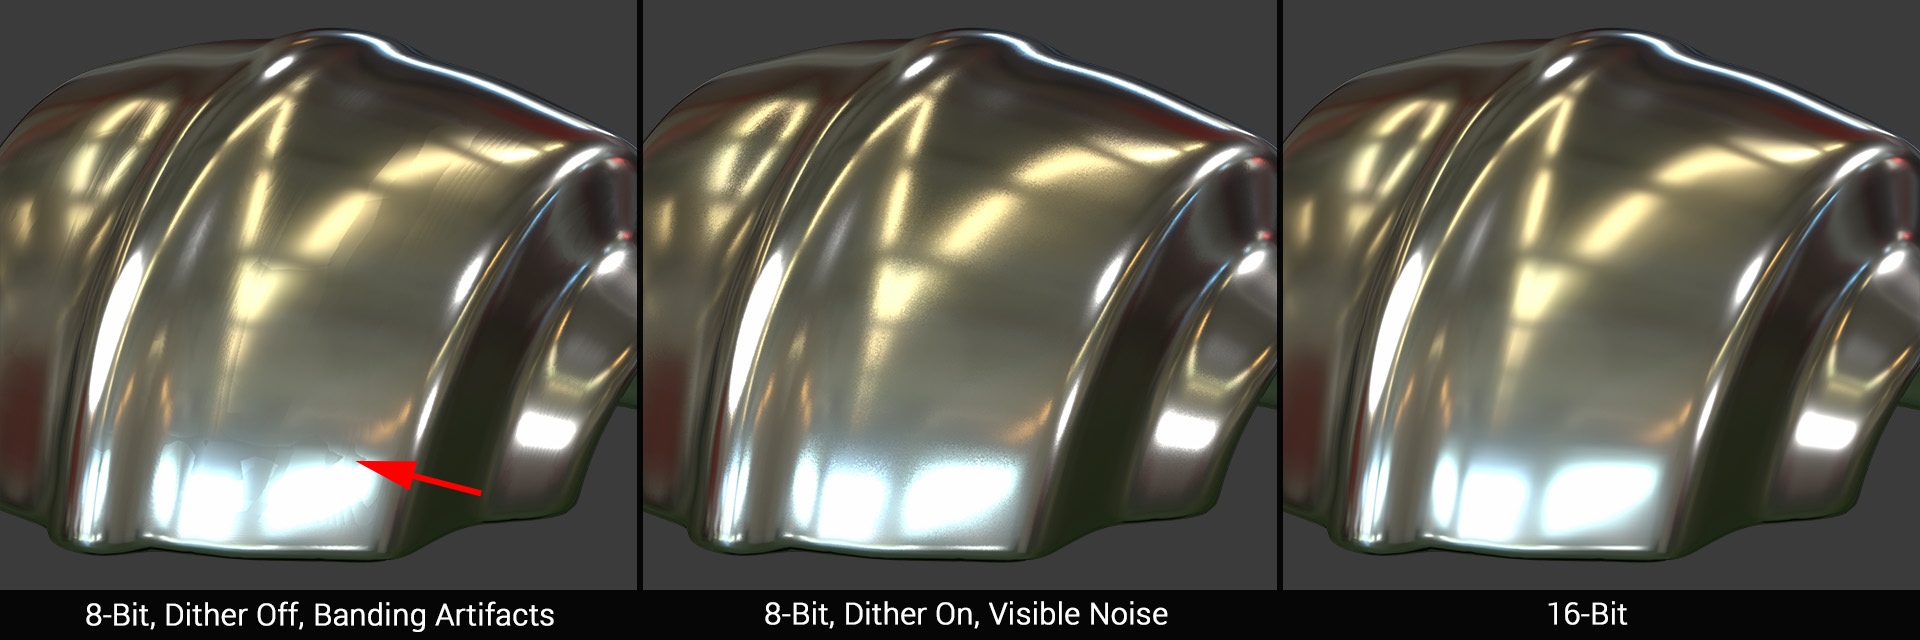
Banding artifacts are caused by a lack of precision with 8-bit normal maps. There aren’t enough color values to accurately represent subtle differences between the high poly and low poly surfaces, which results in stair stepping artifacts.
Dithering will get rid of banding artifacts, at the expense of a bit of noise added to the normal map. Noise is generally preferable, as most surfaces have some degree of texture, so it is on by default in Toolbag. You can bake a 16-bit normal map as well, which results in a smoother bake, however many renderers require an 8-bit normal map. If you bake a 16-bit map, you’ll likely need to convert to 8-bit color for the final texture, which can result in dithering and noise. However, some artists prefer to work with 16-bit source content, in order to defer dithering to the final stage.
That covers it for this tutorial. Check out our tutorials section to learn more about Toolbag, and shoot us an email at support@marmoset.co if you have any questions.


