Introduction
Hello, my name is Vadim Sorici, and I’m a Character Artist specialized in creating realistic characters. For this breakdown article, I would like to focus on the nuances of realistic character creation and share some information that can’t be found in other tutorials. I’ll be covering topics related to eye creation, peach fuzz, skin, transitional meshes, and hair. I hope this will be an enjoyable read and that you will learn something!
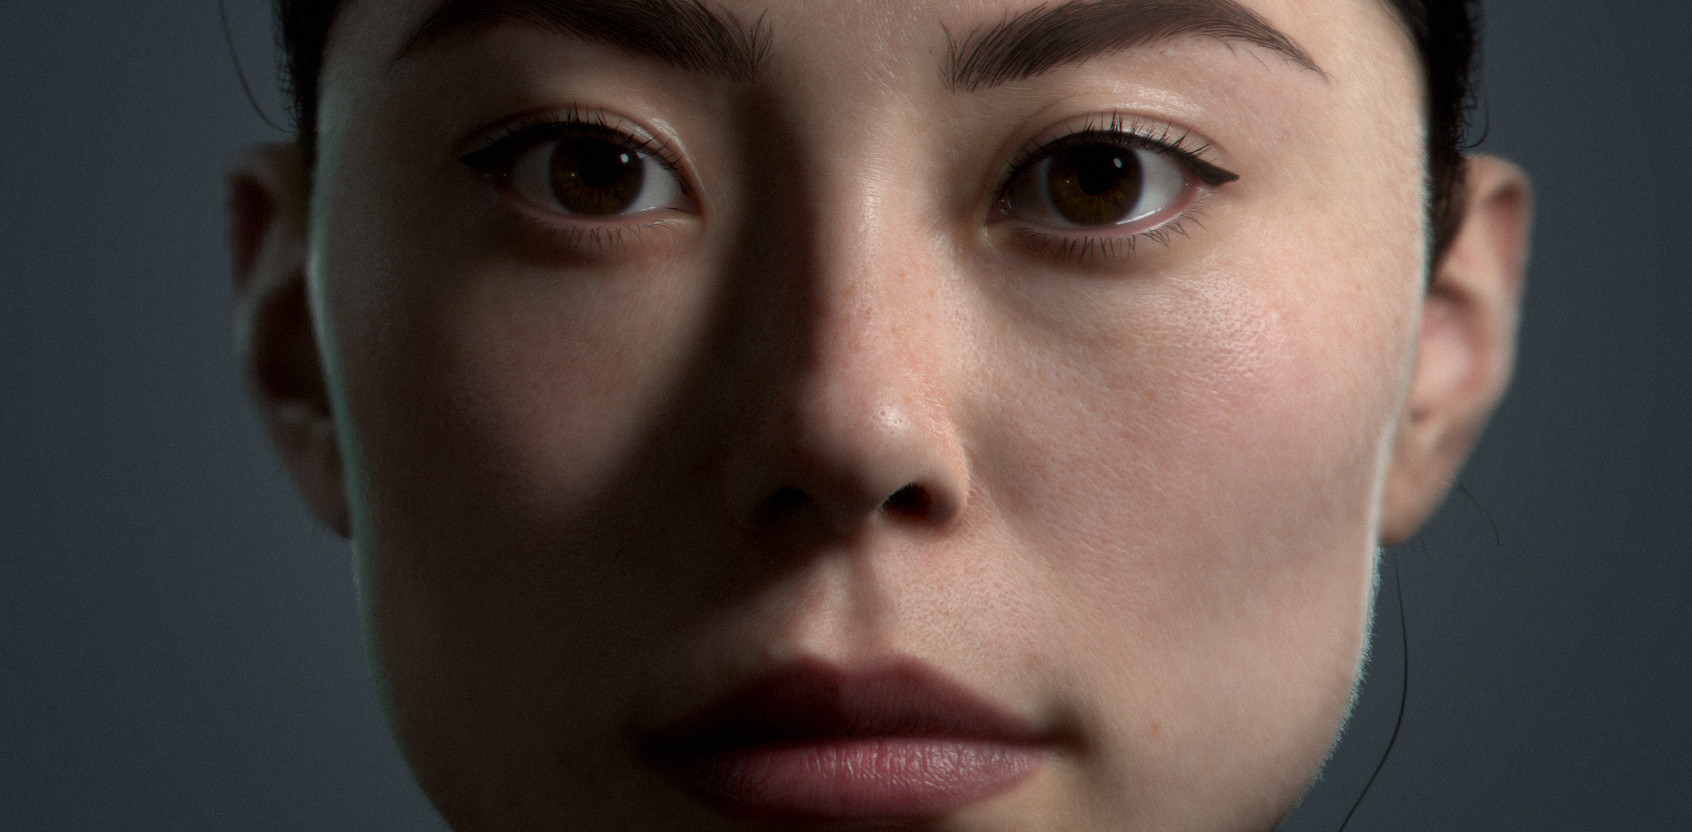
Skin
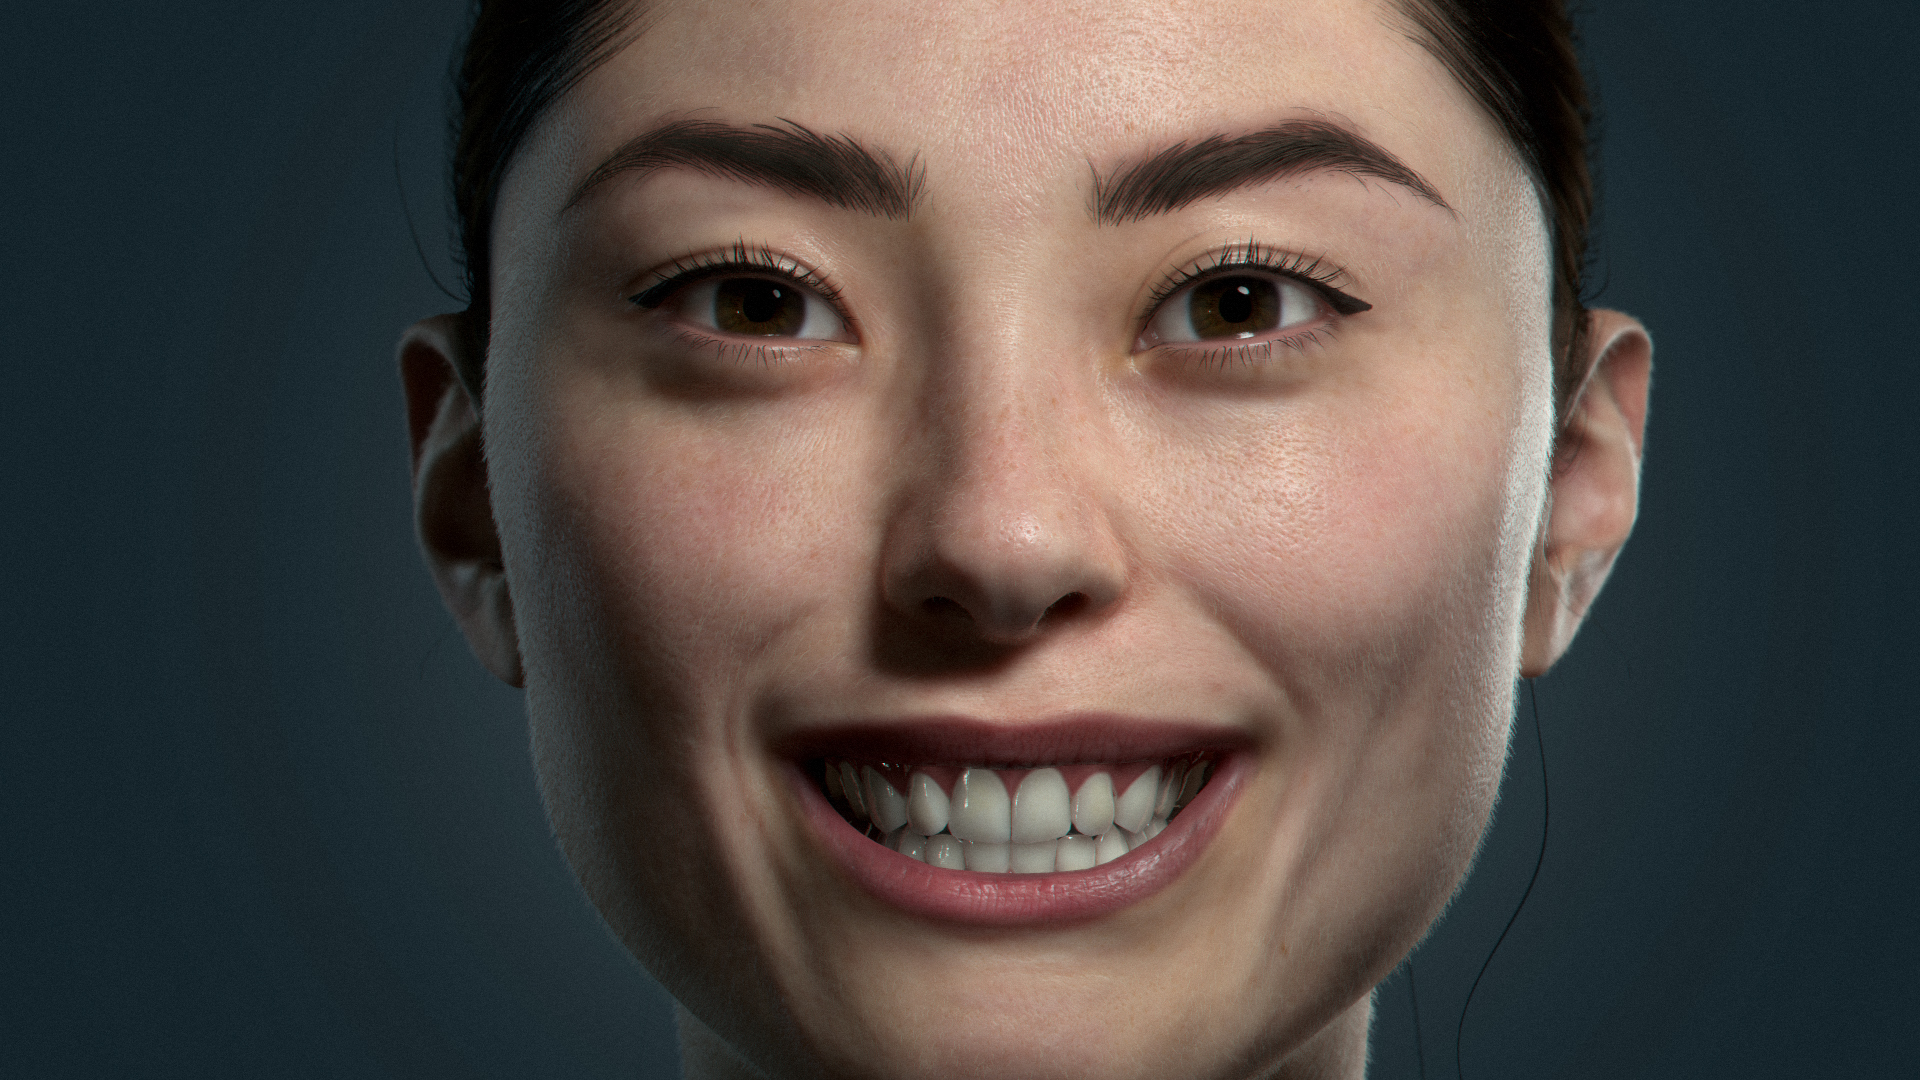
The quality of Toolbag’s skin shader has always amazed me, especially with the variety of results people can produce with it. It’s simplified, yet provides a lot of control. The first steps I take for creating skin materials are acquiring displacement maps from TexturingXYZ. I project them in Mari and manually sculpt some detail in Zbrush.
After I’m done projecting the maps, I clean up the major pores and wrinkle details on the Diffuse map. Using a combination of Cavity maps from Displacement data and hand sculpted details, my goal is to transfer sculpted data onto the Diffuse so the details match in both the highpoly and Diffuse.
Skin Material
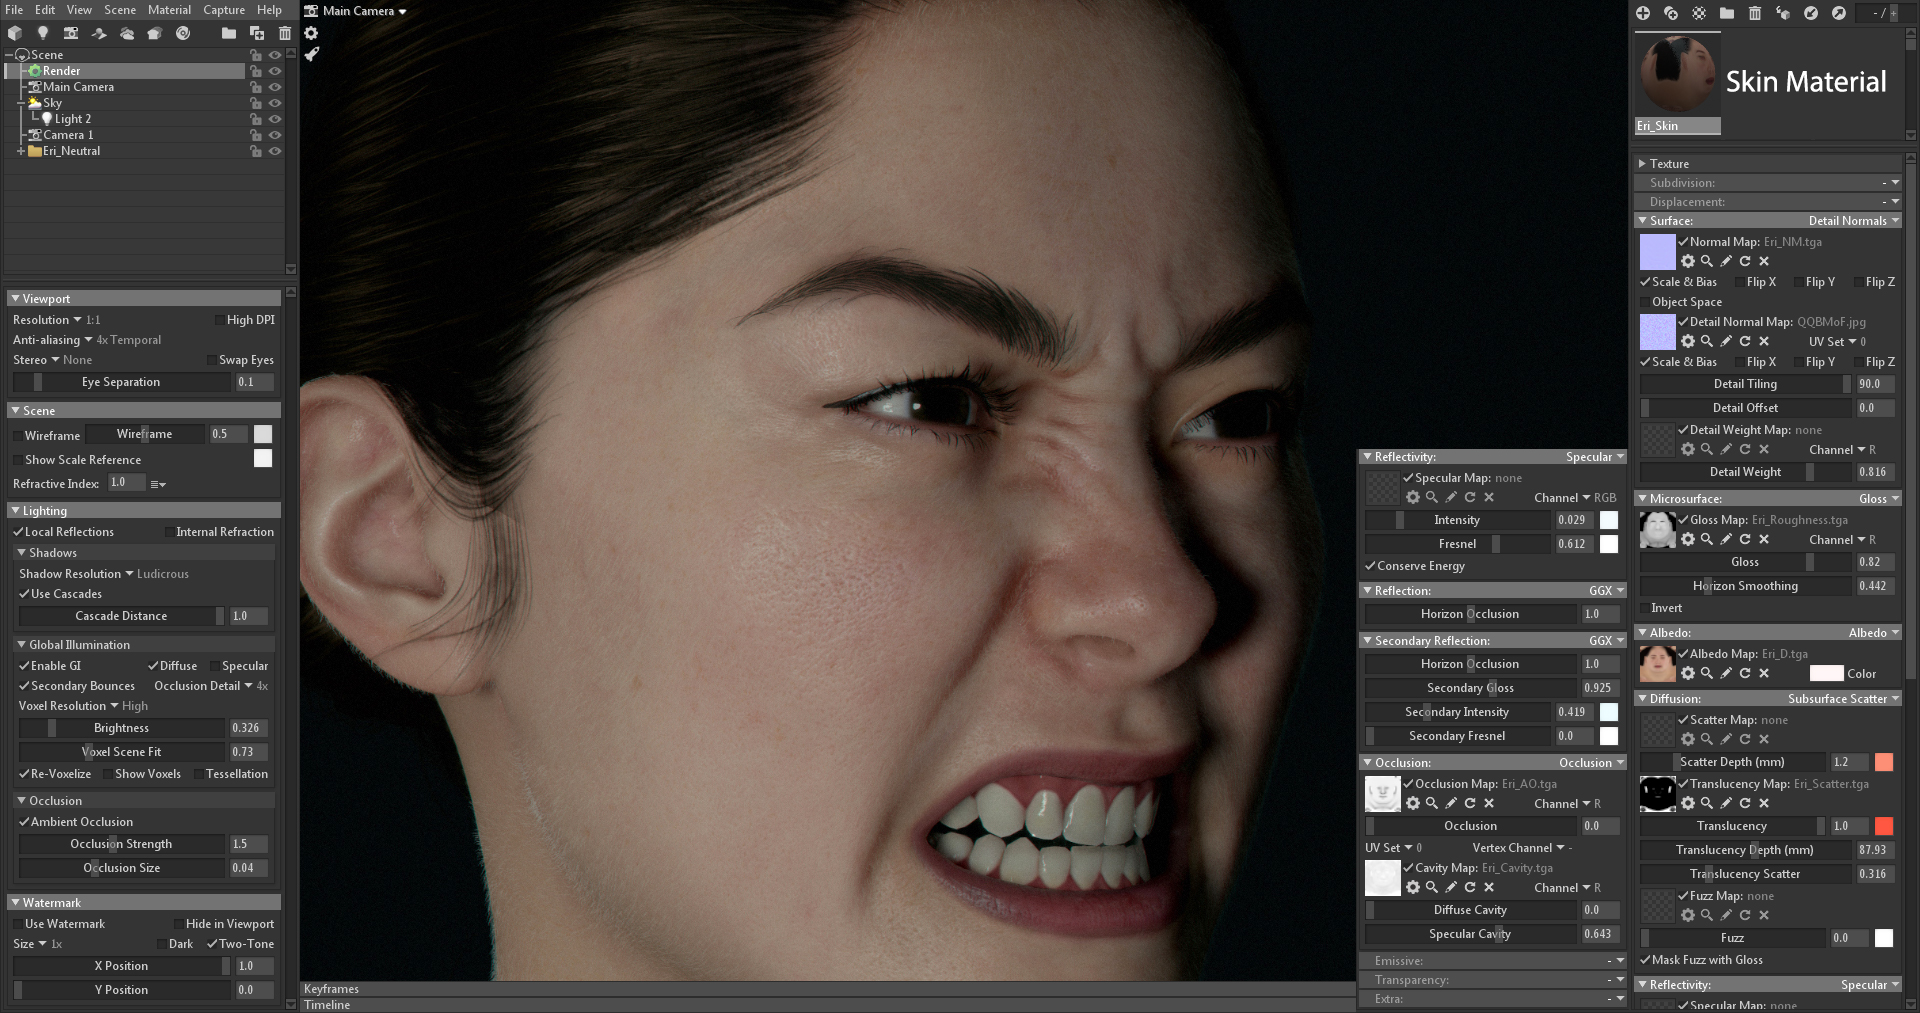
My material setup for Skin is very simple. I use a basic Roughness map with a Cavity map multiplied on top. The Diffusion module is set to Subsurface Scatter and I tint my color to a reddish tone. I apply a Translucency map for the ears and nose by inverting the mesh normals and baking an Ambient Occlusion map. No Fuzz or Specular maps are used since I have actual peach fuzz (more on this later) and use the default physically based Specular value of 0.29. I have Primary and Secondary Specular values; the Primary has a lower Gloss value with a slight blue tint, while the Secondary has a higher Gloss value. The Cavity map will mask out pores, as they shouldn’t have any specularity.
Hair
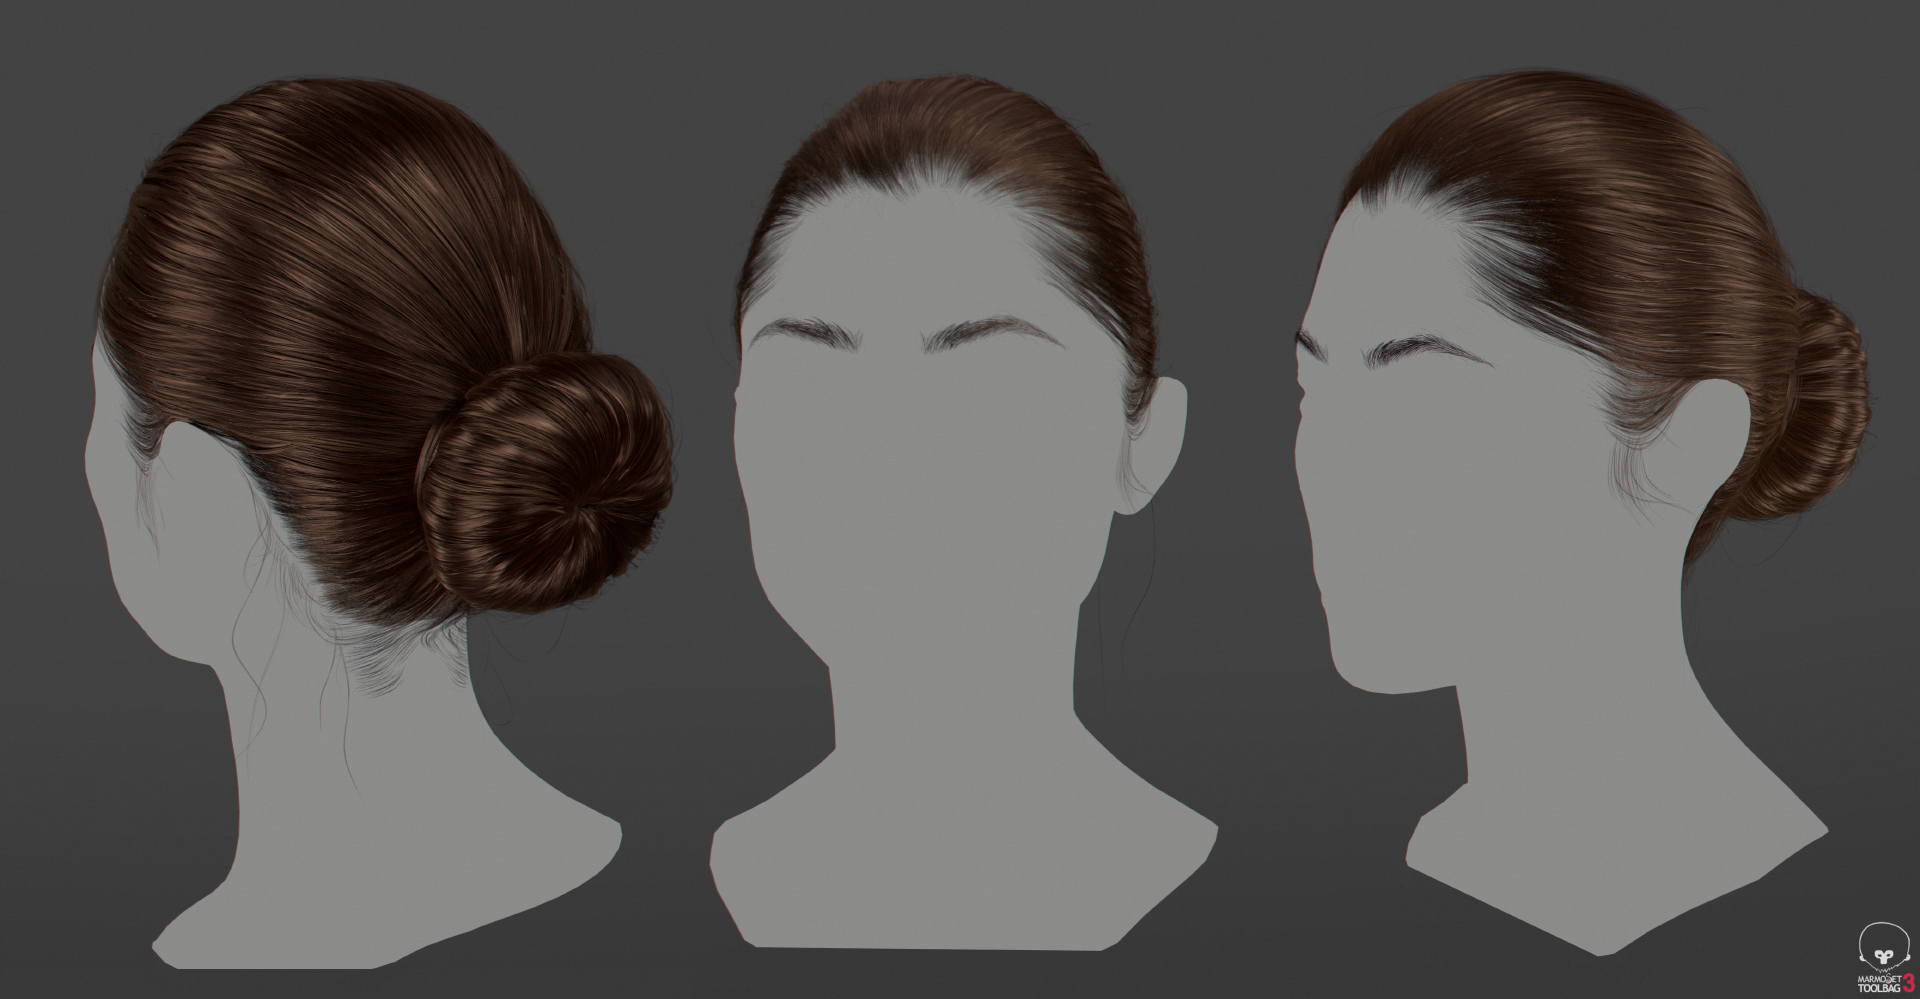
For hair, I use the XGen and Arnold workflow. The hair is created procedurally using XGen descriptions and the textures are baked in Arnold. I’ll try to explain the basics, however, if you’re seeking a more indepth tutorial, I highly suggest checking out Adam Skutts hair tutorial. Keep in mind that it doesn’t matter if you hand paint the hair or use XGen to generate textures, there are no shortcuts for a good result. Building hair relies on manual labour and patience while placing the cards.
Hair Textures
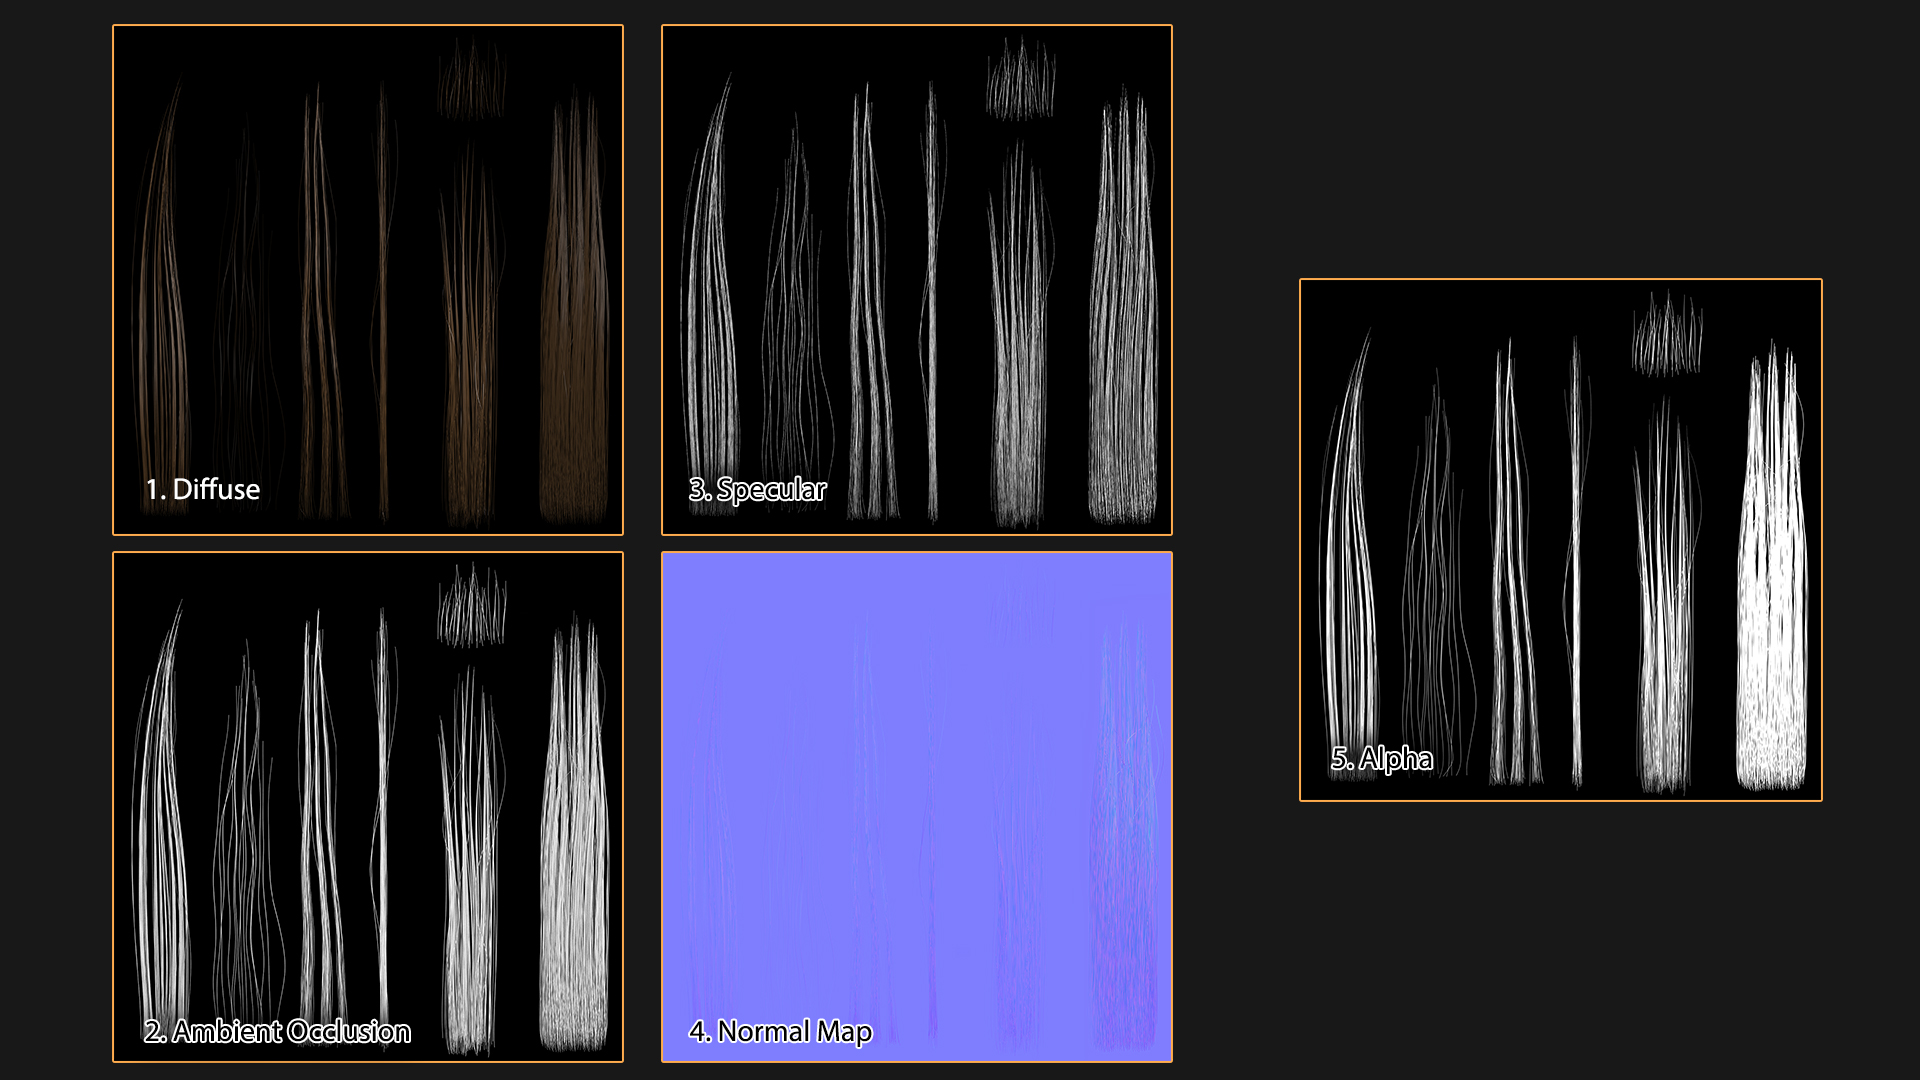
Below are the steps I take for creating textures for hair.
- Bake the Diffuse using a standard hair material assigned by XGen. You can choose to experiment with Arnold’s hair material here. I tend to bake down hair color and modify it from blonde to black, if needed.
- Convert hair descriptions to geometry and use aiUtility to bake the AO map. You can have it set up as a render pass as well.
- The Specular map is just the AO map with a Levels adjustment layer and directional noise multiplied on top.
- The Normal map is baked with aiUtility. Check out my tutorial on how you can do this.
- The thickness of the tips and roots will affect the appearance of the Alpha map. If it becomes too thin, the values will decrease from pure white to slightly grey. Depending on the desired outcome, this might be a result you do or don’t want.
XGen Basics
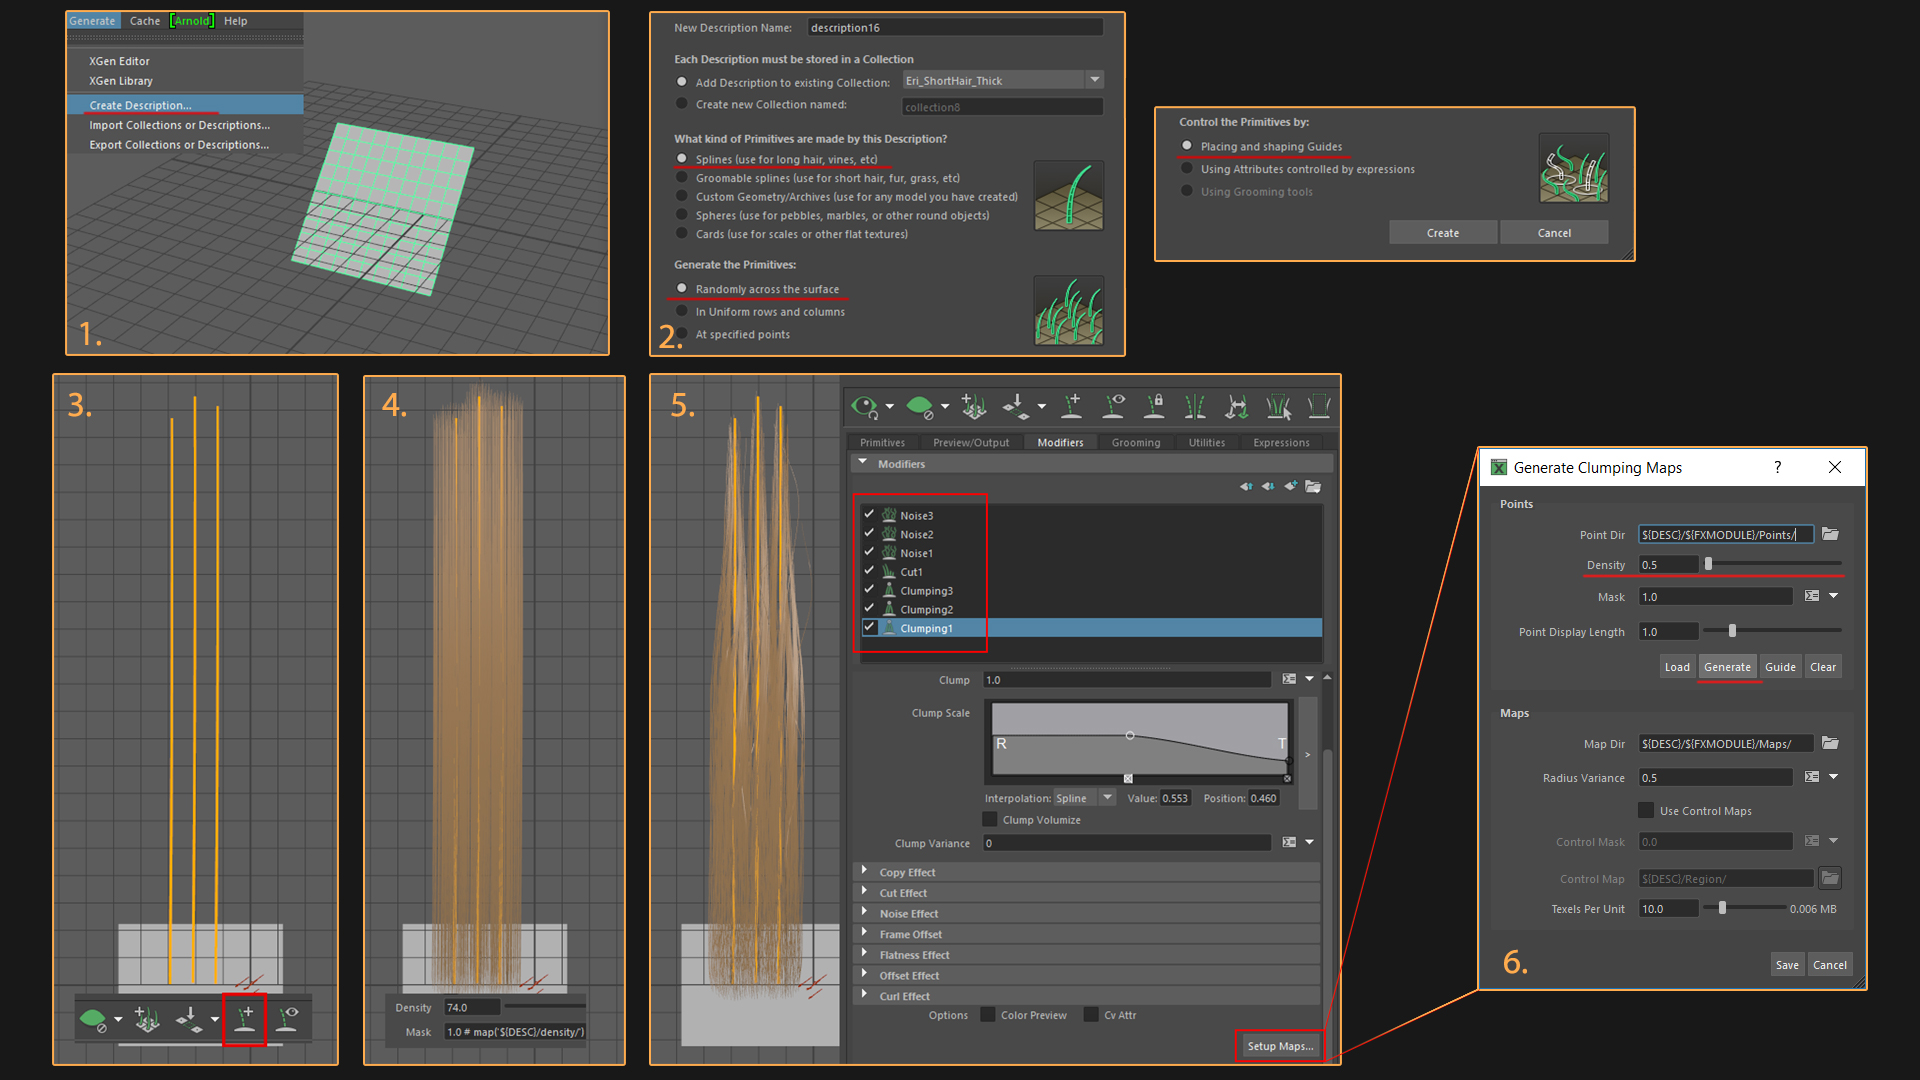
In this section, I’ll be giving a quick rundown of XGen and how it can be used to create hair geometry.
- Create a plane, select it and pick Generate, then choose Create XGen Description.
- Create a Description with these selected parameters.
- Add guides, scale them to proper length, then sculpt them into desired shape.
- Add Density and paint the Region Mask.
- I use a set of Modifiers to achieve the look I’m going for:
-
- Clump modifier will clump the hair strands.
- Noise modifier adds some noise to the hair. You can use masks here to have noise in specific areas or use the slider to control the noise level across the hair length.
- Cut modifier cuts the hair tips and gets rid of the uniform look.
-
- Each Clump modifier has a Clumping map. I usually generate a low density map for the first modifier, a medium density for the second, and high density for the third.
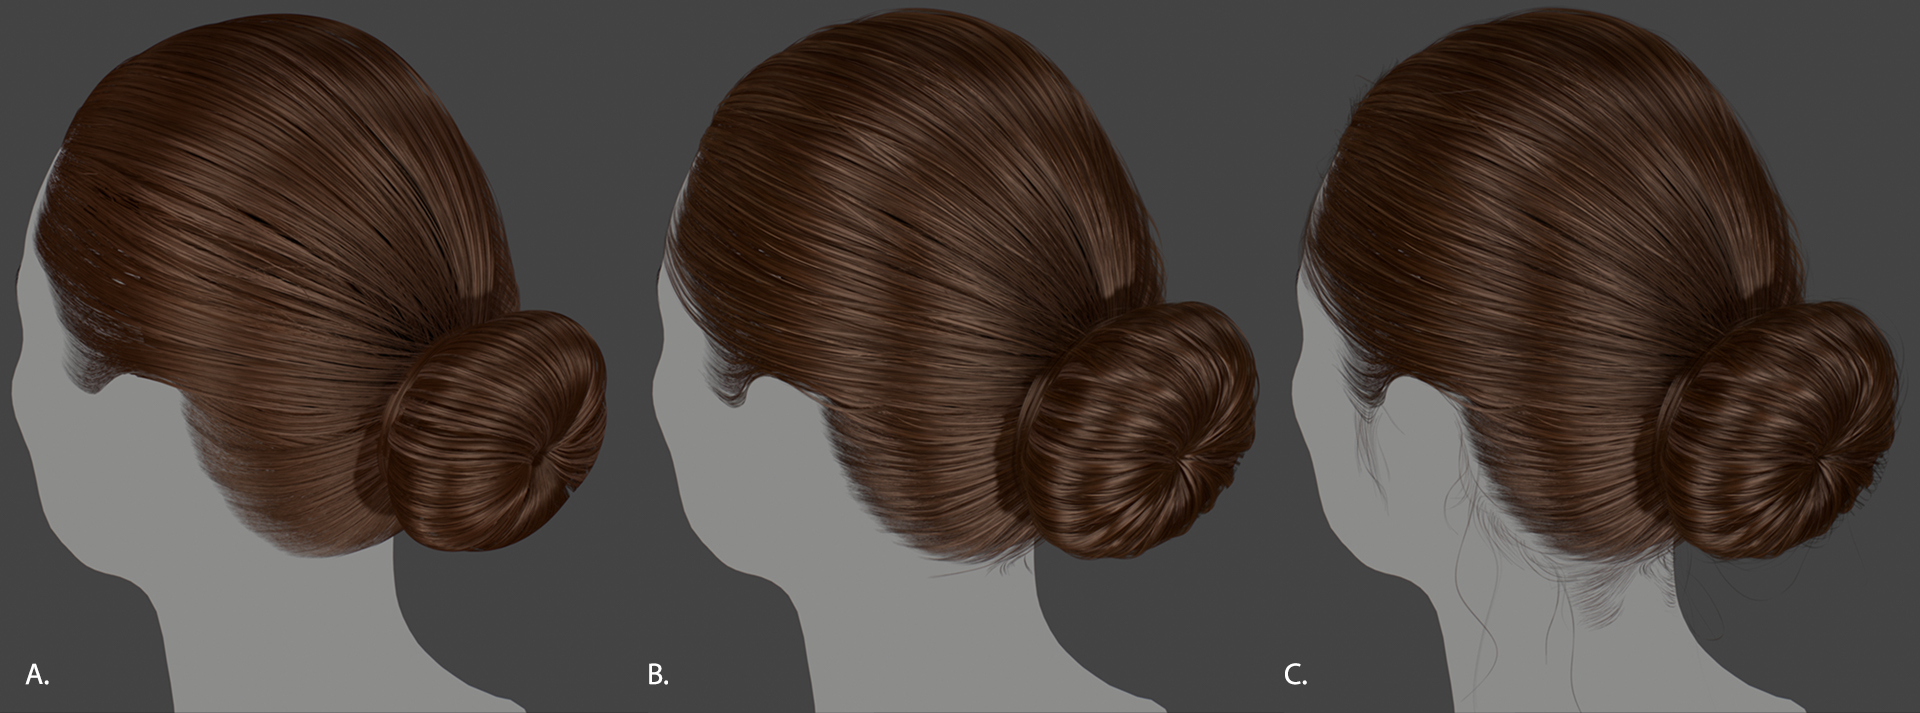
I use a standard hair material that is automatically assigned by XGen and then bake the Diffuse, AO, Alpha, and Normal maps. Once your textures are baked or painted, you should start placing the hairs and work in layers. I would recommend sculpting the haircut in ZBrush first to establish hairline, volume, flow, and proportions. The sculpt also helps you build the first layer for your hair. You can approach hair placement as if it’s retopology – simply placing hair cards on top of the sculpt.
-
-
- The first layer is just a bunch of hair cards that establish the hairline, mass, and direction. This layer should be thick so that it covers the scalp completely, with no visible gaps.
- The second layer has thinner hair strands that add volume, intricacy, and breakup the monotony of the hair.
- The third layer is composed of transitional and flyaway hairs. Transitional hairs are used to create better transition between the scalp and hair. Flyaways are wilder hairs that break up the silhouette and can catch the light to create a fuzzier look.
-
Hair Material
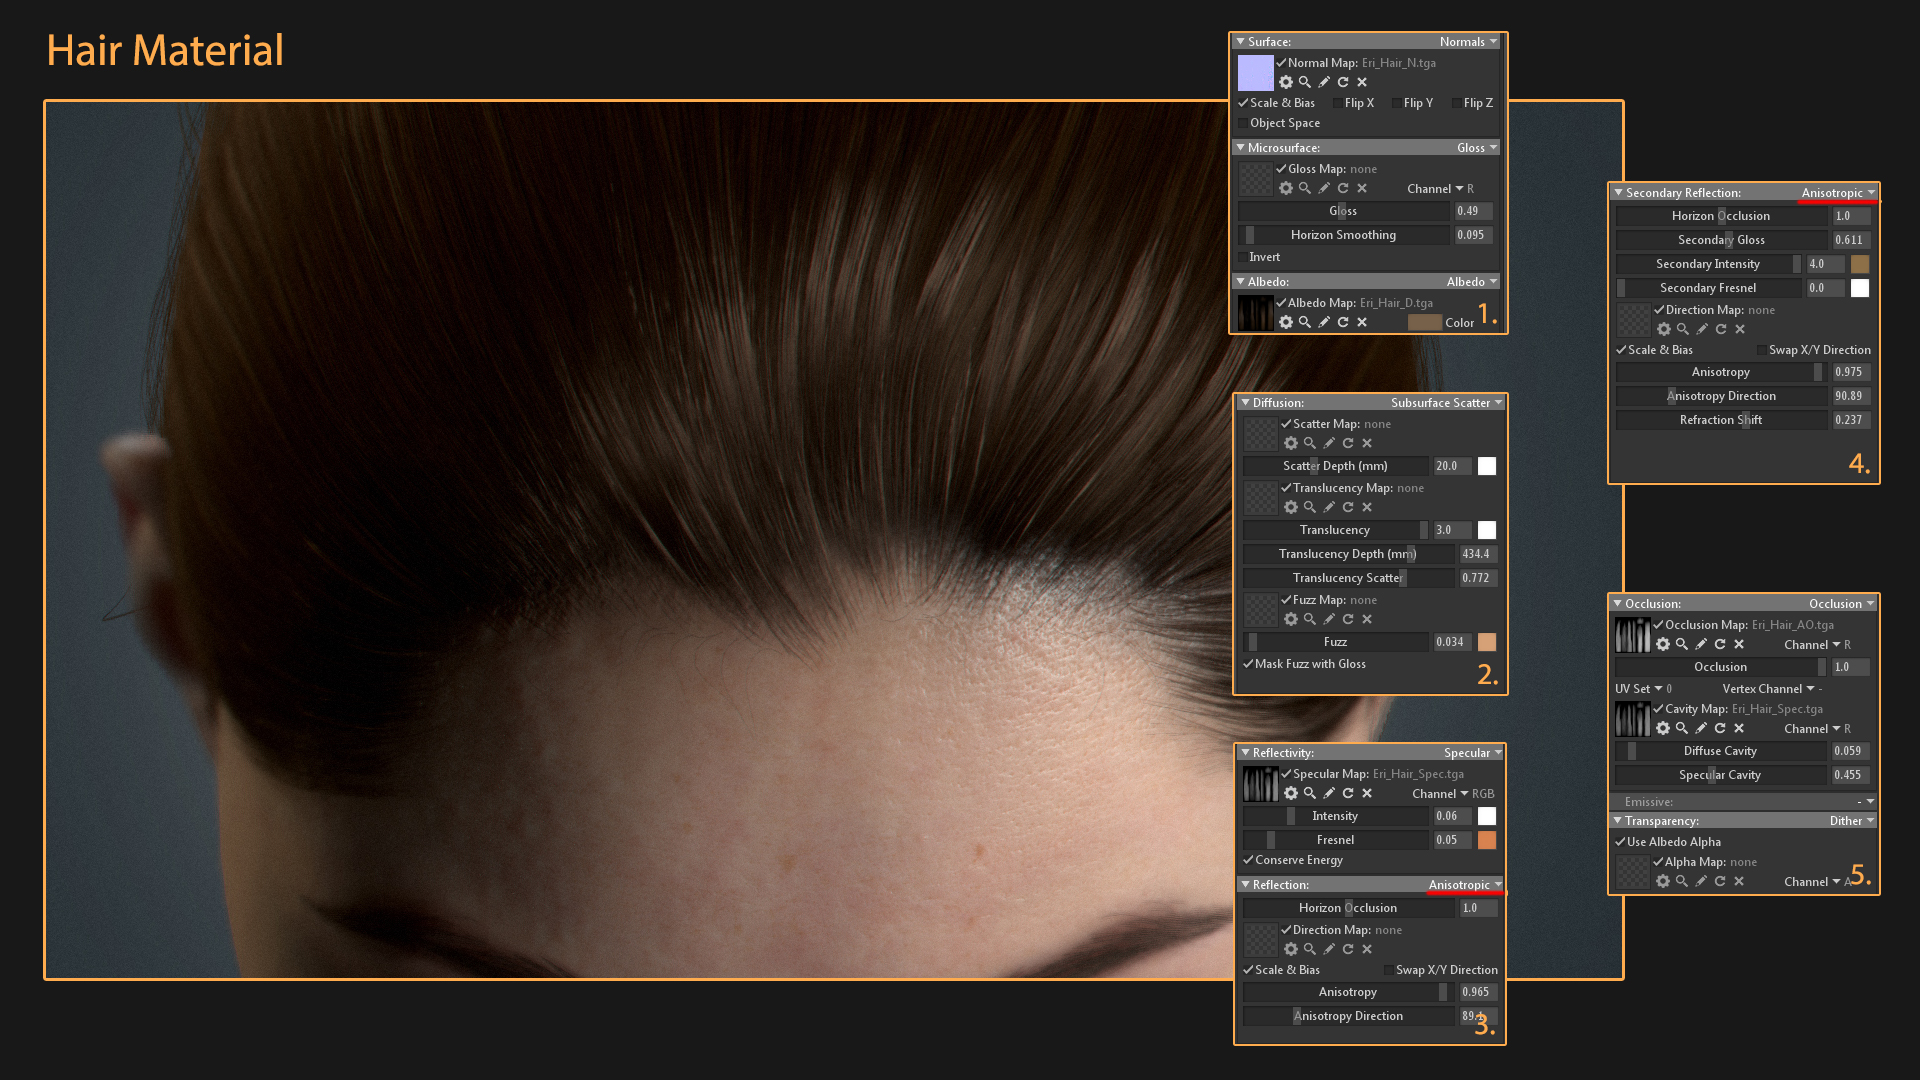
Your hair material settings will vary depending on your lighting setup, as well as the Diffuse and Specular maps. However, there are a few key things to remember when building the material. Hair will have Primary and Secondary Specular highlights; Primary is shifted towards the hair tip, and Secondary towards the hair root. Both of these will have different colors applied.
- Diffuse map with additional color.
- Diffuse module set to Subsurface Scatter. Scattering and Translucency values are set very high to simulate light passing through the hair and give it a softer look. A slight amount of Fuzz can fake rim light, however I’d avoid using it for the most part.
- The Primary and Secondary Reflection types should be set to Anisotropic.
-
- Primary Reflection is shifted towards the hair tip. It should have a tight highlight and the color should not be tinted, if it is, it should be subtle. Anisotropy Direction usually looks good around the 70-90 value range, but this will depend on the hair cut.
- Secondary Reflection has a slightly broader, tinted highlight. Fresnel can be turned off since you won’t need two of them. Secondary Reflection is shifted towards the hair root (there’s a Refraction Shift slider for this).
-
- I plug the Specular map under Cavity. The Specular Cavity slider is used for masking out specularity and can be useful for depth and hair separation.
Peach Fuzz
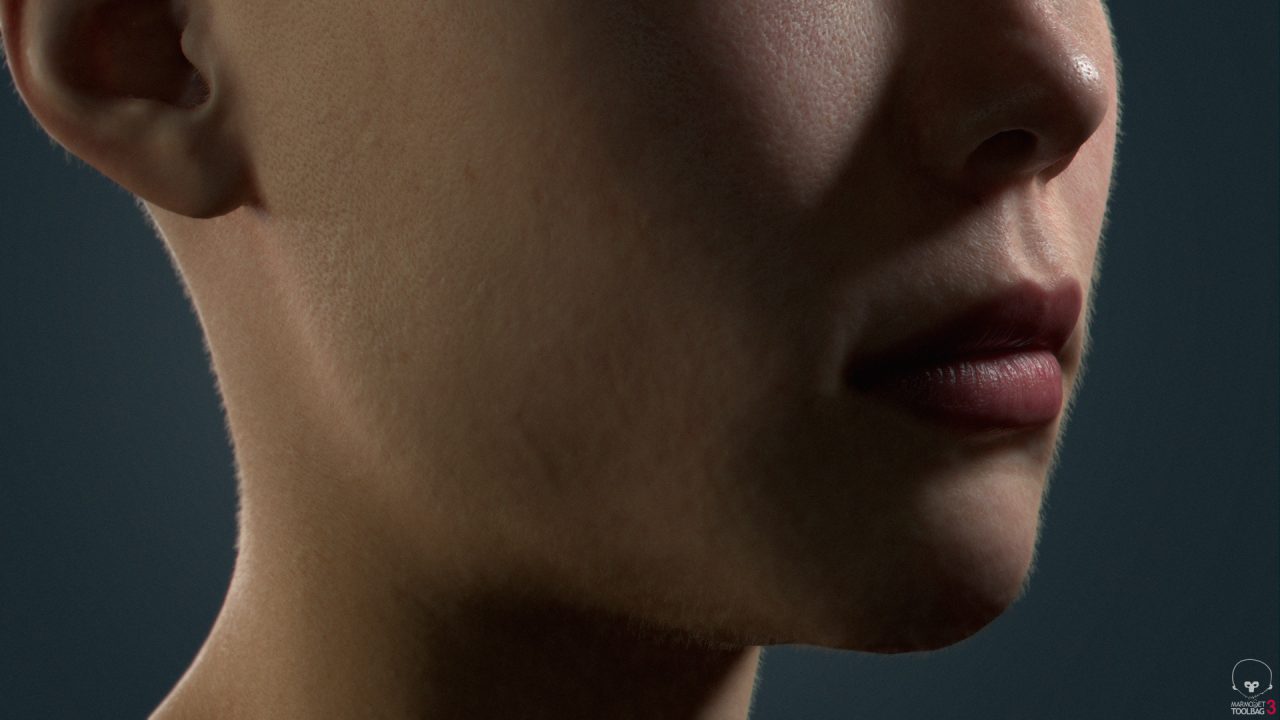
Peach fuzz is known as Vellus hair, which are short, thin, translucent hairs that cover a person’s body. They’re very subtle, however they can be prominent on some faces. I used Zbrush’s FiberMesh to create my peach fuzz. There’s no secret technique to fake it, it’s simply a lot of geometry. The key is to nail the density and length. You can download my Fibermesh preset and skin material here. The Fibermesh preset should work right out of the box, with possible adjustments to length according to your needs. I’ve discovered that tubes work better than planes. Although, I plan to run more tests using planes to make them look just as good due to the high poly count of tubes.

In steps 1 and 2, I mask out areas in Zbrush where I don’t want peach fuzz, then use the FiberMesh preset. Once you’re happy with the preview, click Accept to commit the changes. Steps 3 and 4 display the direction control of the peach fuzz. You should constantly check the silhouette to make sure the length remains uniform. Use the Smooth brush here to cut length. Once you’re happy with the result, export the mesh.
![]()
The important trick here is to transfer the normals of the face mesh to the peach fuzz. This will smooth out and ground the fuzz. In Maya, select the face geometry, select the peach fuzz, and then click Mesh -> Transfer Attributes.
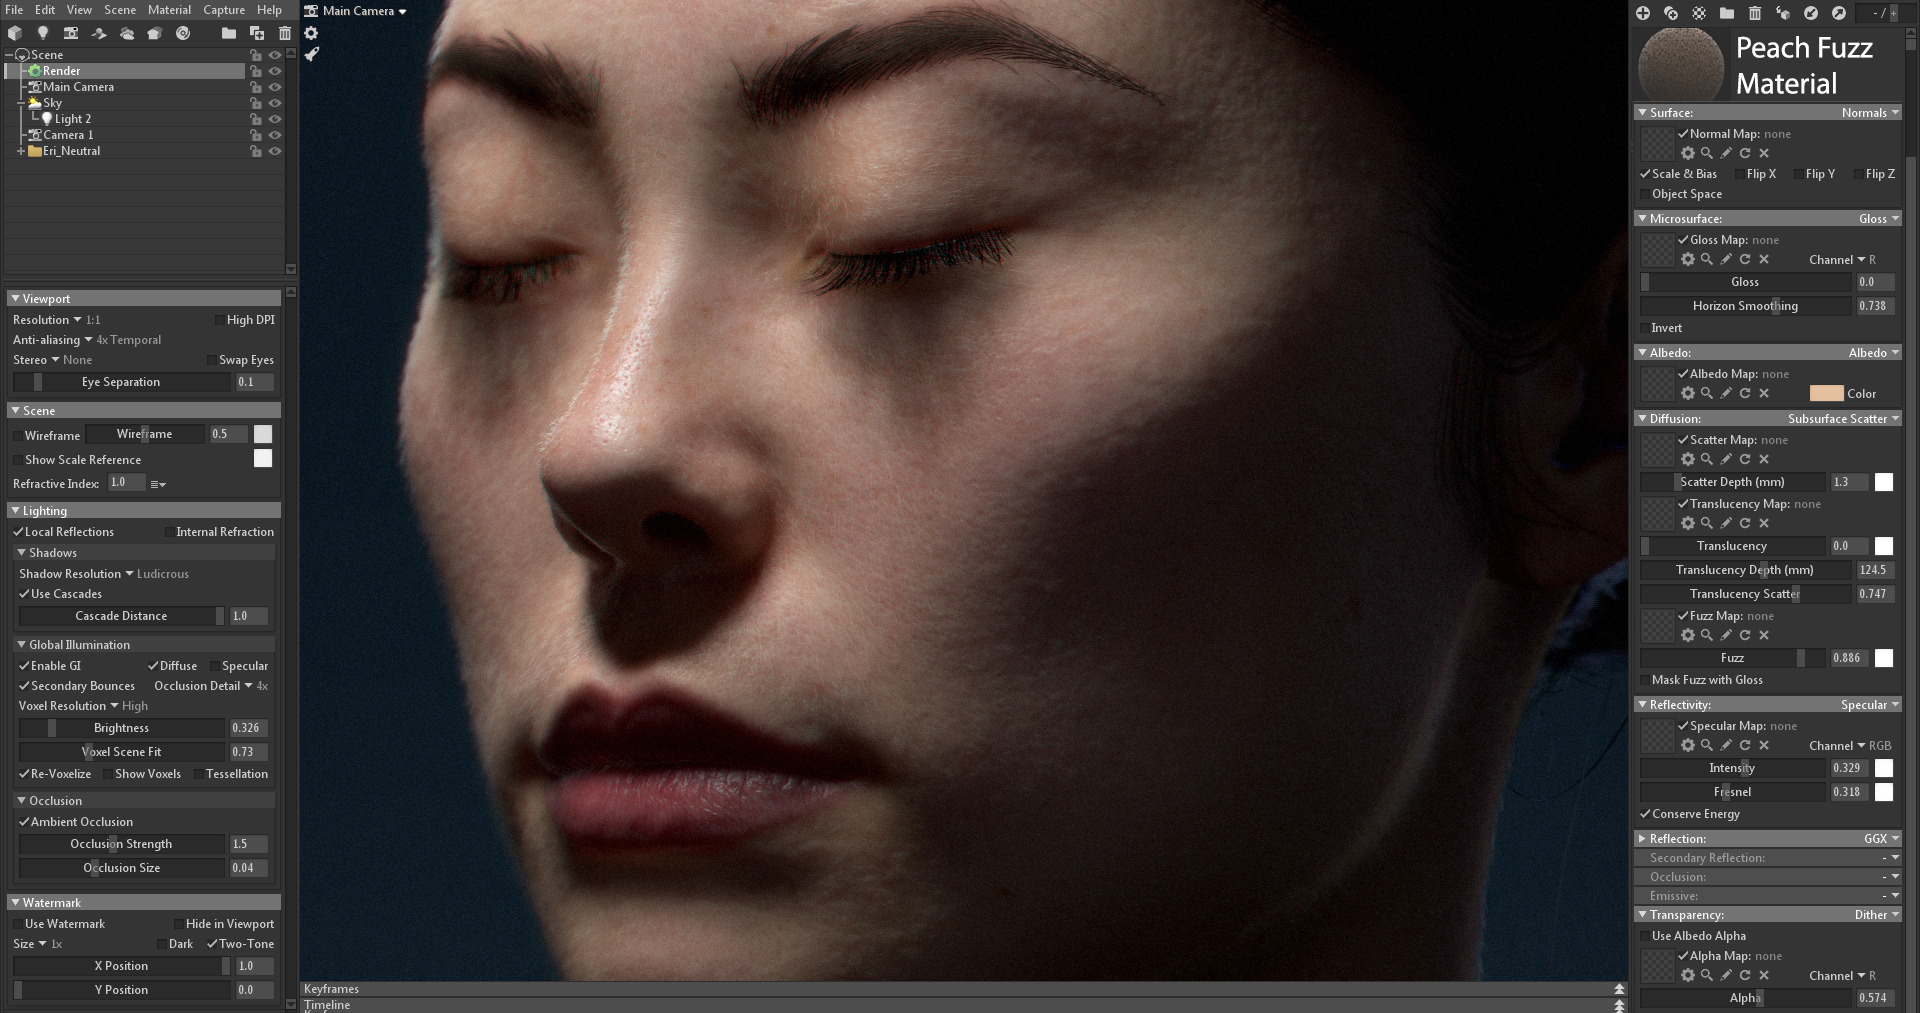
The material setup in Toolbag is very basic. Simply tint the Albedo color to a light yellow and set the Transparency slider to a halfway point.
Note: Peach fuzz is a lot of geometry, so expect some drops in performance. The Speedy Viewport option really helps in this instance.
Eyes
The way I create eyes is a slightly improved version of Peter Zoppi’s method. You can also get familiar with the method by reading Saurabh Jethani’s tutorial. If you think Peter Zoppi’s method is difficult – don’t worry! I’ve provided a template that you can use freely, improve upon, and experiment with!
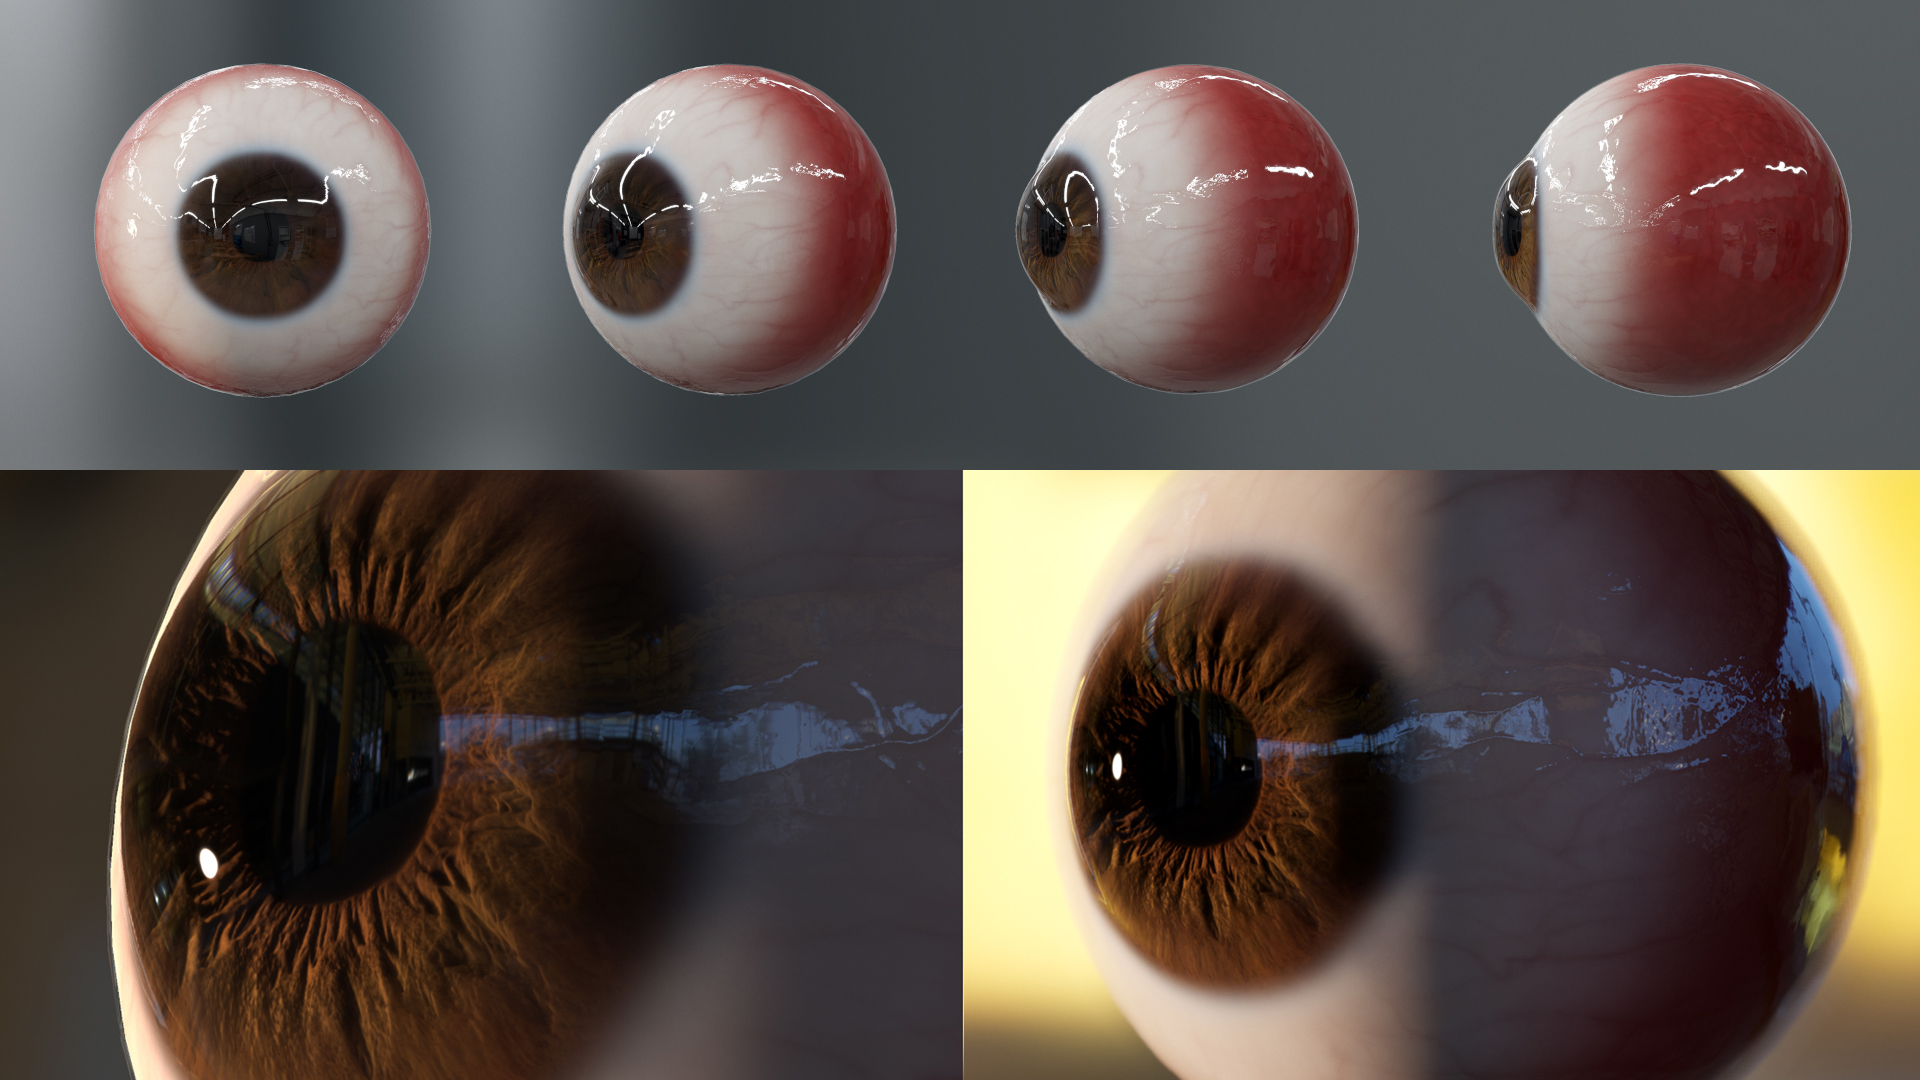
Zoppi’s method is the best approach to faking refraction. In Zoppi’s method you use photos and convert them to Normal Map. My method allows you to sculpt your own iris and have greater control over the transition between the cornea and iris. This creates a softer and more natural look. The tradeoff is that it requires an extra step.
Eye Geometry
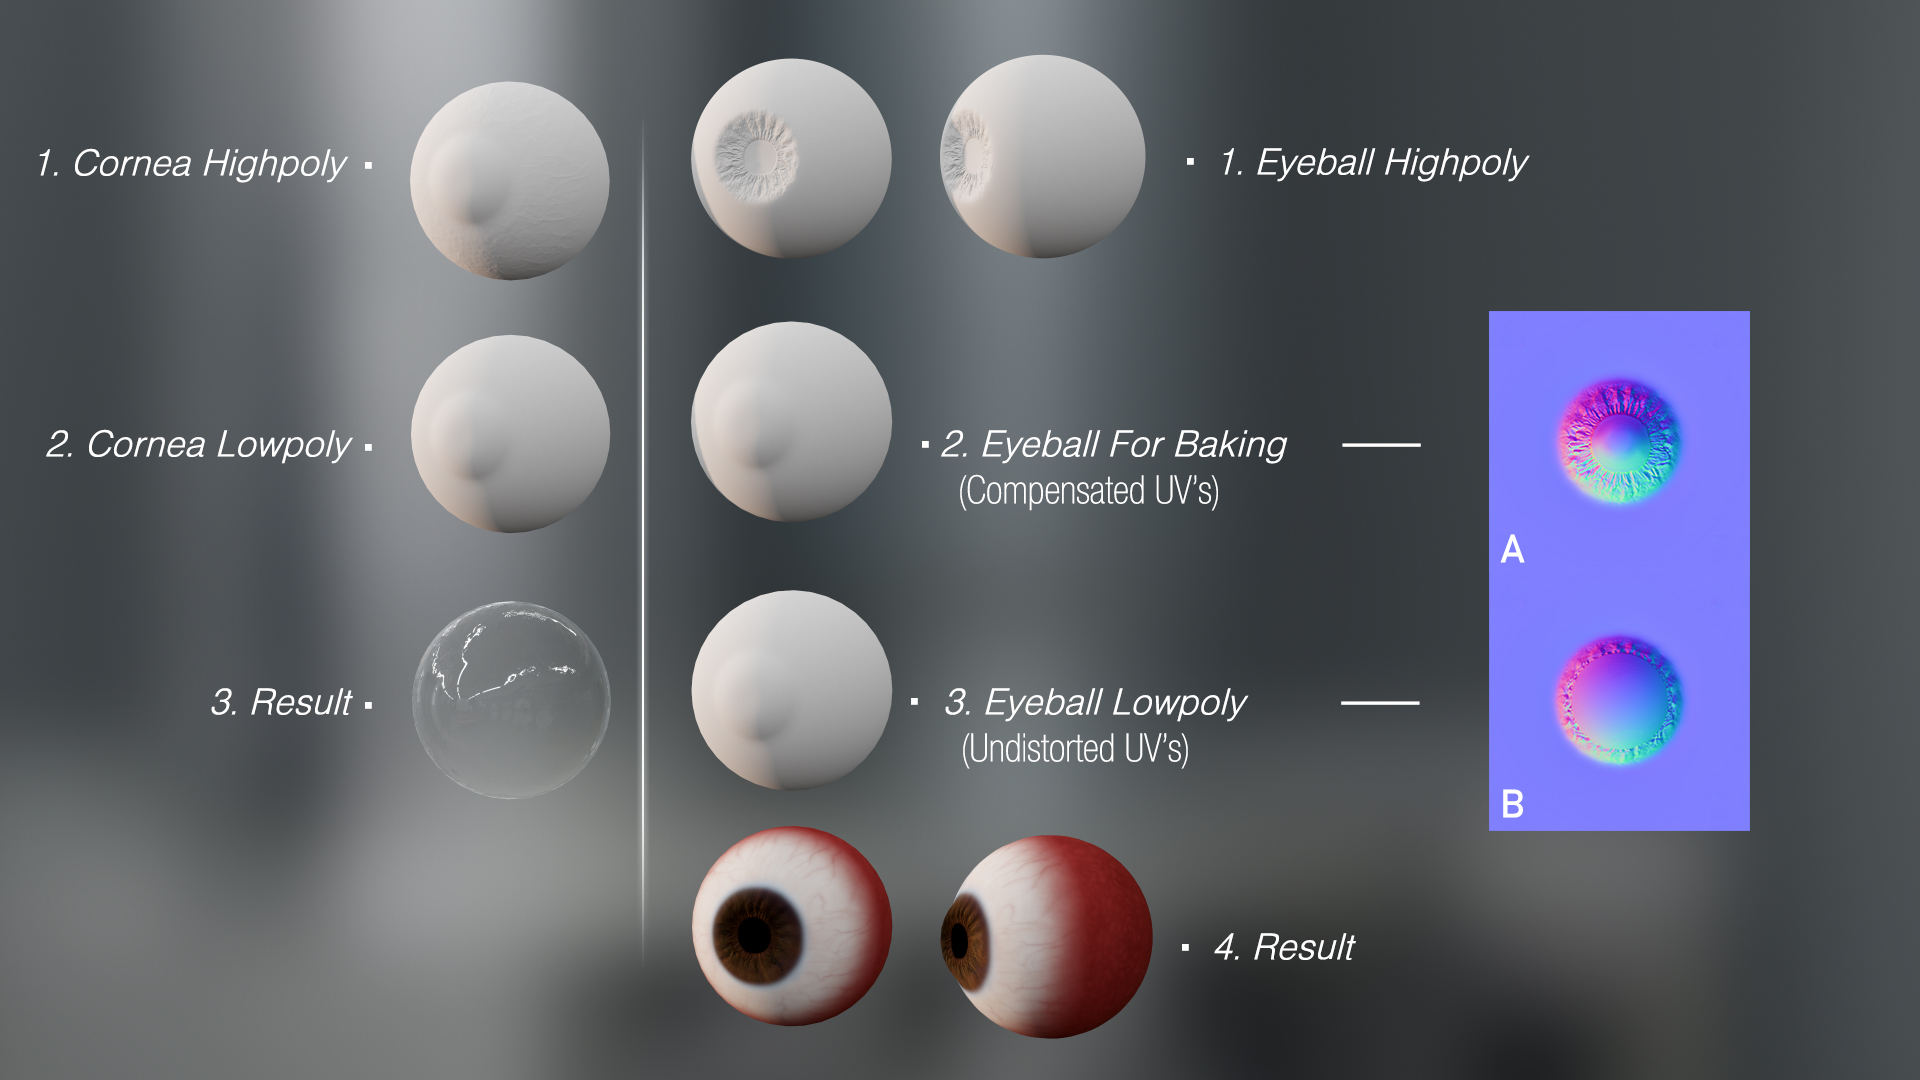
Let’s take a look the meshes that make up the eye.
Left:
- Cornea Highpoly: includes veins and surface breakup for baking.
- Cornea Lowpoly: for final use in-engine.
- Result.
Right:
- Eyeball highpoly: this is a concave mesh that will be baked down on the convex eyeball lowpoly with compensated UVs (Eyeball for baking).
- Eyeball for baking: this mesh will be used only for baking.
- Eyeball Lowpoly: this mesh is for your final in-engine character.
- Result once textures are applied.
-
-
- This is the Normal Map result when baking with the “Eyeball For Baking” mesh.
- This is the Normal Map result when baking the “Eyeball Lowpoly”.
-
The eye workflow requires baking concave geometry (Eyeball Highpoly) onto convex geometry (Eyeball Lowpoly). As a result, you’ll get a distorted Normal map (B). Compensation is needed for this distortion, so you’ll need to use the Eyeball for Baking mesh to distort the UVs in the opposite direction and get the required result (A). The Eyeball For Baking mesh is used only for baking to generate a non-deformed normal map (A) that later will be applied to the undistorted Eyeball Lowpoly in-engine.
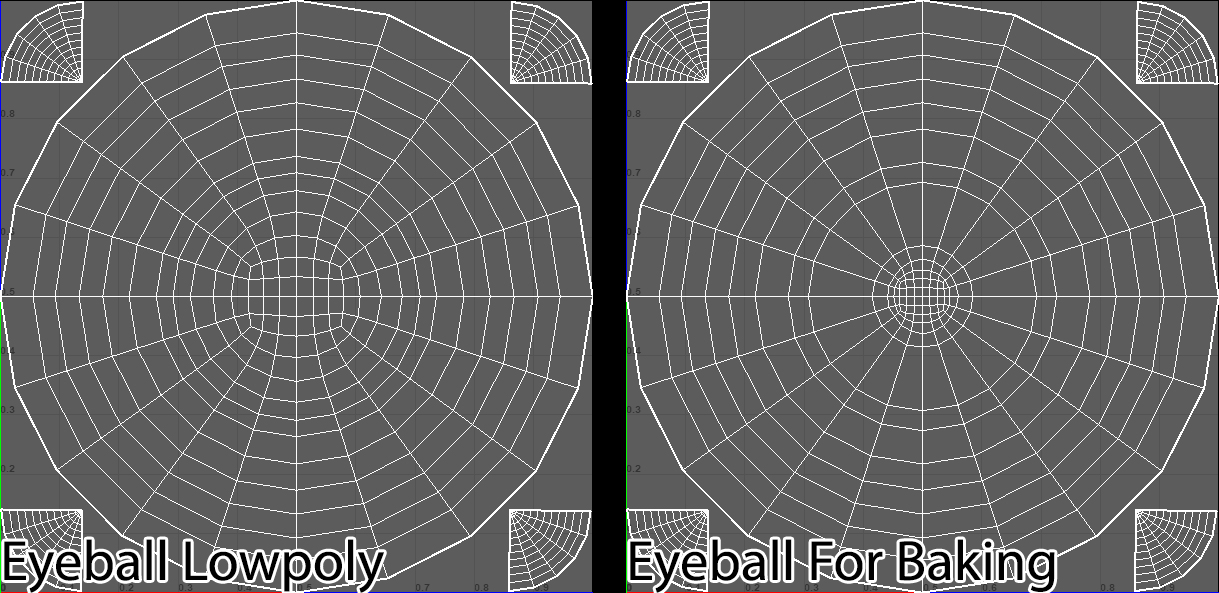
An analogy would be to imagine an image taken with a fisheye lens. Your goal is to remove the distortion generated by fisheye lens. If you use the proper, undistorted UVs for baking (Eyeball Lowpoly), the normal map, or any map baked will have a fisheye distortion. This is because you’re baking concave iris geometry onto a convex surface. To fix this – we need a mesh that has compensated UVs (Eyeball For Baking), meaning that the UV’s are distorted to compensate for the fisheye distortion.
Iris/Eye Textures
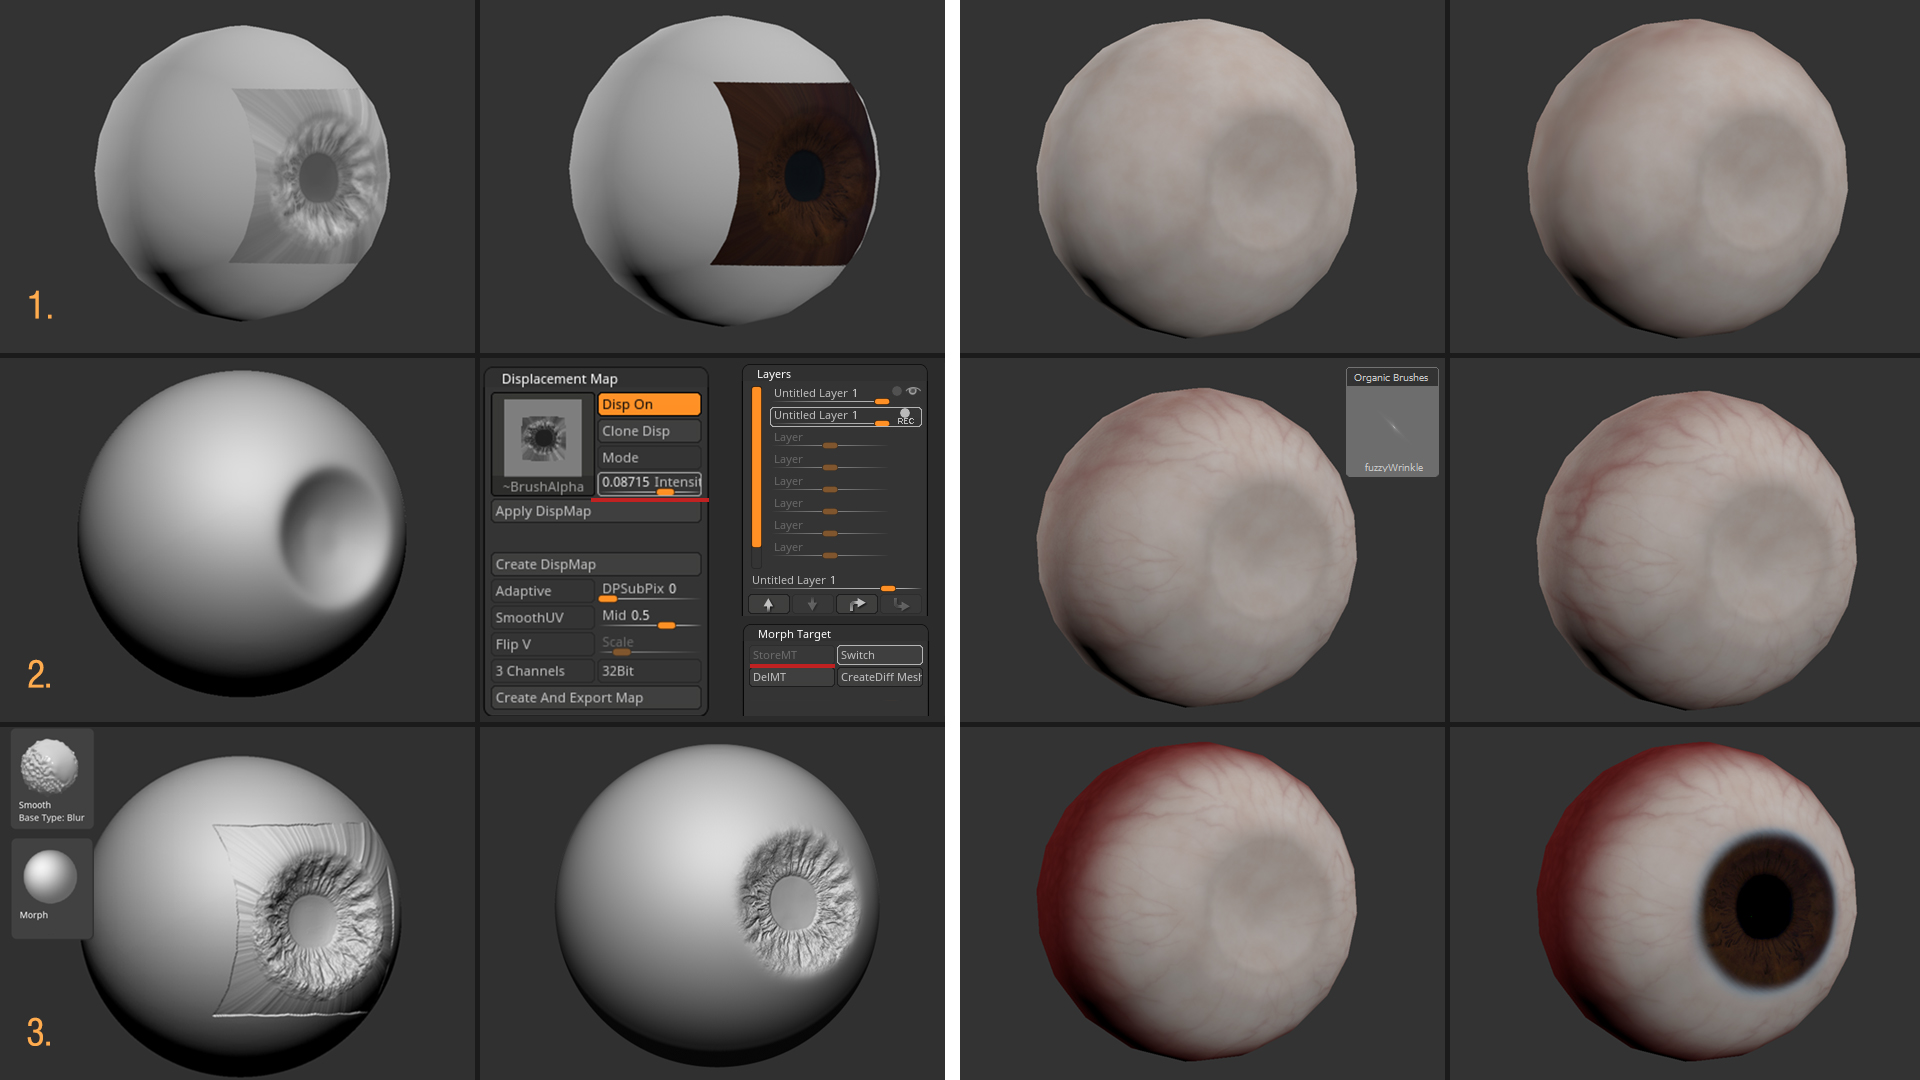
- I start by using using iris scans from TexturingXYZ. The benefits of using TexturingXYZ is that the displacement data matches the diffuse data. I then project the textures in Mari on the highpoly eyeball.
- Once I create my maps, I export them. I tweak the Displacement Intensity in Zbrush and click Apply once I’m happy.
- At this point, the transitions must be smoothed out. I work in layers and use morph targets to do so.
The cornea is painted in Mari using a mix of procedurals and handpainting. I use the “fuzzyWrinkle” brush to paint the veins, which can be found under the Organic Brushes tab. I normally do a combination of vein layers with different opacity and blur levels. For the Cornea highpoly, I simply use some noise brushes and import a hand painted vein mask to inflate detail. This way, the veins in the Diffuse will match the veins in the Normal Map.
The iris is added at the end. One of the things I like to do is to add a subtle blue tint on the outer edge of the iris. It’s not important, but it’s an observation I’ve made when looking at close-up images of irises.
It’s important to note that if you were to desaturate the skin and cornea textures, the value of the cornea should not be lighter than the skin. Otherwise, the eyes will glow and appear too white.
Eye Material
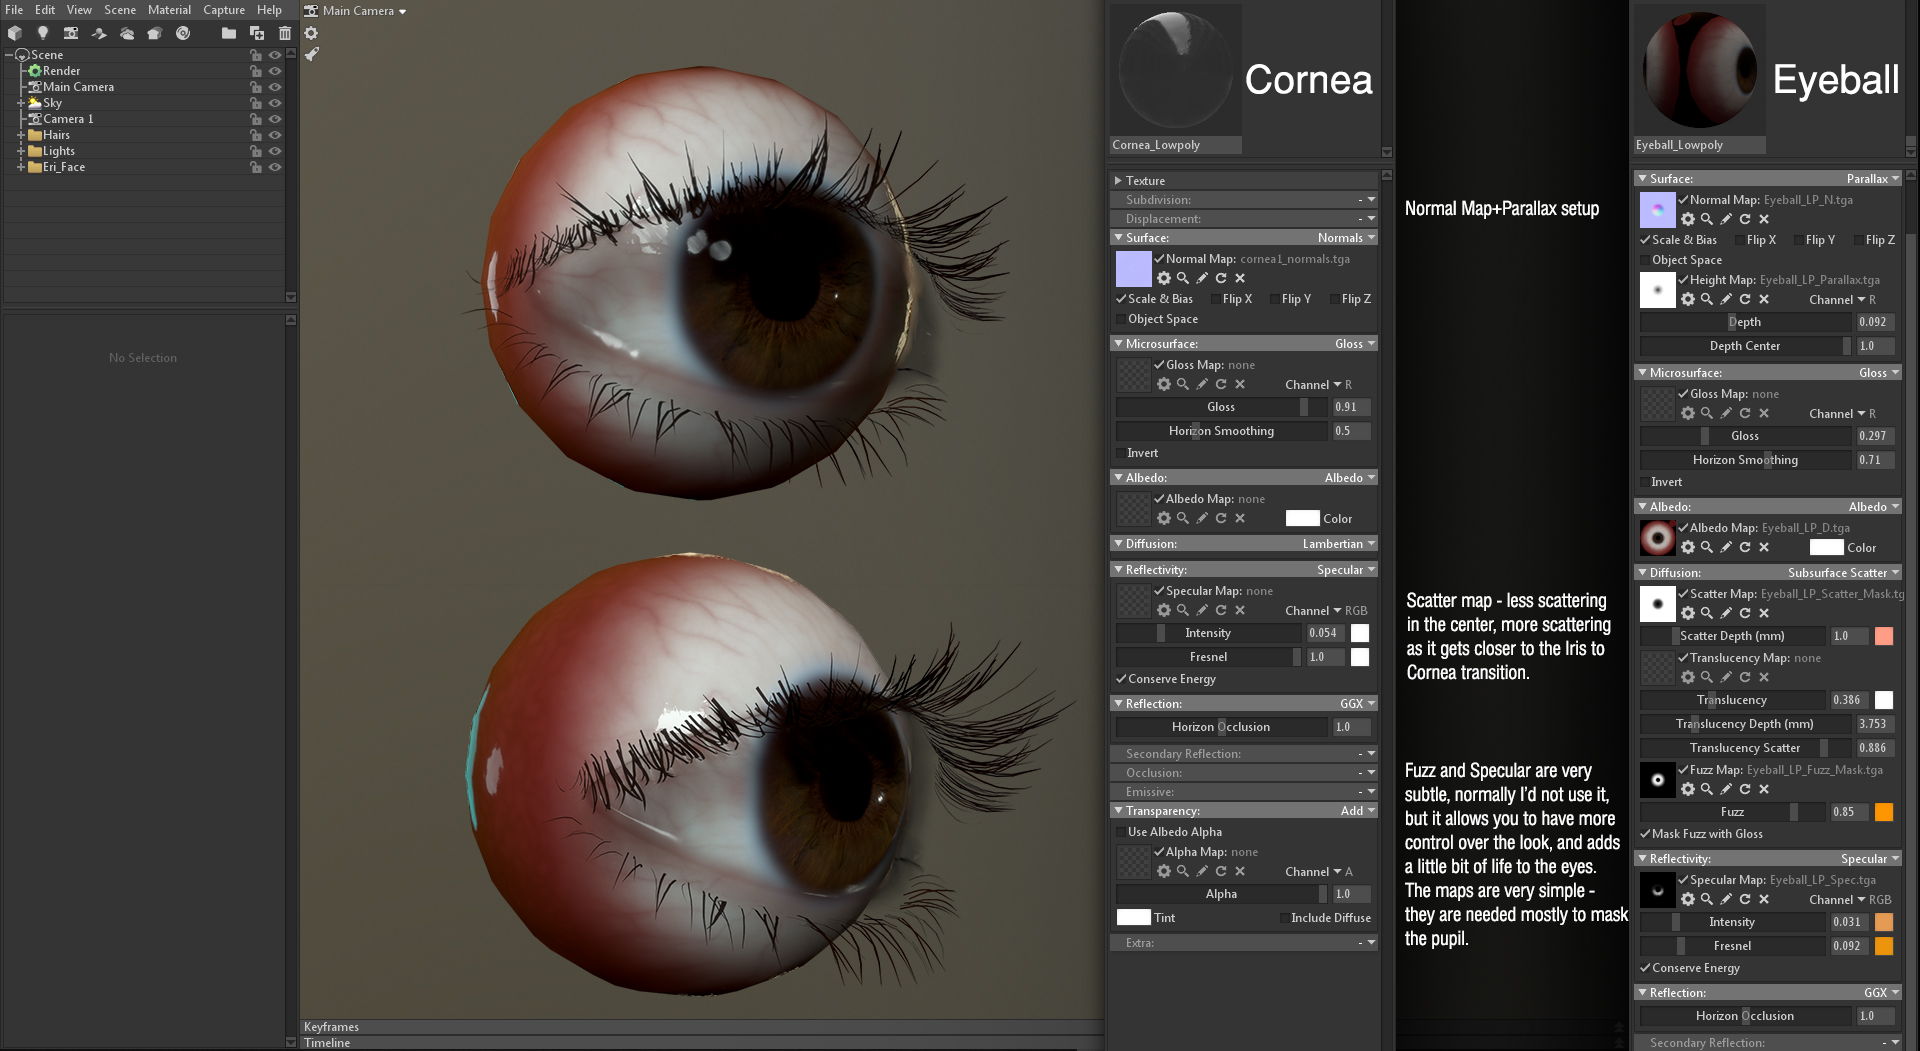
The setup for the eye material is straightforward. You’ll need nicely painted textures, a Normal map, and a parallax setup that works well. Anything extra is personal preference.
Transitional Meshes
![]()
Transitional meshes are meshes that blend two separate objects. For example, eyeballs to lids, and teeth to gums. I’ve made a tutorial about transitional meshes where I outline two methods. For this article, I’ll outline the best and easiest method. The most recent version of Toolbag supports Dithering with Refraction. This can be found in Refraction under the Transparency module. The transitional mesh will blur anything behind it and a slight blur is what we need.
![]()
- Aside from the blur and occlusion between the eyes and eyelids, there’s a thin strip of tear fluid called the upper and lower tear menisci. These fluids create subtle highlights that help sell the realism of the eyes.
- I create a transitional mesh between the eye and eyelids in Maya. Make sure the mesh is just floating in between the eyes and eyelids with no overlapping.
- This is my opacity map which I painted in Substance Painter. You don’t want your transitional mesh to have any visible sharp edges, so mask this out.
- I create a highpoly mesh that simulates the tear fluid. You can insert a tube shape and it should be good enough. In my case, I like to combine all the geometry and dynamesh it in Zbrush. The key here is to bake a convex surface on a concave transitional mesh to emulate the highlight that appears on the tear fluid.
- Once the Normal map is baked, we can see the desired highlight.
Transitional Material
![]()
For the material setup, you’ll need a Normal map for the tear fluid highlight and an Opacity mask. Refraction Blur is responsible for all the magic. Plug your Opacity mask under Cutout and check Use Dither. You’ll now see that anything placed behind the transitional mesh is blurred. The Gloss slider will control the amount of blurriness.
Presentation

My lighting setup consists of an Omni light placed above and a Sky Light. I tried out a few different lighting setups, but ultimately decided to use the simpler one for the presentation. It demonstrates that Toolbag can produce good results using one light with almost no tweaking to its default settings.
Thank you for reading, I hope it was helpful! A special thanks to the Marmoset team for helping me write and edit this breakdown article.
We would like to thank Vadim Sorici for writing this breakdown. You can find more of Vadim’s work on Artstation. Find out how Toolbag can bring your character art presentation to the next level with the 30-day free trial, and visit our Tutorials section for more breakdowns.