
Artist Introduction & Project Ideation
Hey everyone! My name is Sherif Dawoud, and I’m a senior environment artist in the games industry. I’ve been using Marmoset Toolbag to render my material work for years. In this article, I’ll share how I use Toolbag in my workflow and rendering setup for the environment dioramas I recently made.
When I started working on these projects, I only planned to do a few material studies. I started with this cliff material I made in Substance 3D Designer, but I struggled to develop an interesting way to present and render the cliffs. I thought it didn’t look very interesting when it’s only applied to a plane or a sphere. It felt like it didn’t look great in isolation, so while collecting more references and trying to come up with ways to present it uniquely and interestingly, I thought instead of making a single material, I could try making 2-3 similar materials and making a small diorama that looks like a small slice of a larger environment.

Using spheres or planes to render materials isn’t a bad approach, but for certain materials, it can be tricky to read. In some cases, it’s hard to determine the surface’s scale or direction.
These kinds of studies are a great way to experiment with different visual themes quickly and can be done faster than creating full environments, making them an efficient way to test ideas. Plus, I can always reuse my Substance graphs to create similar materials that don’t rely heavily on displacement, which is perfect for game engines. I’m currently applying this approach to a larger project in Unreal Engine 5, where I could tweak and reuse the materials with minimal adjustments.

Exporting from Adobe Substance 3D Designer
When working on materials, I aim to set them up in Toolbag as early as possible. I like to keep Toolbag open on my second screen; this allows me to quickly re-export textures from Designer and see how the changes influence my renders. It’s beneficial to assess how the larger shapes appear in the render in relation to the other materials before I begin adding details.
Here is a cliff I created for another project using the same process.
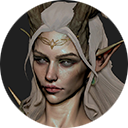
My material setup is very simple. For this project, I exported .PNG images of my basecolor, normal, height, roughness, AO and cavity maps, and SSS masks for the mossy parts of the materials and the foliage textures. This is what the material setup for the cliff looks like.
Setting Up Scenes in Toolbag
Since I was only planning to use simple geometry and materials in this scene, it was very important to get the displacement maps to look right and have enough depth. I kept this in mind while creating the material, relying on trial and error and comparing my scene to reference images.
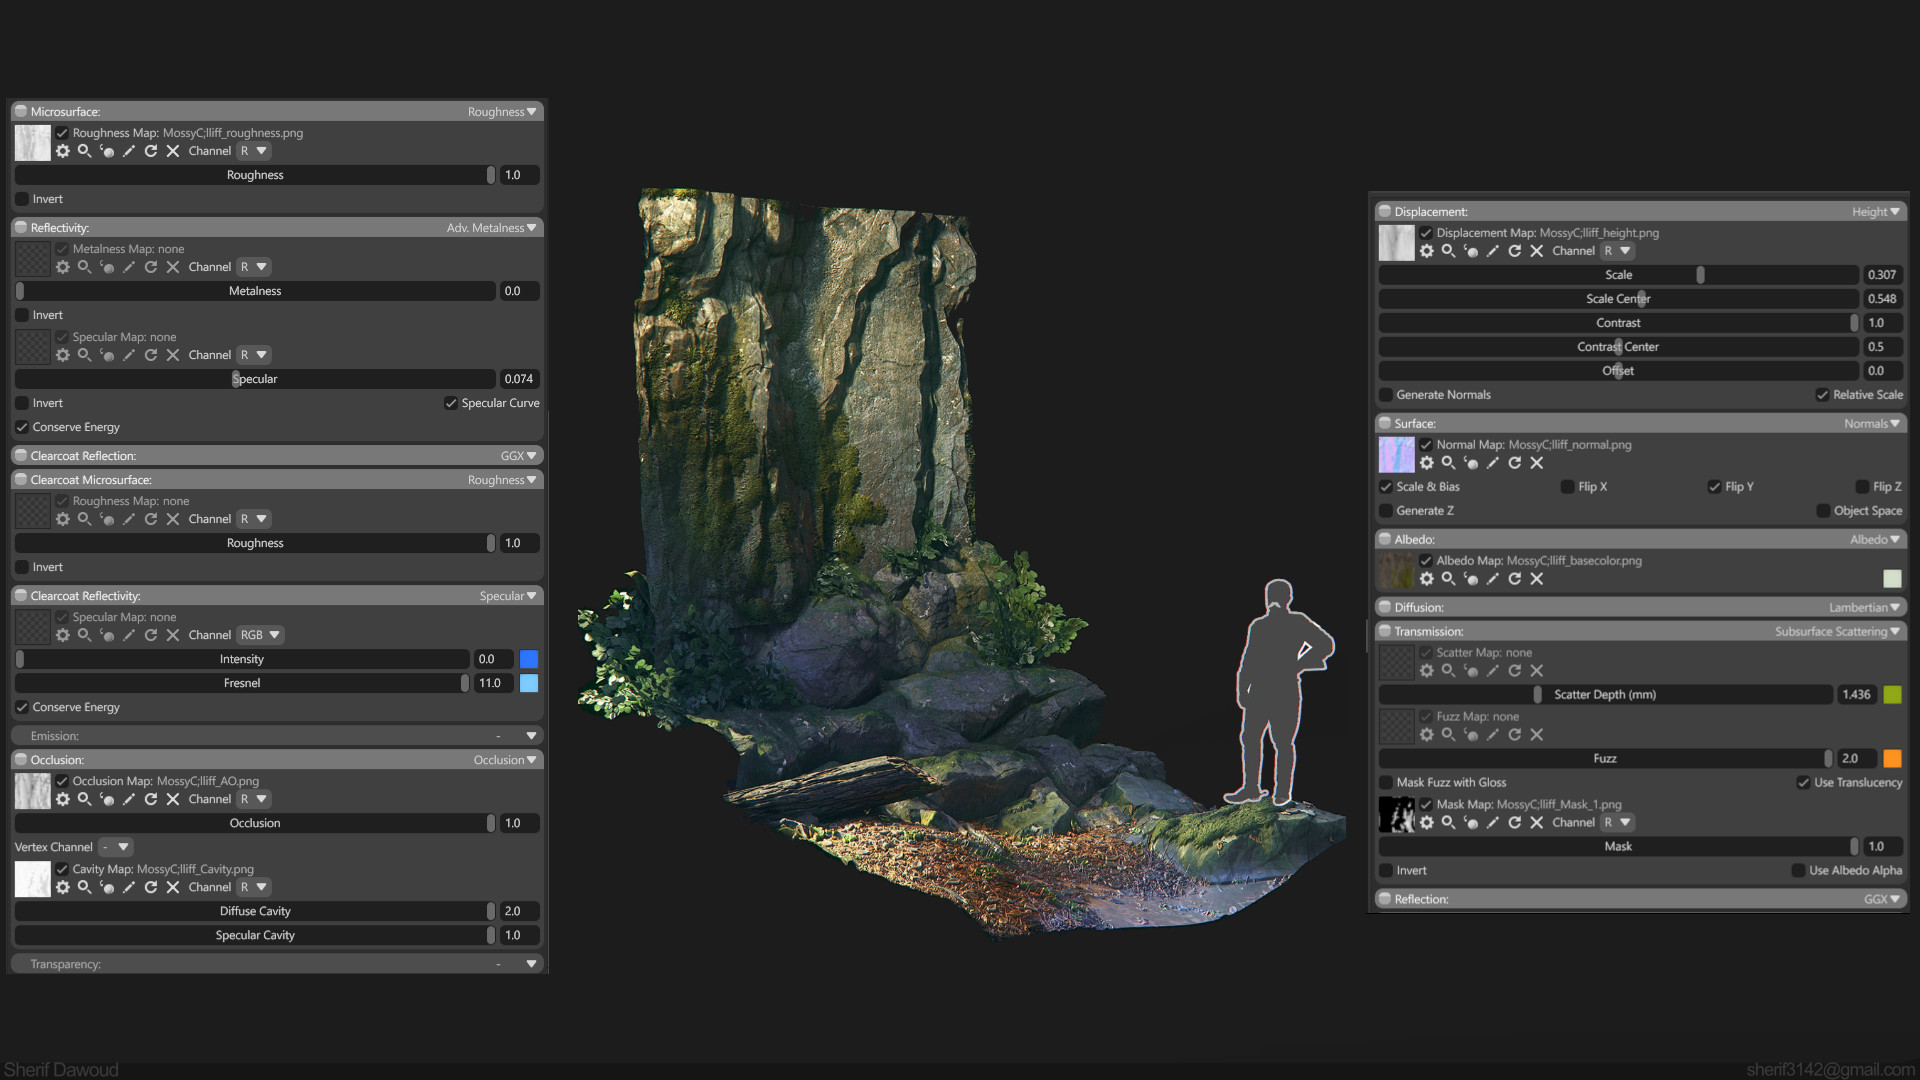
Enabling the Scale Reference option in the Viewport Settings helps me keep the scale of the environment as accurate as possible. This approach is very different from making materials intended for use in a game engine, but it was a fun experiment.
Another challenge I had to consider was that different materials don’t tile seamlessly, which creates visible seams where the planes intersect. To hide them, I made sure the materials’ color and roughness values were closely matched in those areas. Adding subtle noise to the displacement maps and adjusting the lighting direction also helped by keeping the seams in the shaded areas of the scene. That said, if you zoom in close enough, you can still spot them.
The scene consists of a few simple elements: flat planes for the ground and cliff, plus a curved plane to blend between them. I also added some foliage assets and a tree log to break up the diorama’s silhouette.
Like the other materials in this project, the foliage assets were created in Designer. I used a foliage generation tool I built in Substance a while back, making it easy to quickly generate the textures.
I made a few variations of the cliff material with different amounts of moss coverage. The variations are made by adjusting some of the nodes in the Substance Designer graph that control the moss placement.

Lighting and Composition
I like to approach lighting only using a single Directional light, and I rotate it around and do a few test renders to find which light angles look good and complement the shapes I’m working with. When I decide where I want the primary light sources and shadows to be, I start placing my main lights in the scene.
After some experimenting, I ended up using two Spot lights as the main light source, one for the top of the cliff and another for the ground. I also used a Sky light to reduce the contrast slightly and a few smaller spotlights to make certain areas a bit brighter.
I also set up multiple lighting scenarios for this project, presenting the environment at various times of day.

Final Touches and Rendering
After I was happy with how the lighting looked, I wanted to clean up the edges of the diorama a bit. So, I used brush stroke-shaped textures that are the same color as the background to refine the outline of the planes and hide some of the sharper edges.

You can make something similar in any painting software and use the textures as an alpha mask in Toolbag. I made a square texture with four brush strokes and used this texture as an alpha mask for an unlit material, scaled the UVs by 0.5, and added an offset to select one shape per material. I applied these materials to a few planes around the scene and made sure the color of these planes matched the background.

That’s a Wrap!
Thanks for making it to the end of this article; I hope it was helpful. And thanks to the Marmoset team for allowing me to share my workflow with you.
We would like to thank Sherif Dawoud for writing this breakdown. You can find more of Sherif’s work on Artstation. Create standout dioramas in Toolbag using the 30-day trial.
If you’re interested in collaborating on a tutorial or breakdown article, please send us your pitch, along with a link to your artwork, to submissions@marmoset.co.


