


A Brief Introduction
Hi, my name is Steph Everett, Senior Artist at League of Geeks in Melbourne, Australia. I’ve always loved using Toolbag for my baking workflow, and now that we can use it for texturing, I jumped at the chance to add it to my pipeline. This tutorial covers baking, texturing, and rendering a game-ready mesh in Toolbag 4 using a simple rock model I created entirely in ZBrush. Make sure to download the sample mesh files using the link below, and follow along with the tutorial!
Setting Up Baking
Let’s start by importing the rock models that we want to bake. Import meshes via the File Menu, or pressing the keyboard shortcut Ctrl+O. Once your meshes are successfully imported we’ll set up a Bake Project in Toolbag.
Note: As we progress through this tutorial, numbered steps (i.e. 1., 2., 3., etc.) will be highlighted in the corresponding application screenshot that follows.
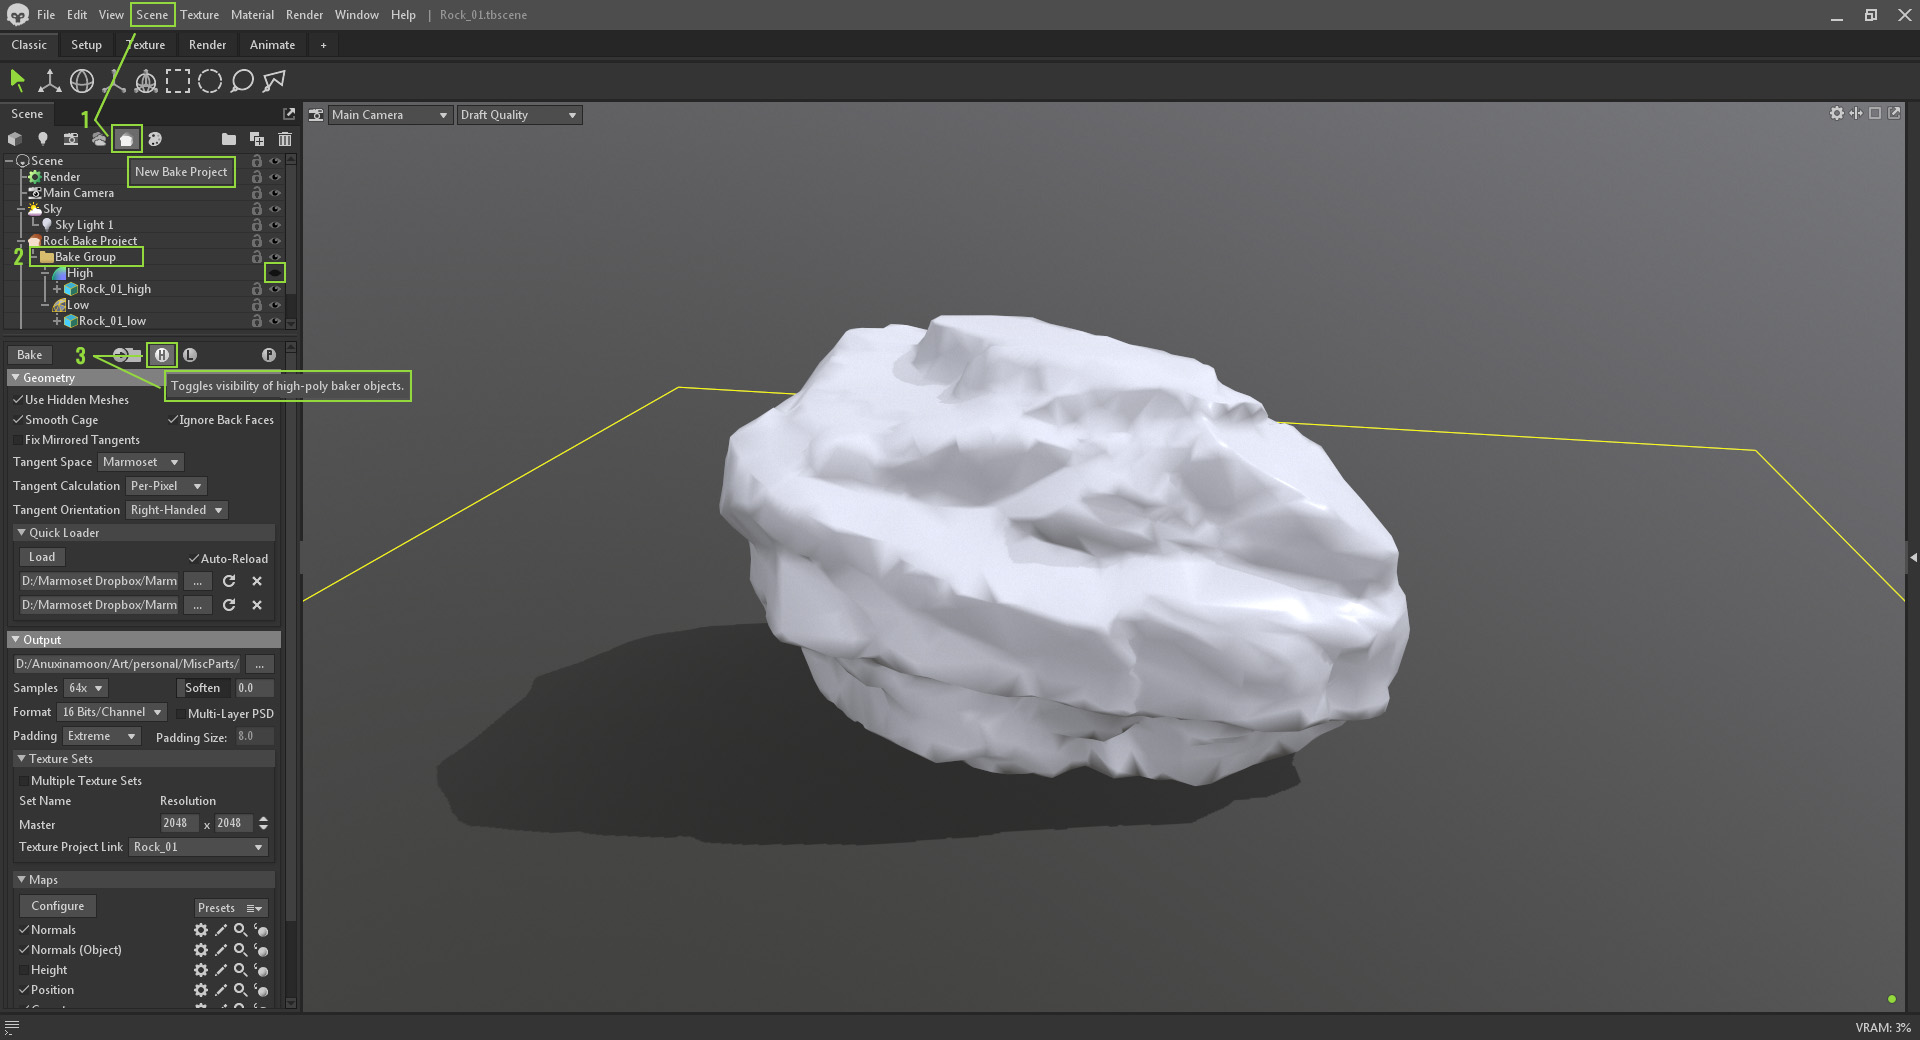
Create a New Bake Project
- Create a new Bake Project from the Scene section of the menu bar, or by clicking the bread icon in the Scene window’s toolbar.
- A Bake Group will appear once a new bake project is created, ready to receive imported meshes. You can drag and drop your imported meshes into their respective groups. Bake Groups are great as they isolate mesh pairs from each other. So if you had a watch on a character’s wrist in separate bake groups, the watch won’t ray cast onto the wrist and vice versa. You can rename the project or the group for ease of use.
- Note: The High bake group preview is off by default. If you want to view the high-poly model, click the eye icon next to the High bake group in your Scene heirachy, or press the H button on the Bake Project Settings.
- Alternatively, there is a Quick Loader option that you can use to optimize the process. The main rule for quick loading to work correctly is that meshes MUST have a _low and _high suffix attached to the names. Rename each .fbx file accordingly. The naming is incorrect if no models or bake groups appear in your bake project.
Here are my high and low meshes loaded in using the Quick Loader, where you can see each mesh pairing into its own group.
Note: I wanted to turn this rock upside down, so I used the Transform settings in the Rock_01_high and Rock_01_low objects to rotate them 180º on the Z-axis.

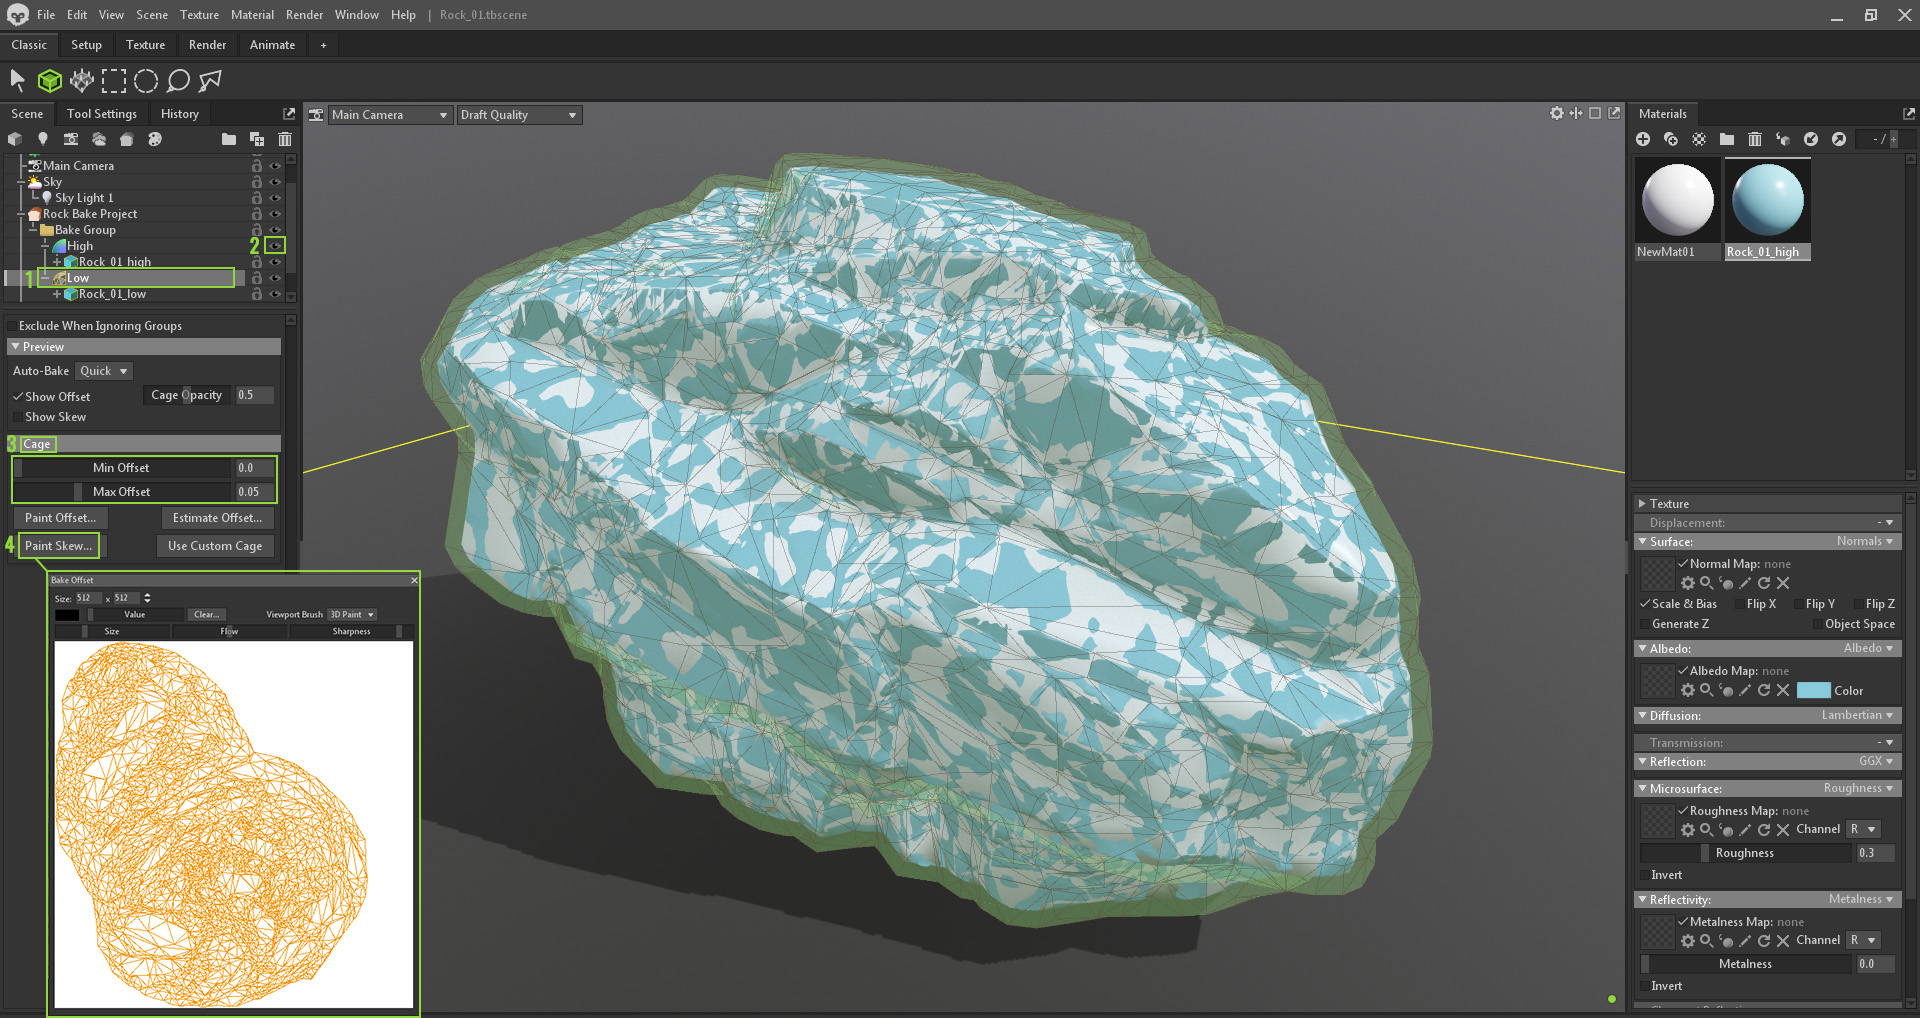
Adjust the Cage
- Clicking on the Low bake group in the hierarchy will bring up the Cage settings. Cages tell the rays the maximum distance to fire to. This helps control the rays on concave faces from projecting onto themselves or other faces.
- To see your cage, make the high-poly visible (blue material applied for visibility), then apply a colored material to the high poly. You can set the Cage Opacity slider to full to easily spot when the high-poly is clipping through. You want the cage to cover the entire high-poly to capture it completely. As shown below, errors will appear when the high-poly is not fully encapsulated.
- Using the Cage Min Offset and Max Offset controls, you can adjust to about 95% and then use Paint Offset to adjust the cage on a vertex level by painting white or black. Use a large brush to paint the map 50 value and adjust for both push and pull influence.
- Skew is the ability to adjust the ray direction. Try it out on bolts or things that don’t look 100% straight. Learn more about averaged normals and ray projection in this post from Joe Wilson.
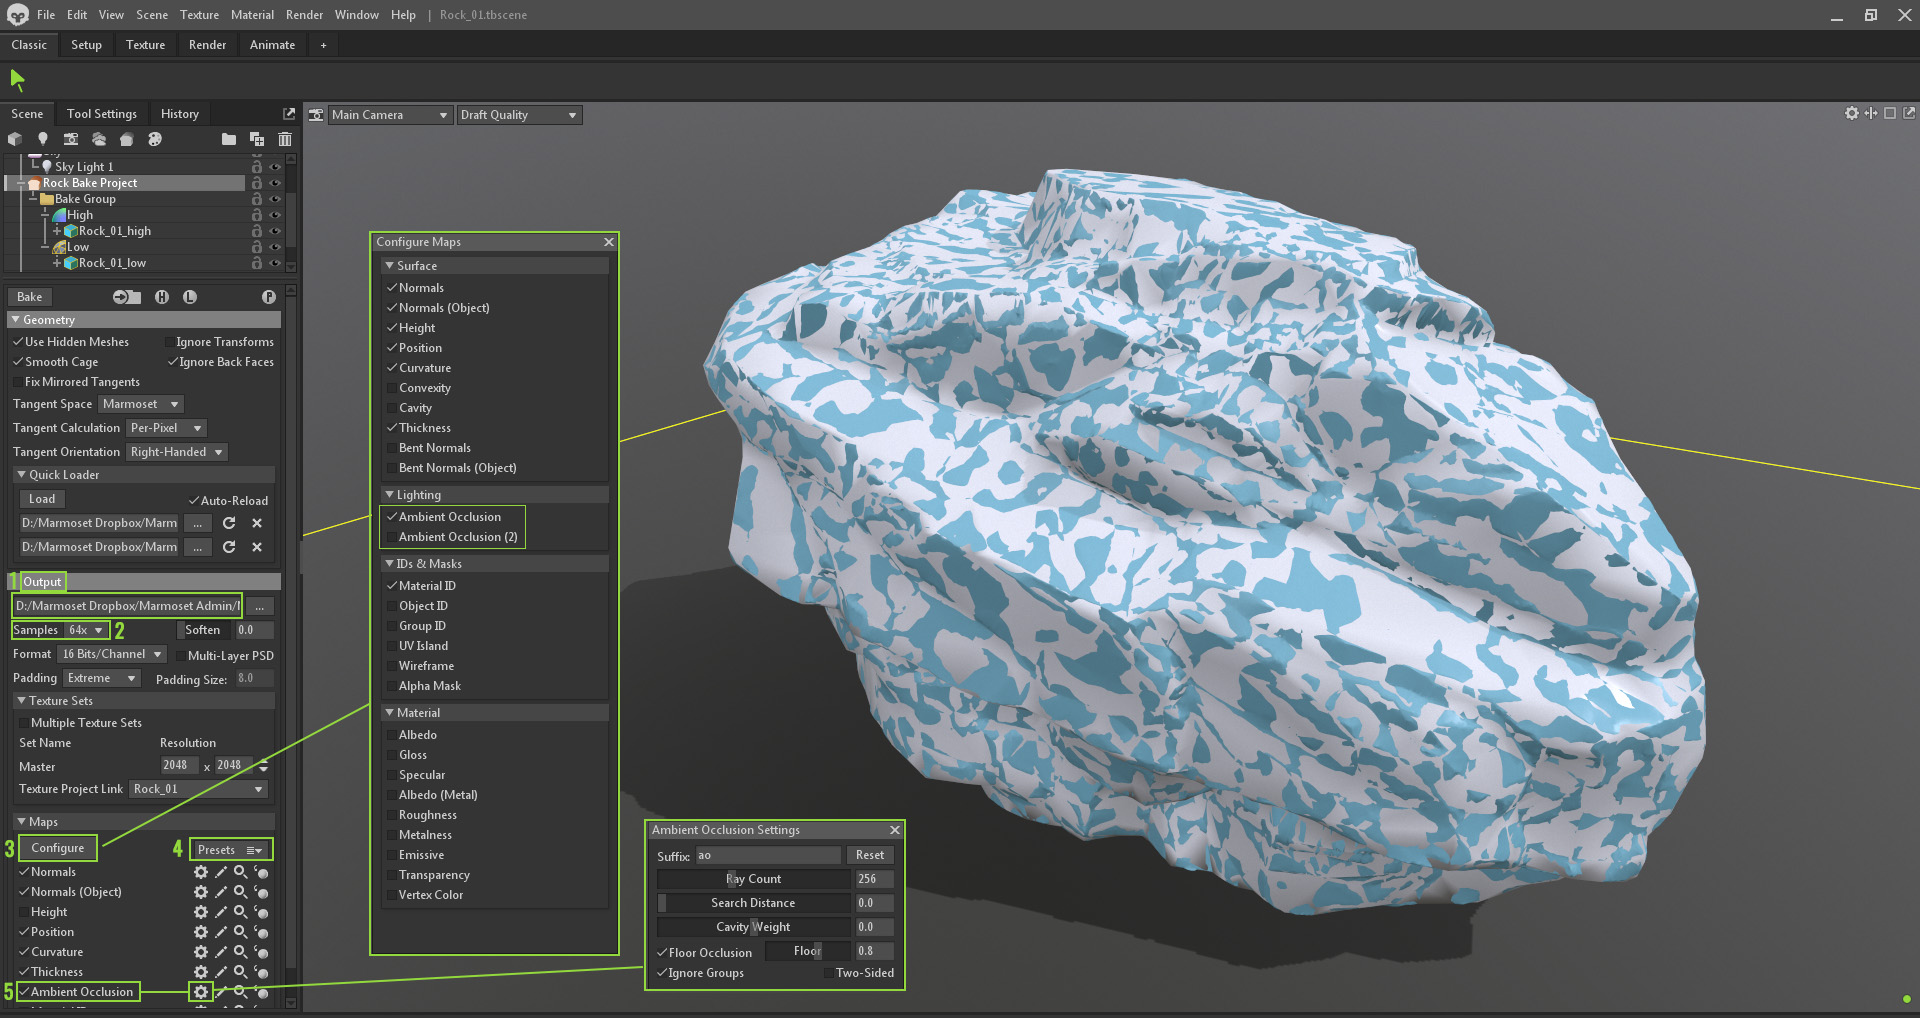
Configure Baked Maps
Click on your Bake Project root to access the bake project settings.
- Set your target folder to save your bake textures in the Output rollout.
- The Samples I have here are for my final bake. I set them to the max, which is 64x. I also bake in 16 bits/channel. You can use lower samples for quick bake tests.
- Clicking the Configure button will allow you to add or remove what maps you want to bake. Note that there are two Ambient Occlusion options, which I will explain after the image. A tick box allows flexibility in what maps to render on the fly. When testing, rendering only the normal map is the fastest way to check for bake errors.
- Hitting the Presets rollout gives the option to save your configured maps as a preset to load every time as default.
- The Ambient Occlusion settings allow you to capture Floor Occlusion, change the Cavity Weight, and switch Ignore Groups on/off. Turning this on gets the Bake Groups to influence each other for the ambient occlusion pass. Test it to see if this is a good fit for your project. I usually have Ignore Groups off for regular AO, but I use AO2 to render groups just in case.
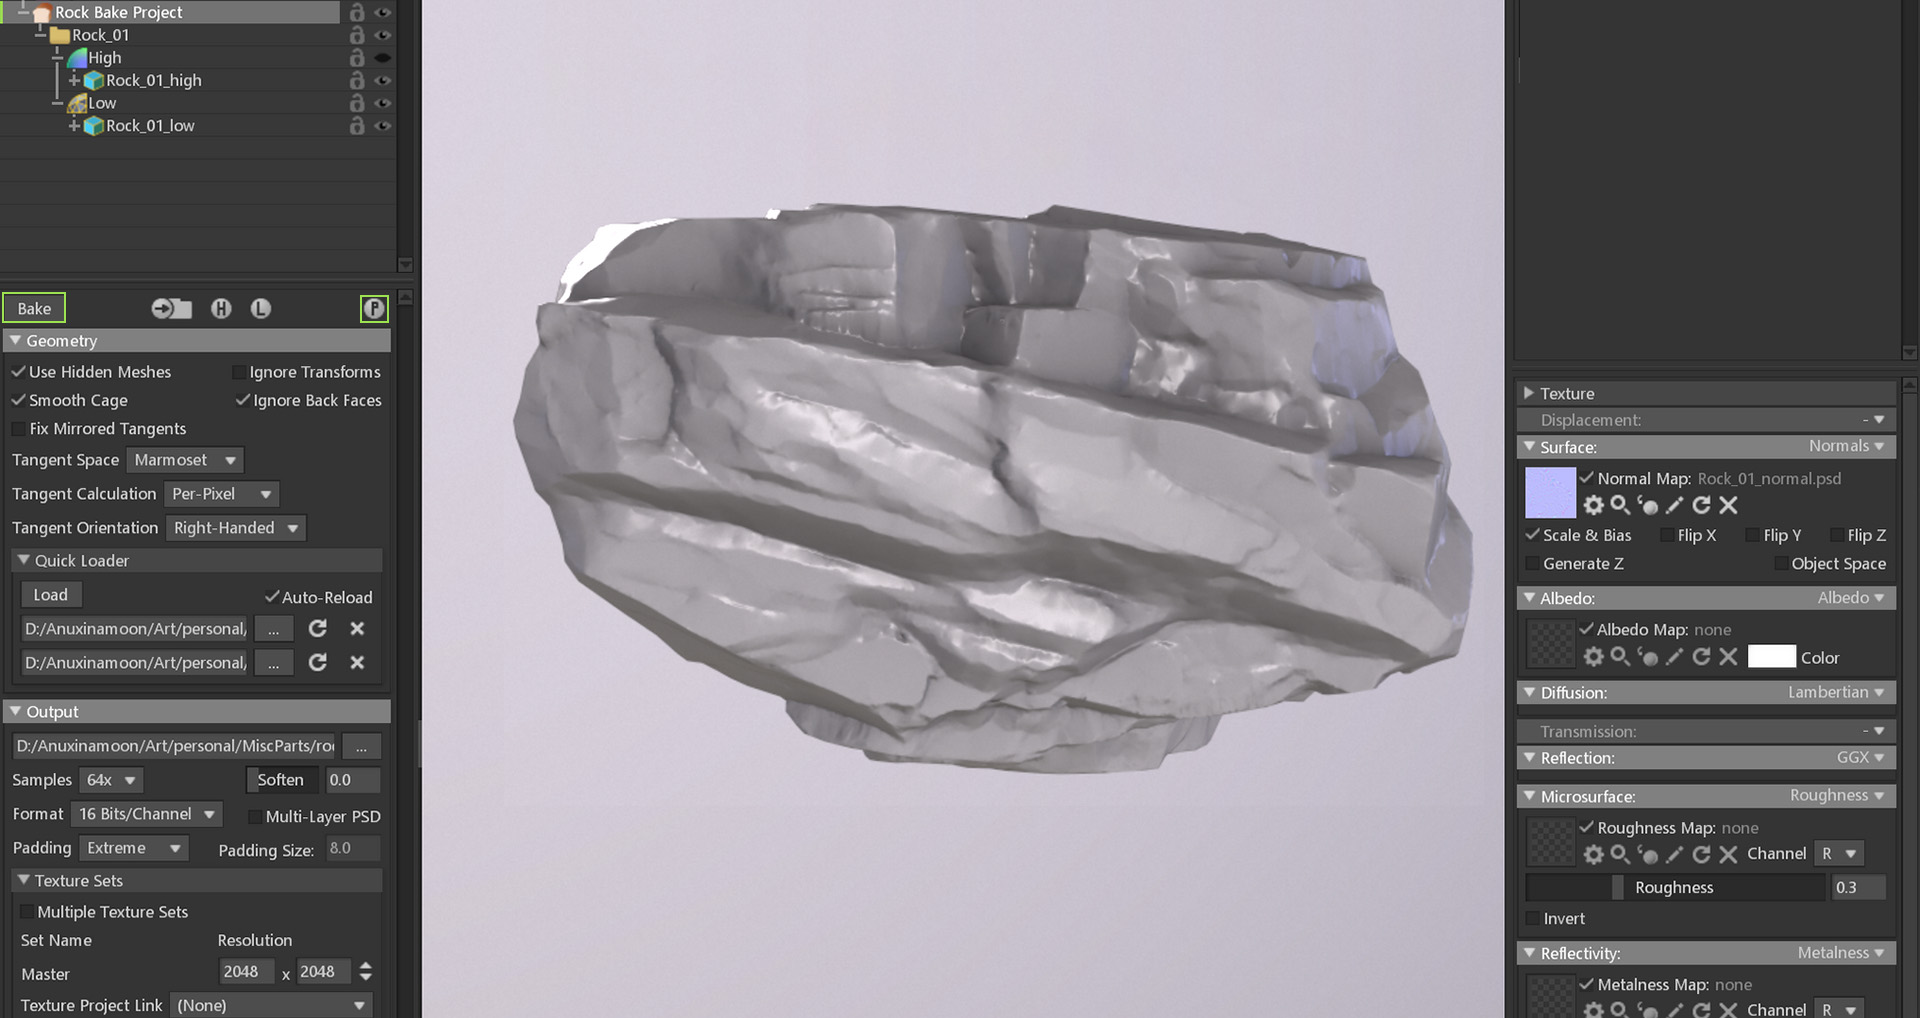
Hit the Bake button to run a bake. After the bake is done, press the P button to preview the Ambient Occlusion and Normal map on the material assigned to your low poly model.
The material now has the preview maps applied (AO and Normal Map).
That wraps things up for the baking aspect of the workflow. Next up – texturing!
Setting up Texture Projects
Texturing in Toolbag is done via a Texture Project. You’ll need to link the texture project to the material your model is using.
- Hit the palette icon or go to Scene > Add Object > Texture Project to add a Texture Project.
- Select your Texture Project in the Scene hierarchy and view its settings.
- Project Settings give you resolution control. I always max out the UV Padding slider for maximum padding.
- Linked Materials is important, as this controls how you will see your texture project on your model. Click and drag the material applied on your mesh to the Linked Materials slot. The texture project will auto-fill the material with the correct textures to display on the model.
- Input Maps is where the previously baked maps will go. You can add more or remove some as needed via Add New. Clicking on the empty squares opens up a browser to search for texture inputs and assign them. Dragging content from Toolbag’s Library window also works.
- Project Maps show which maps can be enabled/disabled under Active Maps in your texture project. You can add other map types and change their settings. Active Maps can be found near the top of the Layer Settings window.
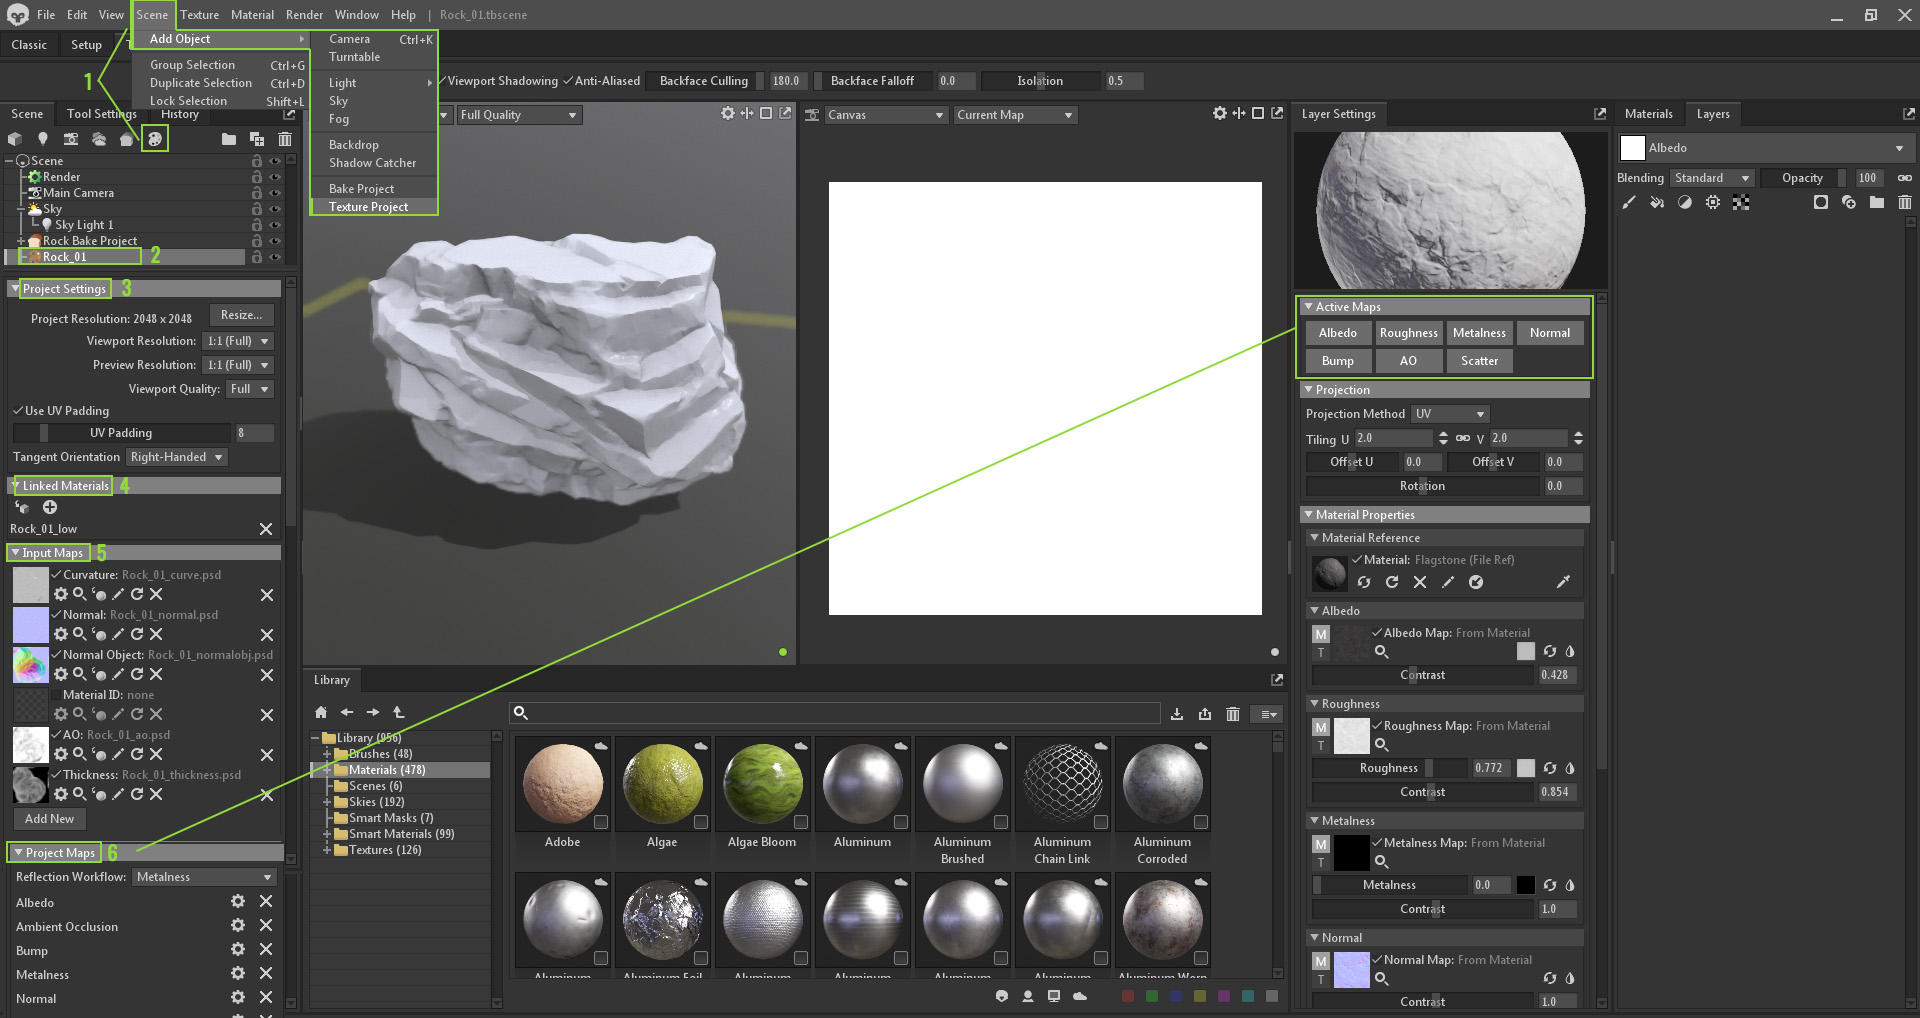

Finally, use Export Settings to designate the location for your final maps that are generated. If multiple Texture Projects in the scene require the same settings, right-click the Texture Project in the hierarchy to copy Object Settings. Select, right-click, and paste the Object Settings to the other Texture Projects.
Link Bake Project to Texture Project
If you have a bake project set up, you can easily create and link a new texture project by selecting your Bake Project object, scrolling to Texture Sets, then selecting New Project in Texture Project Link. This will create a new texture project in the Scene hierarchy that is named and set up with the baked maps and materials linked to Input Maps. With projects linked, any future changes to your bakes will automatically update the inputs for your Texture Project too.

Now let’s jump into the texturing process:
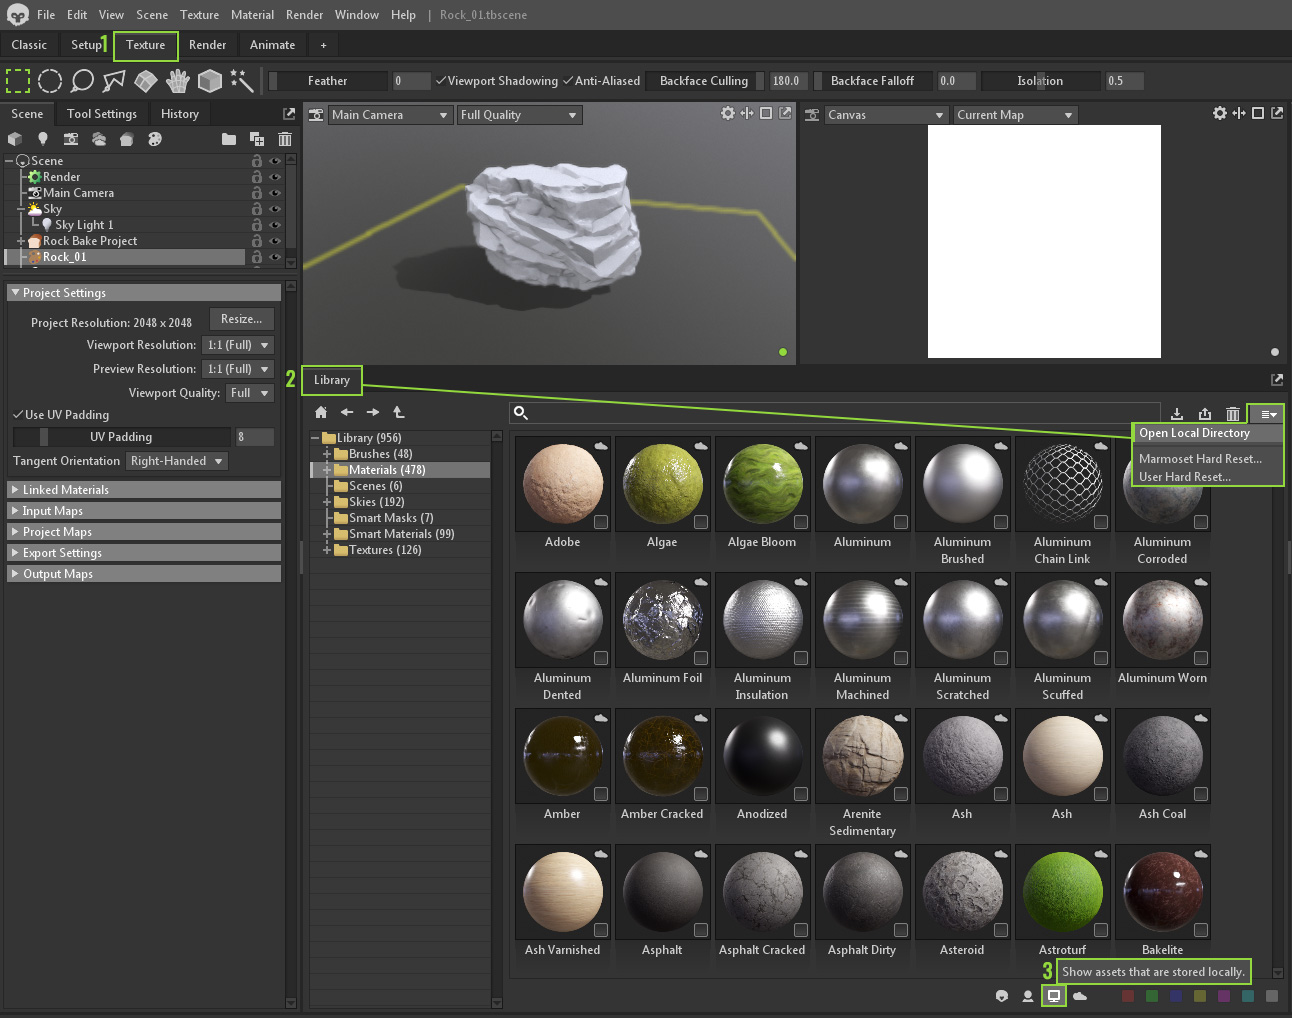
- Select your Texture workspace to start working with the relevant UI.
- You’ll find a Library window on the bottom where you can download assets from Toolbag’s asset library. Double-clicking on any asset will commence the download to your local storage. The location of the library and your custom saved library files can be found in C:\ProgramData\Marmoset Toolbag 4\library. You can quickly access this folder by clicking the top right drop-down menu and selecting Open Local Directory.
- Hit the screen icon to only show locally stored assets to help you filter downloaded assets.
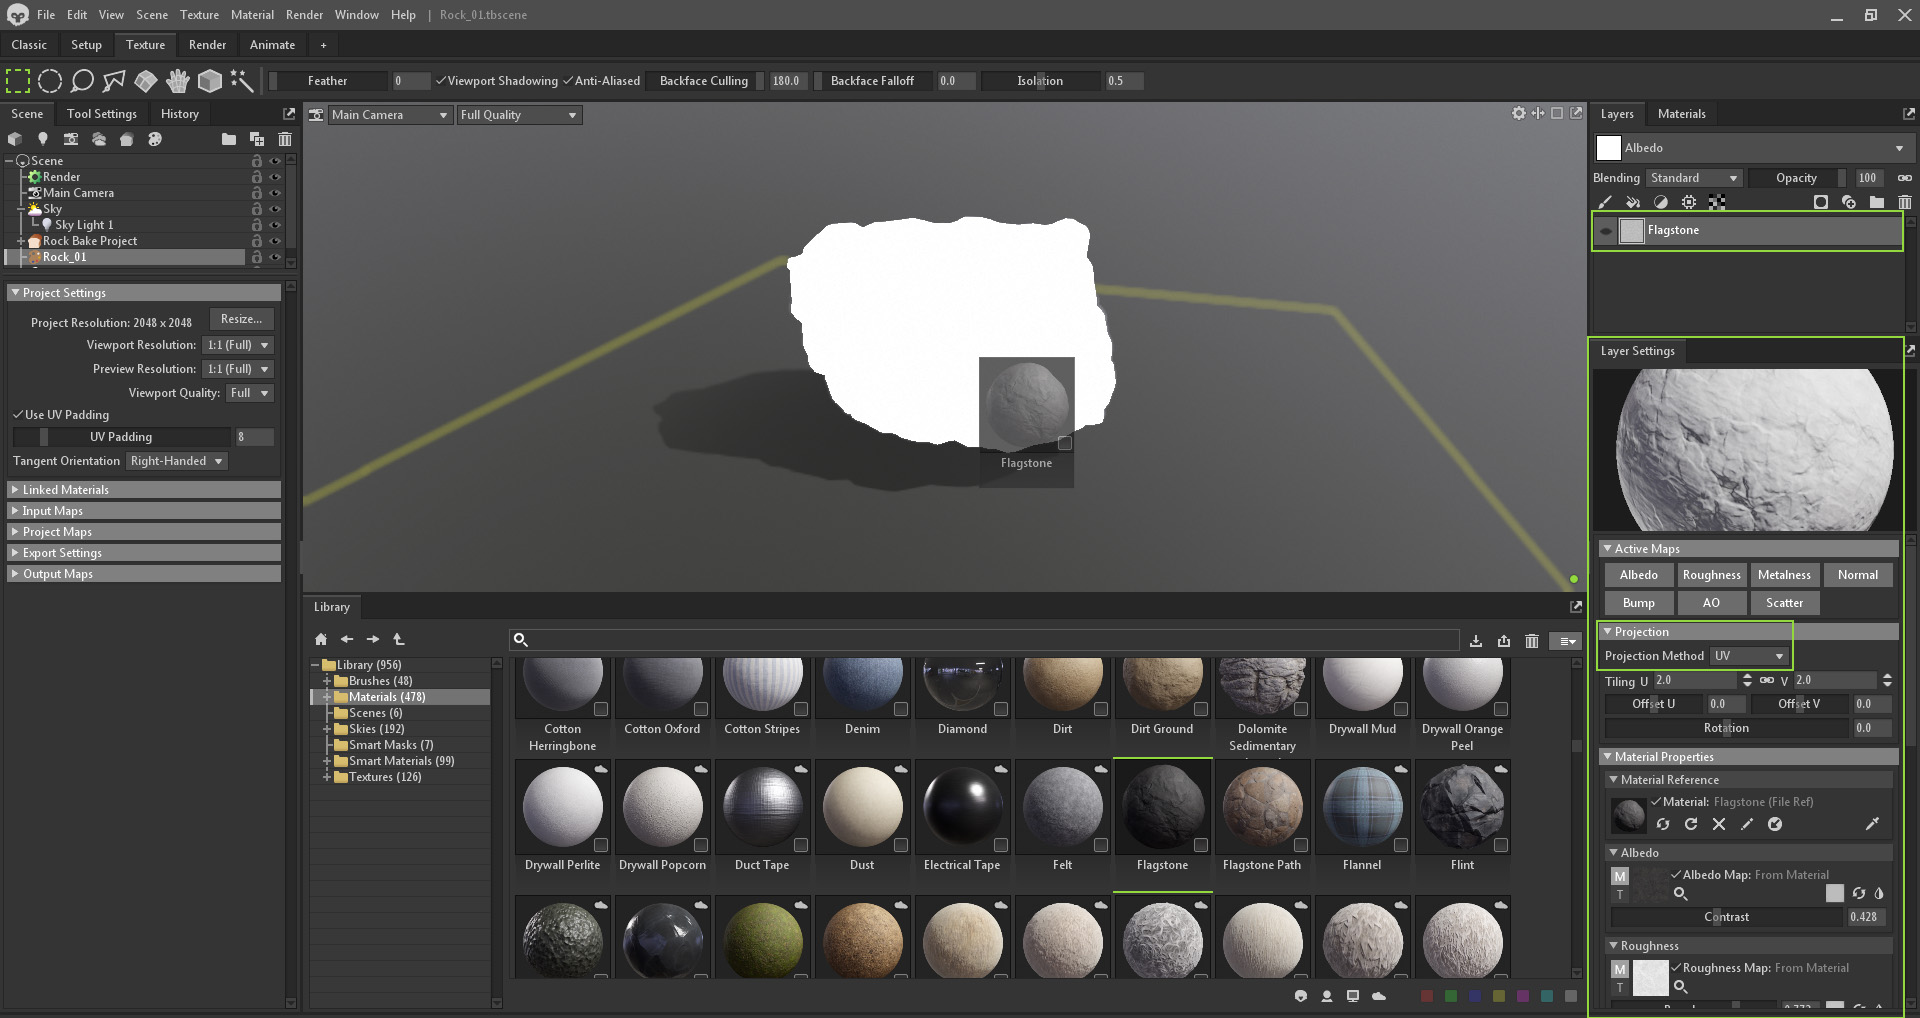
- Click and drag the material you want to start with onto the model to create a new layer in the texture project. If your model has a Material ID loaded into Input Maps, you’ll be able to drag the material onto a specific mat ID color, and it would be masked to that region only. Alternatively, you can click and drag materials straight to the Layer window of your texture project.
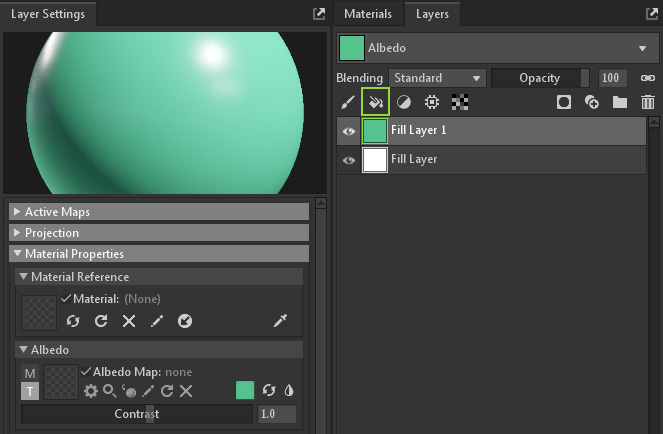
- You can customize the UI to your liking by dragging and dropping windows into one another. I have docked Layer Settings under my Layers window for ease when using Paint layers. Here, the layer stack now shows the Flagstone material that was dragged in from the Library. The Layer Settings display all the material controls for you to tweak. You can change the tint of the albedo, adjust contrast, invert maps, replace maps, tile, offset, rotate the material, and switch Active Maps on/off. Pressing Alt and left-clicking an Active Map will turn off all active maps except for the clicked map.
- Projection Method sets the method for mapping the material onto the model. These are for 2D projections. UV is the default; however, Tri-Planar and Fit to Brush are also available and worth trying.
Create New Layers
There are a few layer options to consider while texturing in Toolbag. Let’s break a few of them down.
Fill Layers create a layer with one color assigned to the entirety of the layer. Use these in conjunction with masks to create color variation and wear.
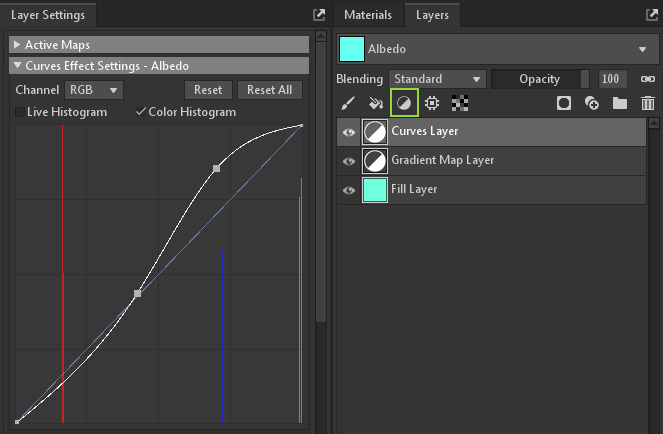
Adjustment Layers only adjust the layers given to them under their influence. For example, a gradient map will take the grey values in the layers under it and allow you to remap them to a ramp of your color choices.
Input Processors reference an Input Map and allow you to easily create and adjust weathering effects. For instance, Occlusion will take the baked AO map assigned to the texture project and give fine controls over how it will be displayed in this layer. These are of great use when building Smart Masks.
Procedural Layers produce algorithmically-generated textures and patterns that offer infinite variation. These layer types can help you create materials like wood grain, speckled metal, and patterned stone.
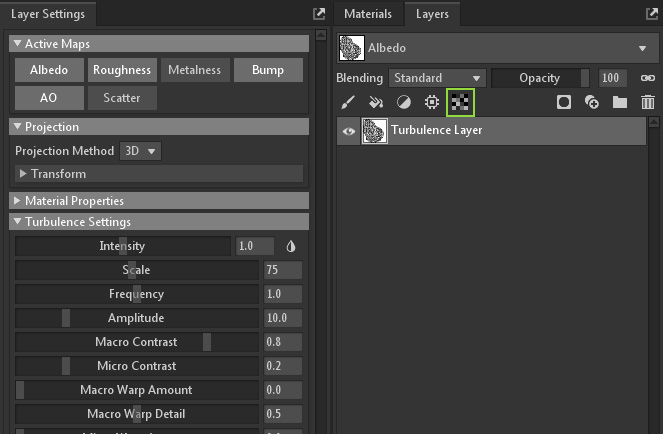
Projection methods include 3D, UV, and Tri-Planar space, and layer settings can include intensity, scale, jitter, and more.
Layer Types Explained
If you’re new to Toolbag’s texturing tools, or just need a refresher, expand each category below to learn more about the Adjustment, Input, and Procedural layer types available to help you craft that perfect material.
Using Masks
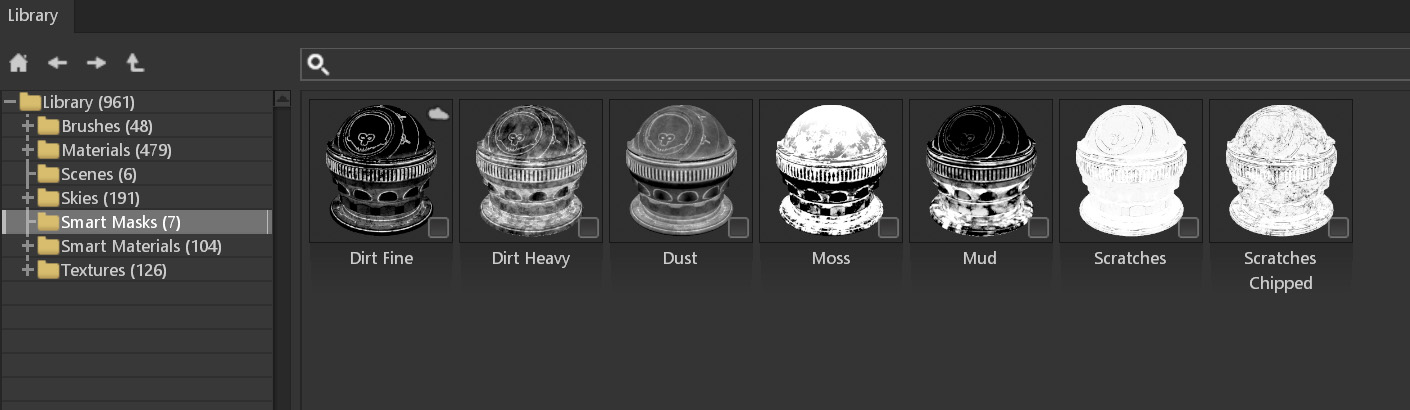
Now back to our texturing workflow. Masks and Smart Masks are where the true power of Toolbag’s texturing comes into play. Smart Masks are preset mask stacks ready to drag and drop onto your layer. You can find a collection of existing Smart Masks readily available in Toolbag’s Library. And when you save your own custom mask stack as a Smart Mask, you will find them here.
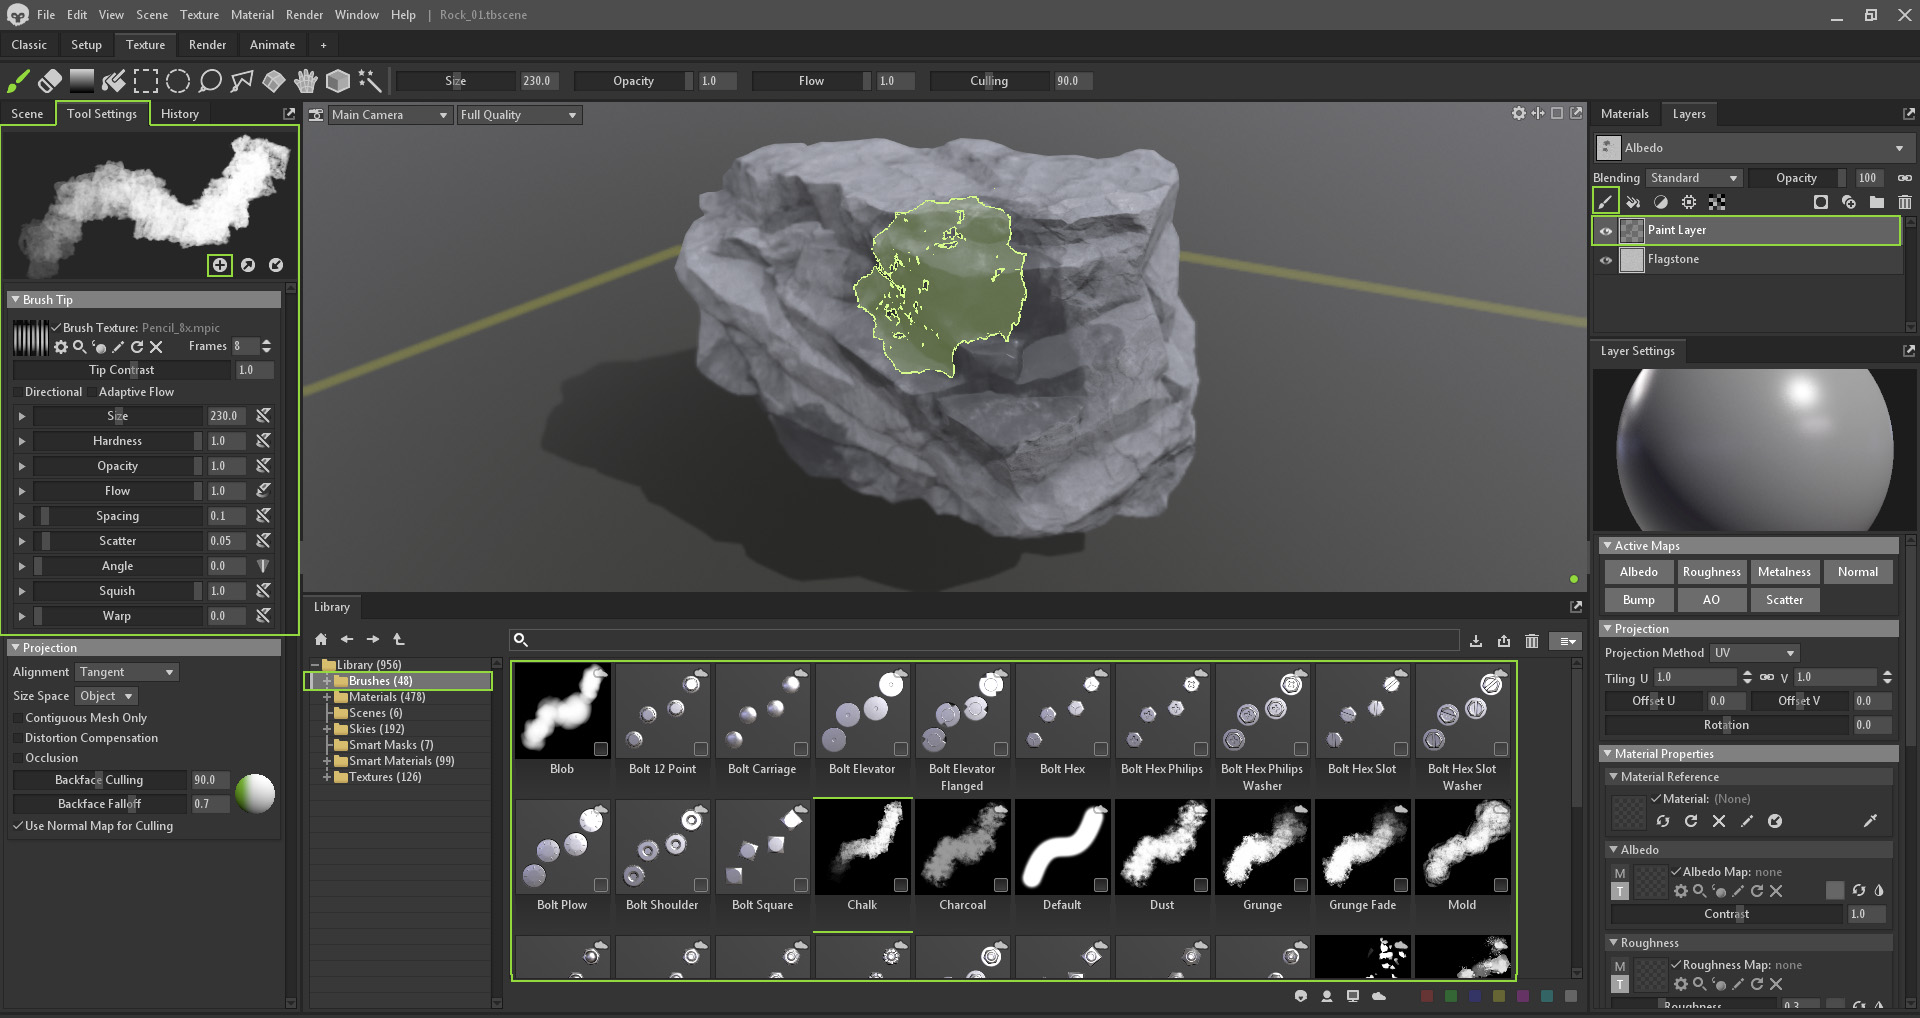
Create a Fill layer and name it Edge. This will be the layer that colors the edges of the rock.
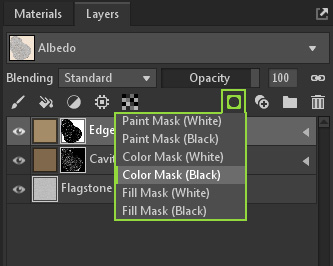
Add a mask to your layer by selecting the layer, clicking the mask icon, and choosing a black or white mask. I usually choose Color Mask (Black). Click the mask to set it to the active target.
With the mask selected, you can now add masks to the Mask Stack. A mask stack is a stack of layers that affect the mask. Think of it like clipping masks in Photoshop.
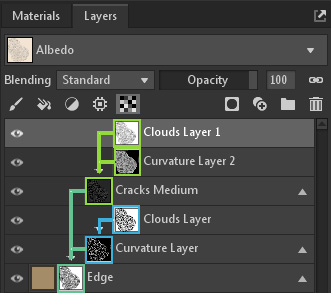
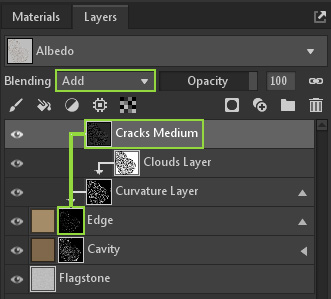
Layers stacked on top of one other apply their effects to layers below them. You can also nest masks into masks, as can be seen in my Cracks Medium layer. This allows for extreme control over how the masks are applied.
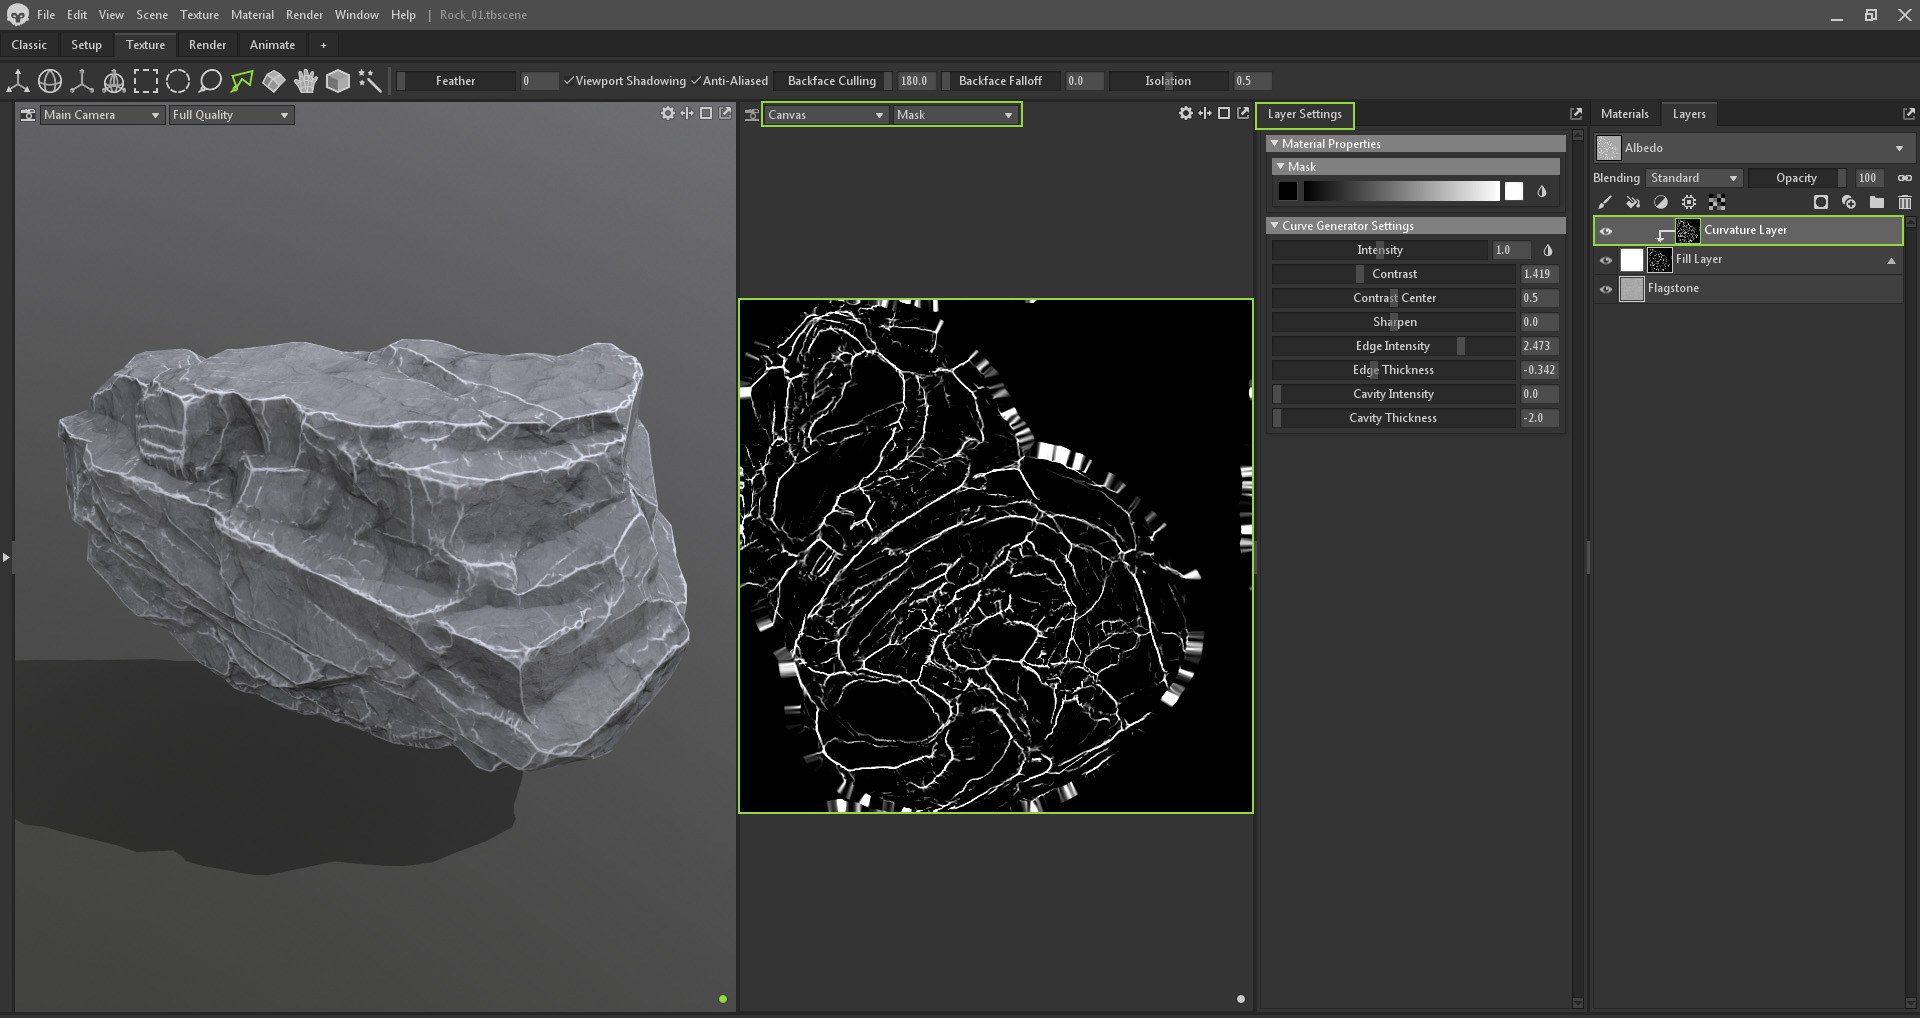
Let’s add to the mask stack by adding a Curvature layer onto the Mask. As mentioned previously, this will use the Curvature map linked in Input Maps.
Setting your Canvas to Current Map (the selected map) will help show what the mask is doing in isolation. This is a great debugging tool.
After selecting the Curvature mask you can look to the Layer Settings window and see all the ways to manipulate the curvature. The teardrop icons to the right of the slider will invert the value. Because we just want edge data to show up, we want to set both Cavity Intensity and Cavity Thickness to zero. Tweak the other sliders till your edges look like how you want them.
I then added a Fill layer and dragged the Cracks Medium texture into the Mask Map slot and set the blend mode to Add. (You can drag the texture from the library into the layer window, and it will make a layer for you called the name of the texture, but right now you will have to re-drag the texture into the Mask slot). I added a Clouds procedural to the curvature mask to help break things up and keep it subtle.
Change the color of your edges by selecting the fill thumbnail on the Edge layer, going to the Layer Properties window, and changing the Albedo color. You can change the Blending mode of the layer to Add.
Note that all layers can also have stacks on them, not just masks! Remember this when you have a paint layer whose color you need to change quickly.

Now create a new Fill layer and name it Cavity, and add:
- a black mask
- an inverted Occlusion layer
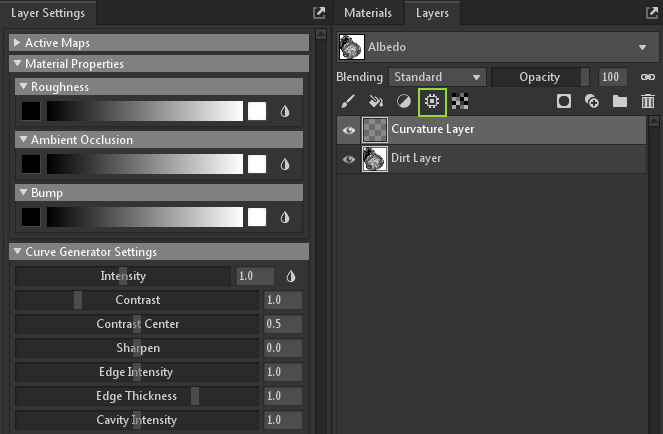
- a Curvature processor

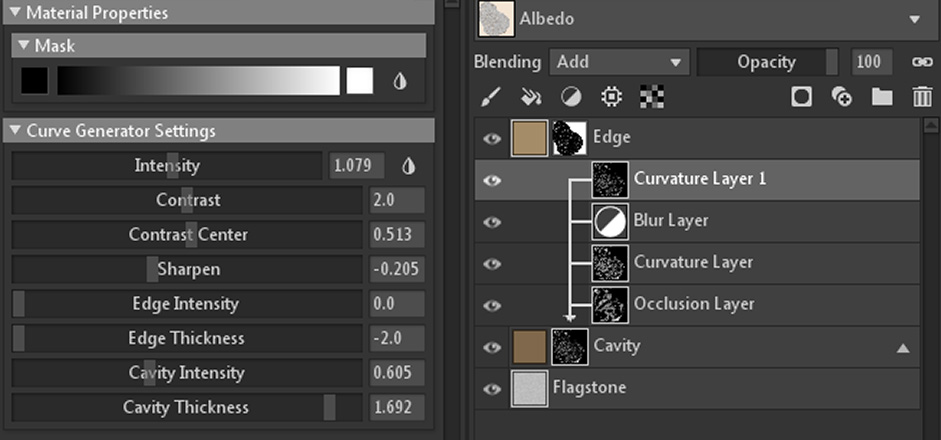
Here I used an Ambient Occlusion layer with a Curvature Layer above it set to Add. Remember to change the Curvature map only to detect Cavities. I set it to quite a harsh Sharpen value but then added a Blur adjustment layer (with Blur Radius set to 24px) to help soften it.
I’ve added another Curvature layer on top to add back in some of the deep crack finer detail I lost.
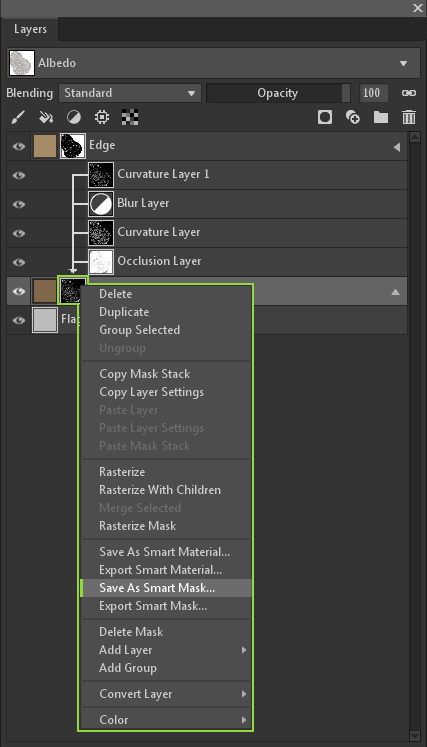
It’s time to save the mask stack as a Smart Mask! Right-click the layer and select Save As Smart Mask from the drop-down menu.
You can create a Smart Material in a similar fashion by selecting all the layers and hitting the folder icon to group them in a folder. Rename the folder to something neat, then right-click and select Save As Smart Material.
I use Smart Materials at work to batch texture lots and lots of rocks at once! It’s very quick and easy. I can export them and share them with my teammates. They are located here: C:\ProgramData\Marmoset Toolbag 4\library\Smart Materials
Export the Final Textures
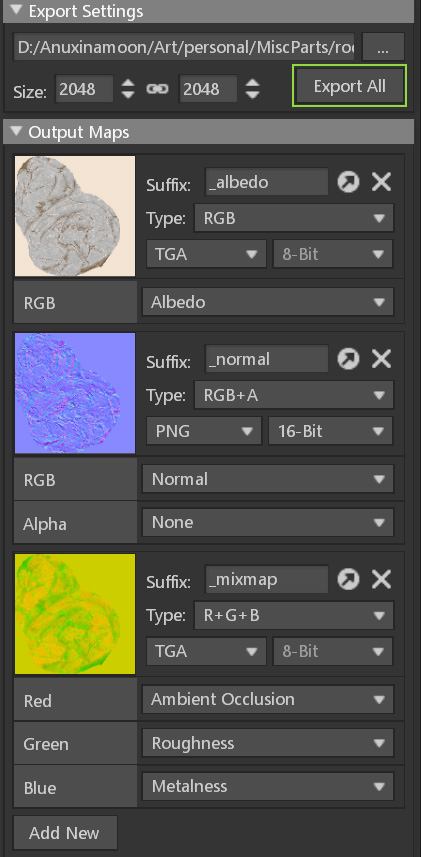
Click on the Texture Project object and scroll to the bottom of the settings. Here you can find the export settings and which maps will be saved. The Export Settings will show the output location’s folder and texture sizes.
While at work, I usually have specific naming conventions and file types. But for now, the only thing that should change from the default settings is the Normal Map output from .TGA to .PNG to allow 16bit normal maps.
I like to rename the mixmap to the letters of the maps in order of RGB. So, in this case _ARM, but that’s just how my brain works. Leaving it default is fine. Hit Export All to spit them out!
Setting Up Your Final Render
Now that the rock is in a state that looks pretty good, it’s time to make a render of it! Click on the Render tab to change workspaces.
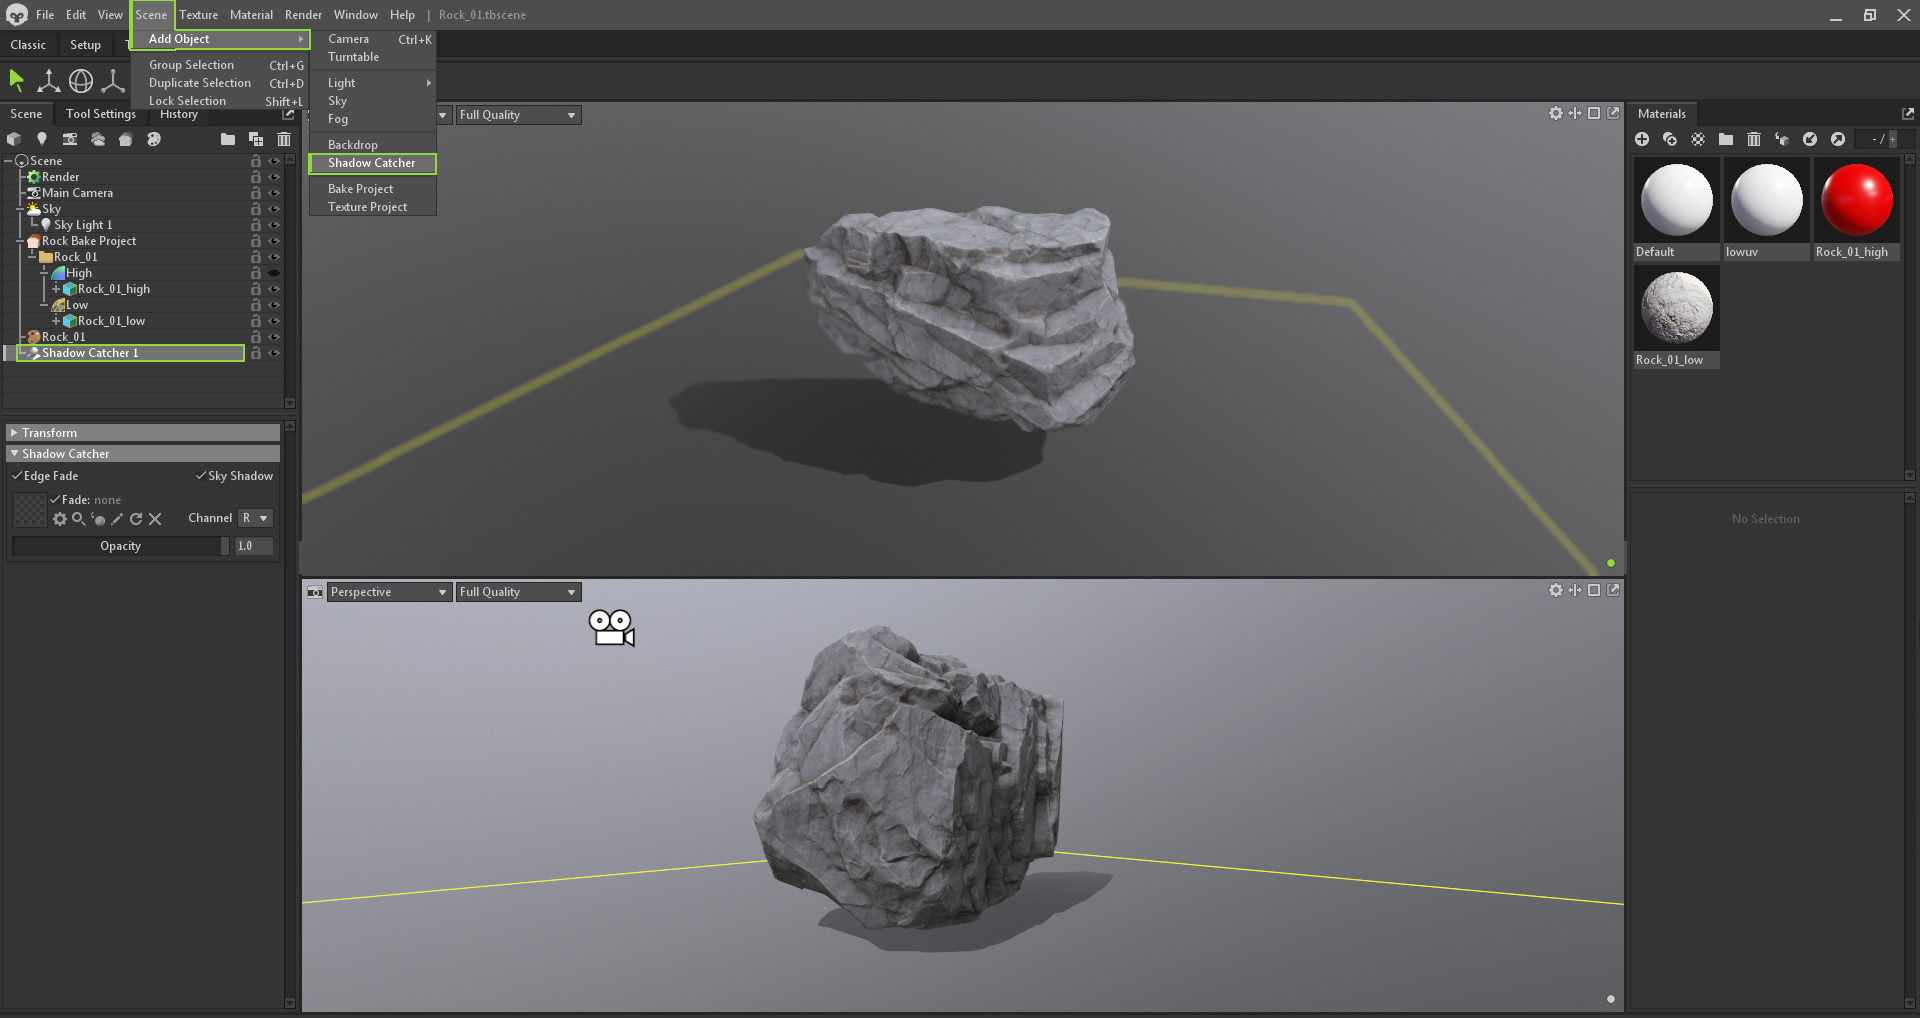
Start by adding a Shadow Catcher by going to Scene > Add Object > Shadow Catcher. Move the shadow catcher around till it looks okay under the rock.
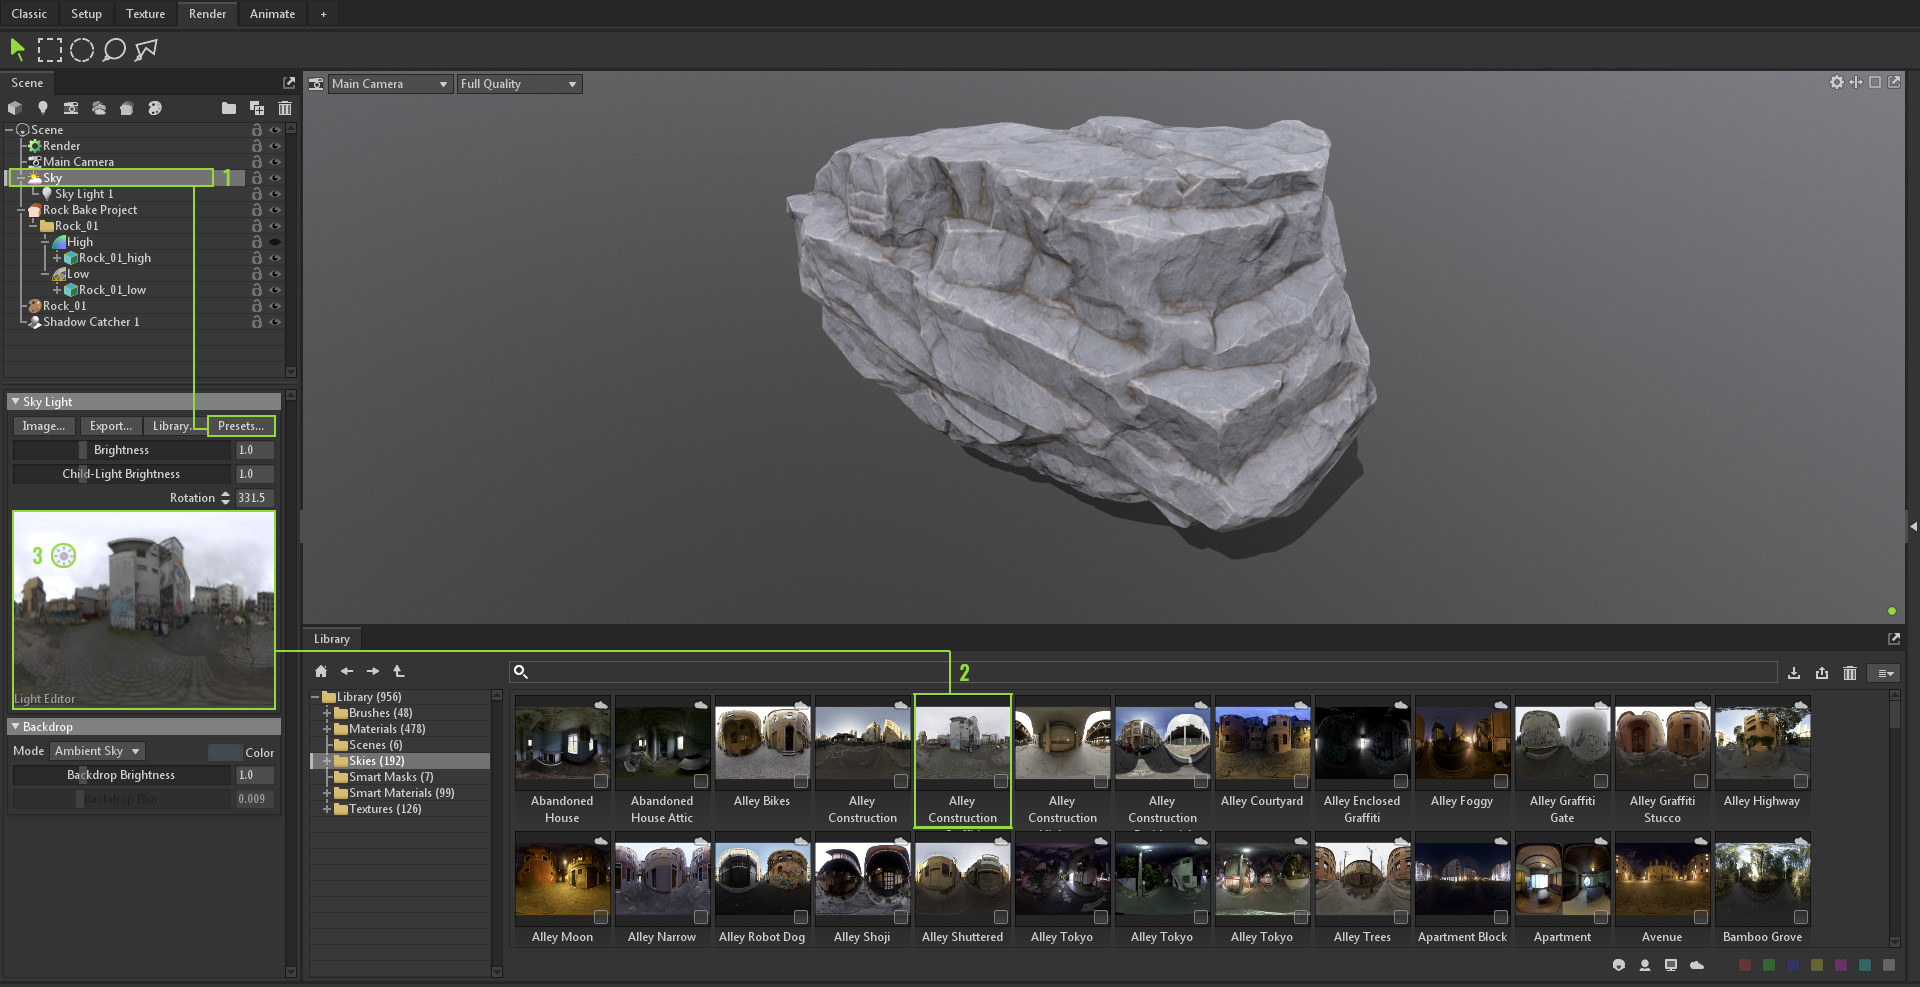
Now time to try out new sky panoramas.
- Click Sky in the scene hierarchy and choose a new sky image by hitting the Presets button and downloading a new one from the Library.
- Double-click to download the one that looks neat, and drag it onto the Sky’s Light Editor window. The scene’s lighting will change, and Shift+Right-click-drag will rotate the skybox.
- Click on the brightest part of the image in the Light Editor to add a Directional Light. Moving this newly created icon around will change its angle and color. Rotate the sky using the Rotation dials to your liking. You’re able to change the color and brightness of the sky in the Backdrop settings.
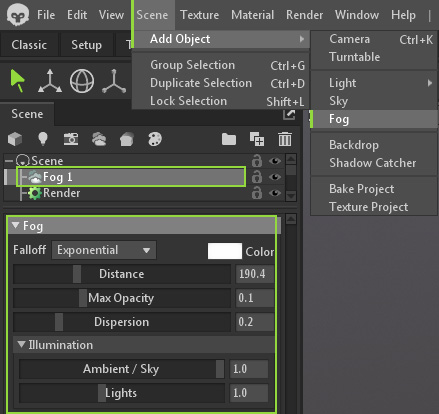
Fog can be added through Scene > Add Object > Fog or clicking the cloud icon in the Scene window. I chose not to use fog, as it didn’t do much for my scene. The rock is too small right now. Experiment with scaling the rock and see if you get a nice result!
Your Render Settings
The Render object has all the settings of what kinds of tech should be used to help render the scene. Play with the settings here to get a feel of what each component does. This is where I enabled Ray Tracing. If you notice slow render times and have a decent GPU, set the Denoise to GPU.

Set Up the Camera
- Create a new Camera from the Scene menu, the toolbar in Scene > Add Object, or with the hotkey Ctrl+K.
- Select the newly created camera from the drop-down to change views in the viewport window.
- Clicking the Camera object in the hierarchy will roll out its settings.
- A neat thing you can do is constrain a camera to track a mesh during an animation. Enable Follow Target in the Camera settings, then select the rock low poly model in the Bake Project to enable Camera Target under Transform.
- Under Lens, enable Safe Frame to show the bounds of your composition.
- Try enabling Depth of Field and adjusting its settings to hone in on a focal point and create cool camera effects. Middle-mouse-click on an area in the viewport to quickly focus on a point in your composition. Enabling Sticky Focus will keep the focus on that spot, including when you rotate or move the model/camera. Play with any of the sliders to adjust the strength of the bokeh effect.

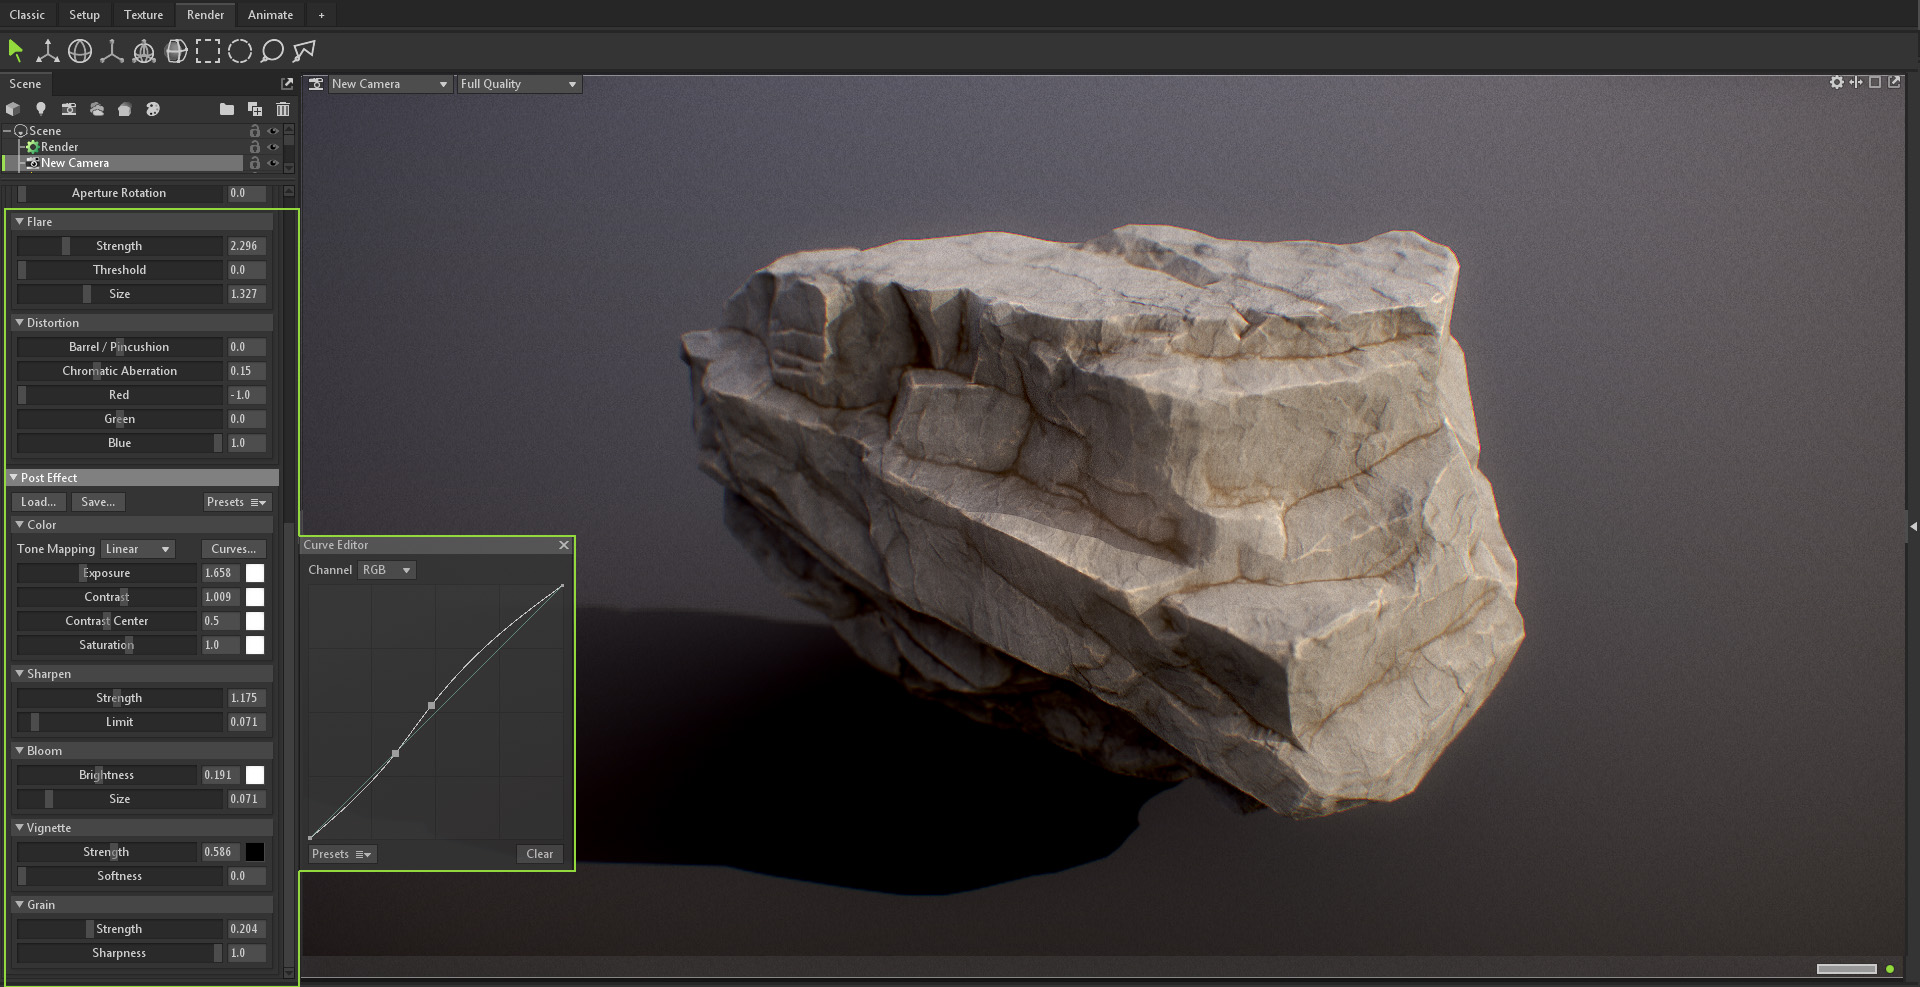
There are the usual Post Effects sliders to configure, including processing options such as Tone Mapping and Curves. Try them out and see what looks good! Below is an example of a mess of effects that I created for fun.
Head back to the Render object and go to the Output section. I have collapsed the Video rollout for now as this will come later. For now, we will work on the Image output.
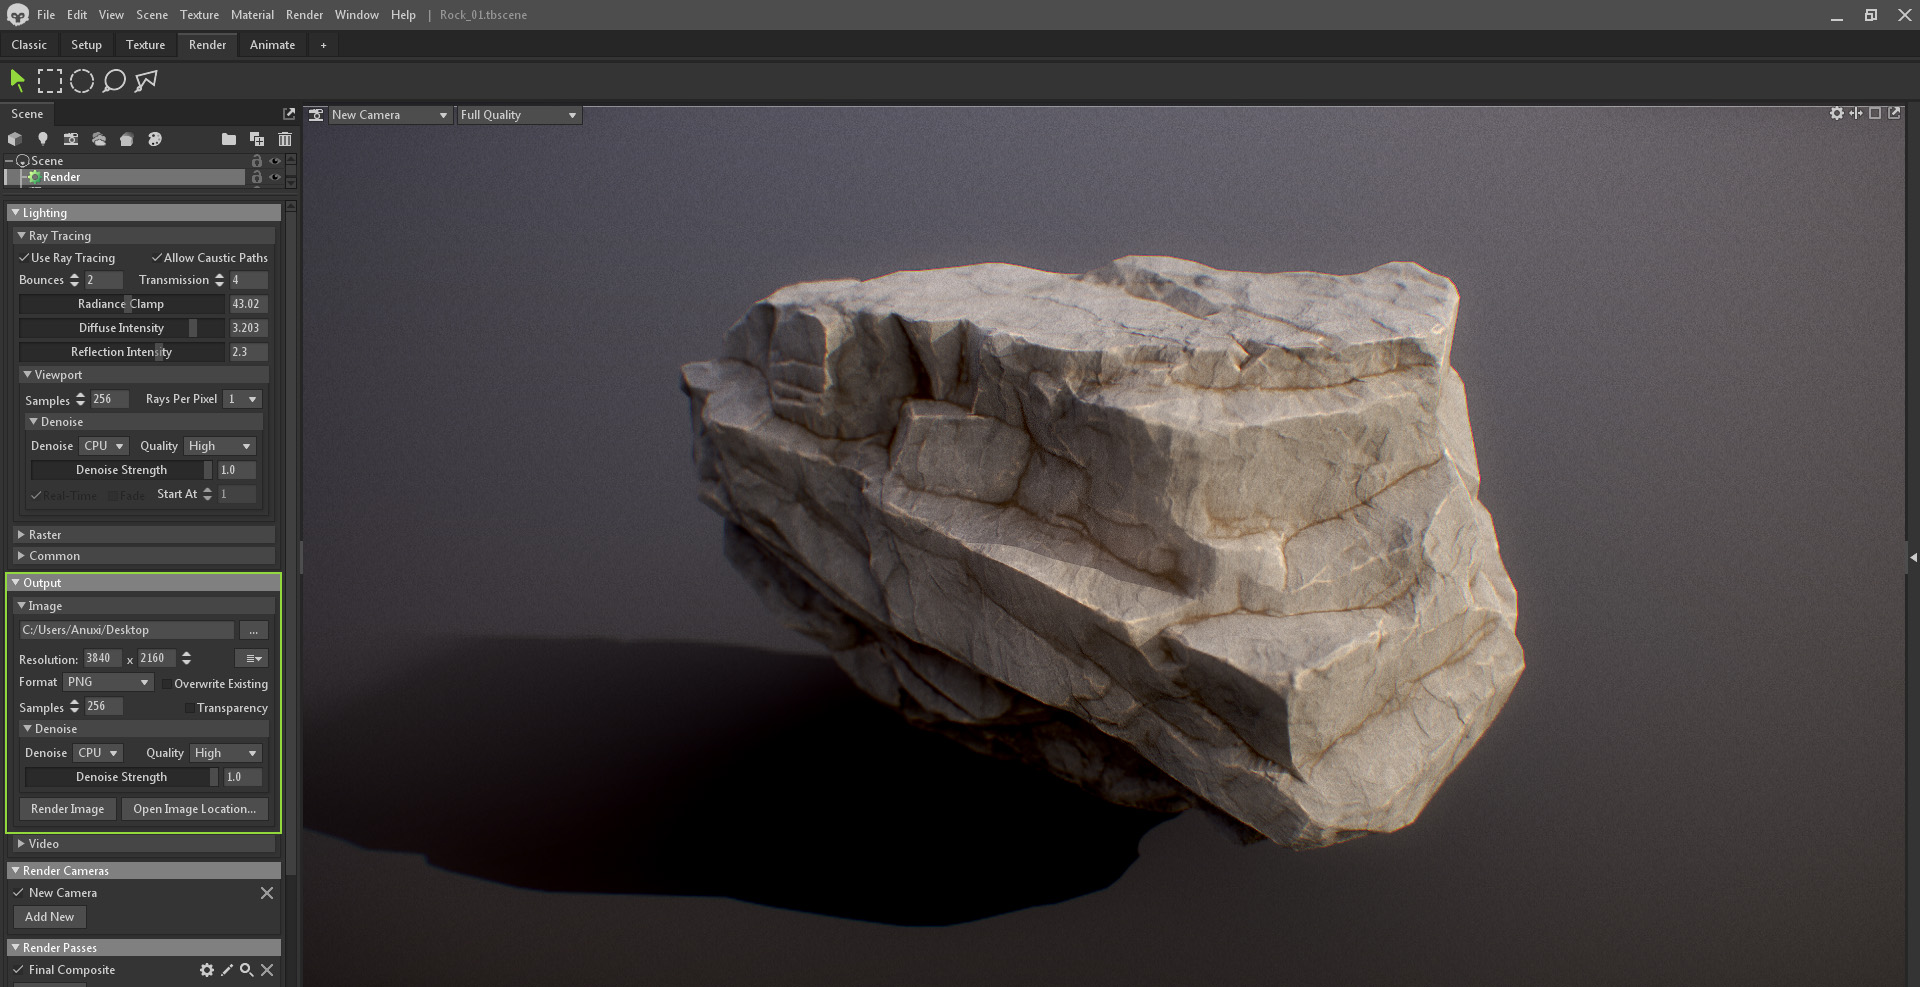
Set the Resolution to your preferred setting and the output destination. A neat trick is to render at 4x the intended final resolution and re-scale it in an image program.
Change the Samples after you’ve done some test renders, since adding more samples will increase rendering time. If you see no difference in the quality from 256 to 1024, just keep it at 256.
Hit Render Image to get a saved render image!
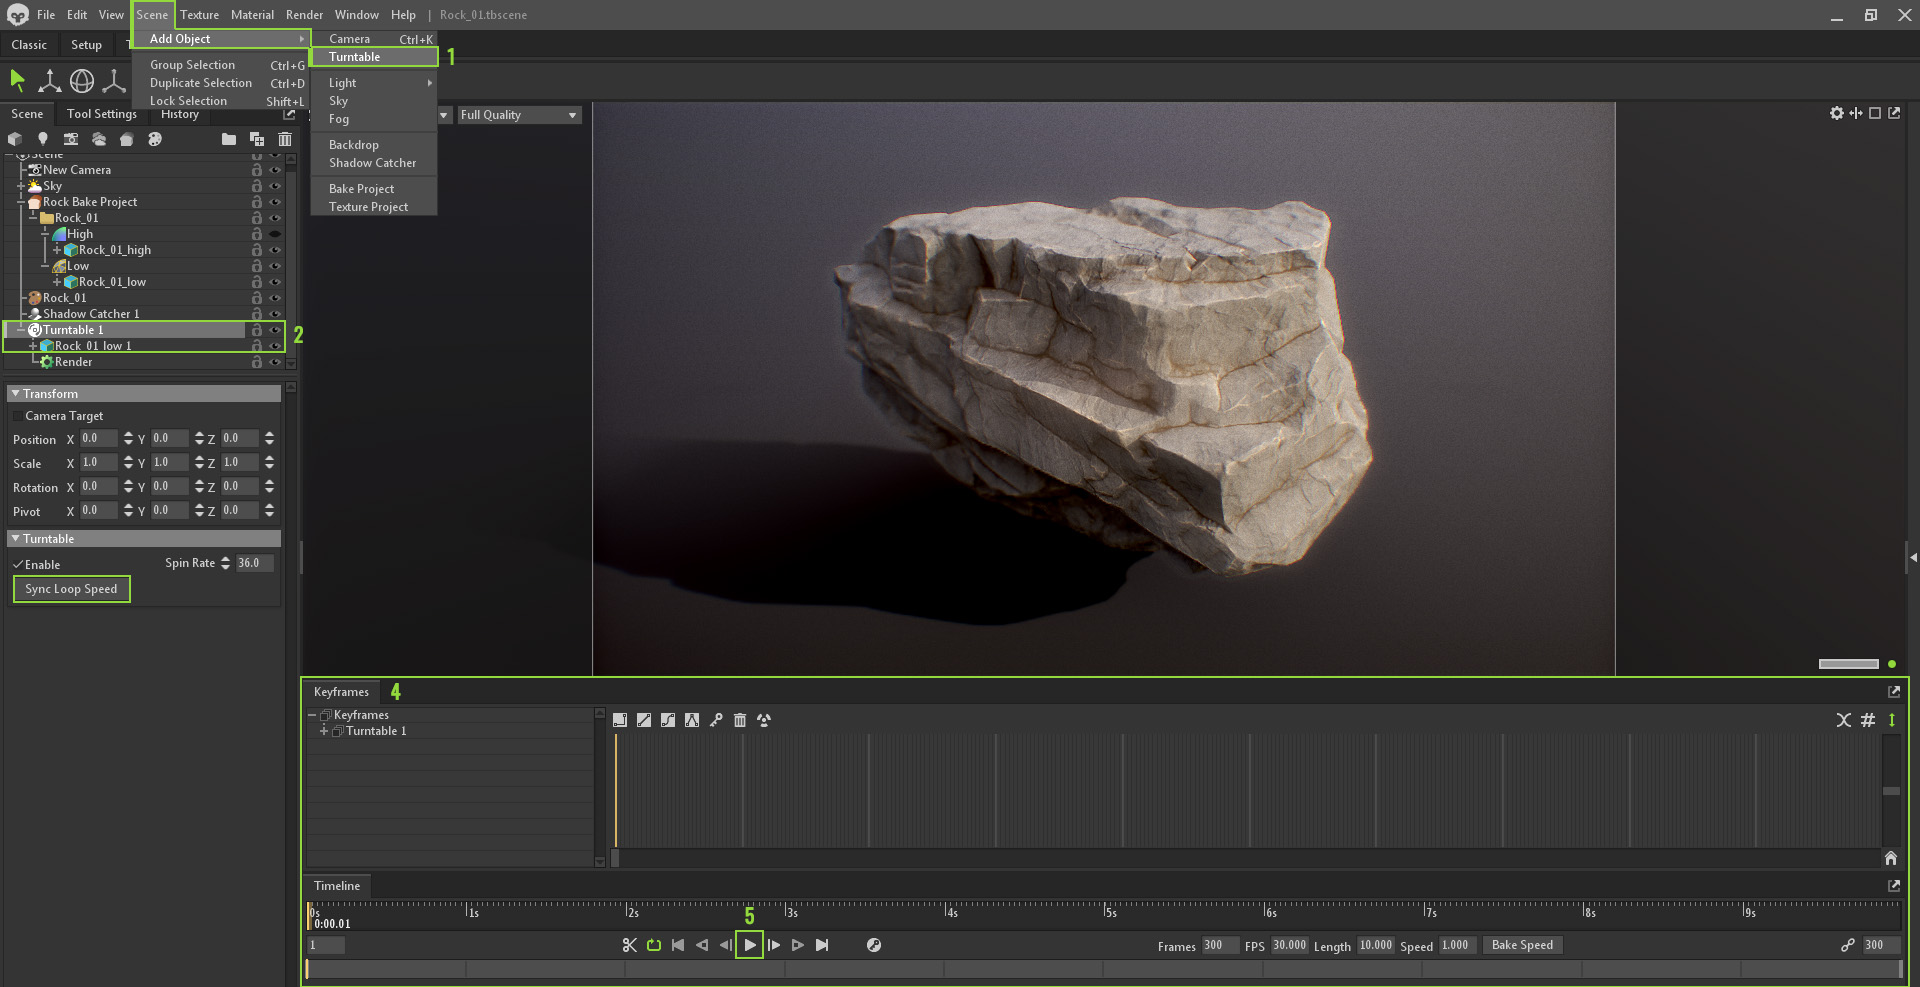
Set up a Turntable
- Create a new Turntable object from the Scene menu It will automagically embed the default Render Object inside it.
- Duplicate the Rock_01_low mesh and nest it in the Turntable object.
- Select the Turntable and hit Sync Loop Speed.
- Then all you need to do is click on the Animate workspace to view the Keyframes and Timeline windows.
- Press the Play button on the bottom of the Timeline window to view a test of how the turntable will look. It should spin and loop.
Turntable Setup Options
If you wish for your camera to move around the rock instead, place the camera inside the turntable and unparent your mesh from the Turntable. Here are some examples of the different end results:
Option 1: Placing the mesh inside the Turntable object will rotate the mesh.

Option 2: Placing the camera inside the Turntable will result in the camera circling around the mesh.

That covers it for this tutorial! Now go out there and break things with confidence, it’s the best and most fun way to learn.
We’d like to thank Stephanie Everett for writing this breakdown. You can check out more of Steph’s work on Artstation and discover Toolbag’s baking, texturing, and rendering features using the 30-day trial.


