Introduction
Hello there! My name is Alex Coman, and I’m a freelance artist based in Romania. I work primarily in architectural and product visualization. About a year ago, I started dabbling with creating game-ready props as well.
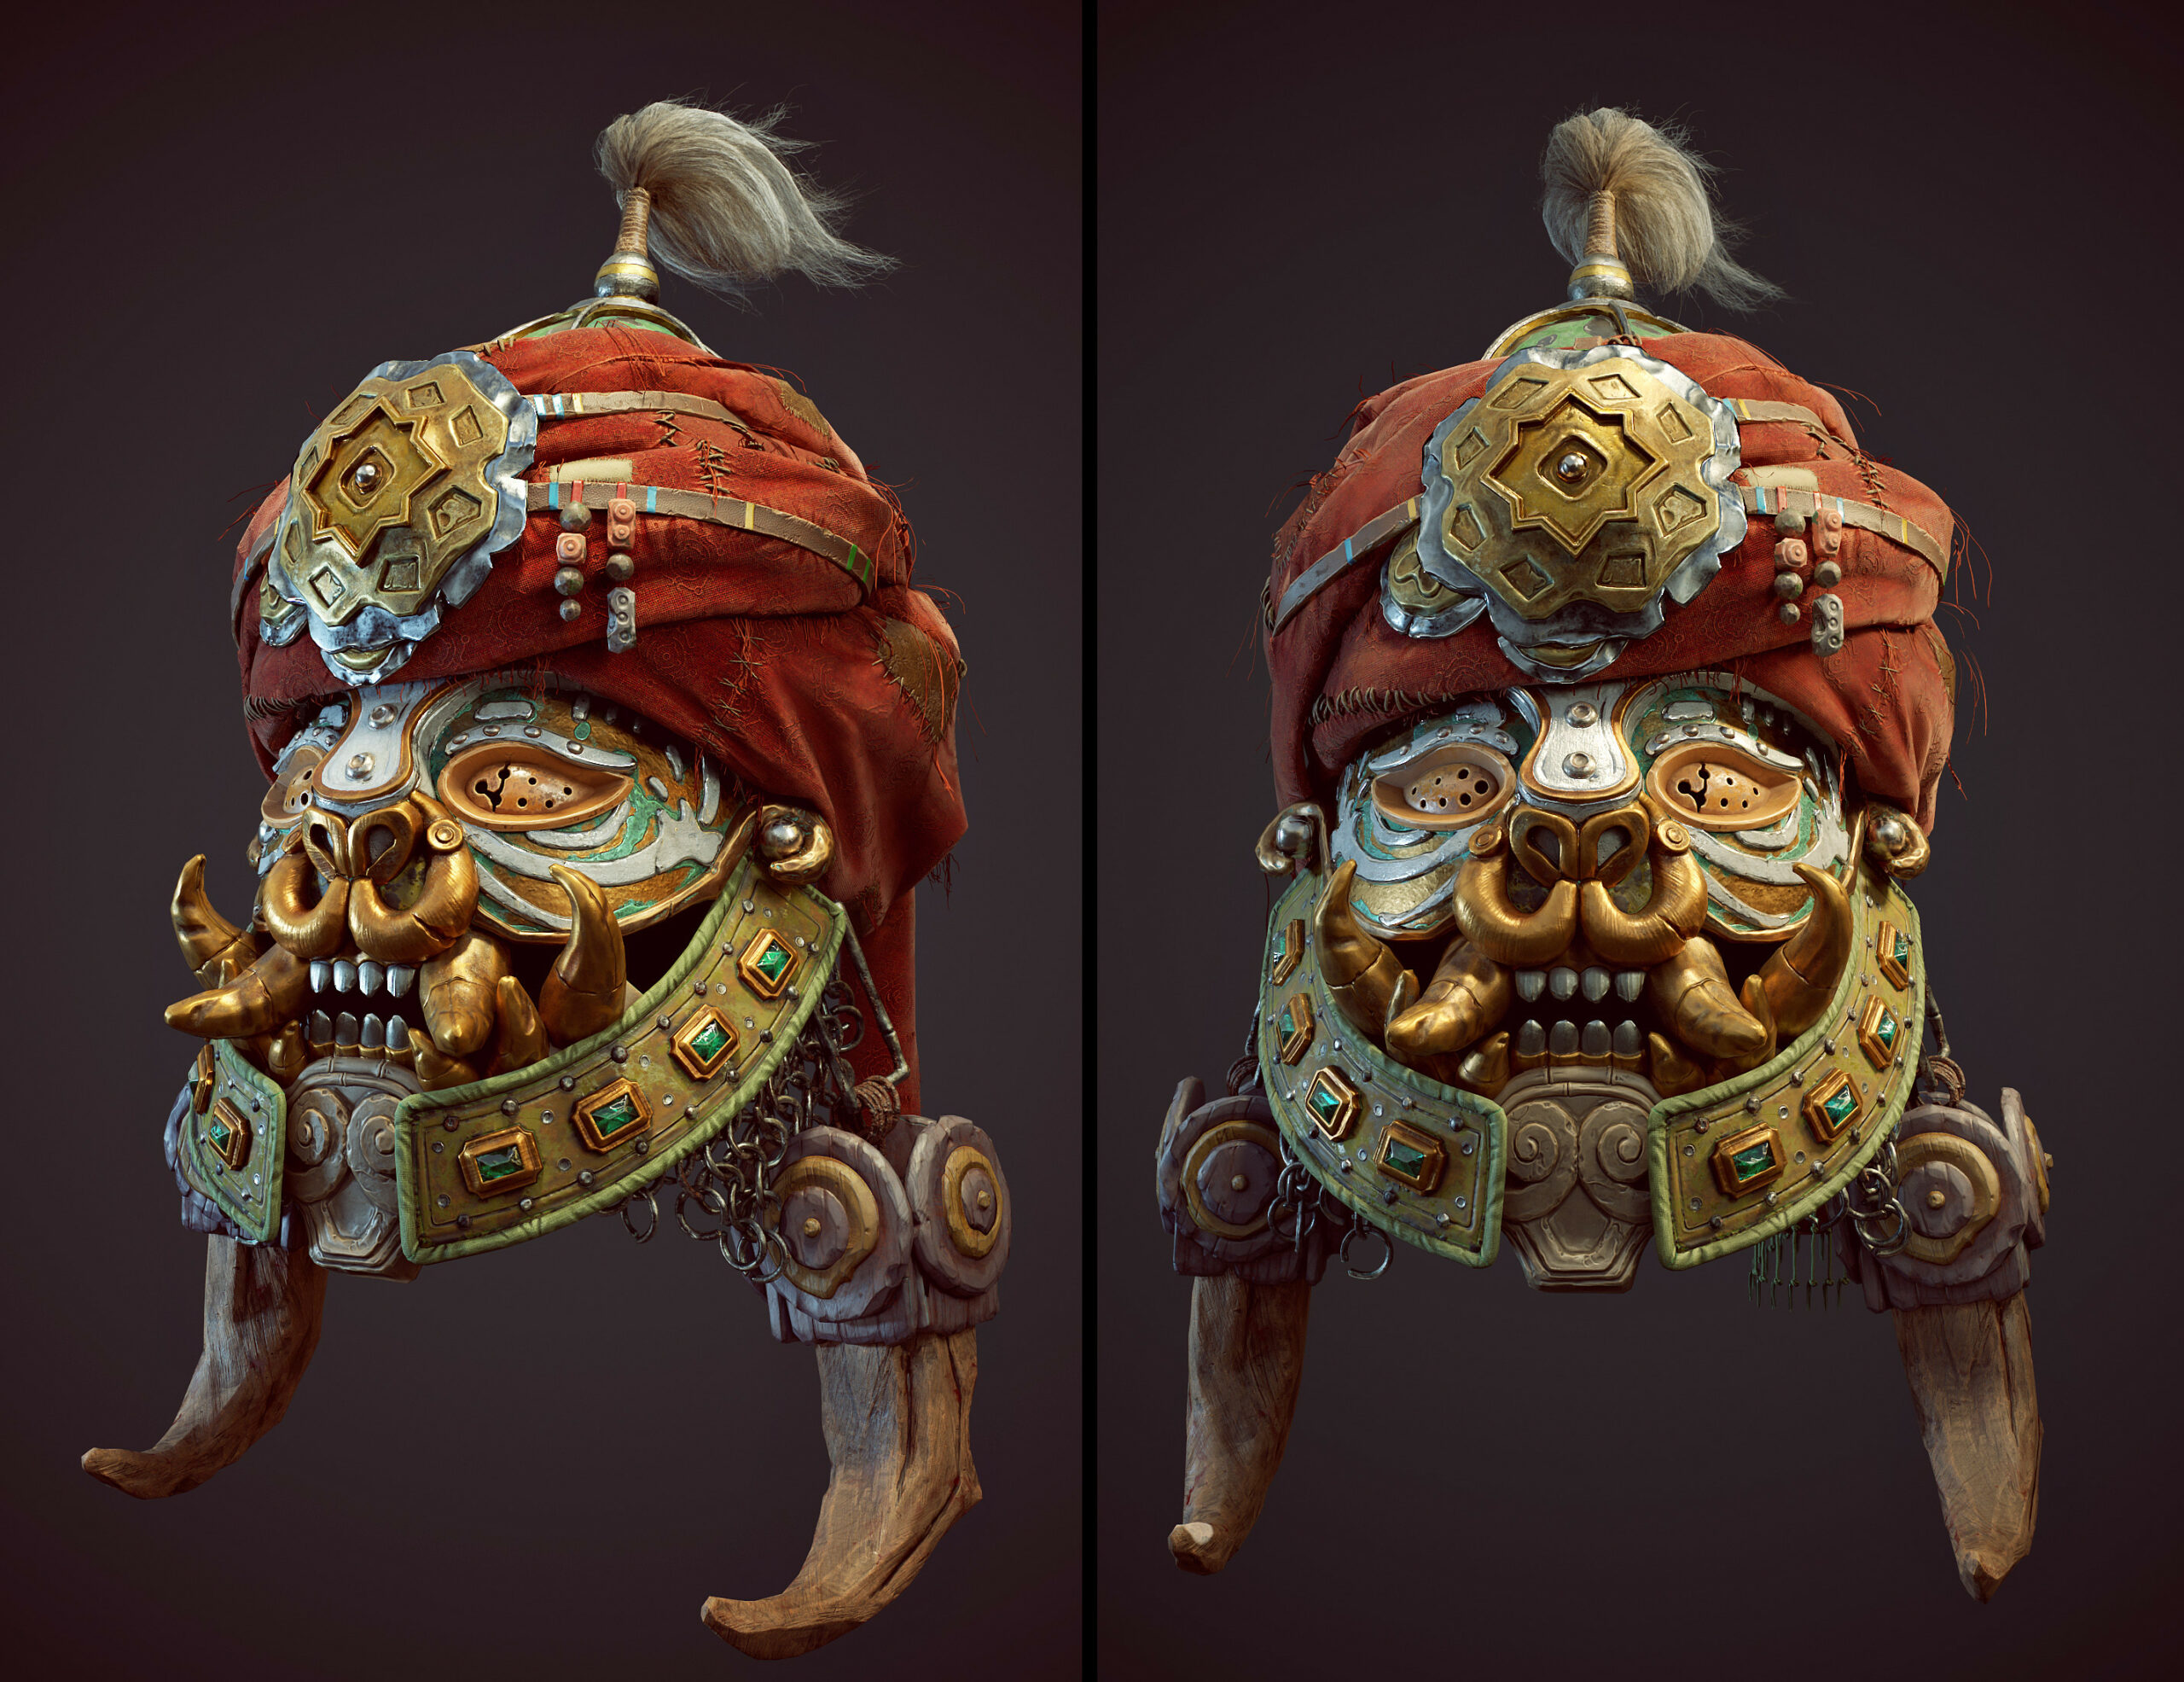
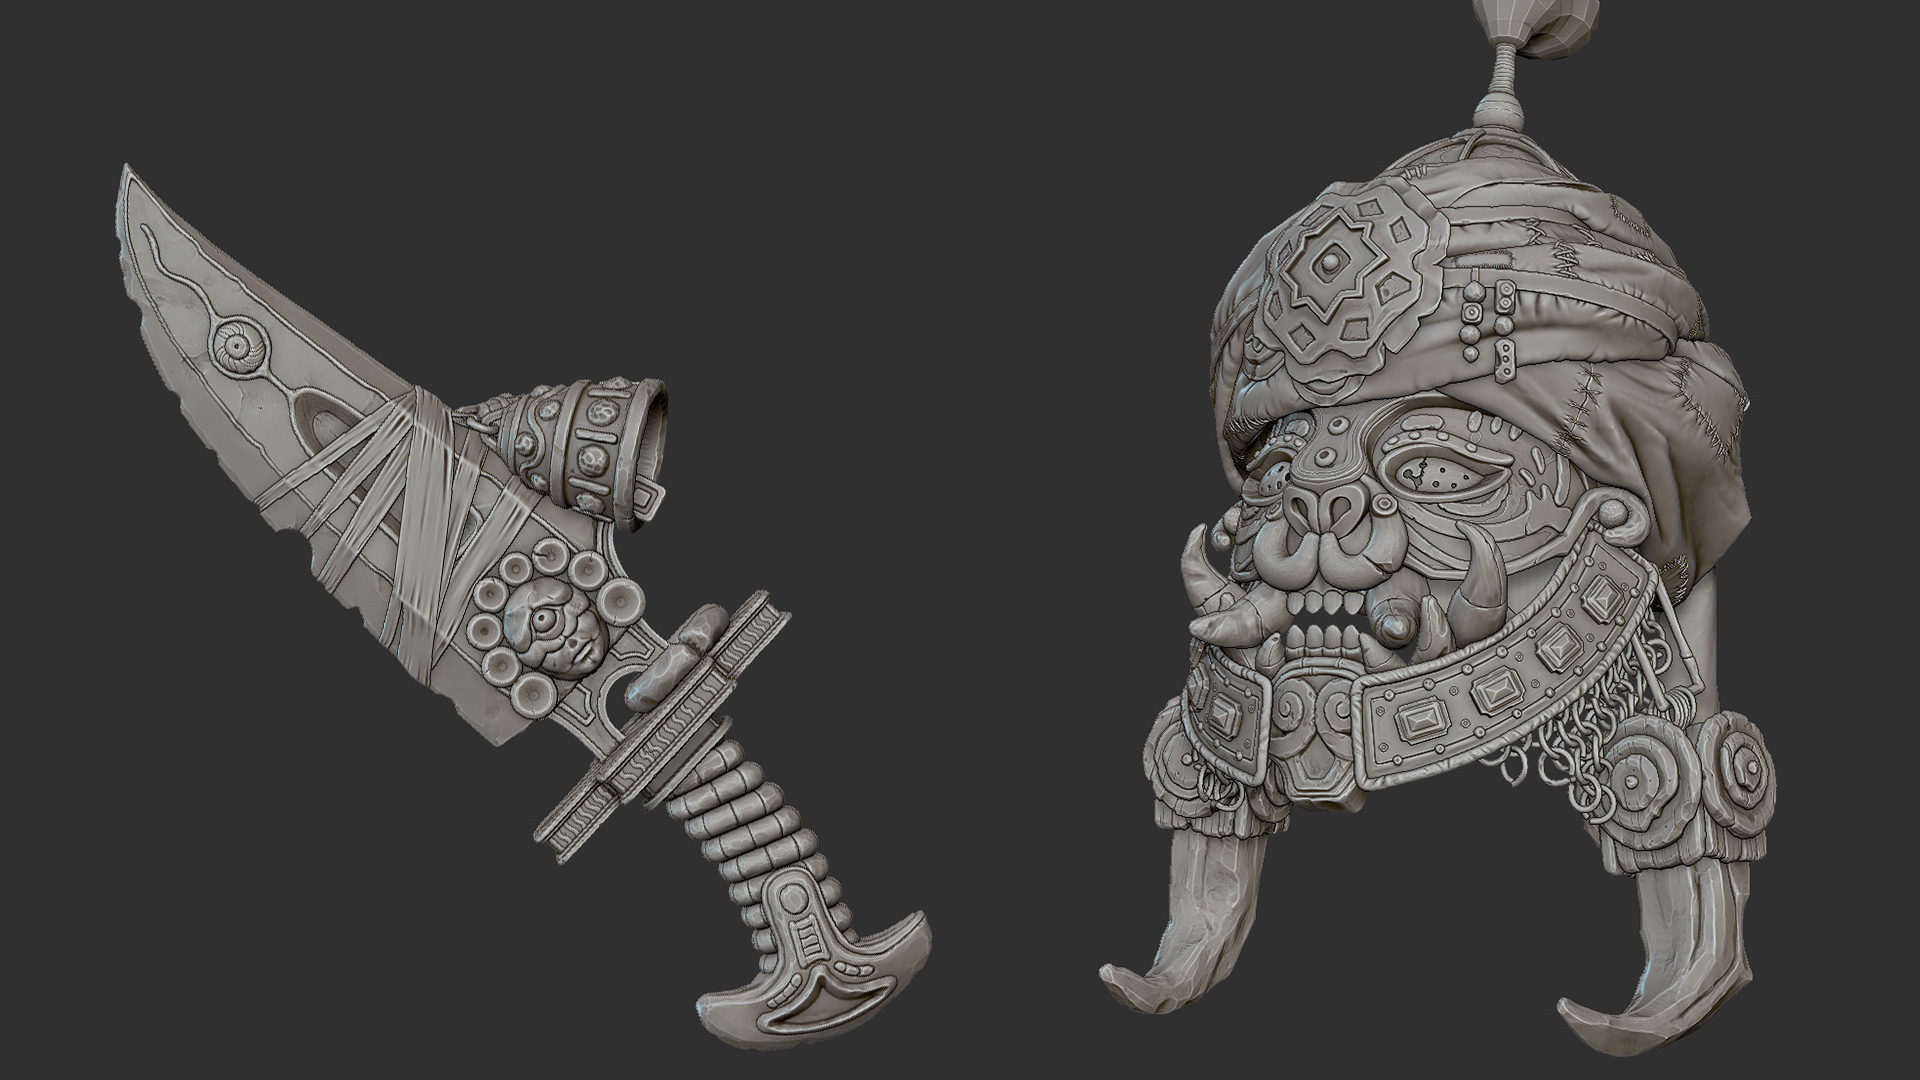
In this breakdown, I’ll show you how I translated concept art into 3D (“Deadly East” by Timur Akhmetov) and approached the 3D texturing and presentation process in Toolbag.
Sculpting & Baking
I like to sculpt as many details as possible since this helps with material definition and provides a good high poly to bake from. Setting up bakes in Toolbag is very easy, straightforward, and significantly faster if you have an RTX card. After slightly decimating my high poly mesh in ZBrush, I imported the meshes into my Toolbag 4 scene and set up a bake project.
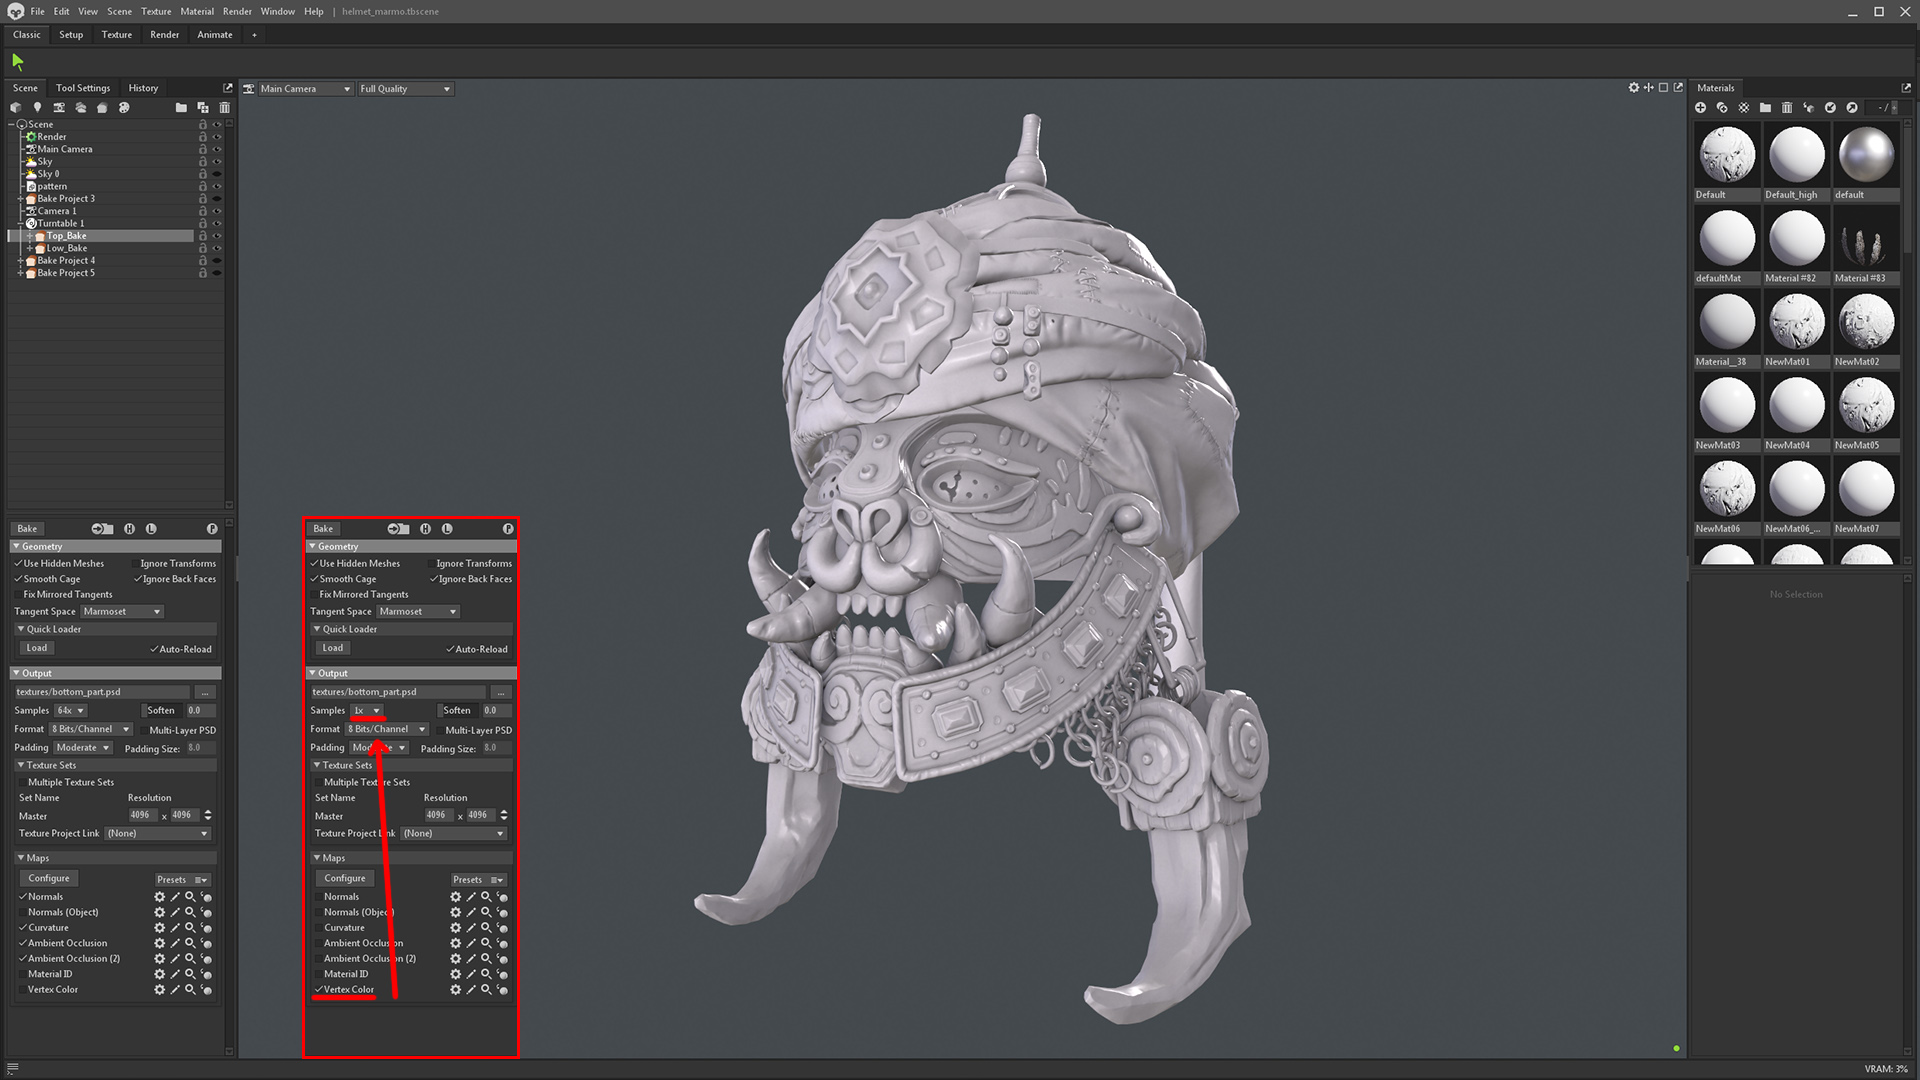
I like maxing out the Samples setting on every map I want to bake. The only exception is the Material ID map, which is set to 1x so that the edges are not aliased. This means I avoid any problems when masking color selections while texturing.
Learn how to use Bake Projects in Toolbag
Additional Baking Resources
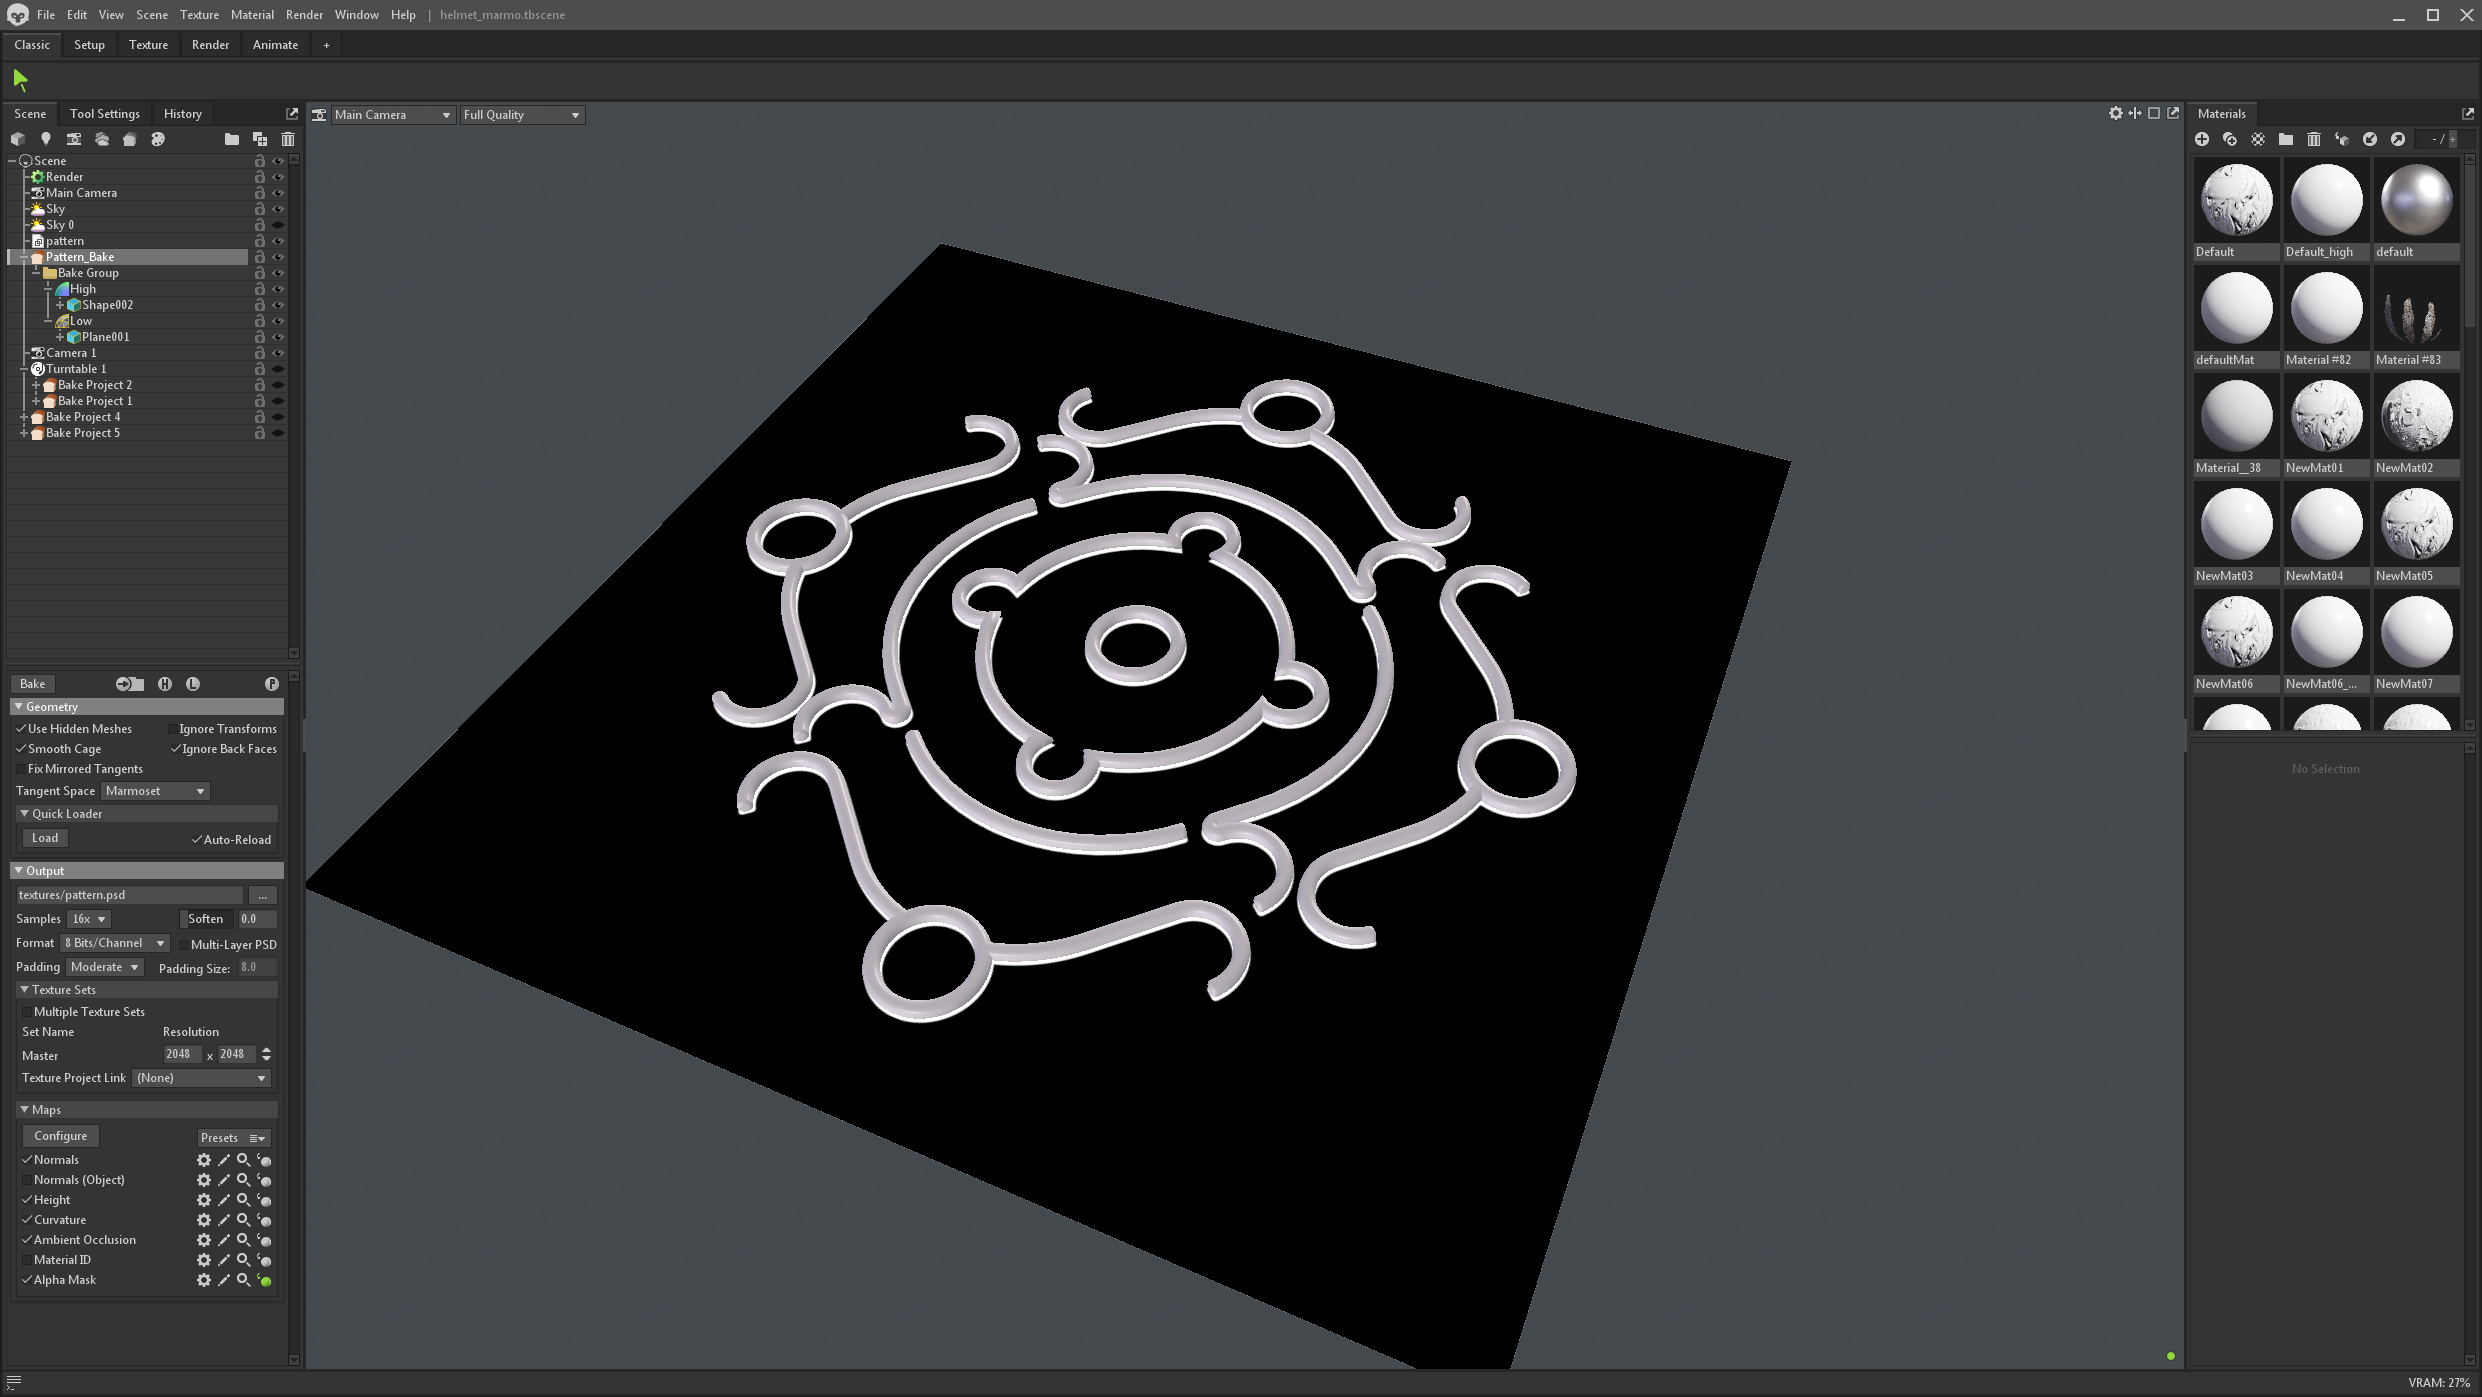
The concept includes a pattern on the turban, which I took my time to recreate using splines in 3ds Max. I later imported this spline pattern into Toolbag on a simple plane in order to bake maps for use in the texture project.
The turban was made in Marvelous Designer, and I created the topology in a way that allowed me to cut the UVs where the fabric texture would follow the direction of the mesh. After some adjustments to the tiling settings, both the fabric’s texture and the pattern detail I created were flowing in the correct direction.
Texturing Preparation
Before diving into the texturing process, I make sure to do some brief preparation for my scene to ensure that I’m creating the results that I expect while texturing.
Scene Blockout & Color Correction
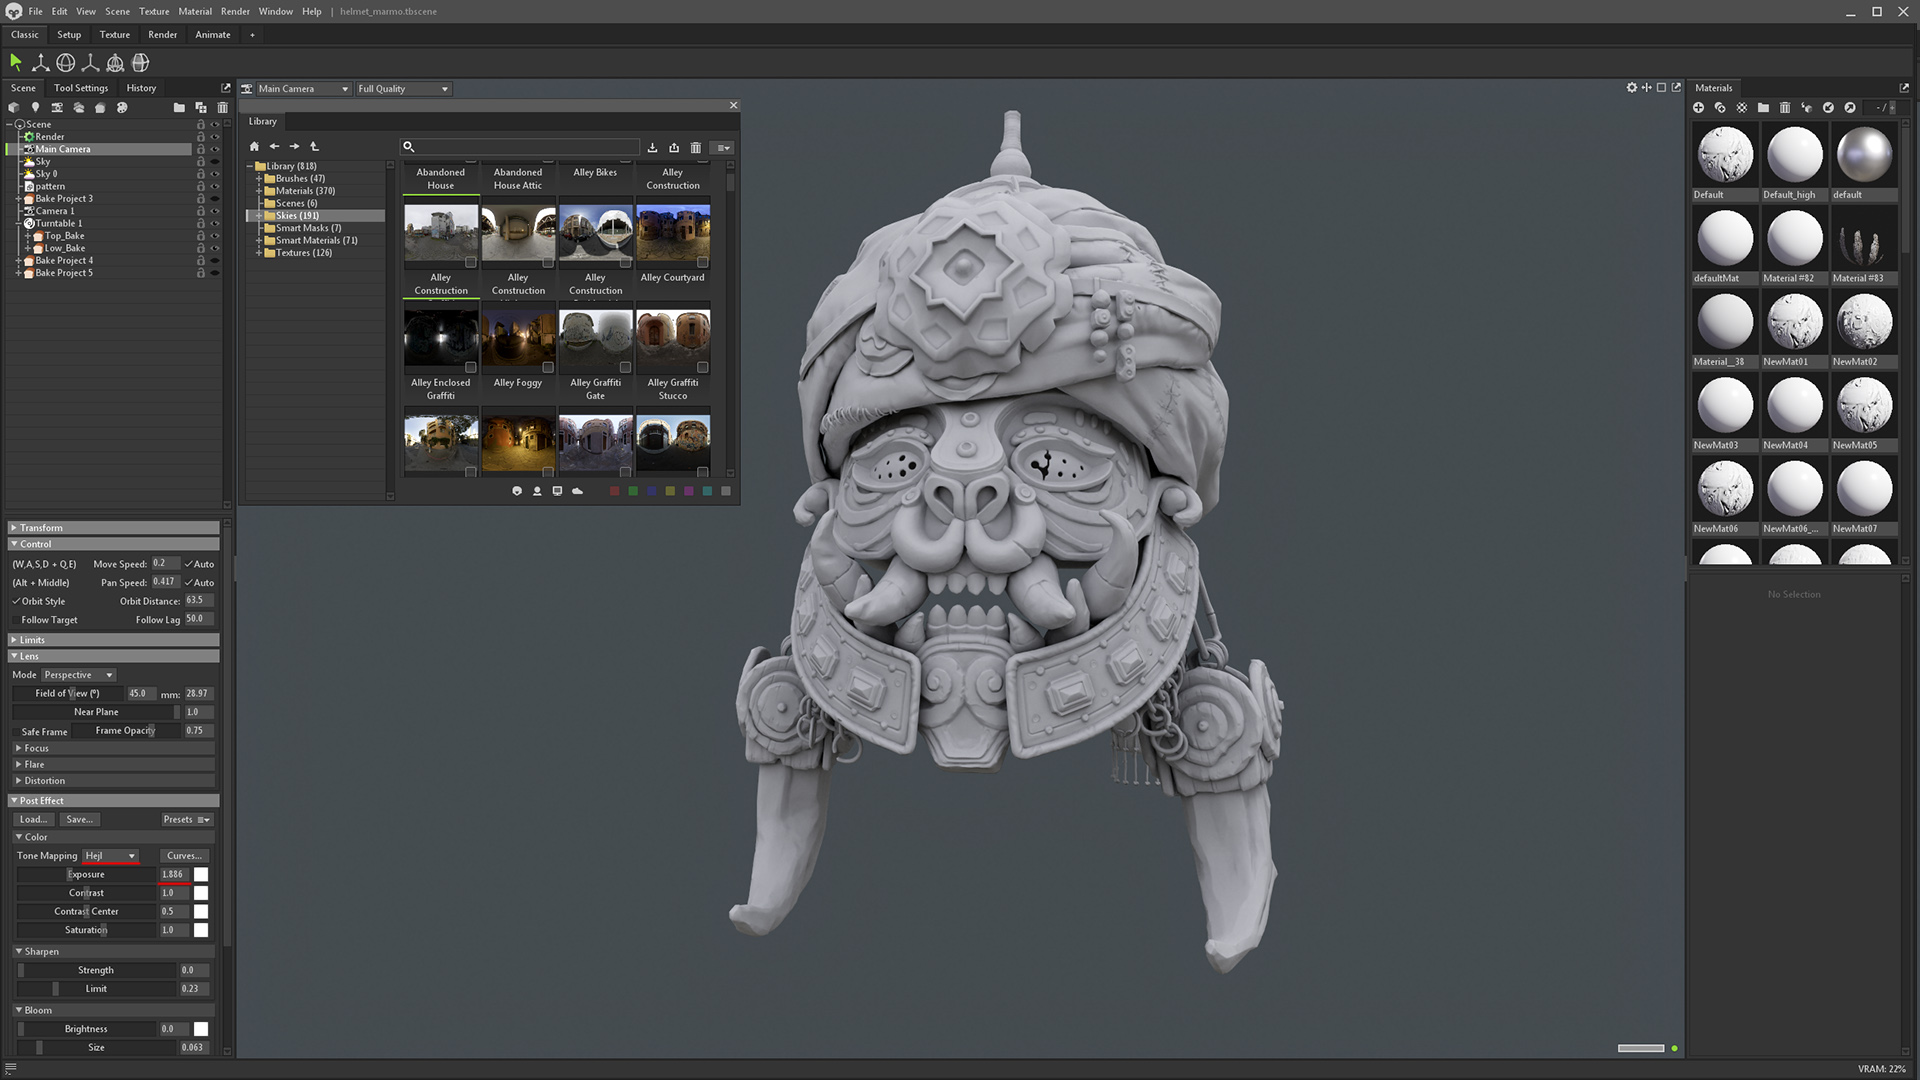
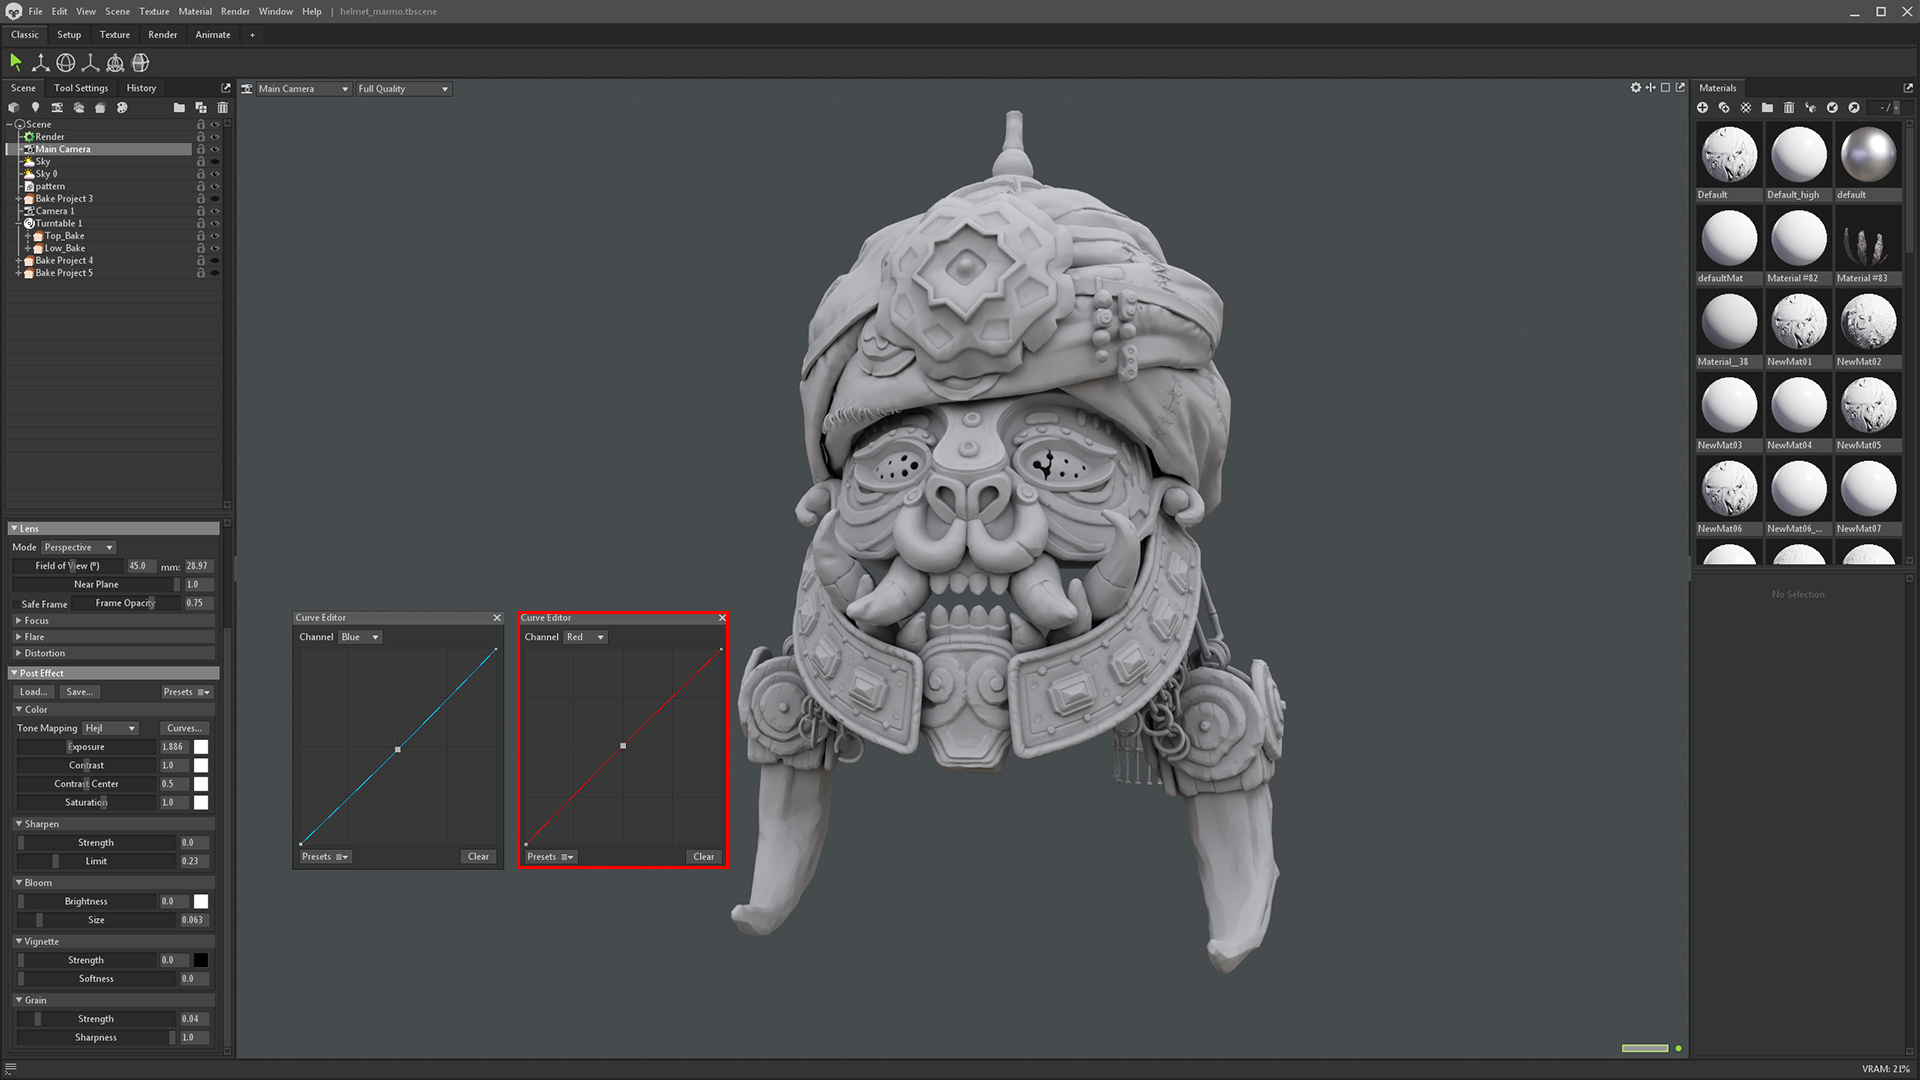
For the most accurate results while texturing, be sure to select an appropriate and neutral Sky to light your scene and choose your camera’s Tone Mapping. In my case, I used the Alley Construction Sky from the Library and set my Tone Mapping to Hejl for good color accuracy and contrast.
Another tip for color correcting your scene is to adjust the channels in the camera’s Curves setting. You can take a screenshot of your model with a white/grey material applied, bring it into a photo editing app of your choice, and check the RGB values. In my scene, the sky is tinting the model towards blue, which means I can increase the red values and reduce the middle values in the blue channel. Using this technique can help ensure that your colors will be accurate.
Using Material ID’s to Texture a Mesh
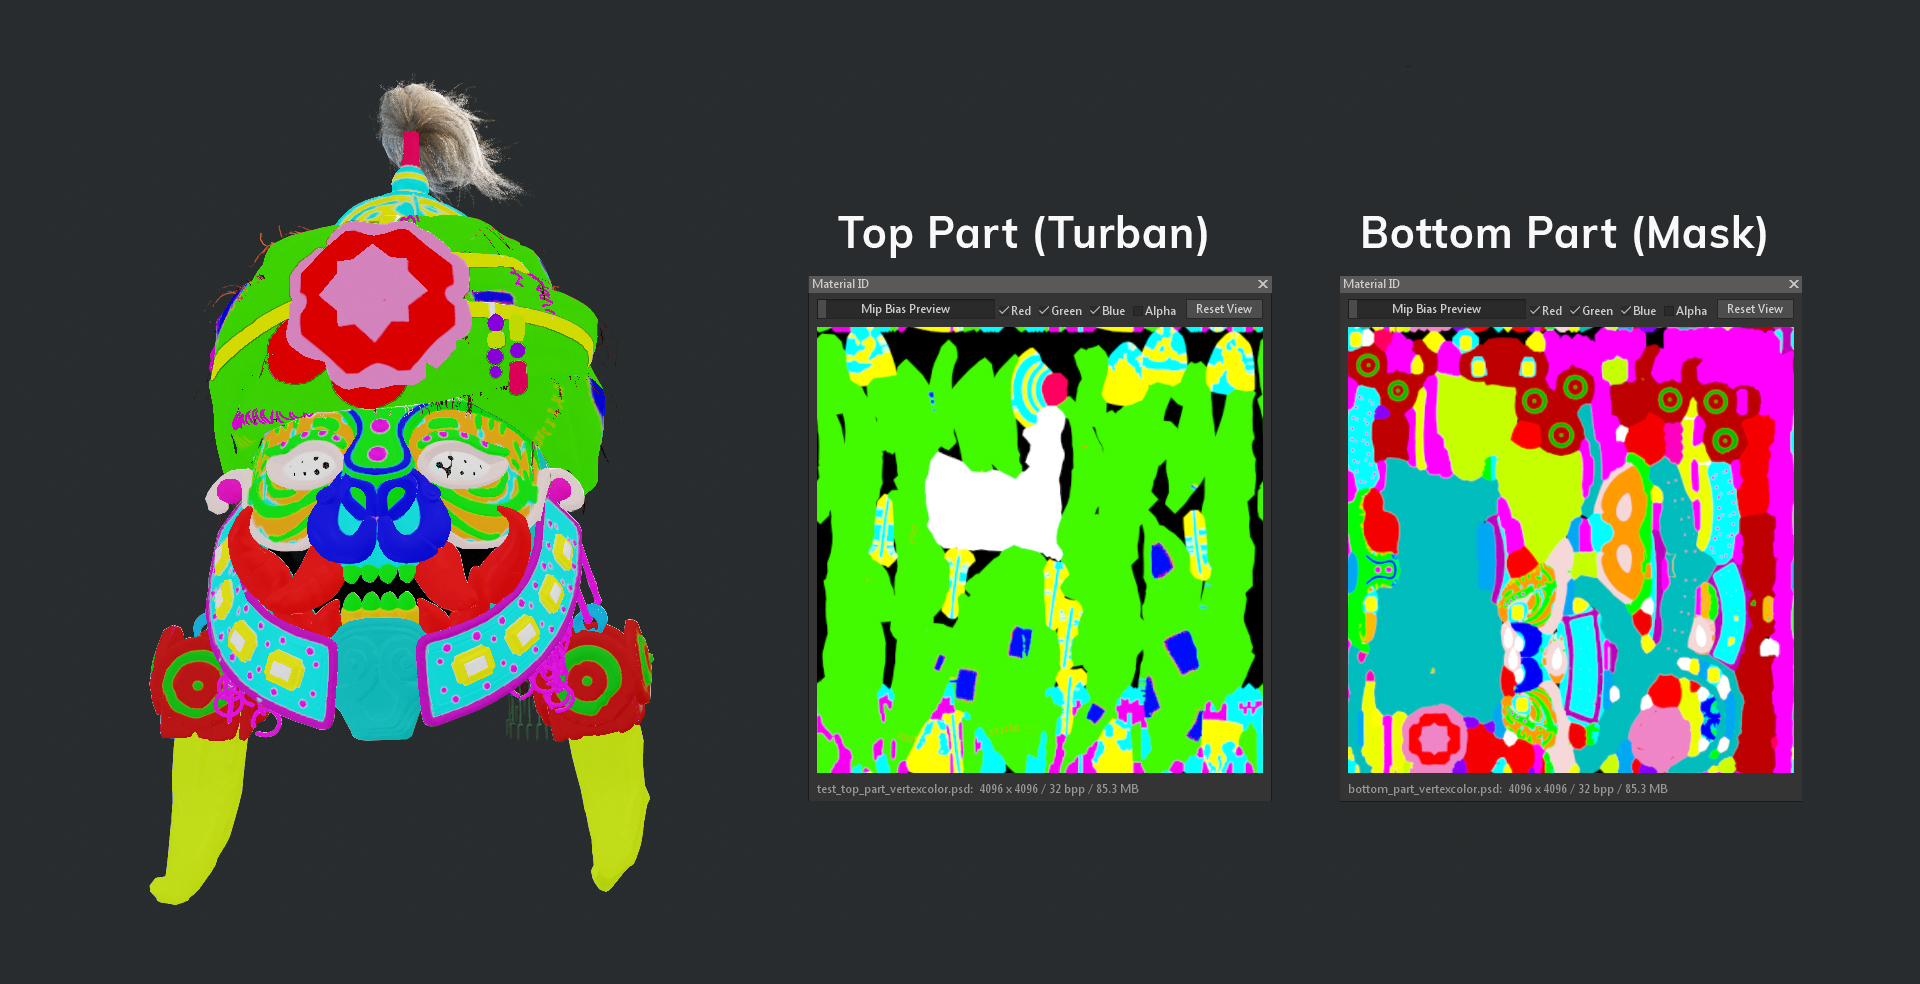
The turban was textured using the Material ID map that was generated in the Bake Project. When I added the details in the mesh, I kept all the elements separate so I could color code them using vertex paint. I also gave the patches and both thick and thin threads their own ID colors so I can texture them easily.
I used two 4k maps and two texture projects in total for the asset in order to get the best result possible, especially when rendering close-ups. You can see the ID maps associated with the texture projects below.
Learn how to use Texture Projects in Toolbag
Creating Material Build-Up
My approach when texturing is fairly simple. I work my way up from a base material, making sure to add variation to everything (diffuse, roughness, etc.), and continue to add dirt and other effects as needed.
The Turban
I started with the Burlap cloth material from the Library which, after modifying the Tiling scale, was a perfect fit. I changed the Albedo color, increased the saturation using a Hue/Saturation adjustment layer, then I started to add a bunch of wear and tear, patterns, and sun discoloration. Using the ID map, I applied the Rope Manila material to the threads as a base layer. The leather patches were made up of a combination of leather materials from the Library as well.
Face Mask
The base of the inside of the face mask used the Brass Antique Smart Material and I modified it according to my needs. I then applied a grunge map from the Library and set the Blending to Overlay to generate more texture and color variation. The concept has some nice highlight specks on the face, so I duplicated the base metal layer, lightened it, reduced the Roughness, and increased the Bump values. I masked this layer using the Lichen Dots Light grunge map and created two more diffuse and roughness variation layers for the metal, masked by various grunge maps. The dirt buildup was created using a combination of grunge maps and the Occlusion processor, along with some hand-painted detail.
Jaw Guard
Sometimes, it can be difficult to identify materials from looking at concert art, and I felt this way about the jaw guard. My approach was to build the material layer by layer until I got the desired effect, keeping in mind how dirt distributes itself and playing with color variation. The base was a fill layer with the Grunge Marbled texture applied to the Albedo slot and the color set to a brownish color. After this, the fun starts and I begin to add color and roughness variation using different grunge maps. Dirt is very important when it comes to such an exposed piece, and you can use the Occlusion generator in combination with grunge maps to achieve some believable effects. I highlighted the edges using the Curvature processor as a mask on a light fill layer. Finally, to help make this asset look closer to the concept, I created some moss-like detail using a green fill layer with some masks applied and layered some Occlusion and Curvature processors for cavity detail.
Gem Creation
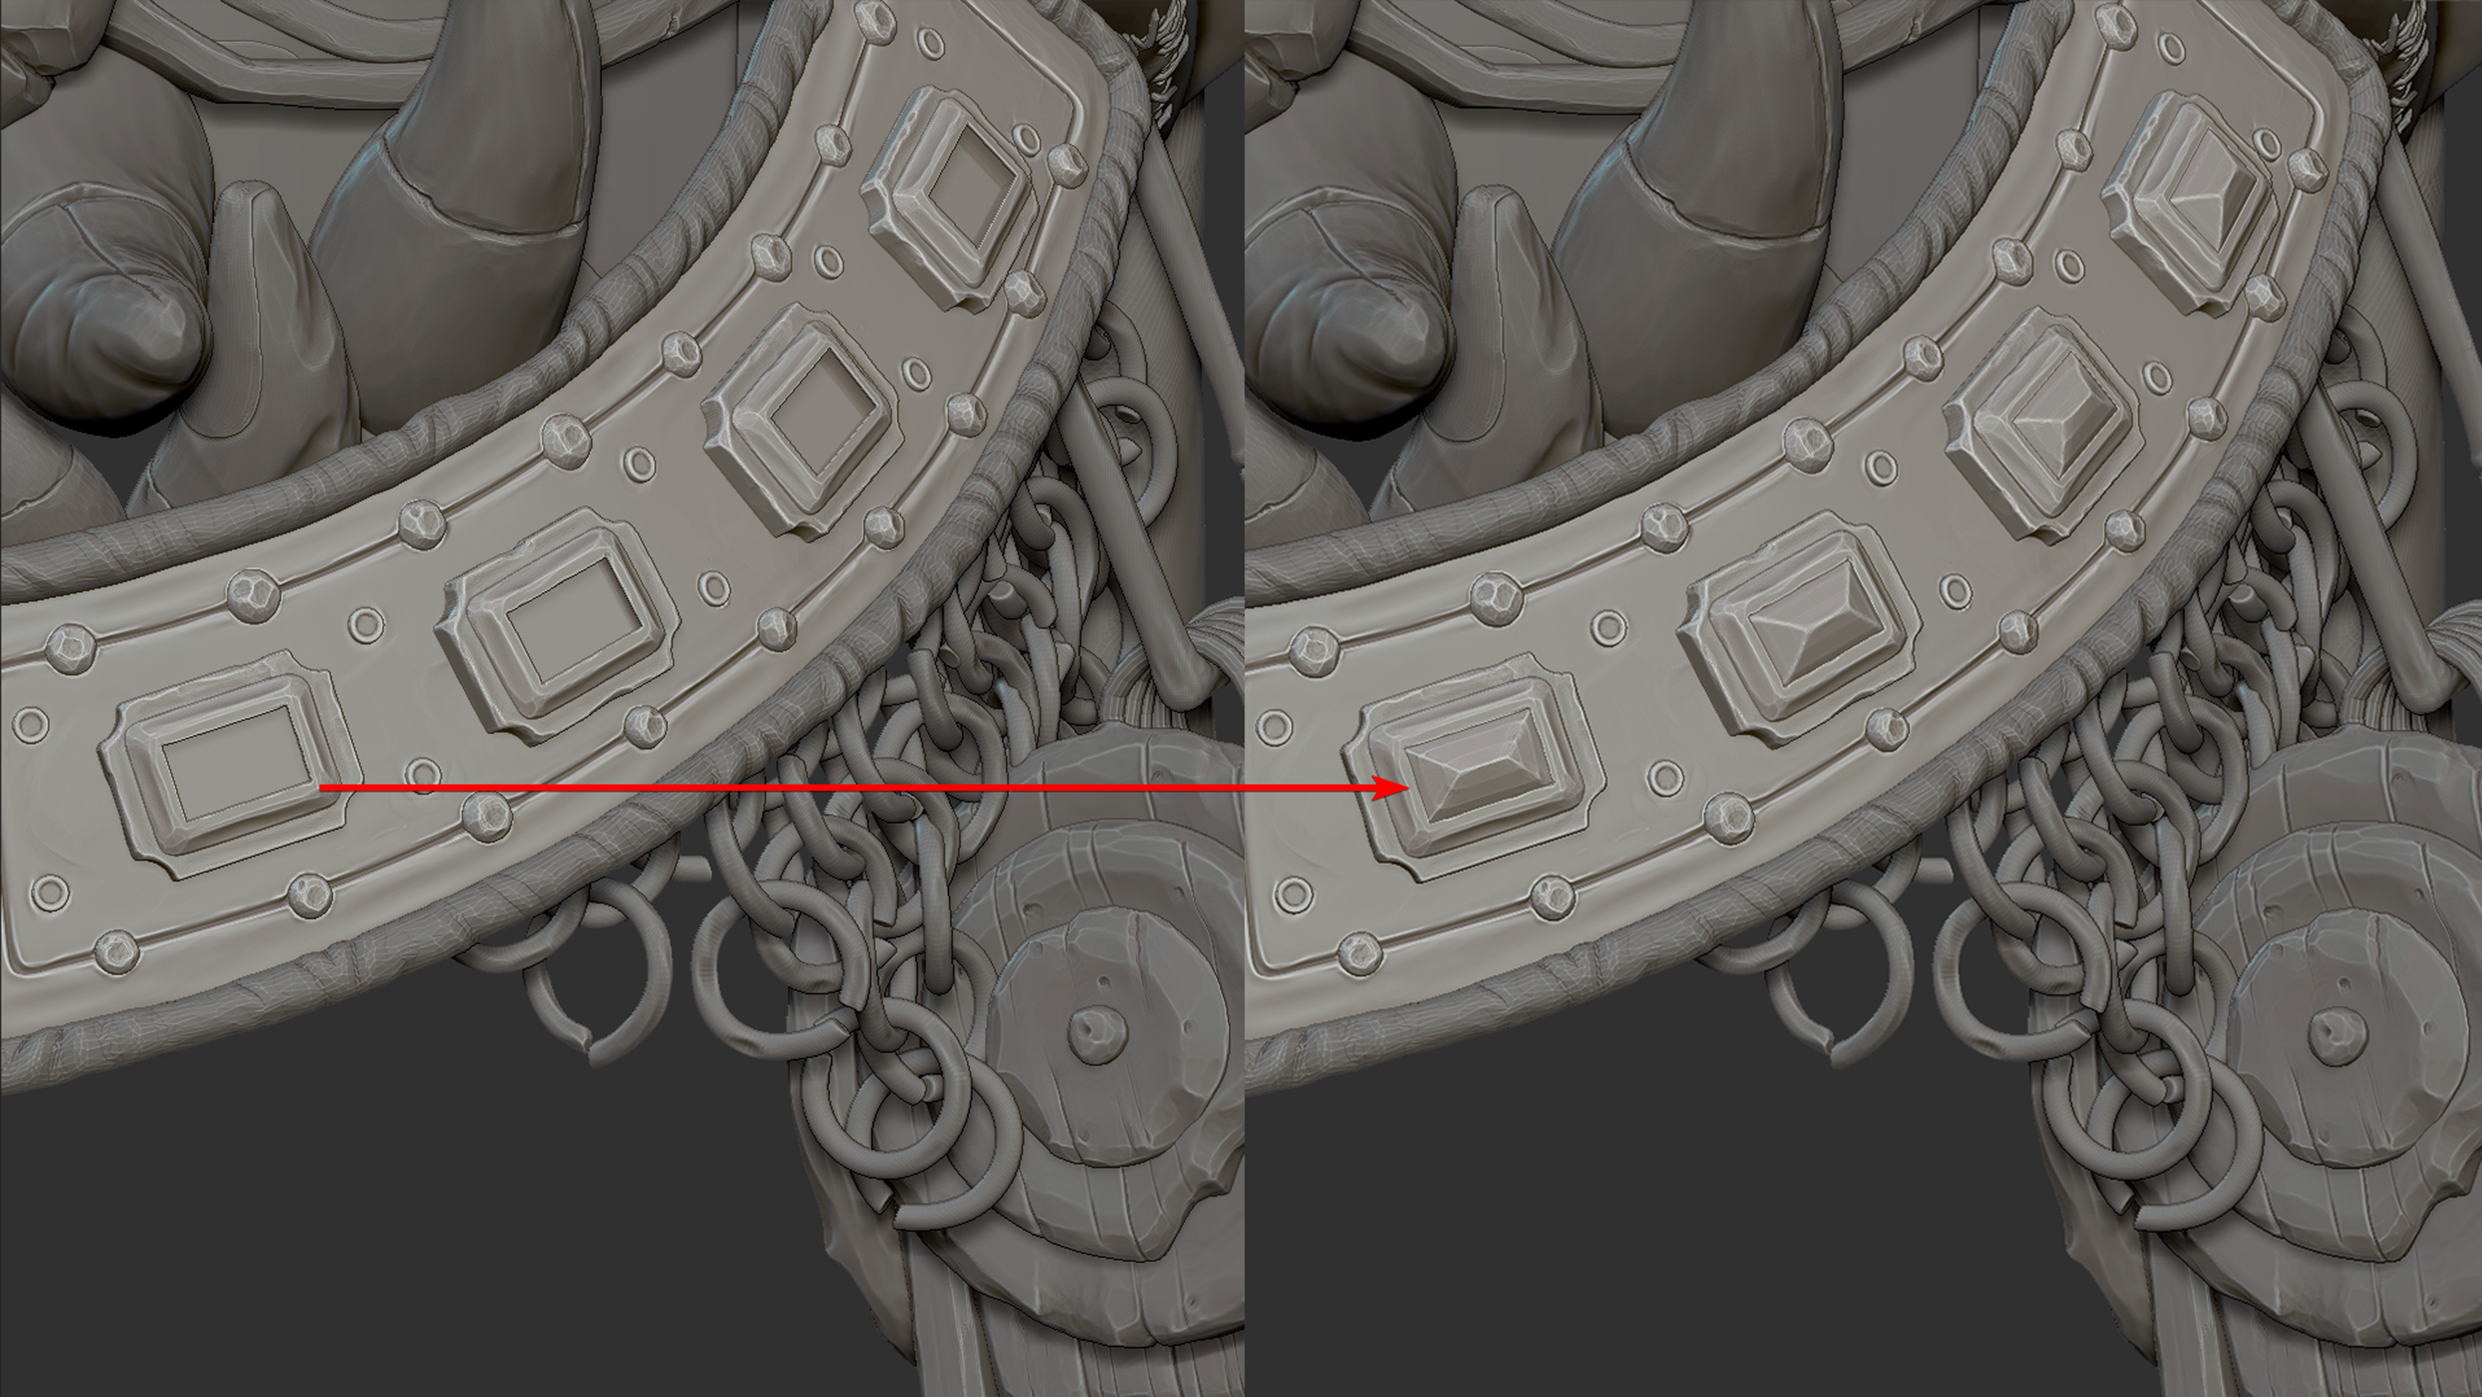
I used the Glass material for the gems, changed its albedo color, and added scratches and dents along with some dirt. I also built a socket in both the low poly and high poly geometry to give the gem something to refract.
Back-face Culling Trick
When I was setting up the final shots, I found the gap where the mouth is on the mask to be a bit distracting. While this is completely normal, it was breaking up the silhouette in an unappealing way. I ended up modeling a one-sided plane to fit the inside of the mask, imported it, and gave it a black material with its Dither Transparency set to 0.9. I also enabled Cull Back Faces in the mesh properties so that the mesh is viewable from the front, but not the back.
Presentation
I feel like this subject is often overlooked, but if you want your work to have an impact, it’s almost as important as sculpting and/or texturing. I wanted to recreate the same feel of the concept art for both the dagger and helmet while lighting my scene. At the same time, I wanted to create a museum environment for the props to live in.
Lighting the Scene
The video below shows all the lights that I used, which include a dim Sky light and several Spot lights to emulate a studio environment and to help accentuate different elements of the mask. One good tip here is to never let your Spot light Diameter setting have a value of 0, as this gives perfectly sharp shadows which rarely exist in real-world lighting. Increasing this slider helps to create nice, soft shadows in your scene.
Post Processing
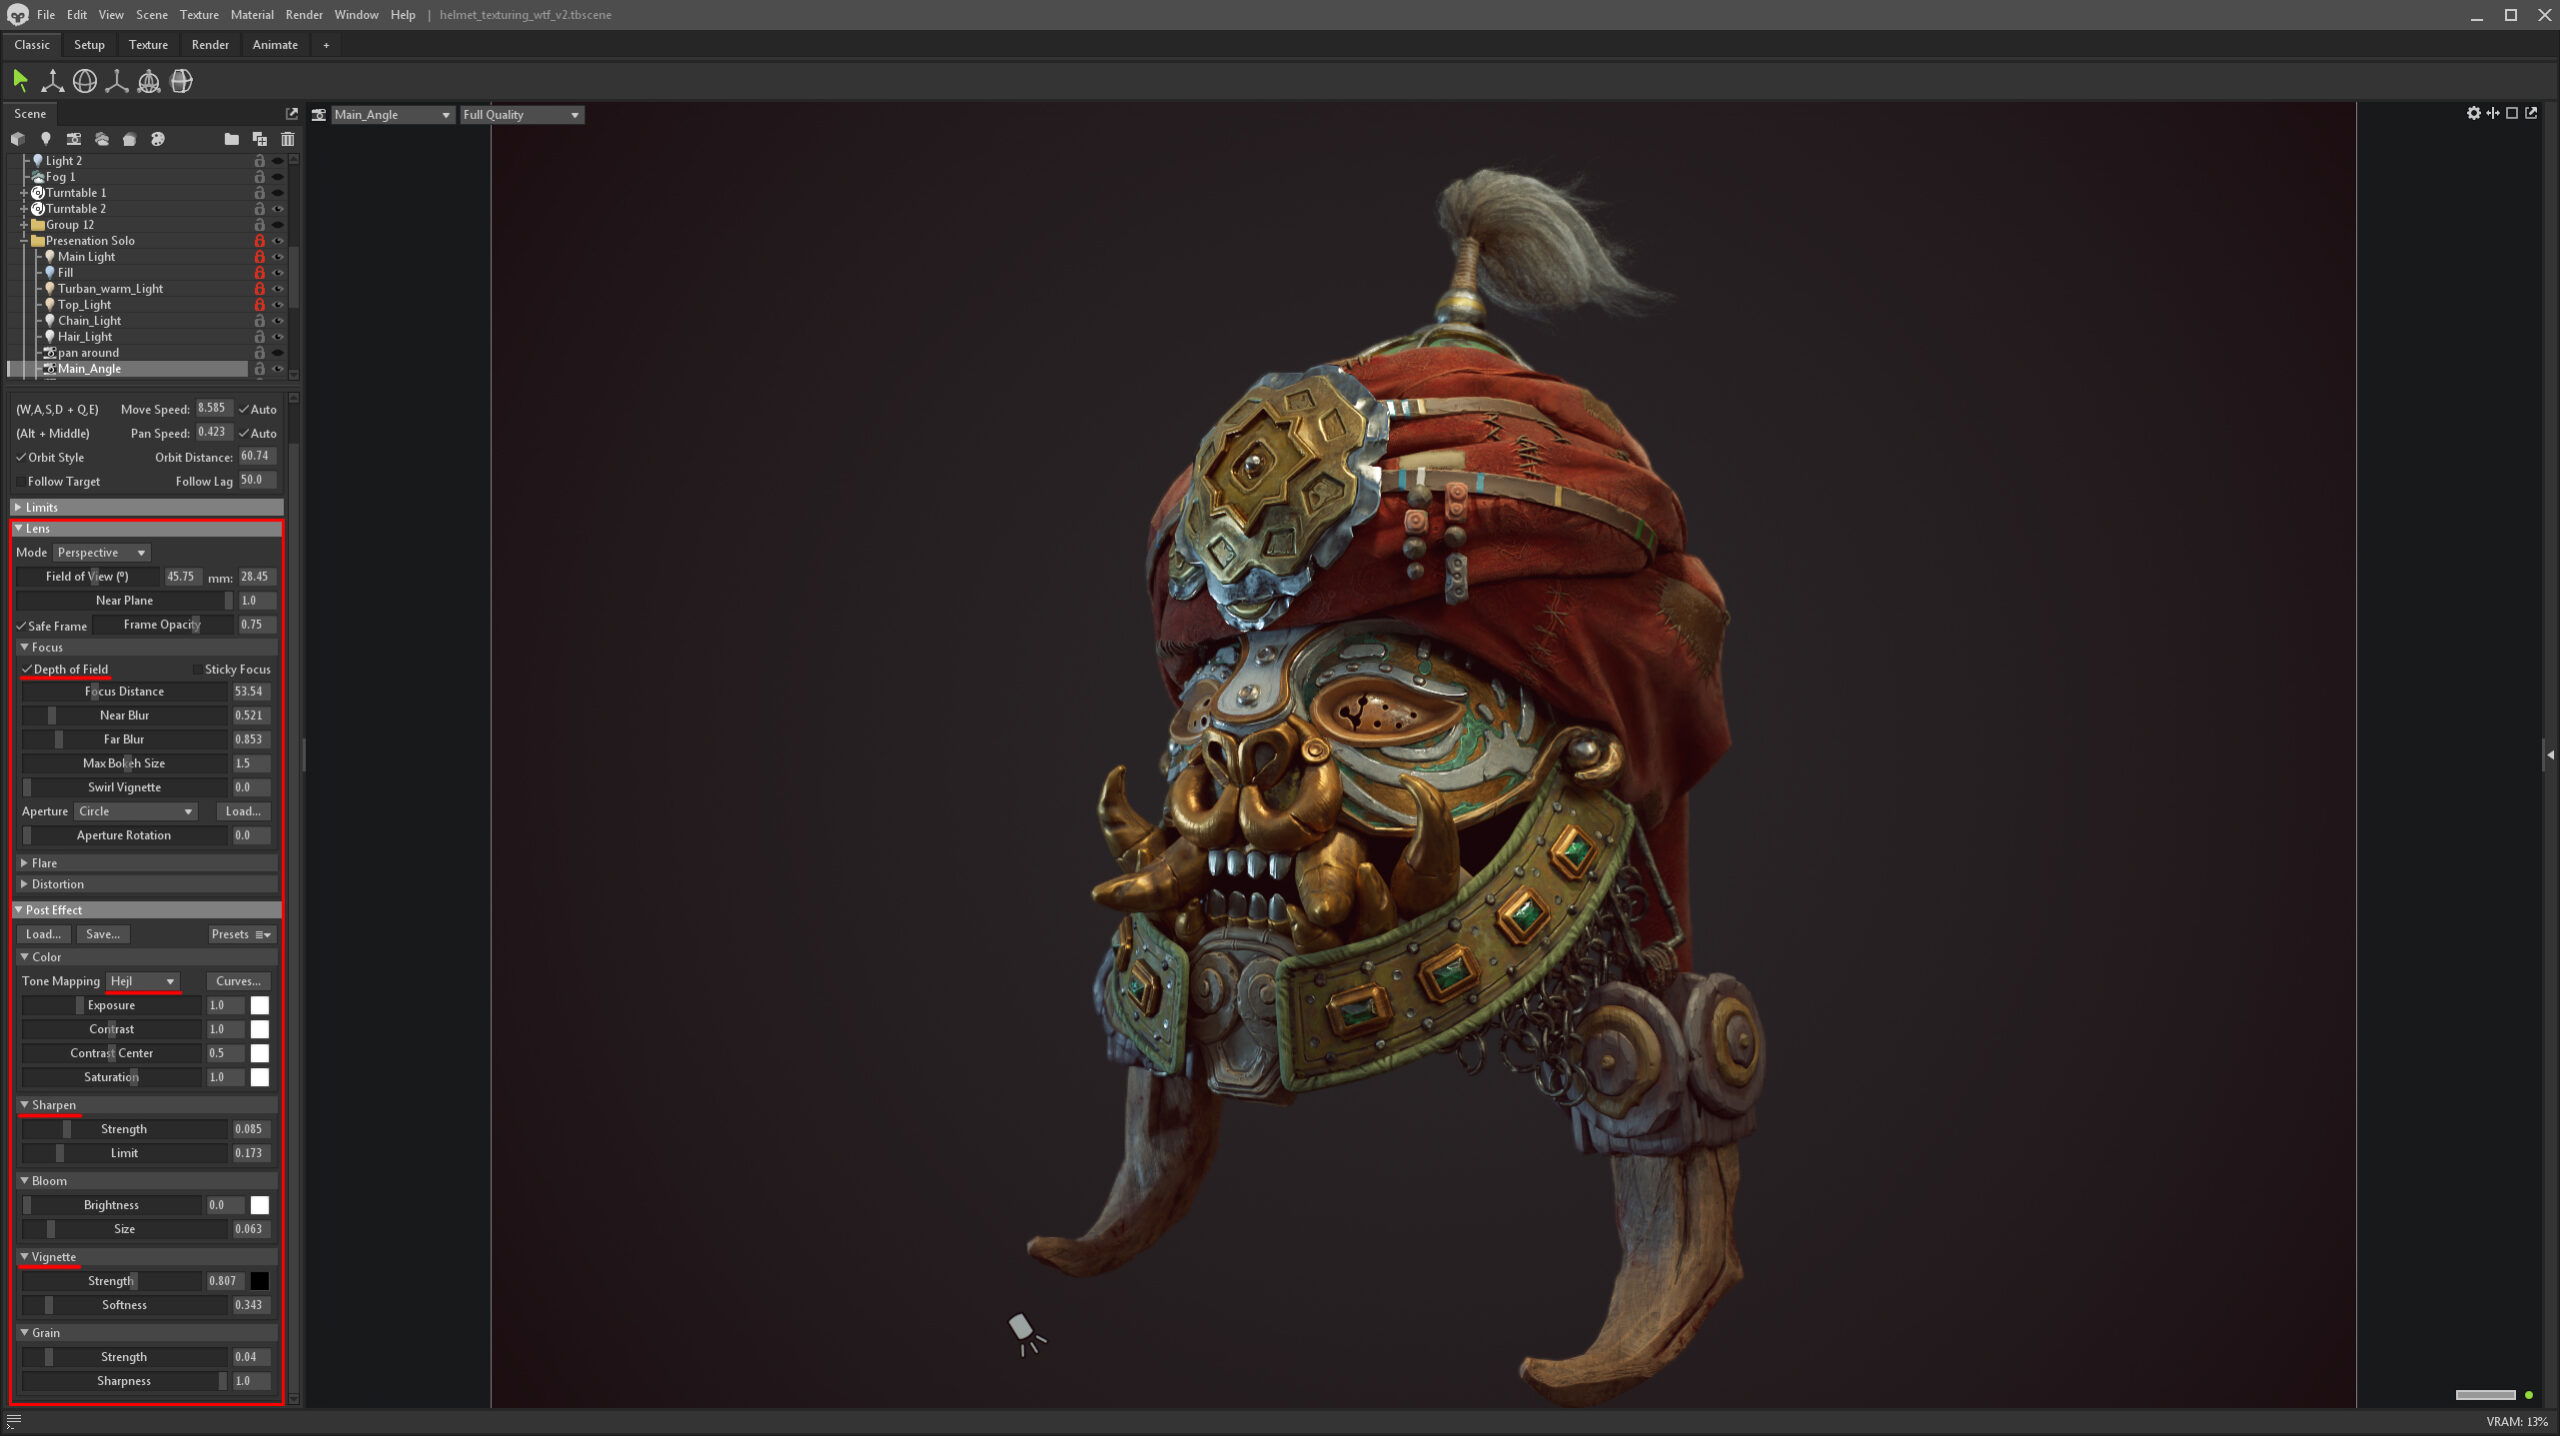
The Hejl Tone Mapping option in the Camera object has a great balance between color and contrast, helping to make your presentation pop. The default Linear Tone Mapping option could be used when rendering animations that will be further processed or composited since this simulates the way cinematic cameras work and make your image flatter. It’s always easier to add contrast in post-production than to try and remove it after the fact.
The camera settings I played with the most were Depth of Field, Sharpen, and Vignette. I made sure they were set at low to moderate values, as a high DoF value can make your object seem very small, and it’s very easy to oversharpen and apply too much vignetting.
Ray Tracing the Museum
For the museum scene, I was heavily inspired by the National Palace Museum in Tapei. While Ray Tracing significantly improved the overall look of the helmet, it really shined most in the museum scene. It enabled me to have perfect reflections and a sense of immediacy to see what my scene will look like without needing to bake lighting as you would in a game engine.
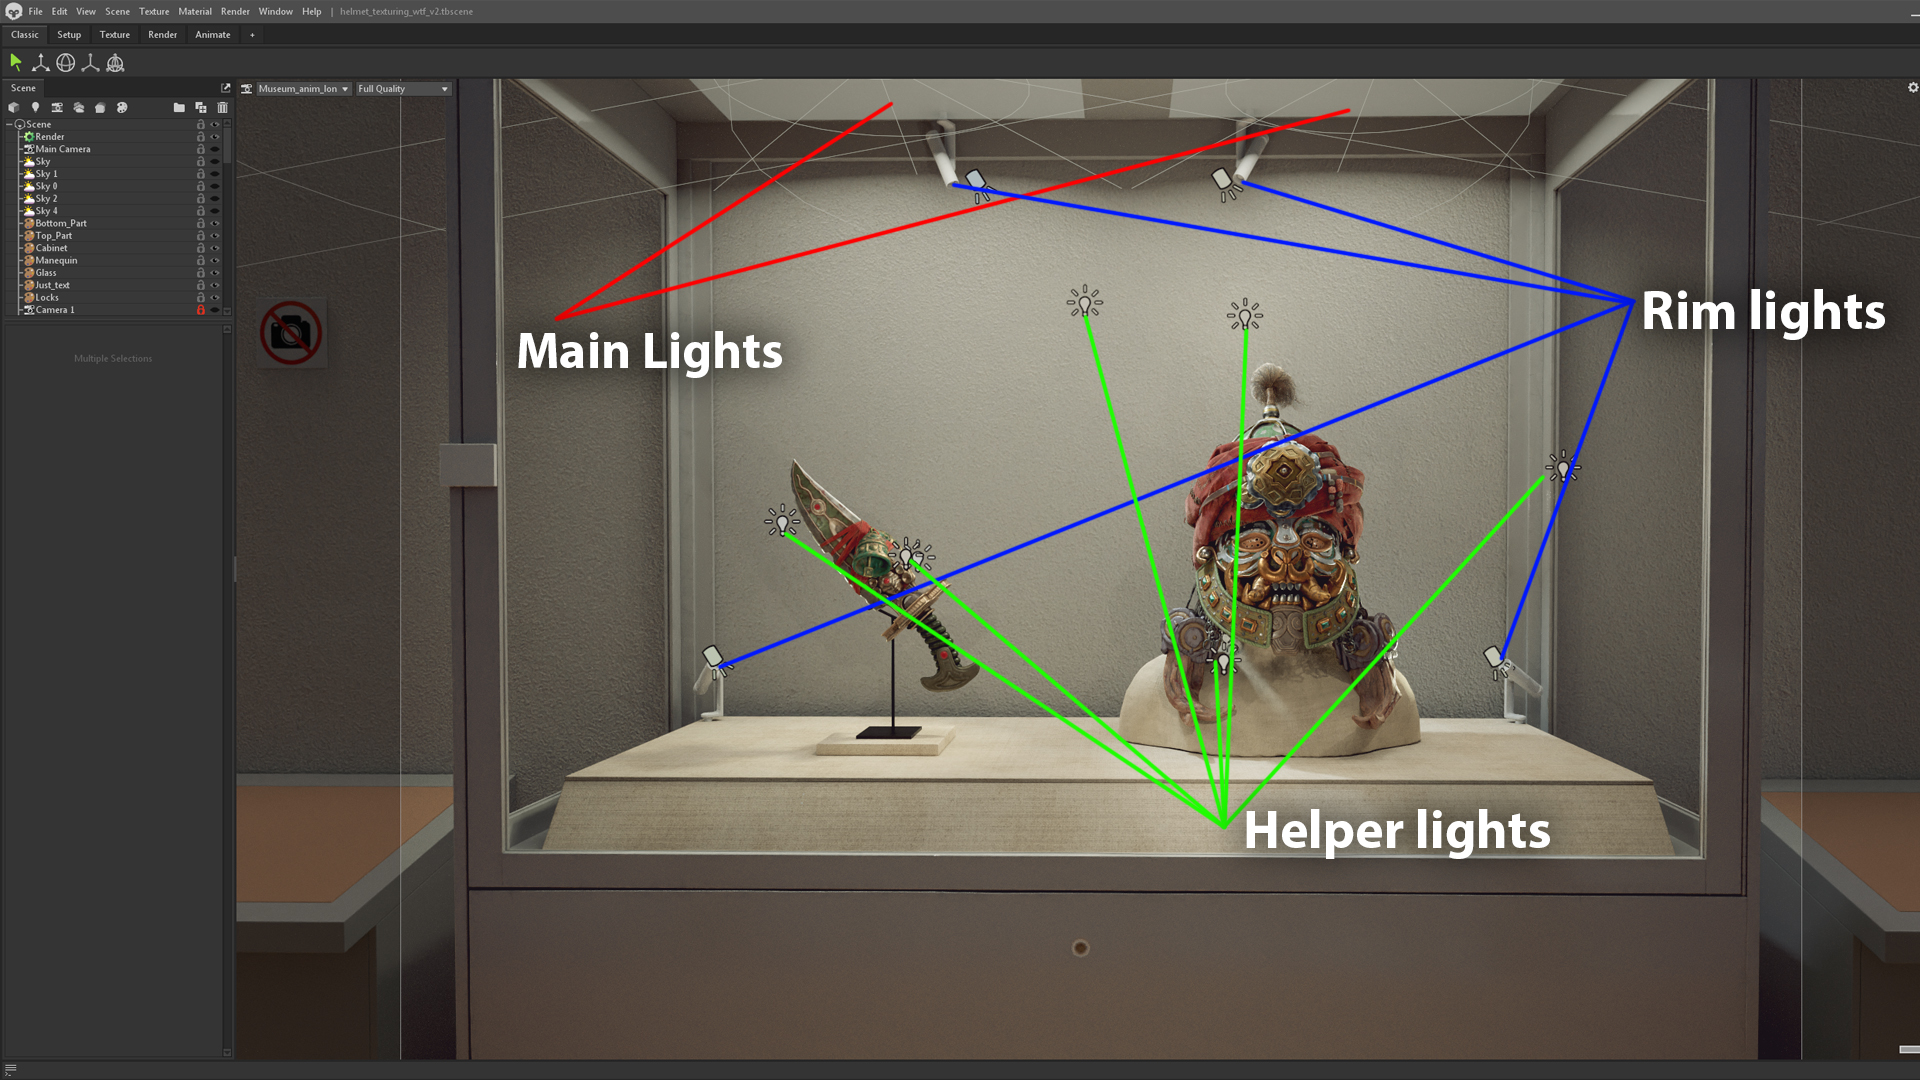
Lighting the museum was a fun experience. I started with a dimly lit Sky to generate some ambient lighting, then I added additional museum-style lights. The two main lights on the top were the fill lights, and then I added helper lights to create nice reflections for the assets. However, I felt this wasn’t enough, so I added some Spot lights to act as rim lights to help accentuate the forms. The post-processing was treated similarly to the individual renders, where I set moderate values for Curves, Depth of Field, Sharpen, and Vignette.
Conclusion
Thank you for checking out my breakdown, I hope it’s been useful. You can find me streaming Toolbag 4 and other game art-related content regularly on Twitch.
We would like to thank Alex Coman for writing this breakdown. You can check out more of Alex’s work on Artstation. Dive deep into ray tracing and texture projects using a 30-day trial for Toolbag 4.
If you’re interested in collaborating on a tutorial or breakdown article, please send us your pitch, along with a link to your artwork, to submissions@marmoset.co.

