Introduction
Modeling the Bottles and Liquid
I created bottles and liquid models using subdivision modeling techniques in Modo. After completing the models, I froze the geometry to create perfect curvature with a high poly result.
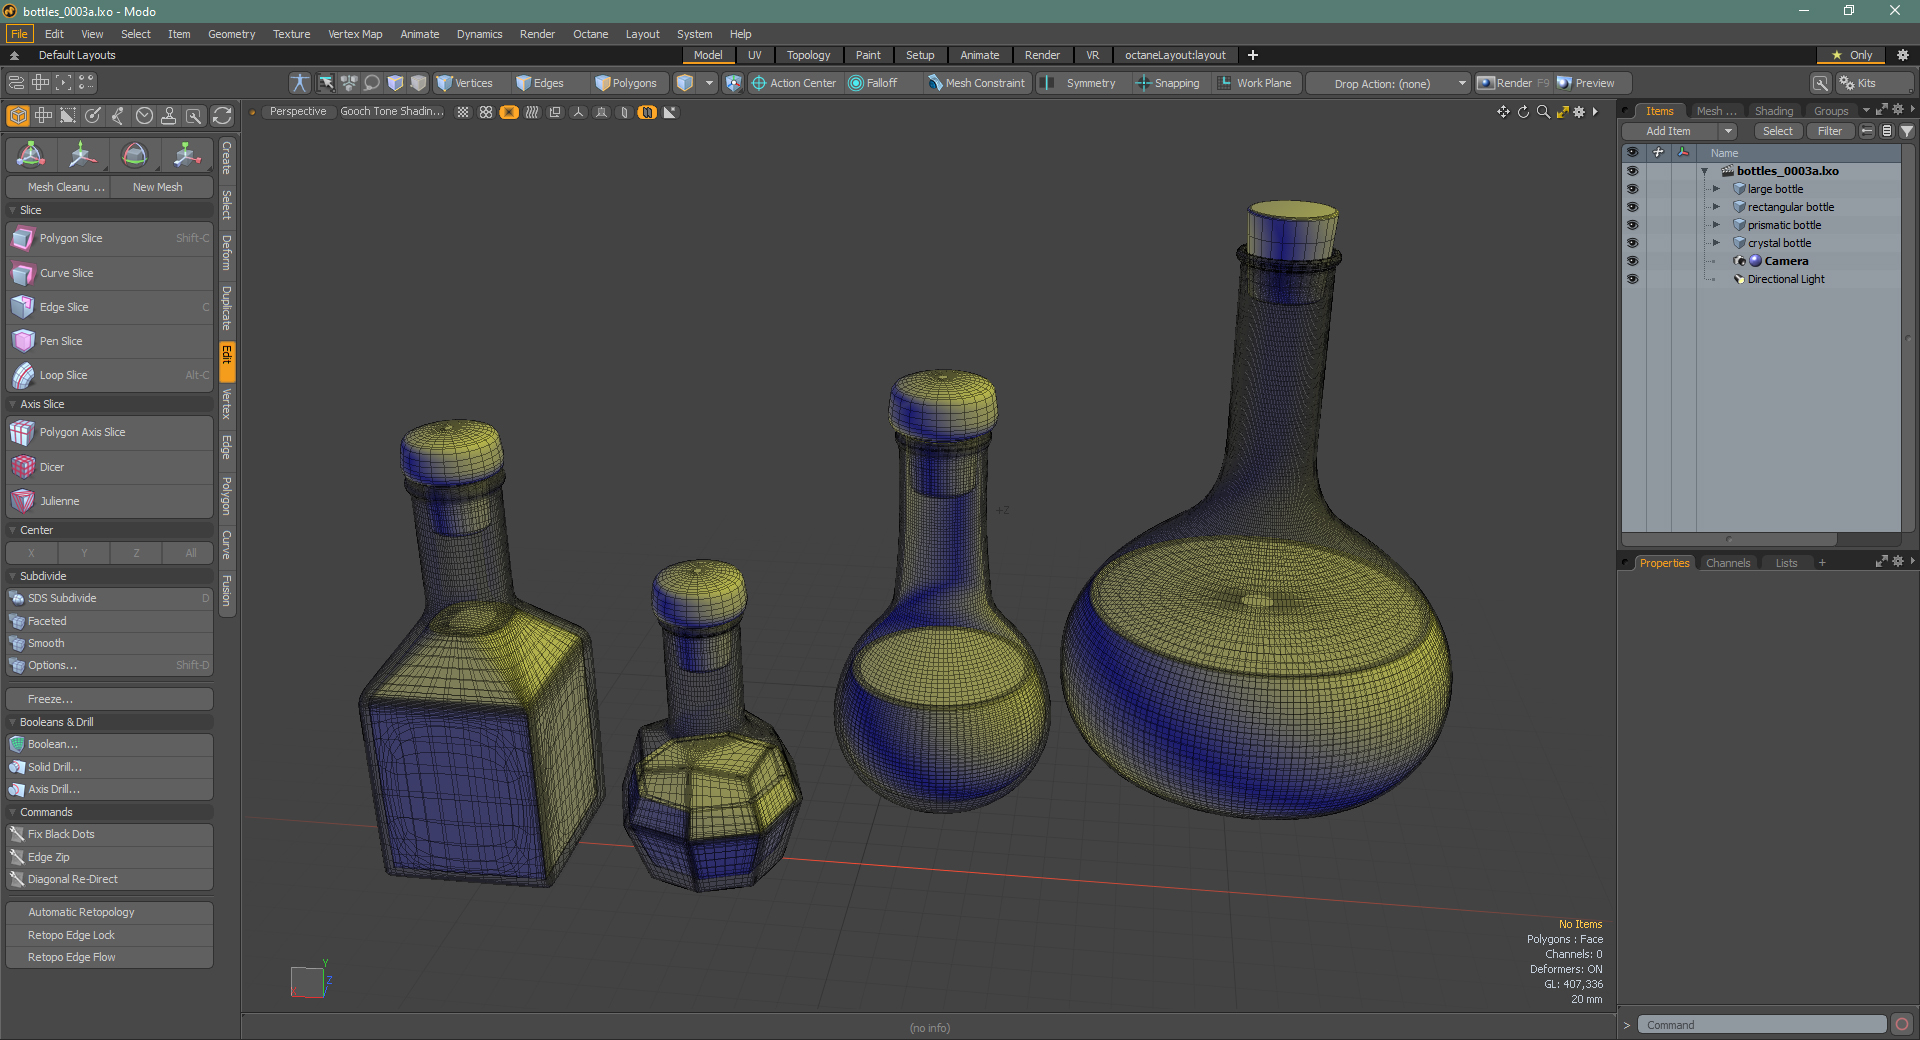
There are some important things to consider while creating this type of geometry. The first is to add thickness to the bottle geometry.
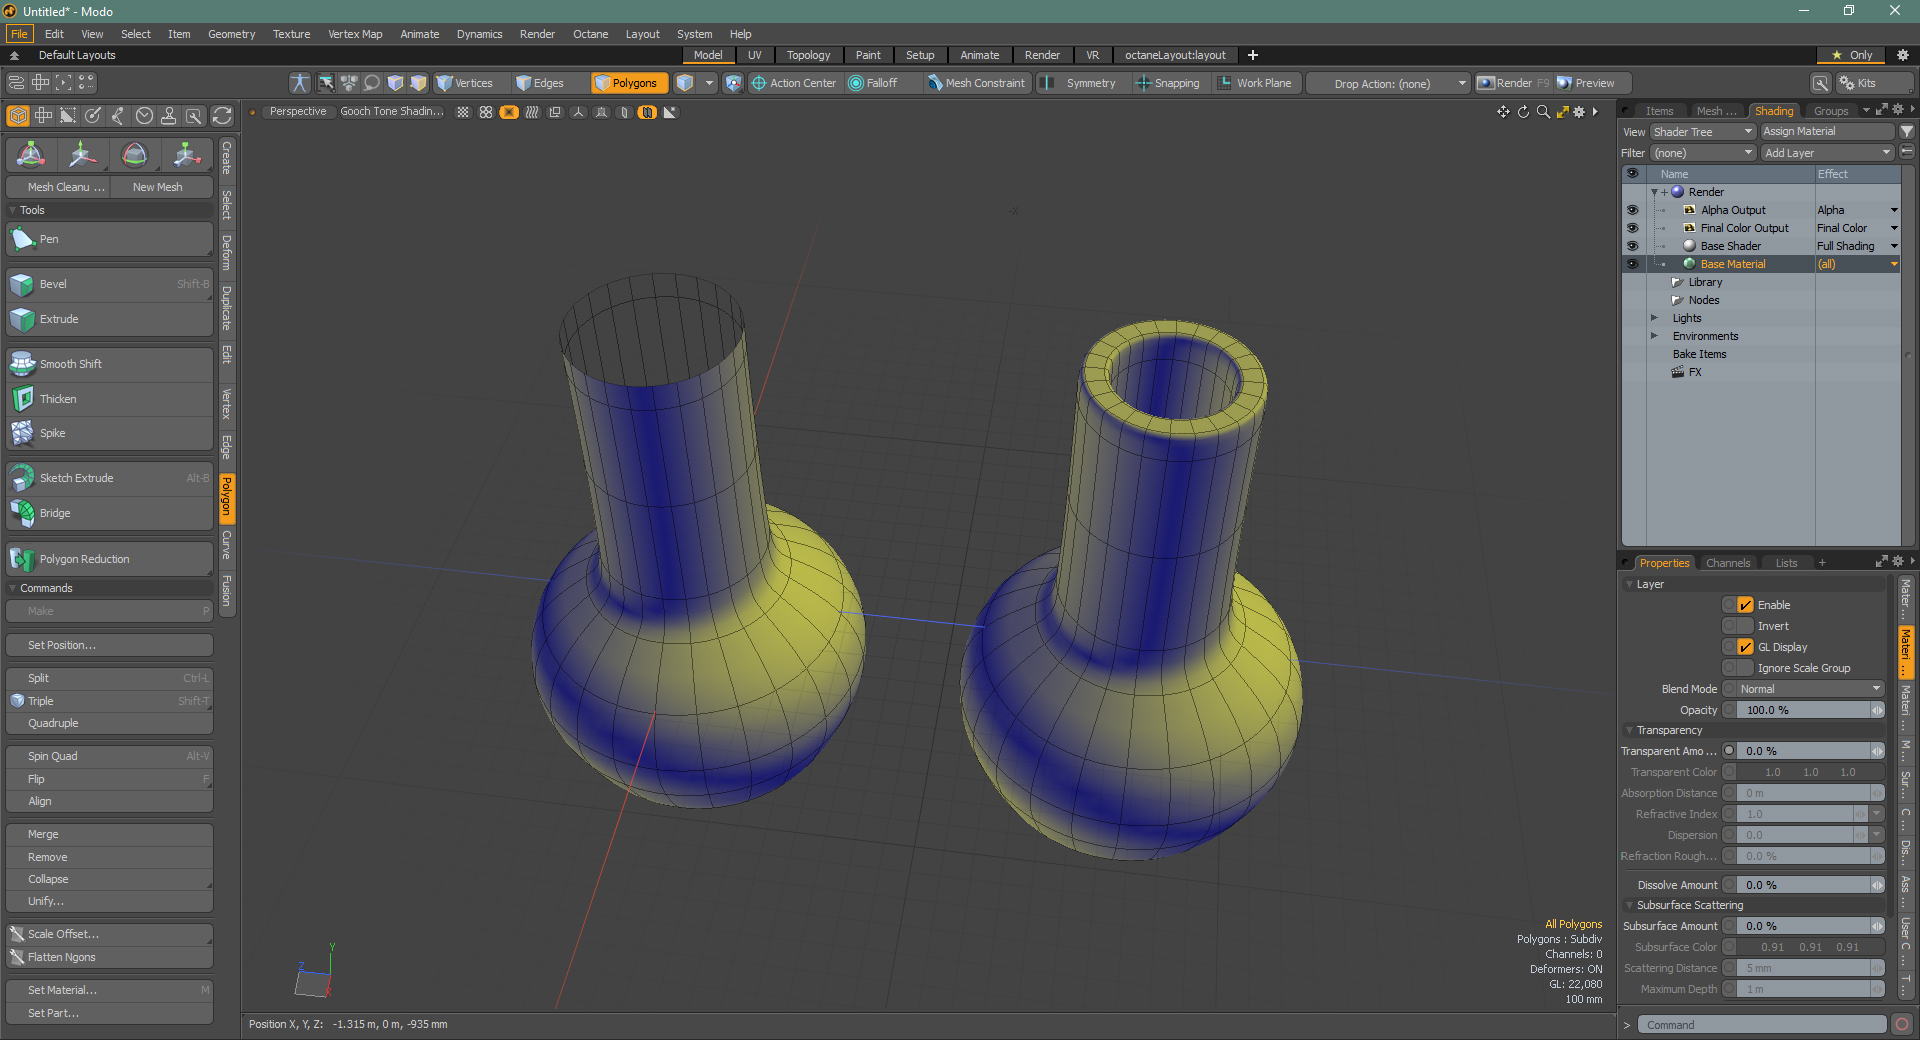
Next, I created liquid geometry inside the bottles by copying and pasting the inner facing polygons and recapping them.
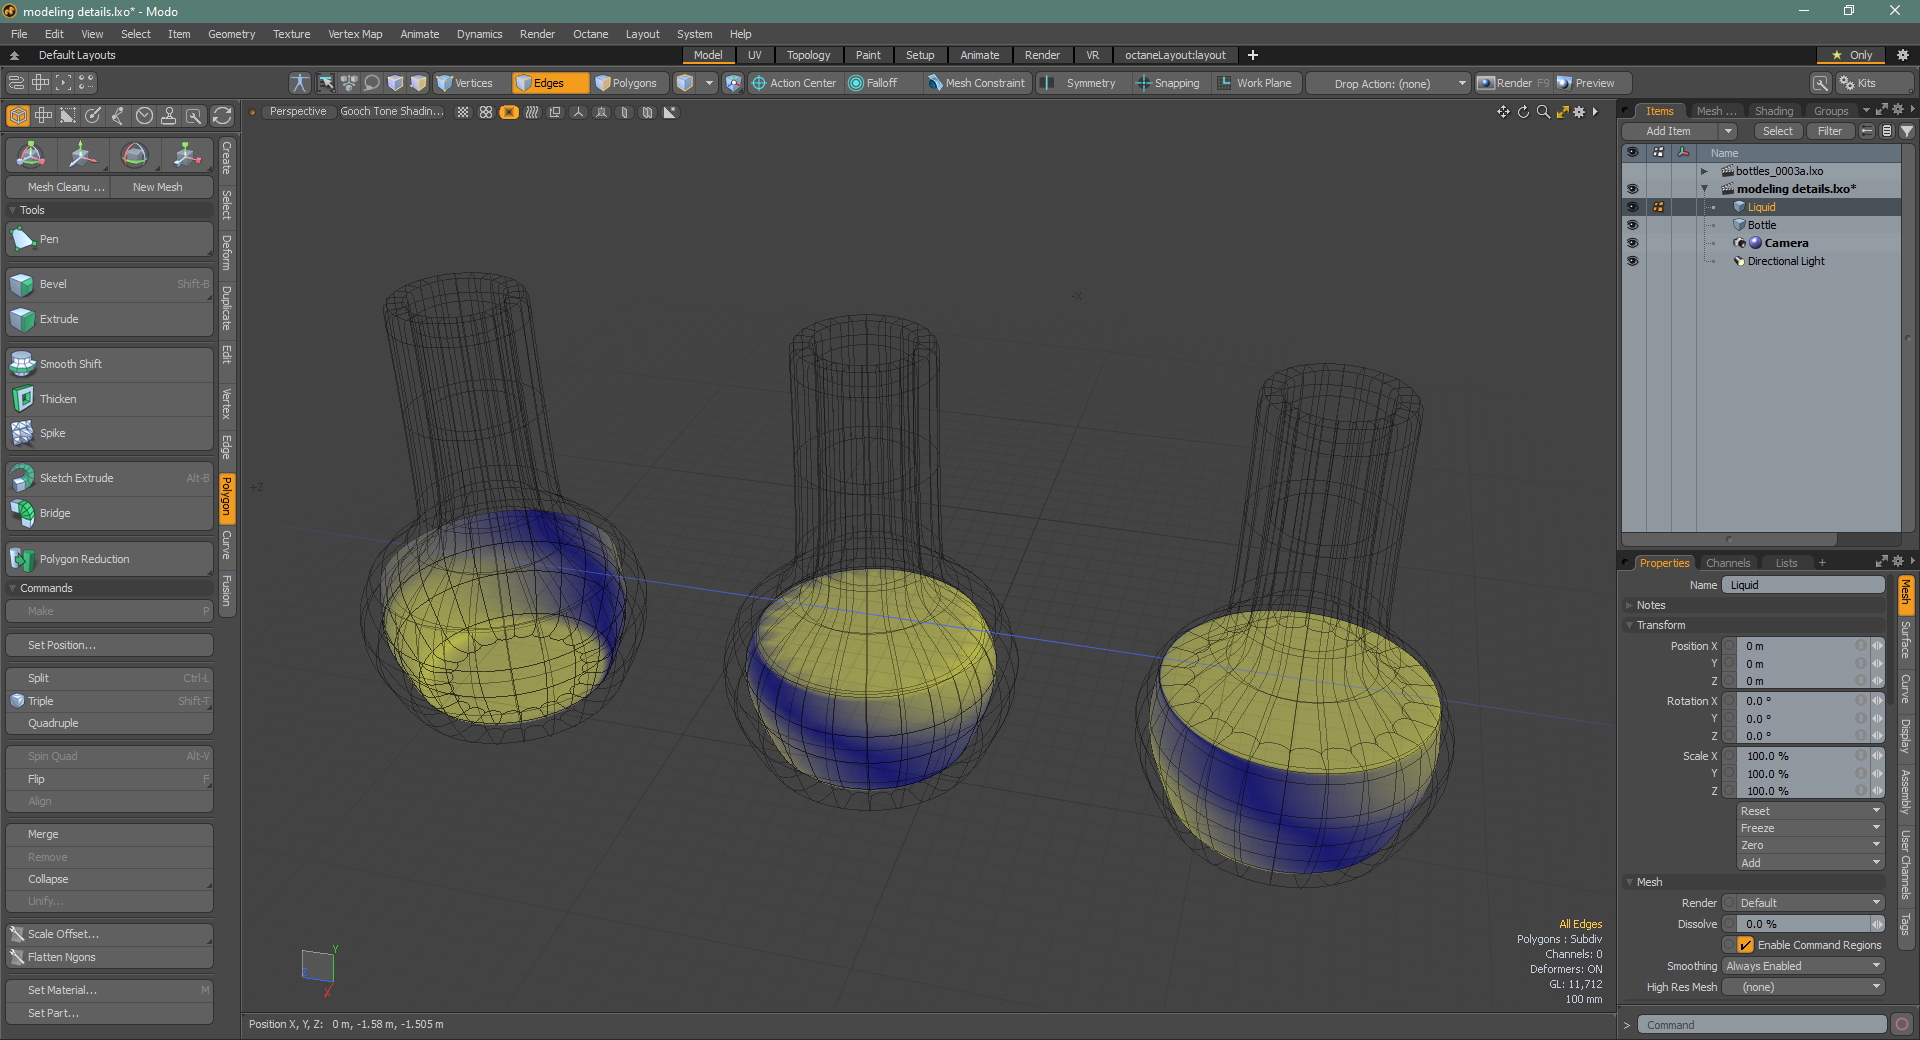
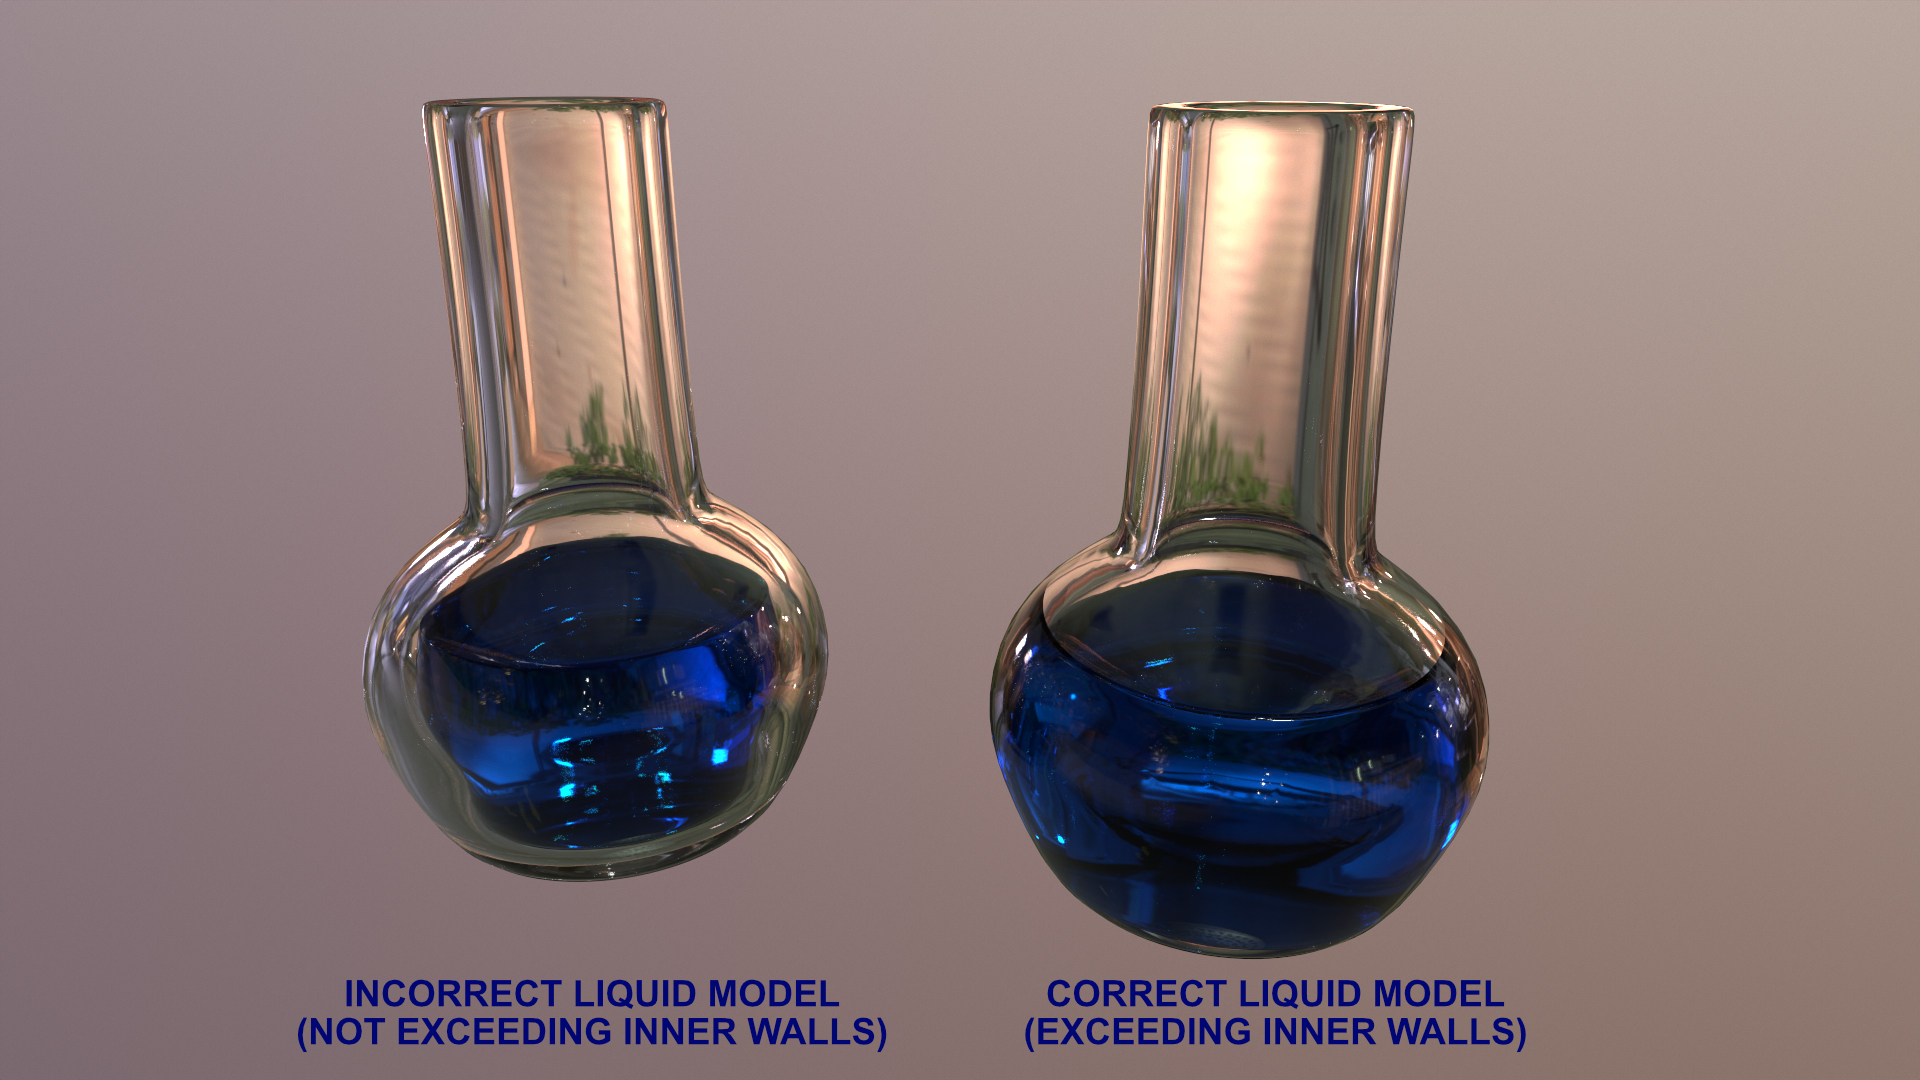
An important detail of ray tracing is that liquid geometry and bottle geometry cannot overlap. Otherwise, you’ll see strange artifacts in the renders due to intersection errors. The liquid geometry needs to be enlarged to sit in between the bottle’s outer and inner facing geometry to solve this issue. If the liquid is smaller than the inside of the bottle, the refractions will be wrong.
Toolbag Scene Setup
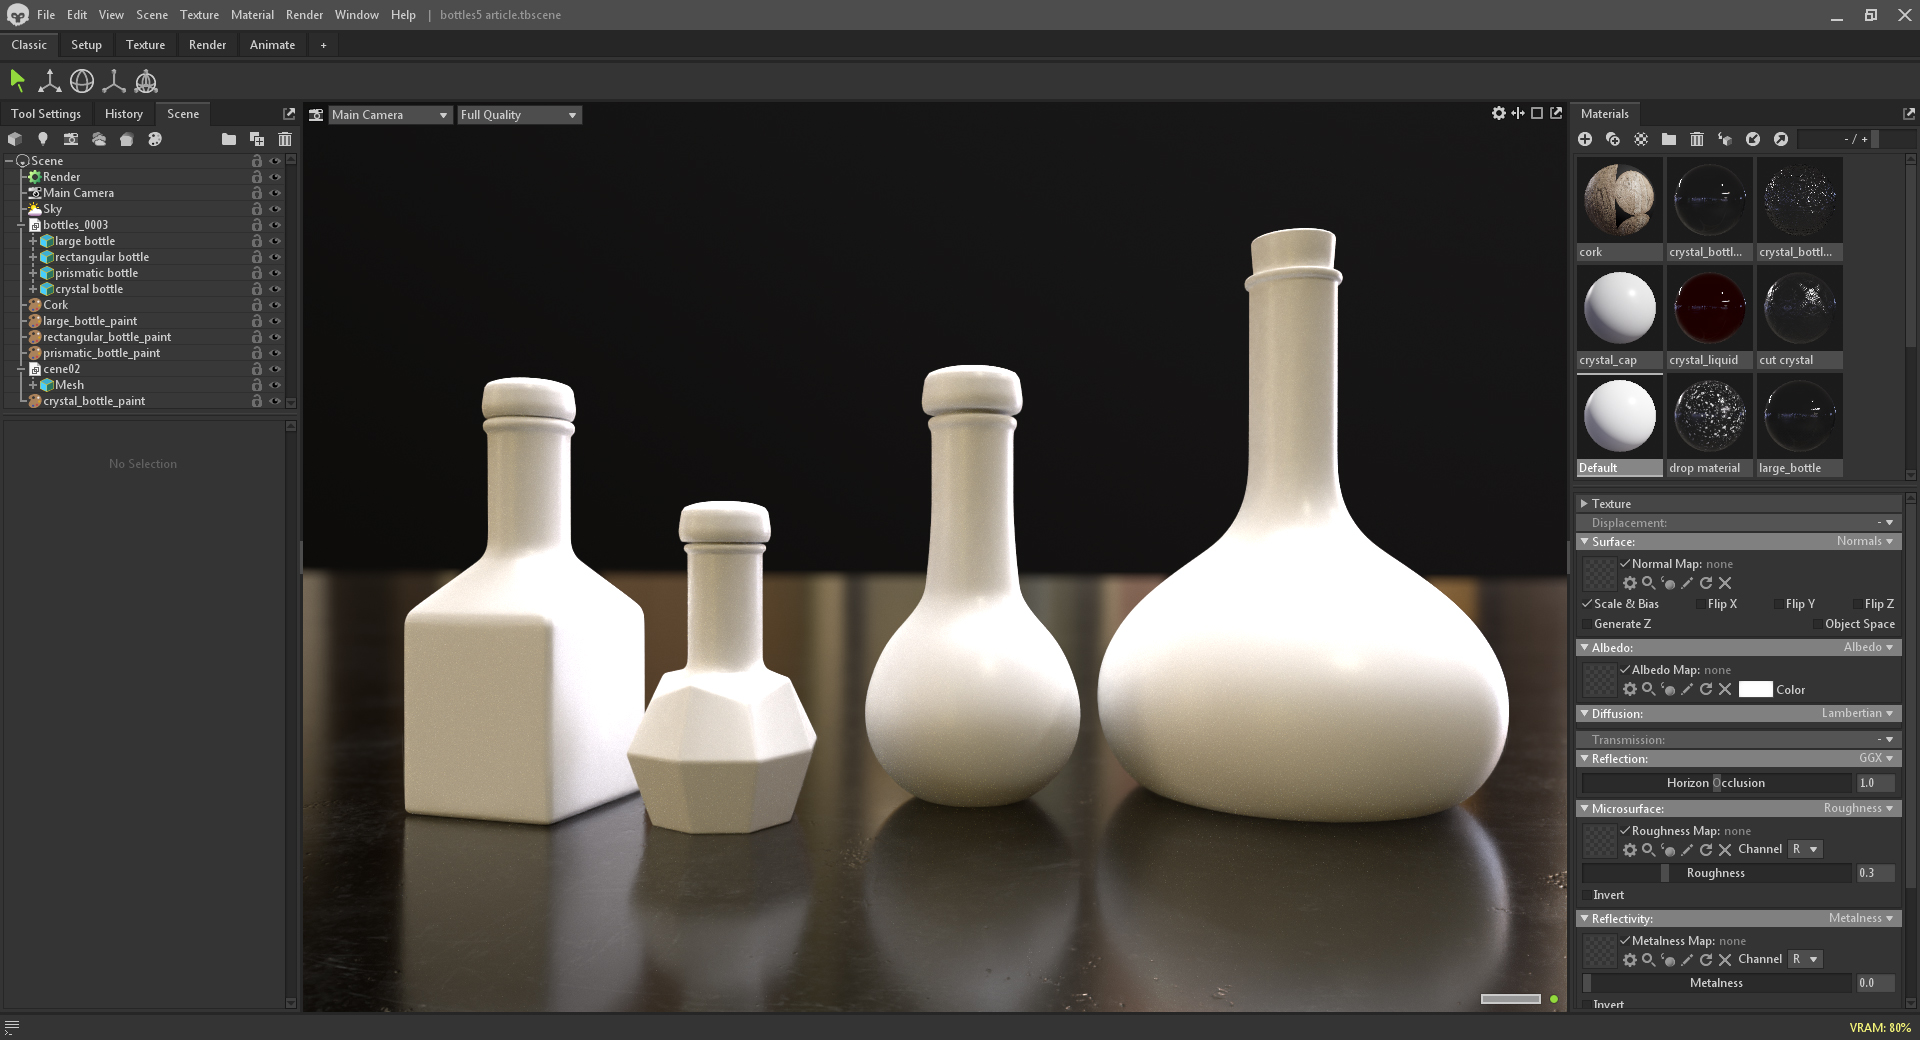
I exported my models as an .FBX file and imported them into a new scene in Toolbag 4. Before moving forward, I made sure to turn on Ray Tracing under the Render settings.
Cork Material Creation
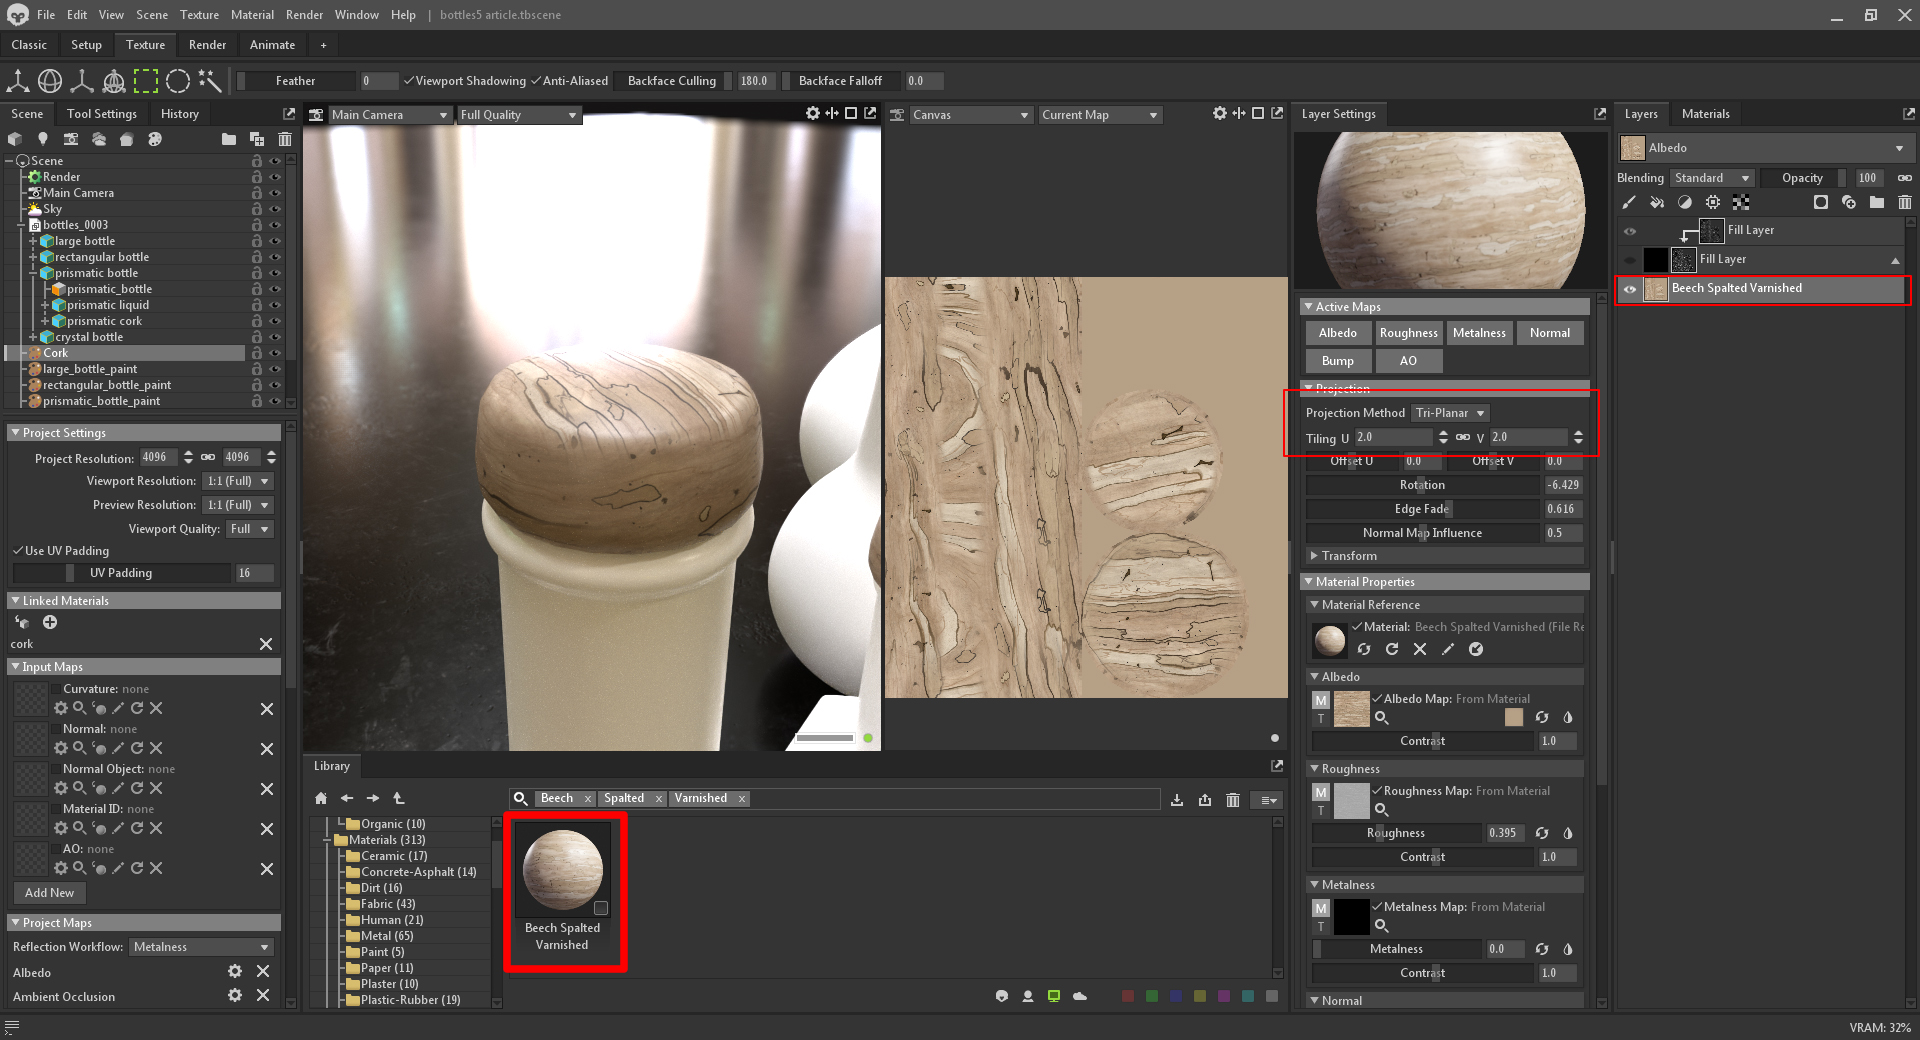
I added a new Texture Project to the Scene hierarchy to create a cork material. I added a Beech Spalted Varnished material from the Library to the Layers window and set the Projection Method to Tri-Planar with 2x tiles.
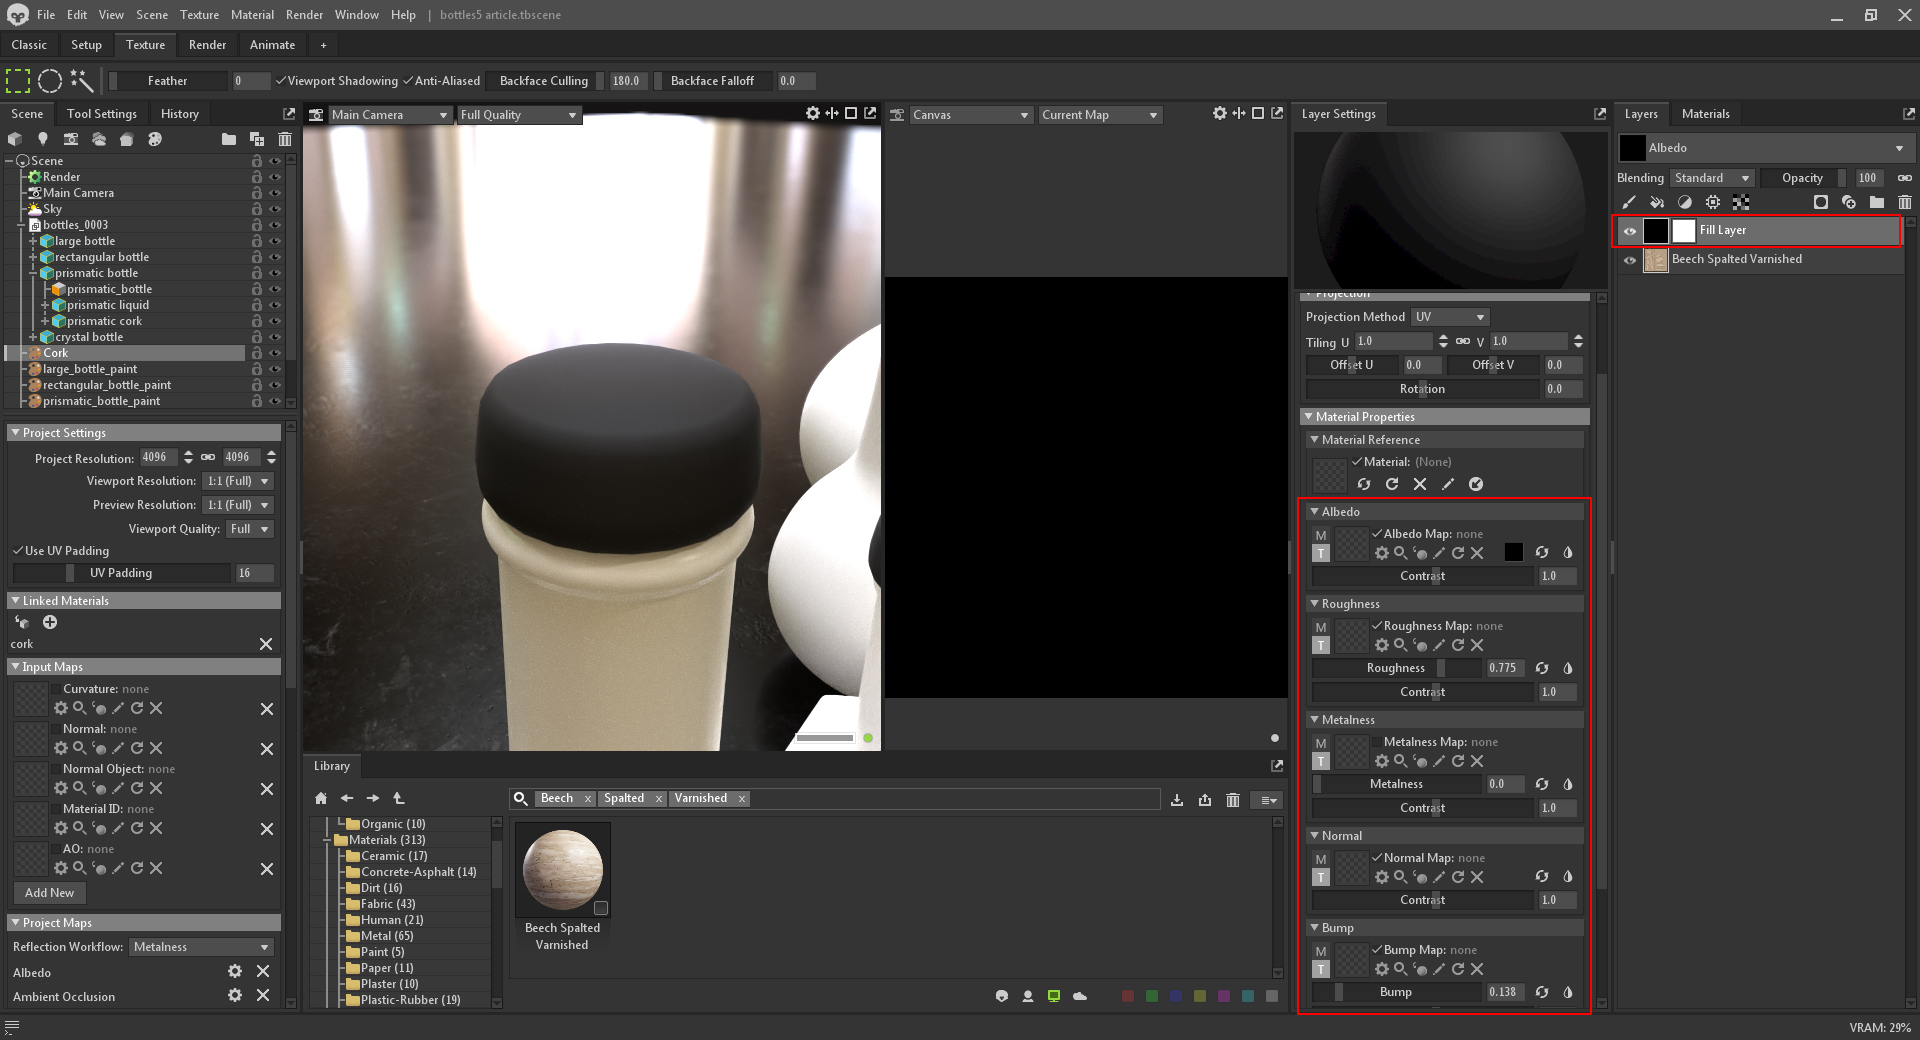
Next, I added a Fill Layer with a black color, zero Metalness, a high Roughness value, and a low Bump value. Values lower than 0.5 for Bump equates to cavity detail. This layer will create darker scratches with cavities, according to the mask I will assign.
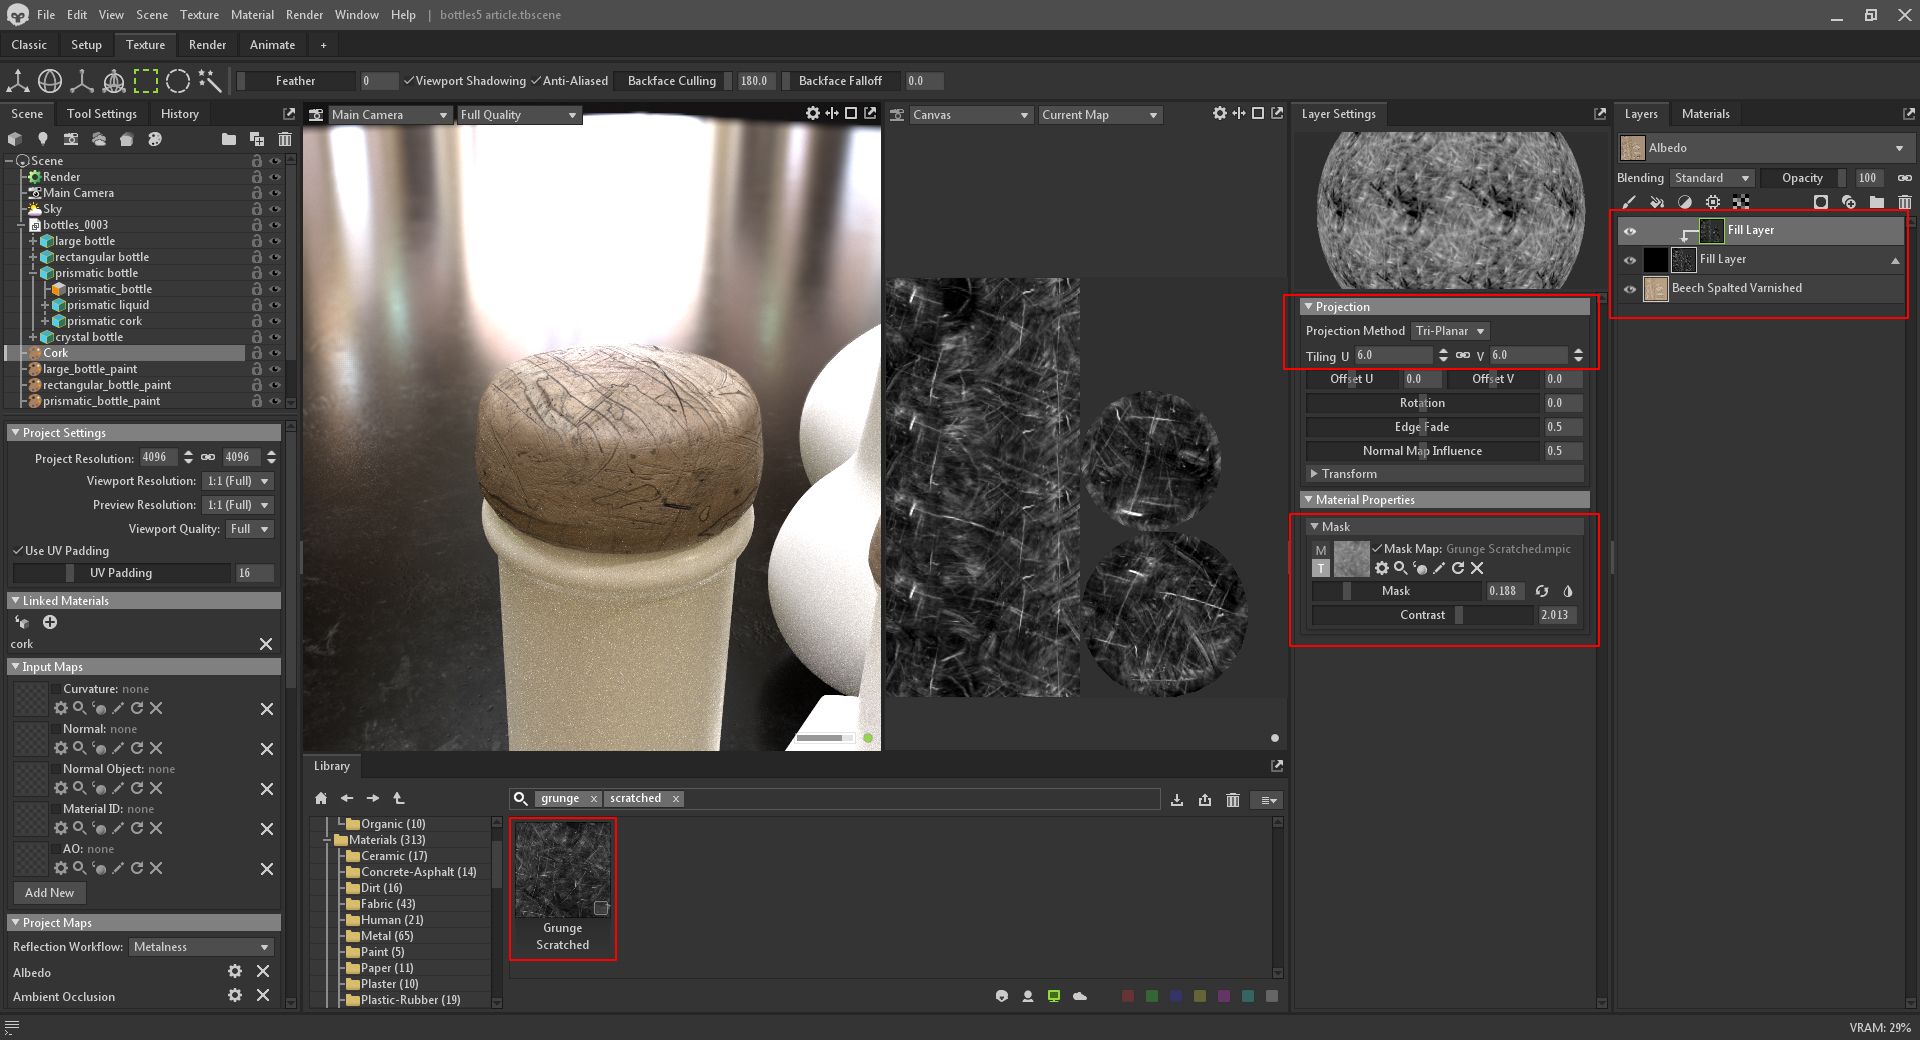
I added a Fill Layer to use as a mask for the black Fill Layer. I used the Grunge Scratched texture from the Grunge Maps folder. I set the Projection Method to Tri-Planar and the tiling to 6x. I adjusted the Mask opacity and Contrast to control the scratch intensity, which created an organic, worn-out look to the cork material.
Liquid Material Creation
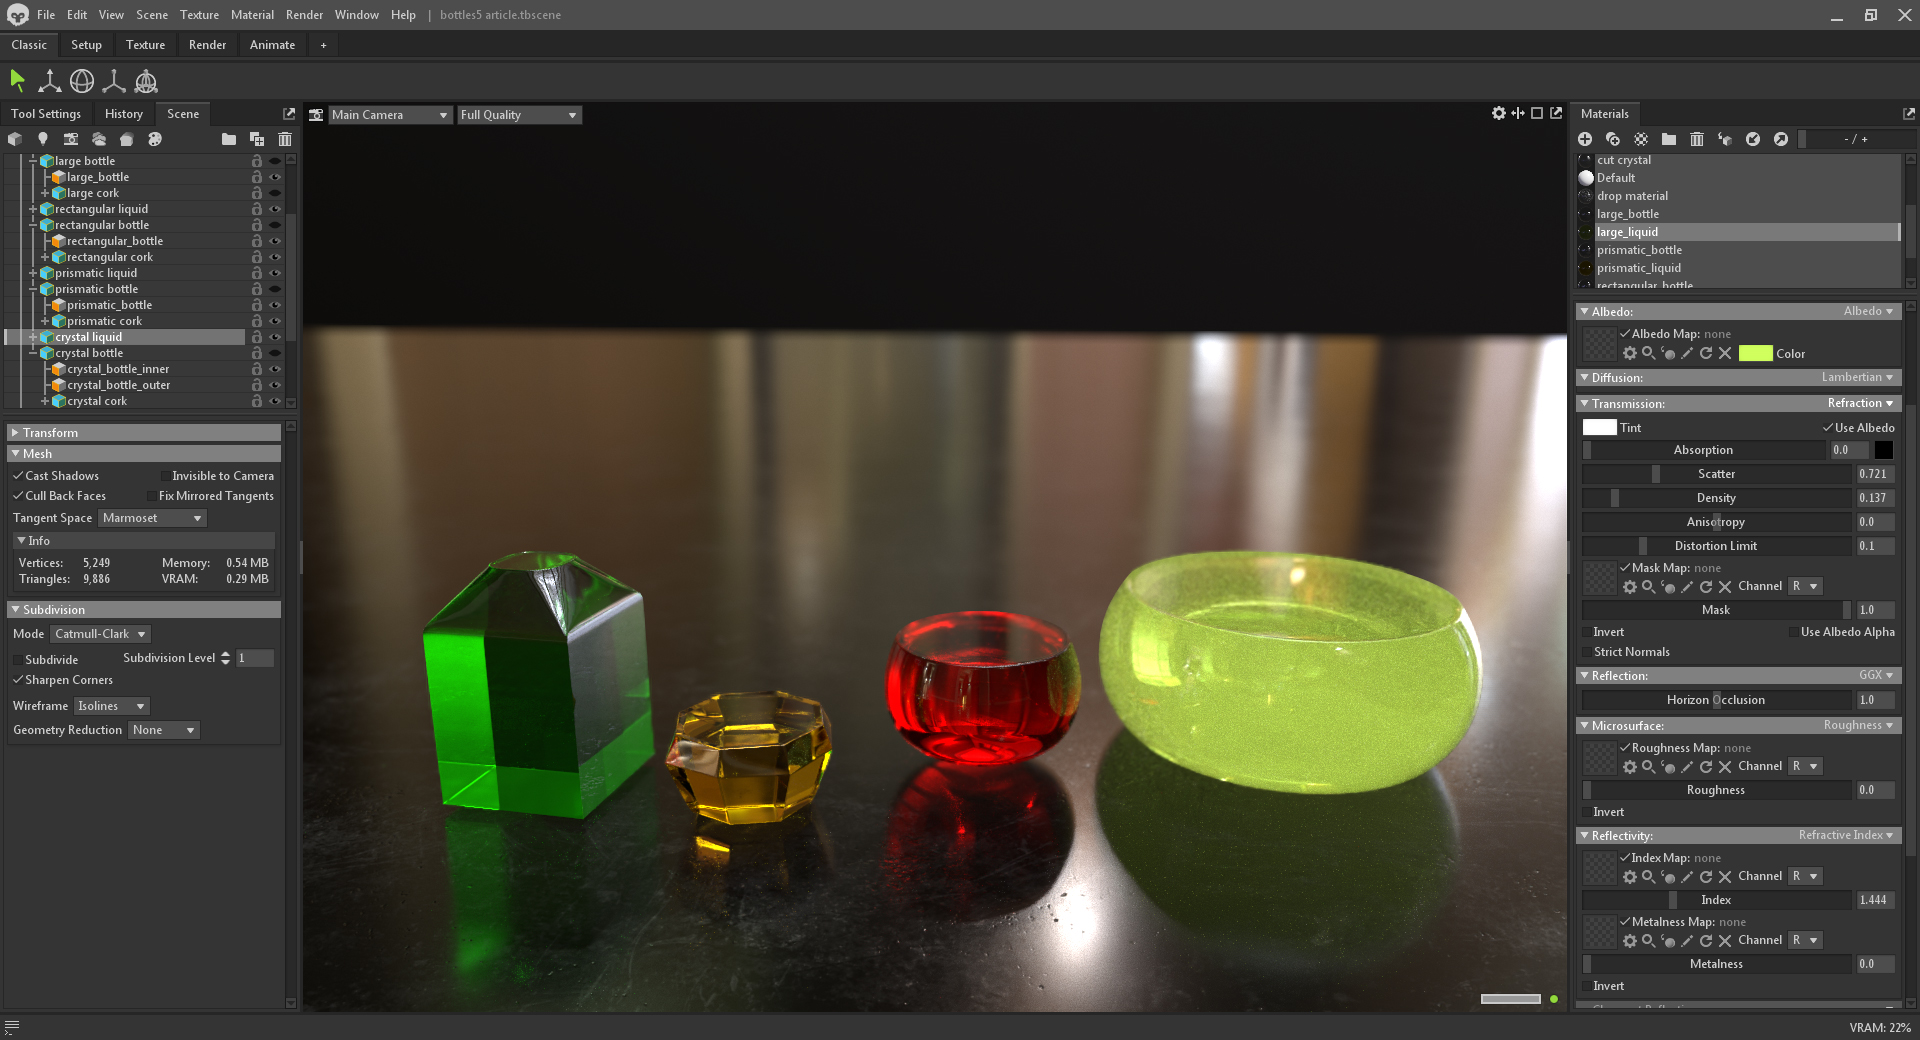
Liquid materials are simple to create. To start, I defined a color for the liquid and then set the Transmission module to Refraction. I adjusted the Scatter and Density values, lowered the Roughness, and changed the Reflectivity module to Refractive Index. I adjusted the Index value to 1.4 to create an olive oil looking material.
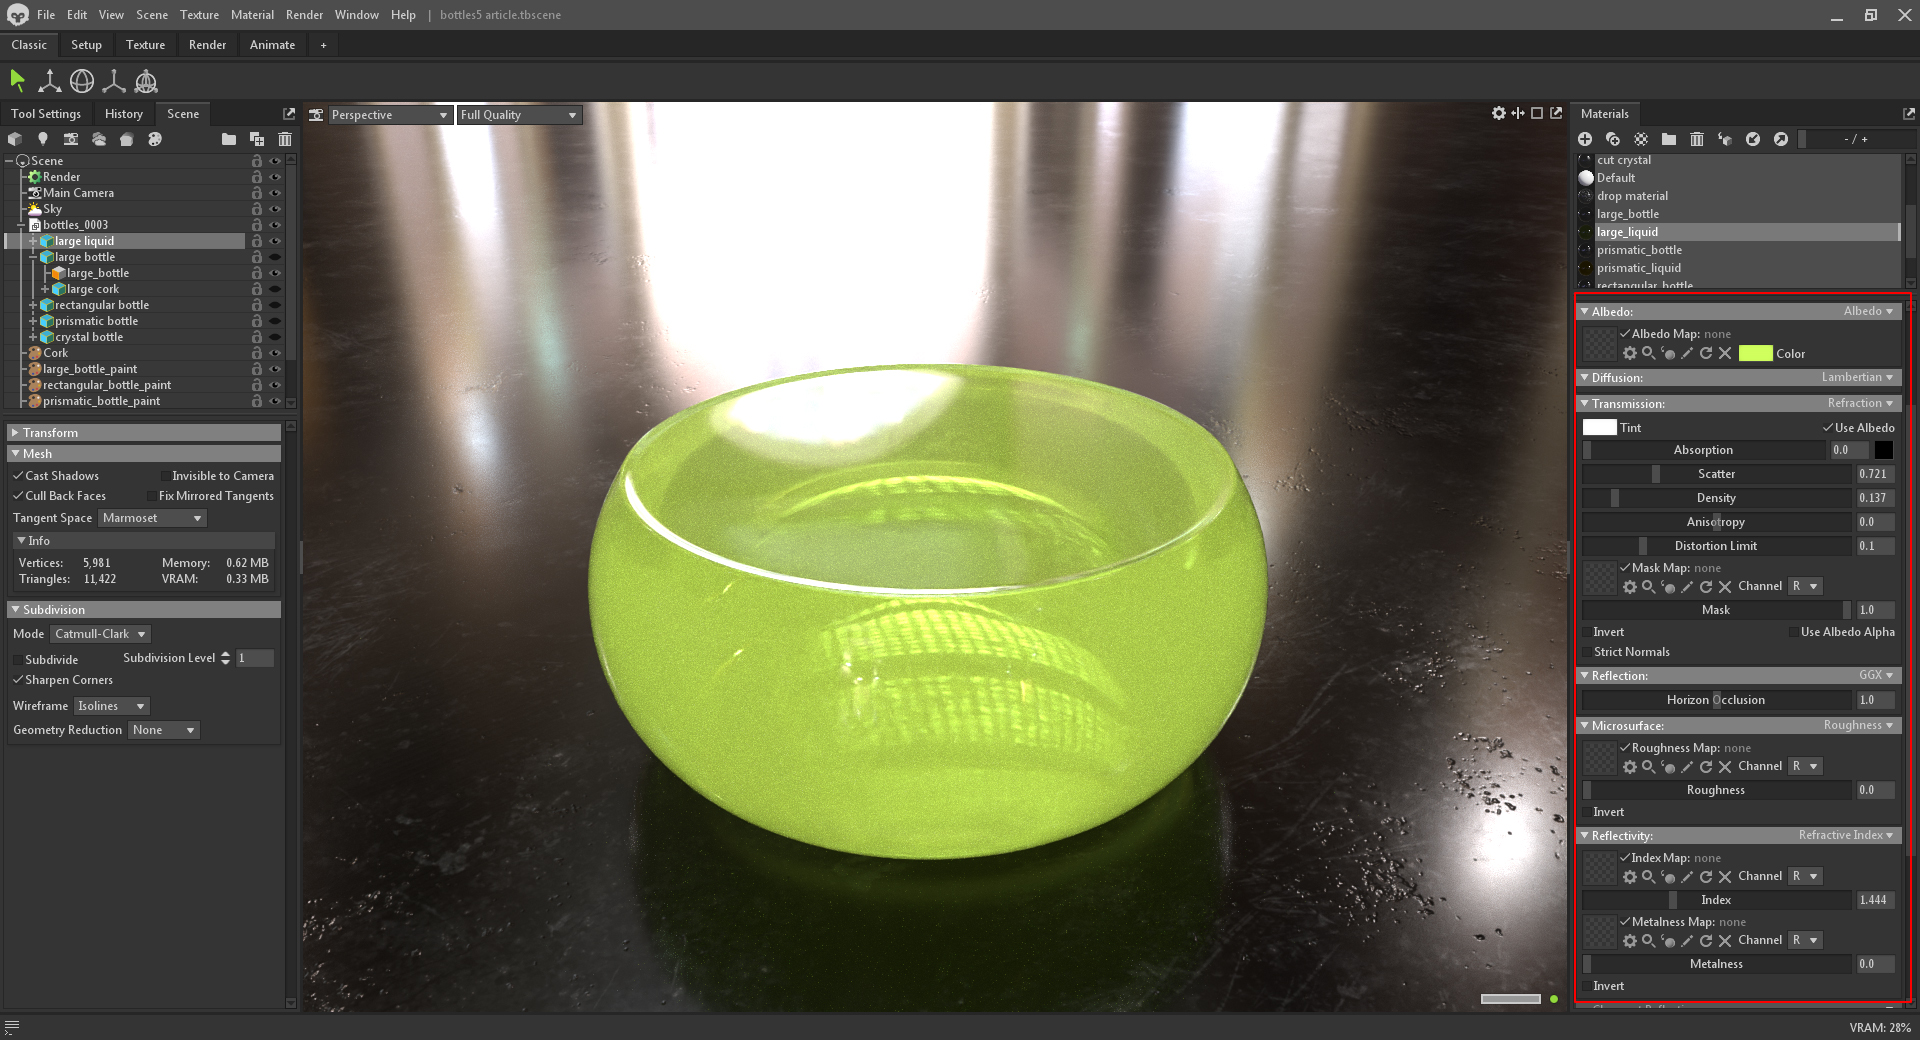
I used the same material setup for other liquids and set them to different colors and scattering values. Keep in mind that the encasing glass will affect the final appearance of the liquid.
Bottle Material Creation
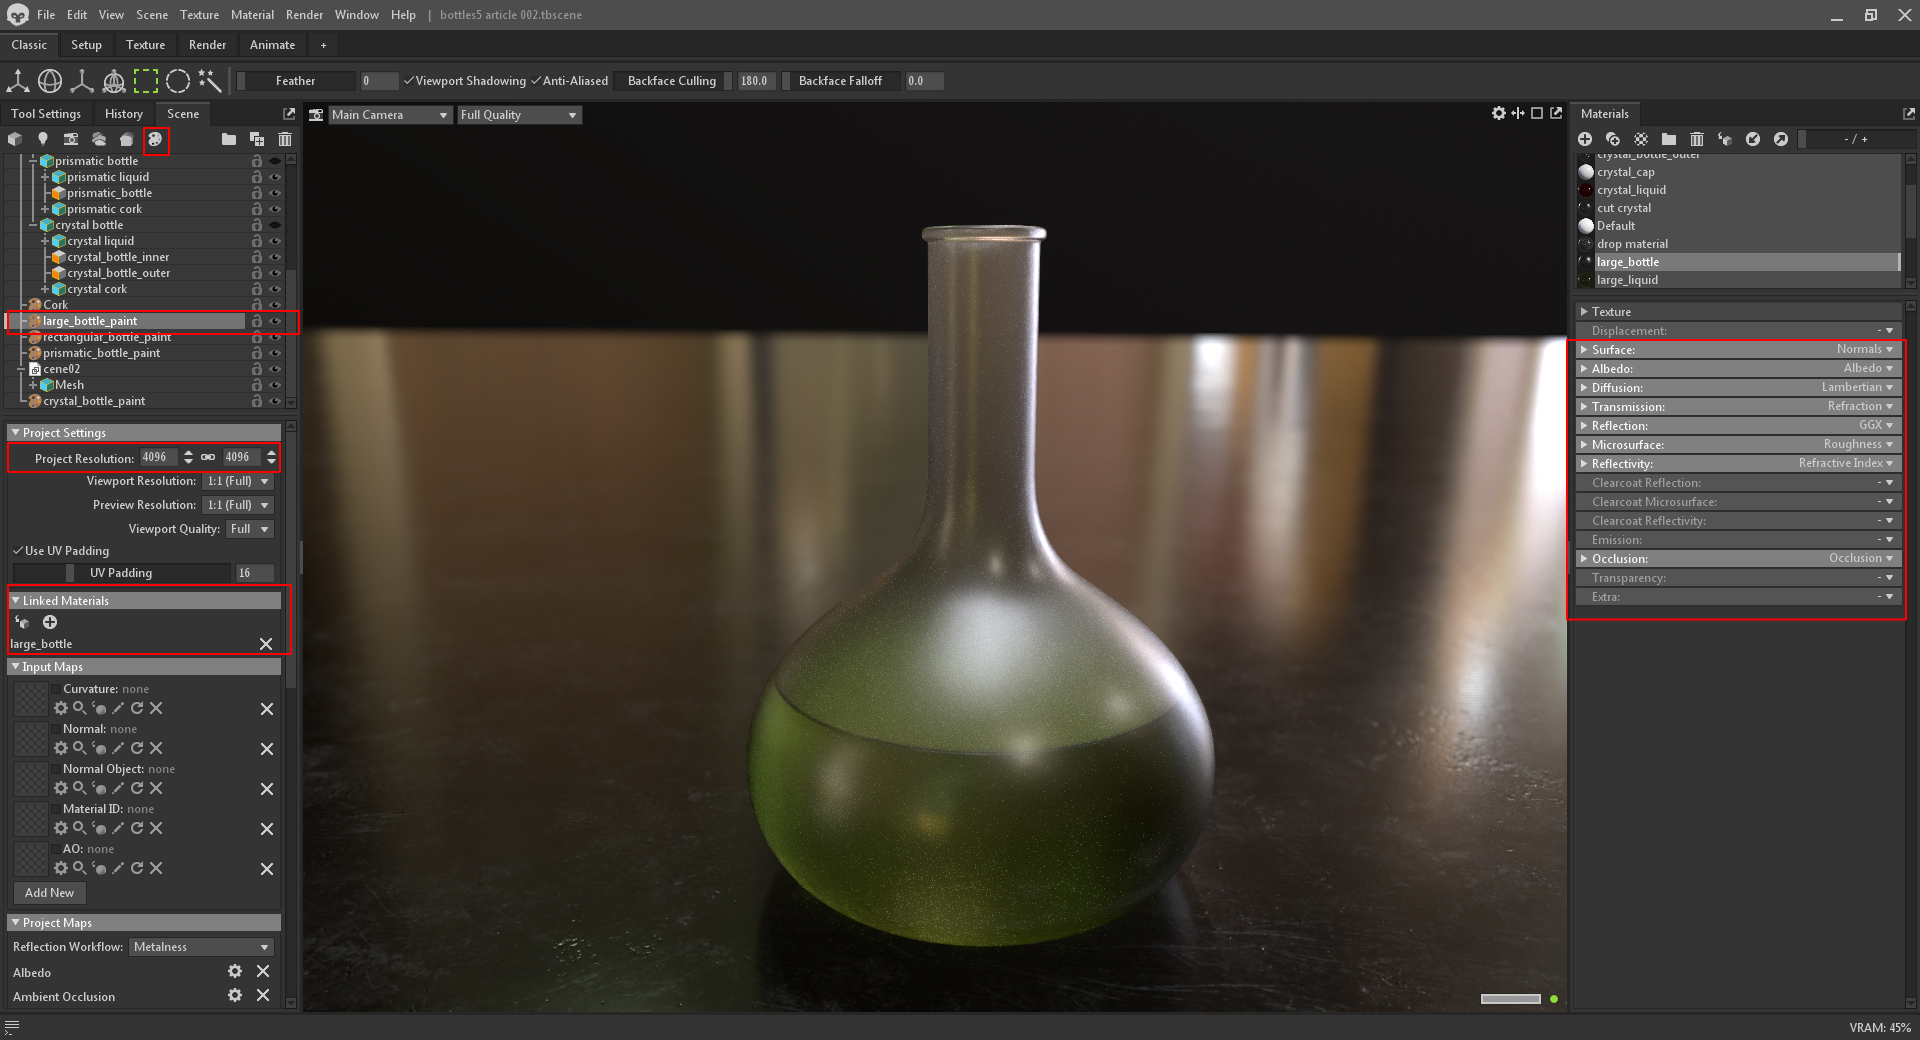
I created new Texture Projects for each bottle. Starting with the large bottle, I created and linked a material on the left side panel. In Active Maps, I activated the Metalness and Roughness maps and changed the Transmission module to Refraction. Similar to the liquid materials, I changed the Reflectivity module to Refractive Index.
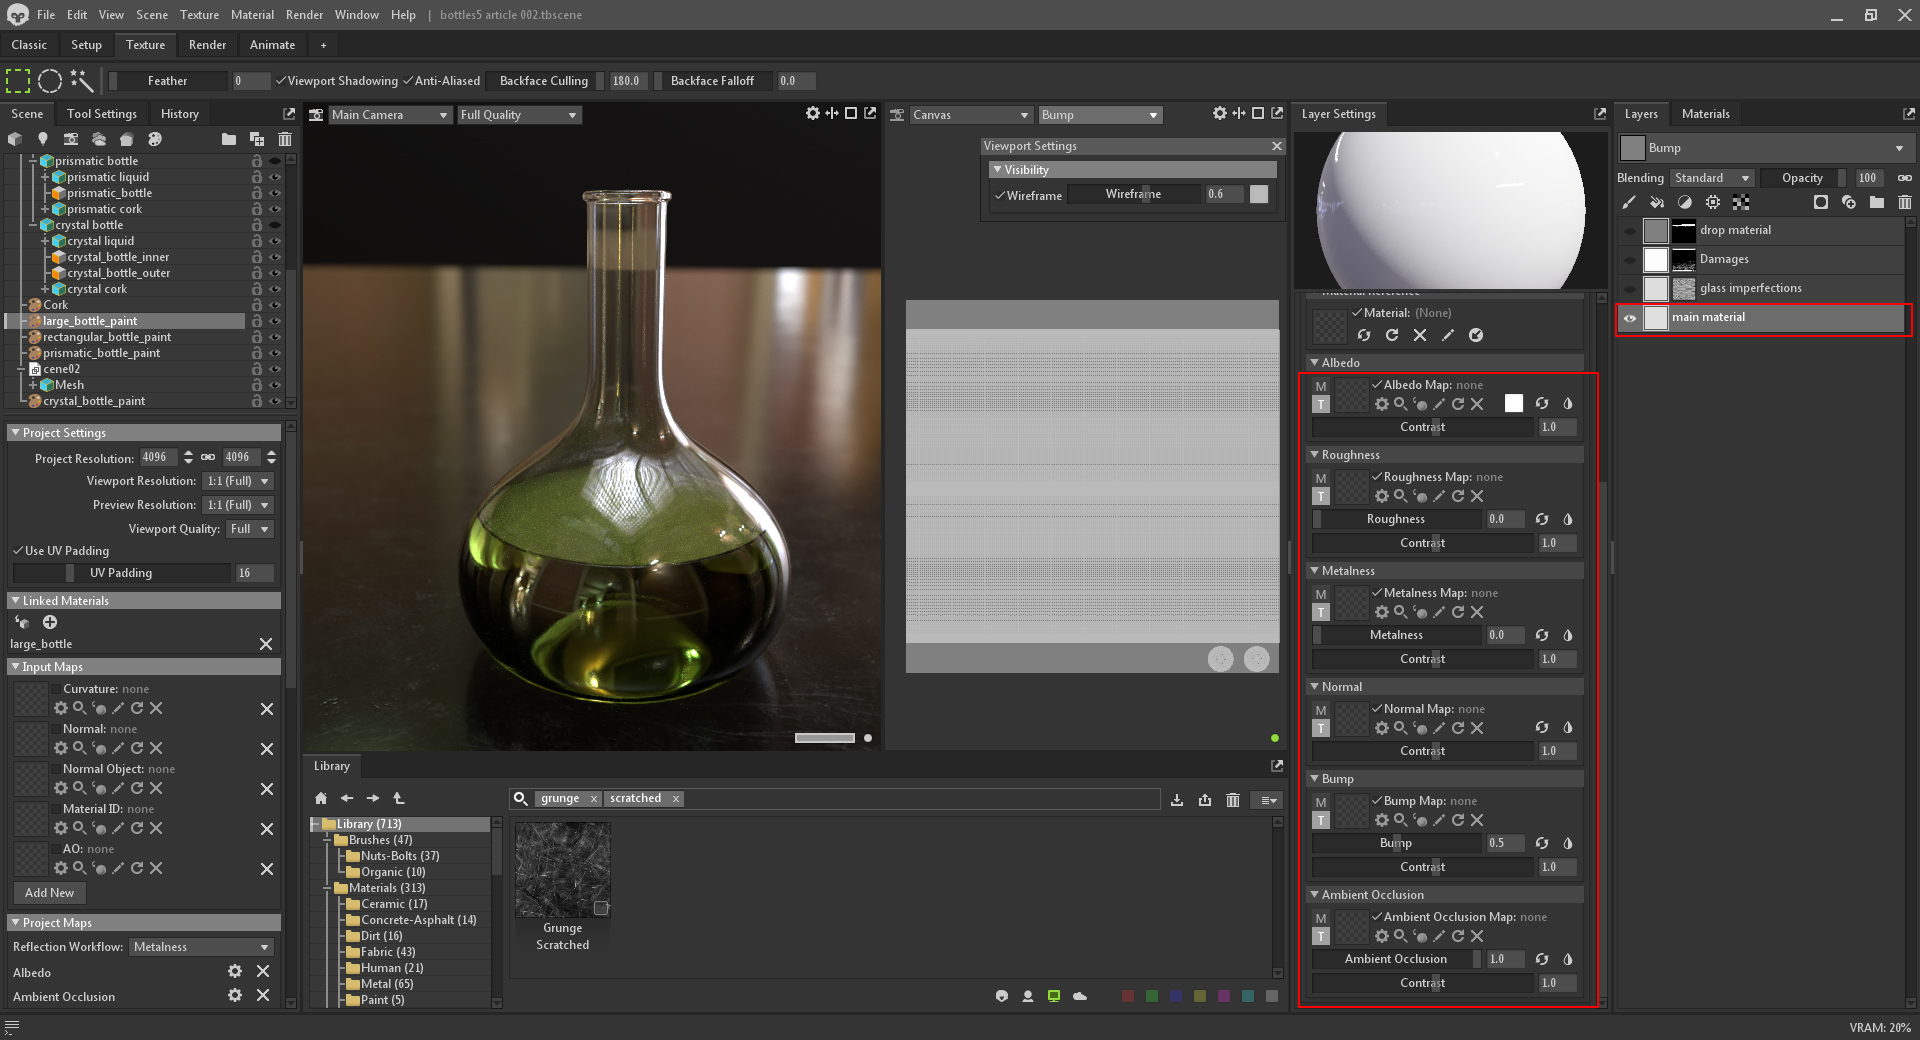
Now I can start adding layers for the glass material. First, I added a Fill Layer to act as the glass’s main material and set the Roughness and Metalness values to zero. Remember that these channels are connected with the linked material that is assigned to the 3D geometry. Since the linked material has its Metalness module set to Refractive Index, the textures in our Layers window will be transferred directly to the linked material and generate refractive results.
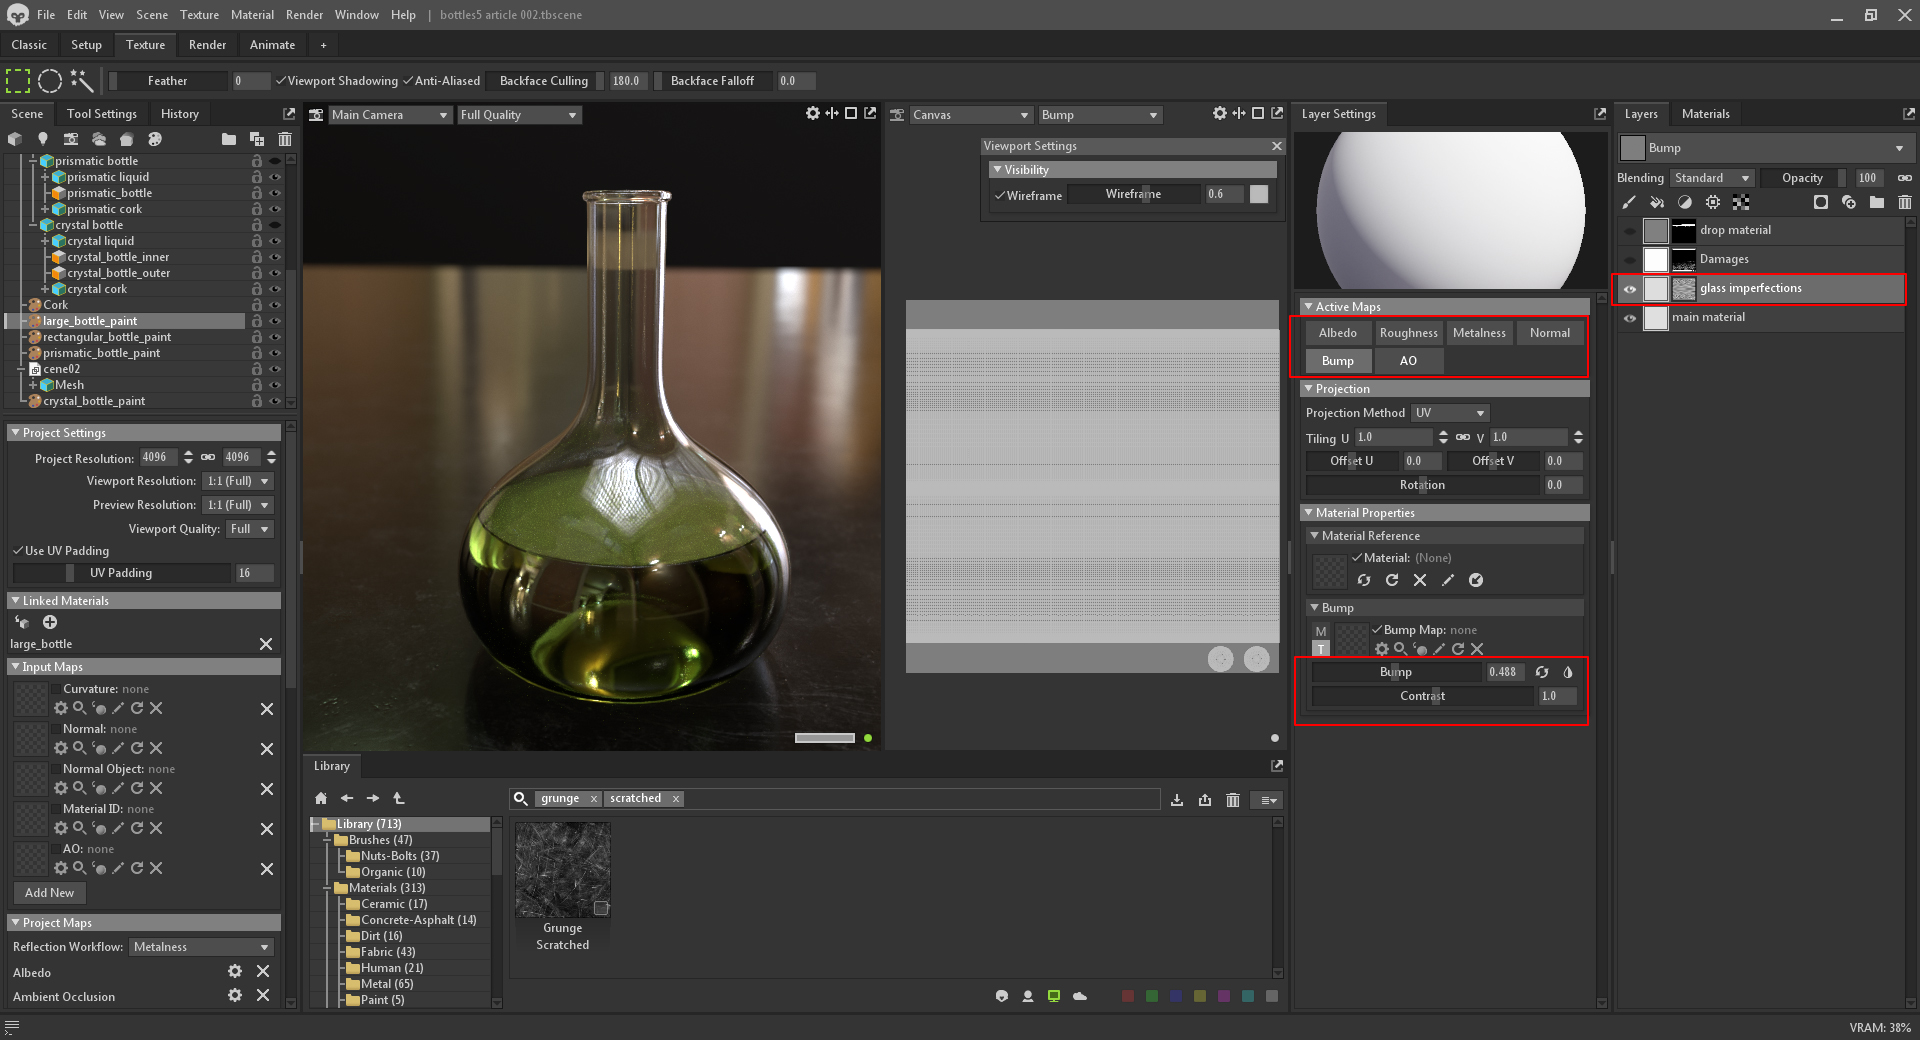
Second, I added a Fill Layer and named it Glass Imperfections to create imperfections since most manufactured glass products have a slightly wavy surface that produces bent refractions. To start making this effect, I enabled the Bump channel and gave it a value of 0.488.
Then I added a Perlin noise procedural mask to the Glass Imperfections layer. I adjusted the Scale under Perlin Settings and set the Projection Method to 3D.
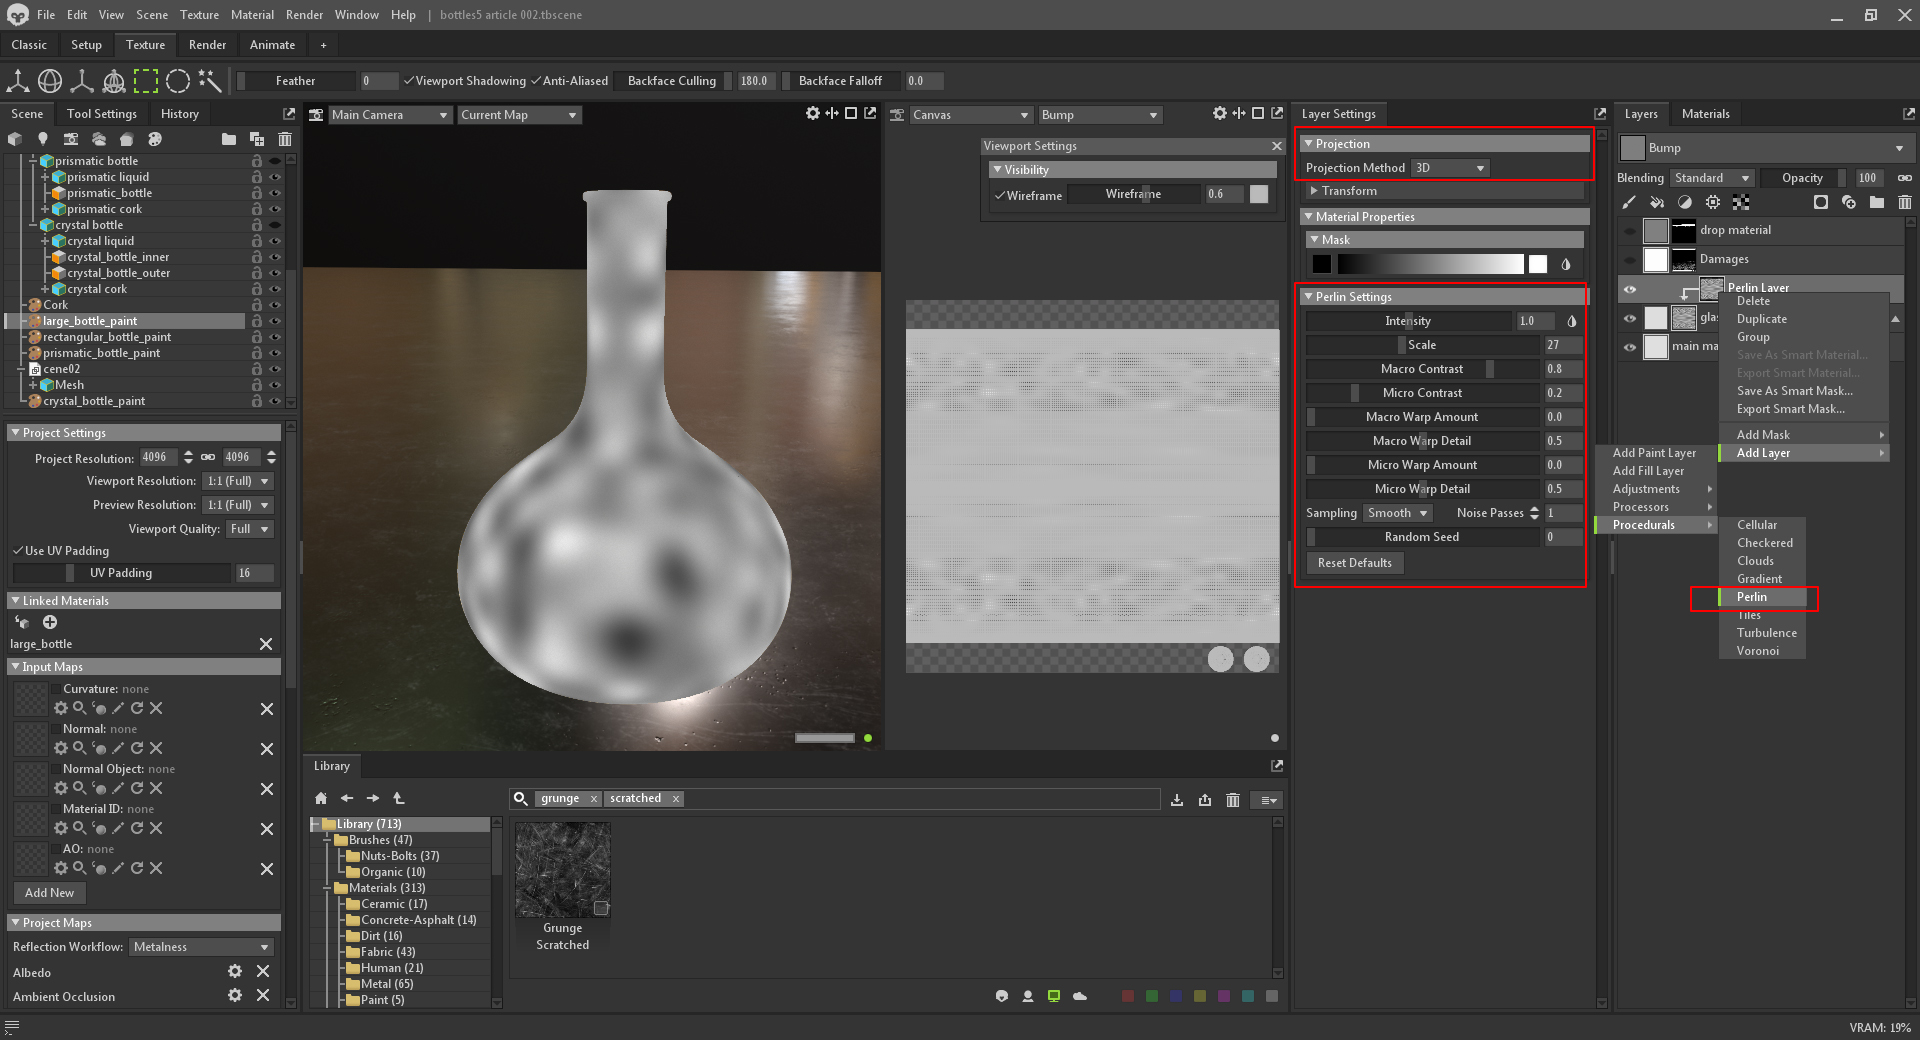
This results in a light waviness, which can be seen by looking into the refractions.
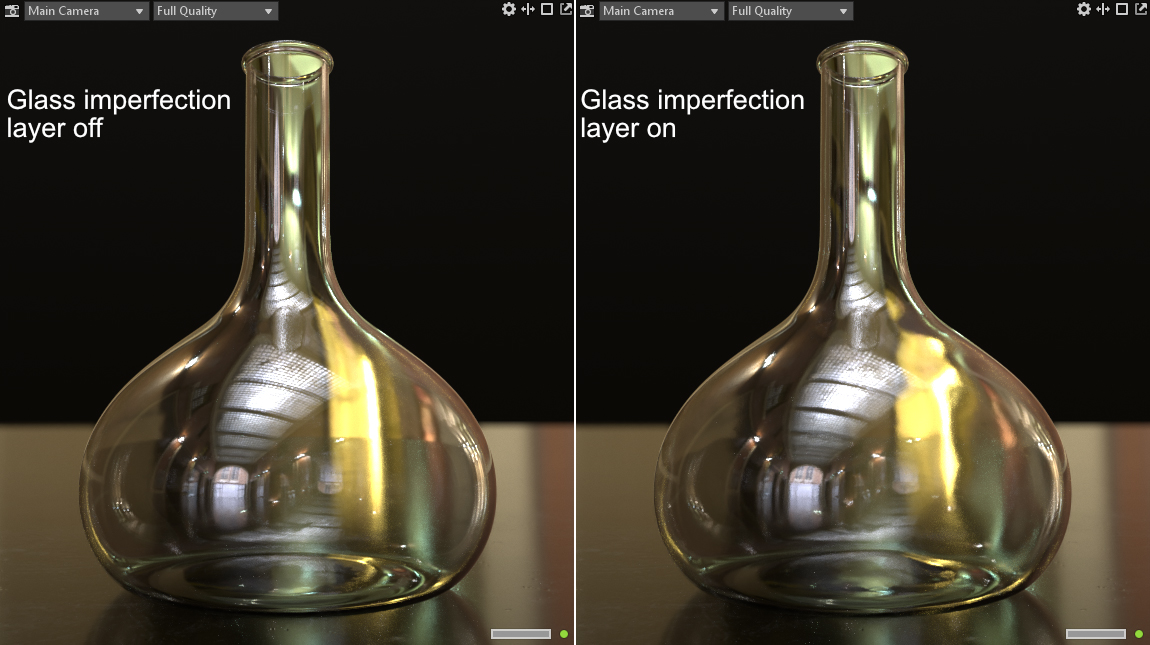
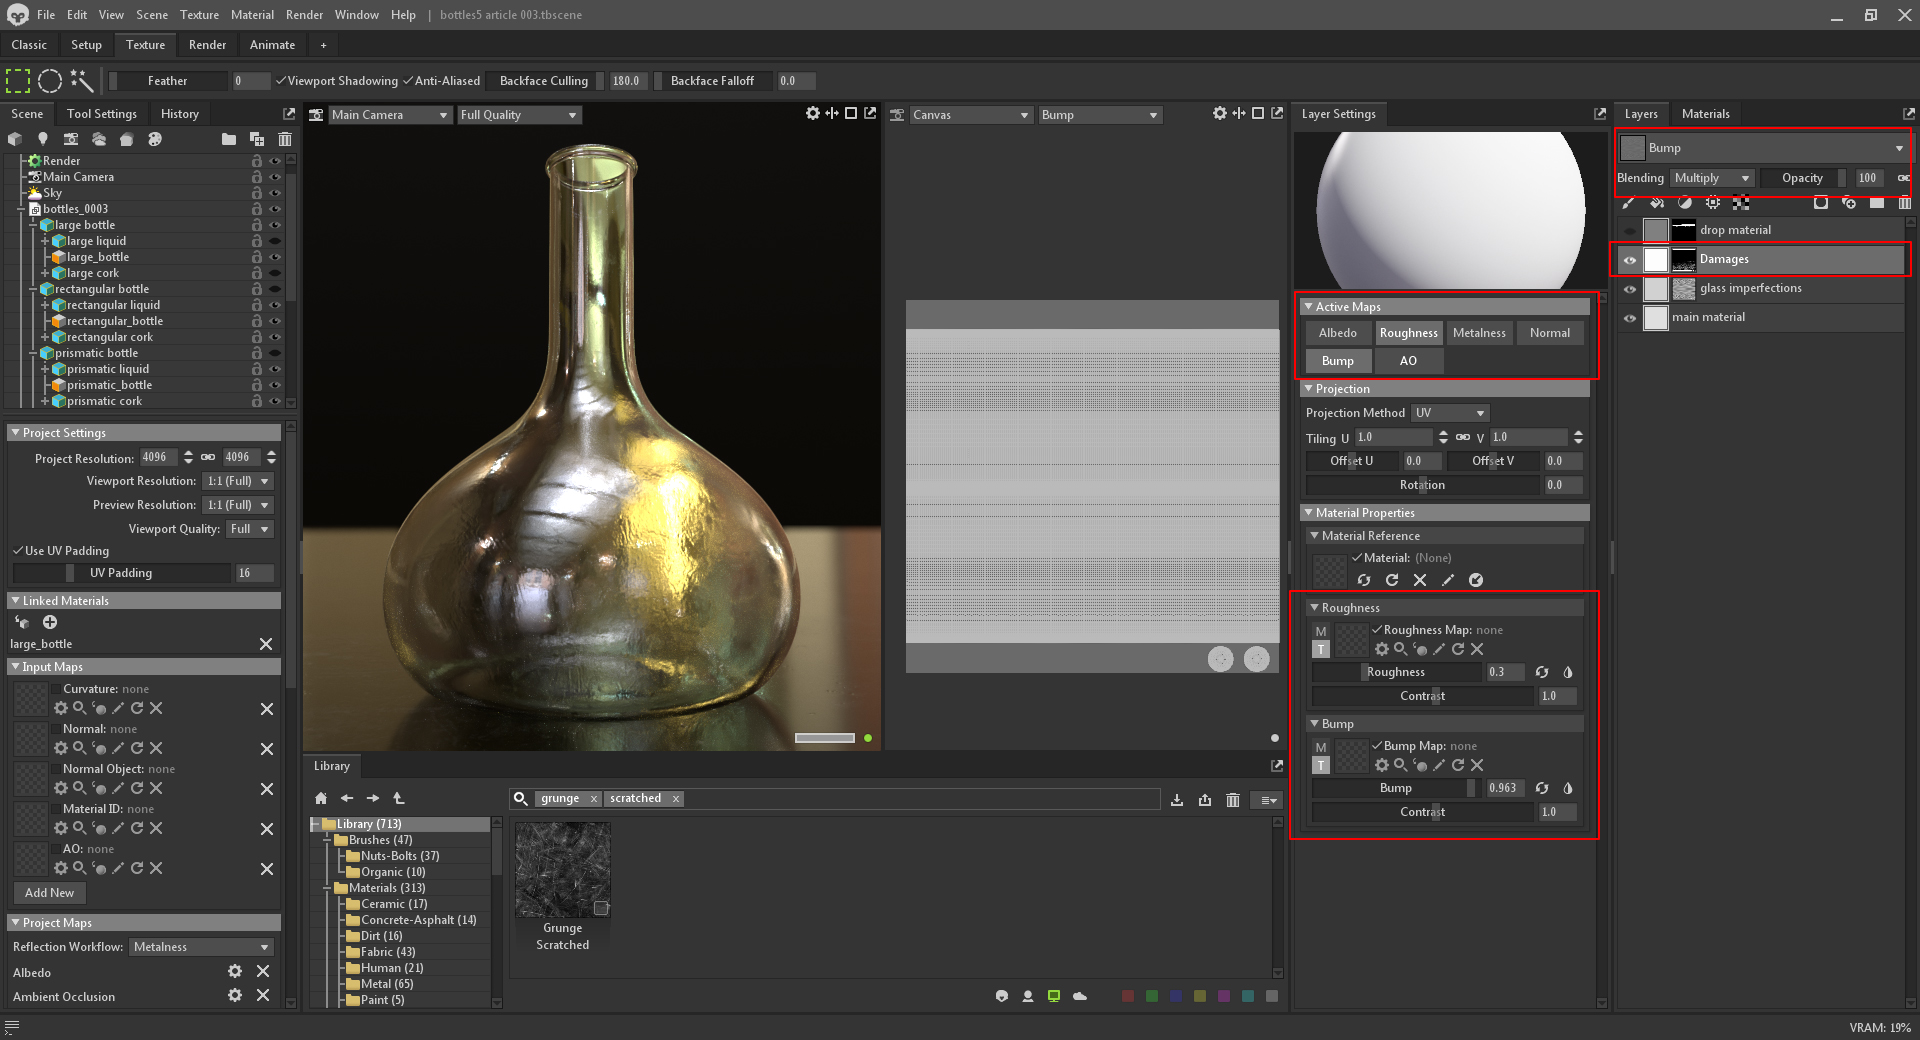
I added another Fill Layer and named it Damages, which was used to add some detail in the Roughness and Bump modules. Despite defining it as a damage layer, it generates low-quality manufacturing details of the glass, similar to old bottles and windows. I set the Roughness value to 0.3 and added a high Bump value. As you can see on the Layers panel, I set the Blending for the Bump channel to Multiply to preserve the Perlin noise waviness I generated on the previous layer.
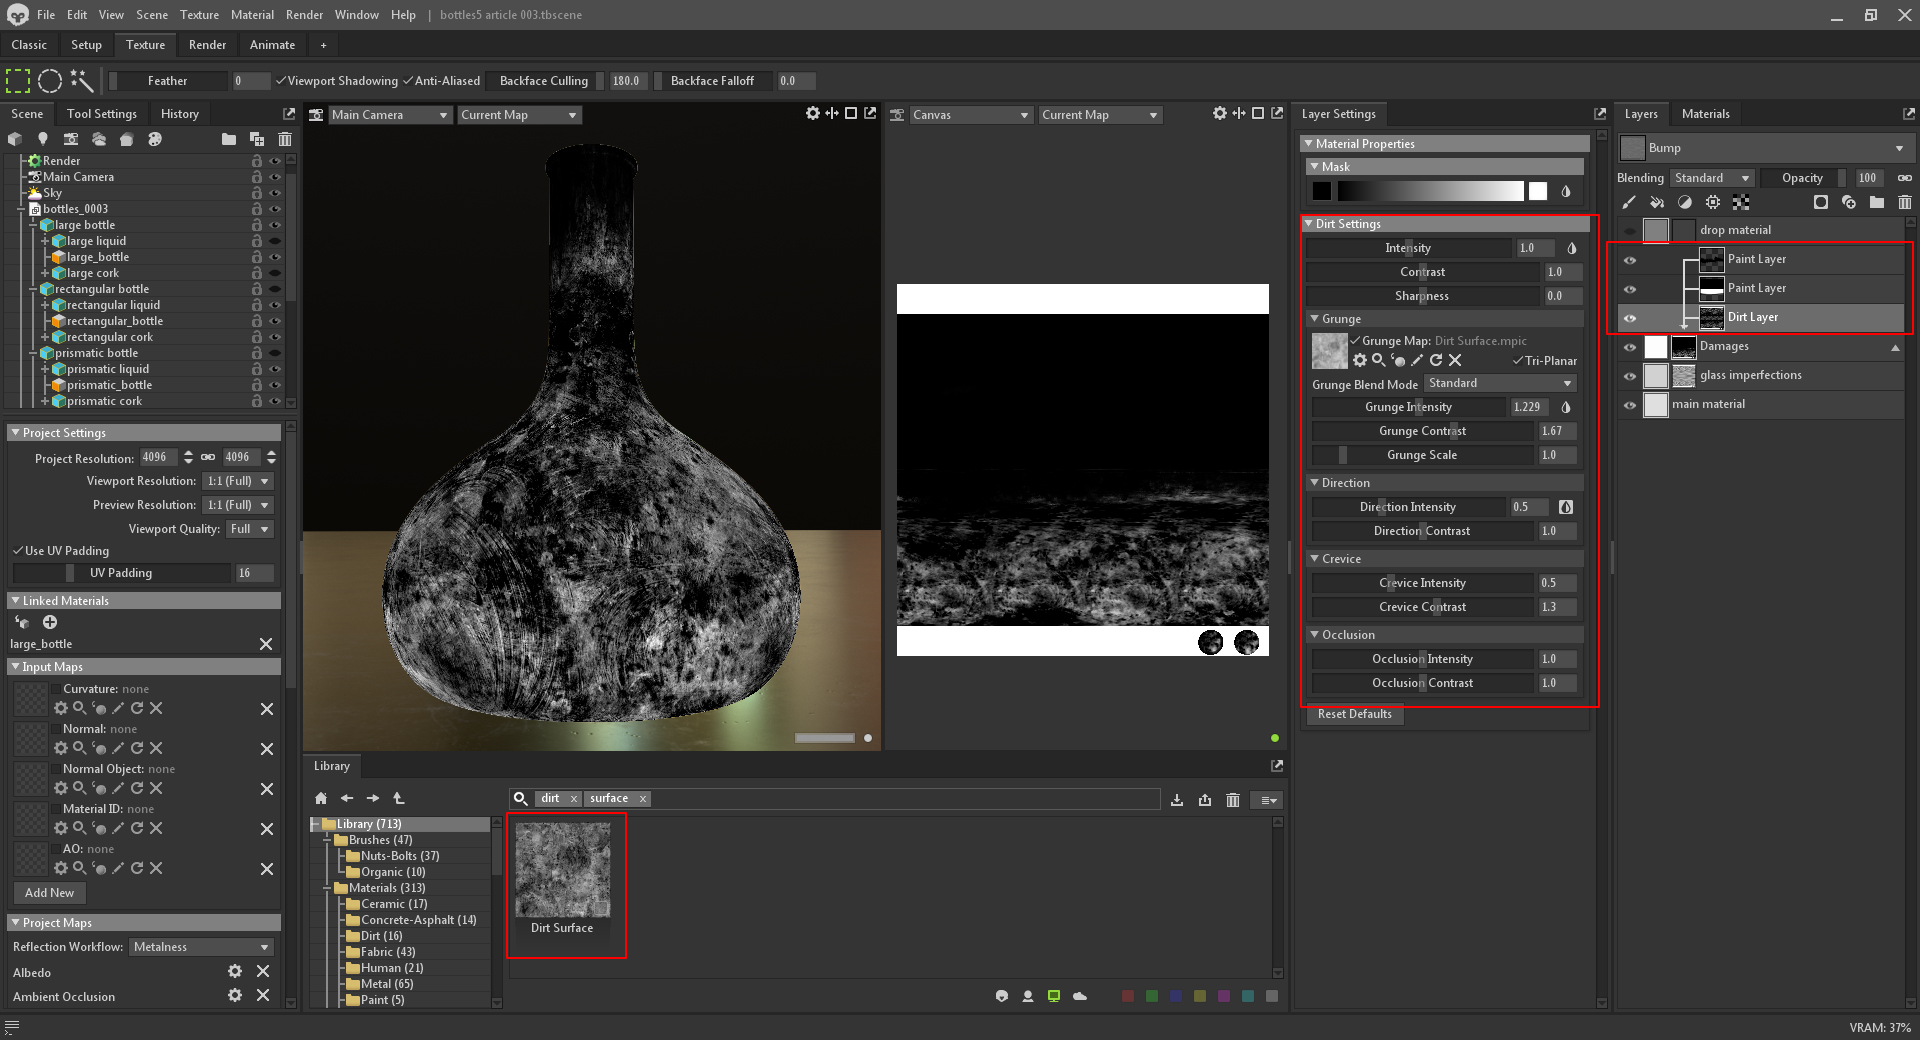
I layered multiple masks for this damage layer. I used the Dirt Surface Grunge Texture from the Library for the first layer and set it to a Tri-Planar Projection. Above this, I added a Paint Layer and manually painted out the dirt detail from the inside, isolating it to exist only on the outside of the bottle.
Layering Water Droplets
The final step in the texturing process was to add my procedural droplet generator, which can be found on my Artstation Store. This Substance file creates procedural, random, and adjustable droplets with 2 parameters. You can export several variations of the droplet texture using Substance Player. I exported my droplet textures in 2k resolution.
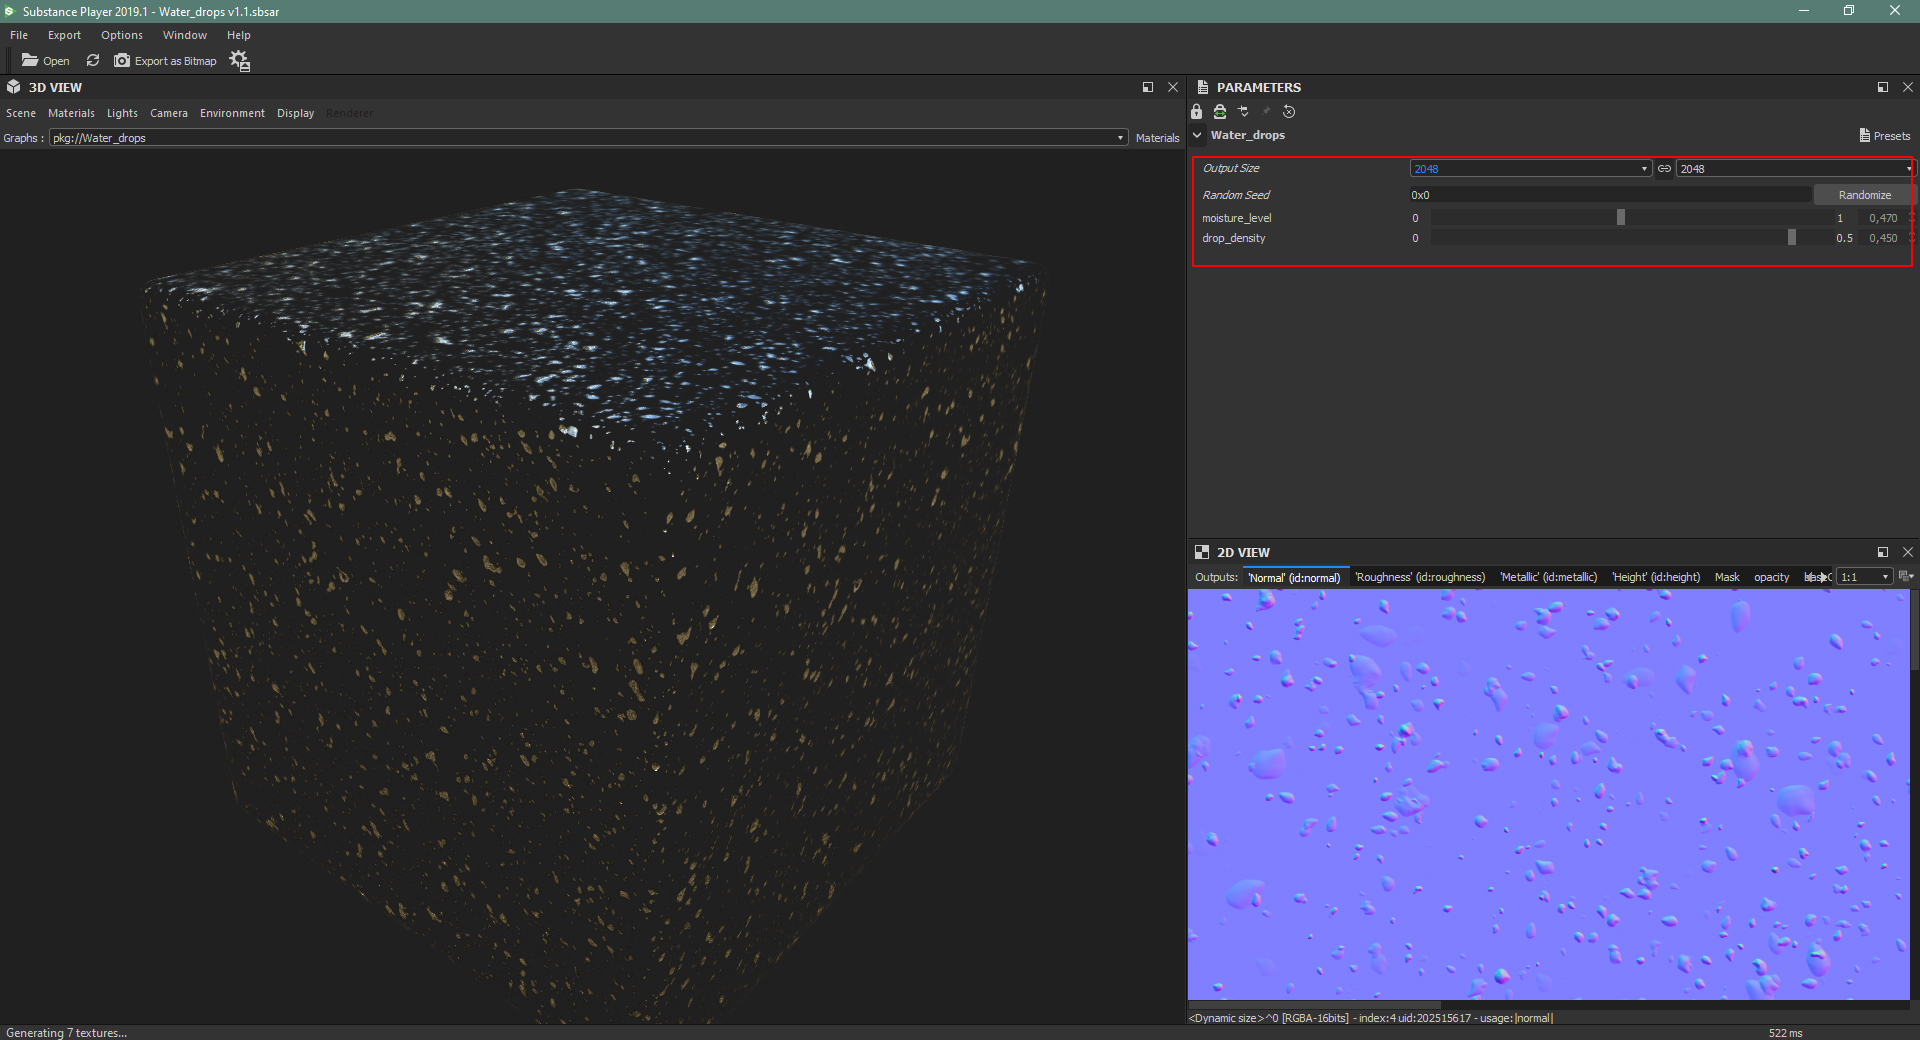
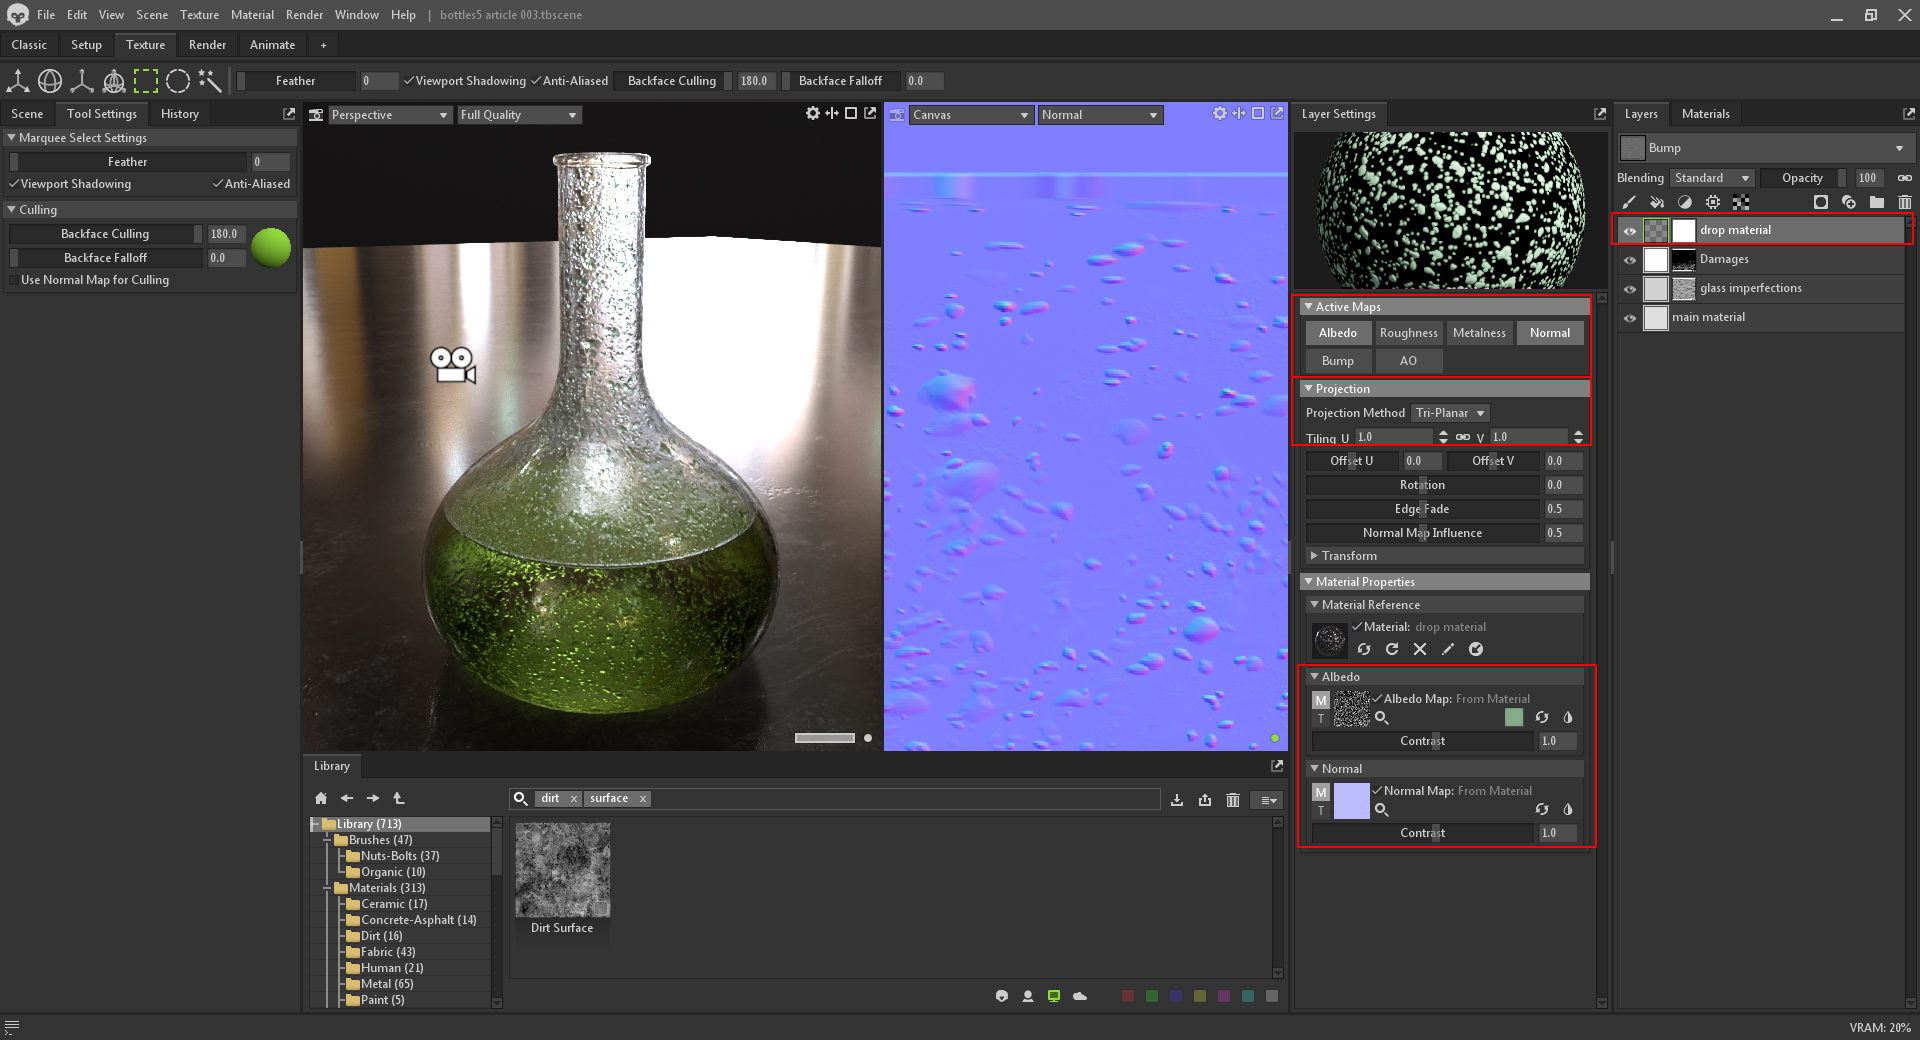
I applied the droplet textures to the active maps in my texture project, Albedo and Normal, and set their Projection to Tri-Planar. Since the liquid color is green, I changed the Albedo color so that the droplets have a green tint to them.
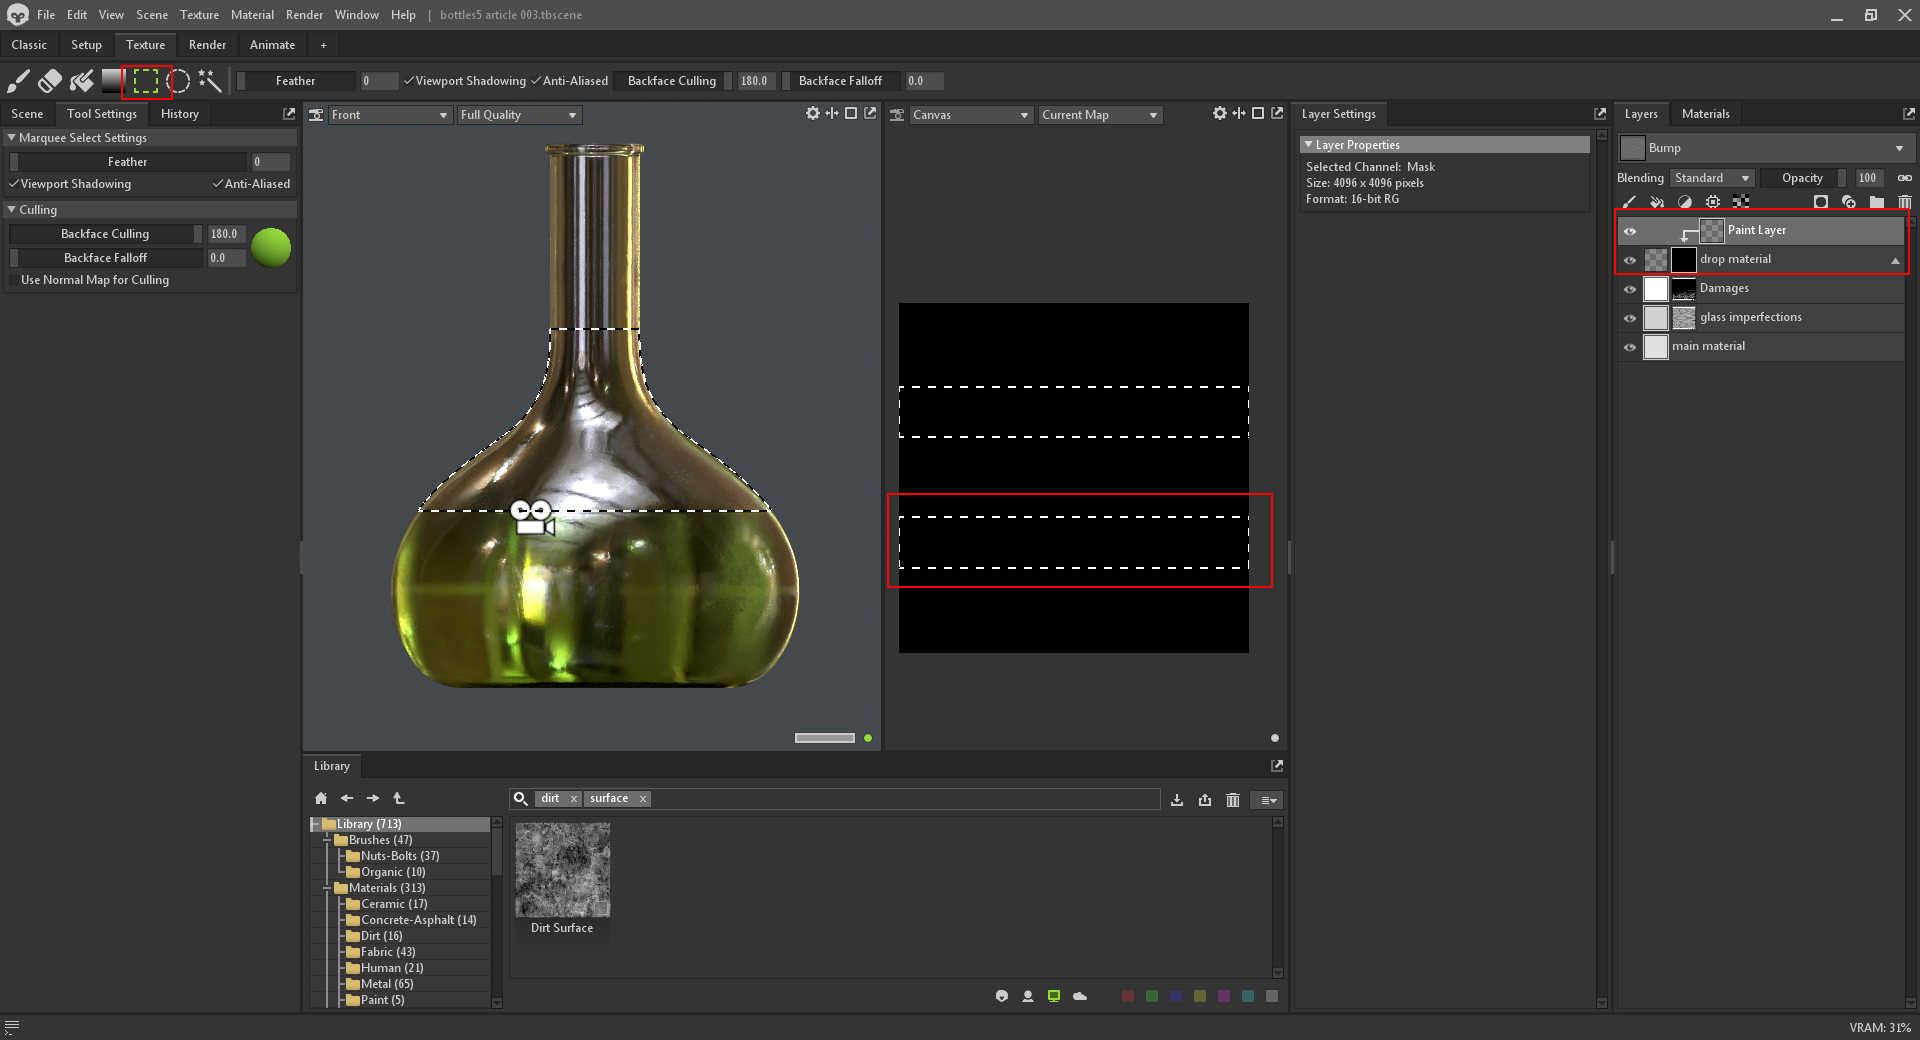
I needed to isolate the drops to exist only outside the bottle and above the liquid. To do this, I added a paint layer as a mask and used the rectangle marquee selection tool to isolate the area I wanted to paint. I switched the camera to a front view and selected both inner and outer surfaces of the bottle, then deselected the outer faces in the Canvas window.
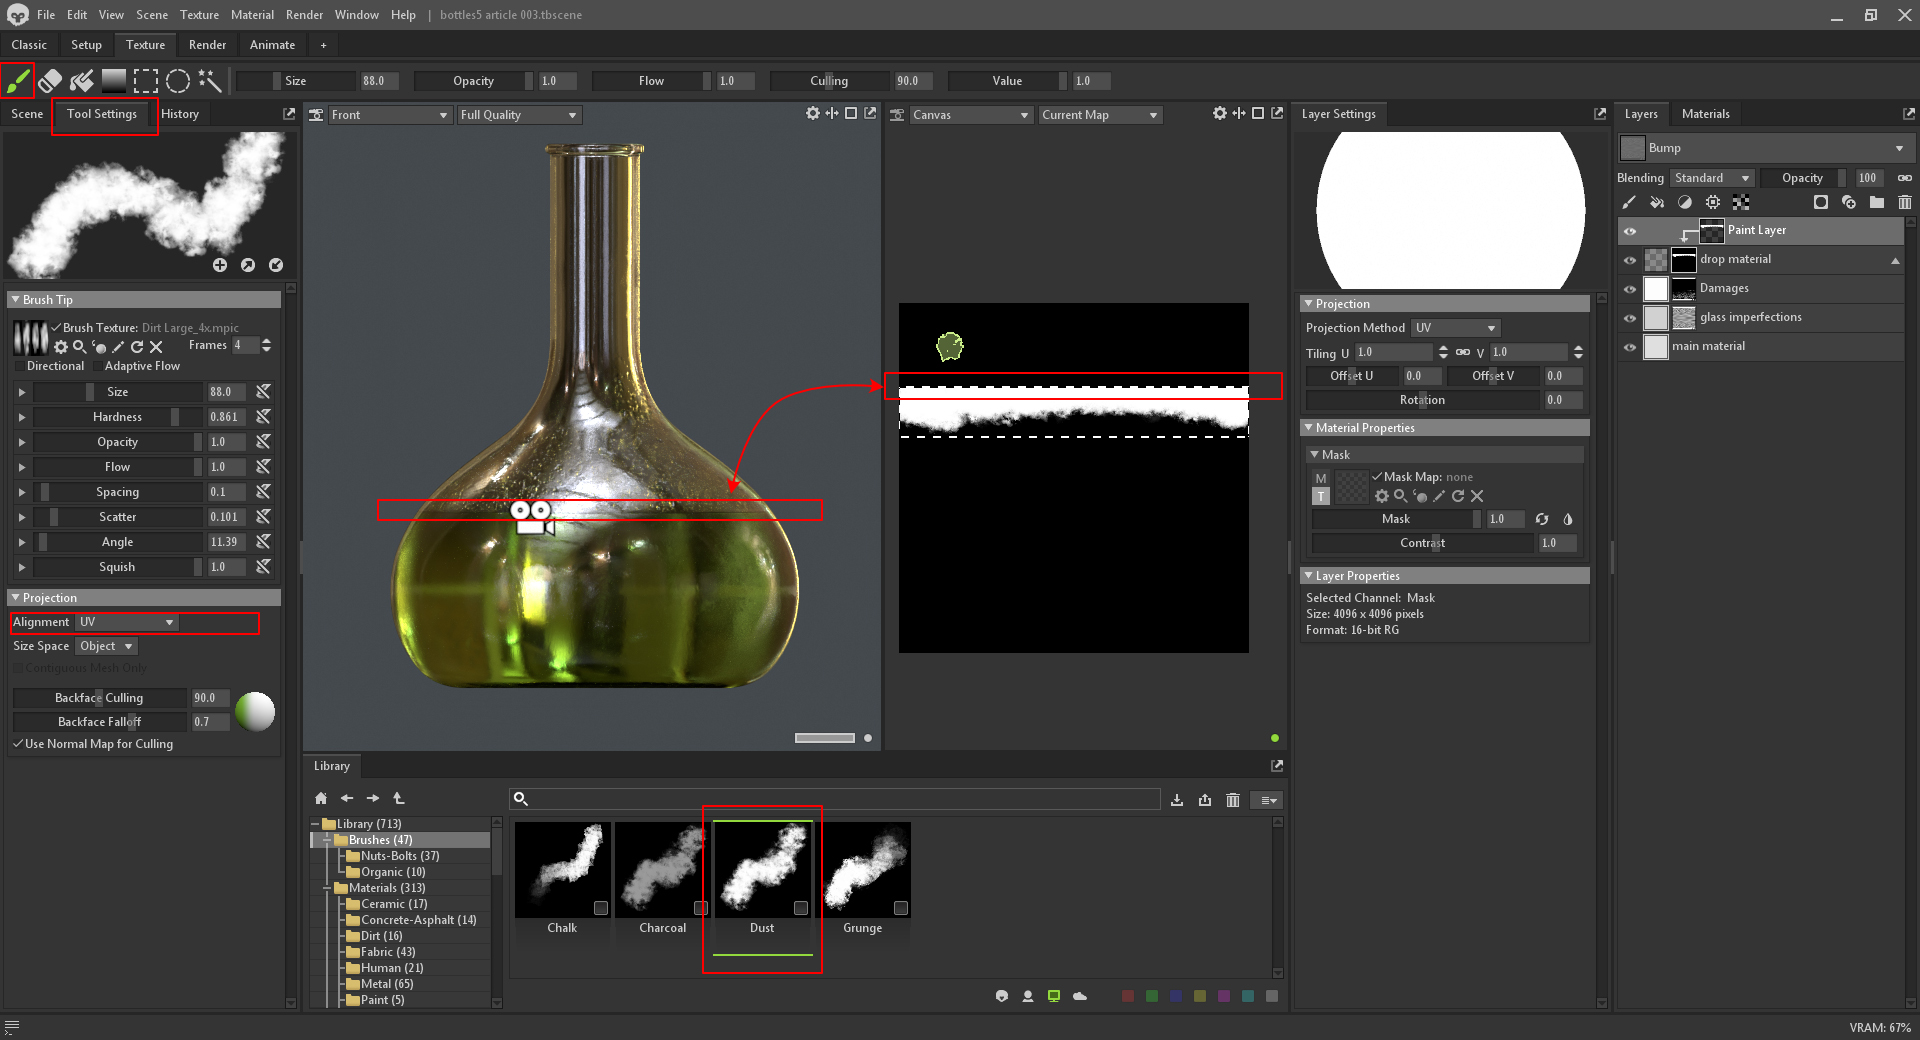
I used the Dust brush preset from the Library to paint some organic edges on the harshly masked edge in the Canvas window. In the Brush Settings window, I set the Projection of my brush to UV since the inside of the bottle’s UV is inverted. Trimming the top caused drops to be trimmed from the underside. I must say, the ability to use a selection tool in a 3D viewport is an amazing feature!
For a final touch, I added moisture on the glass’s surface by adding a fill layer with the Roughness Map activated and a value set to 0.725. I added a Mask with a Dirt Processor to the Fill Layer, which helped create the glass’s moisture.
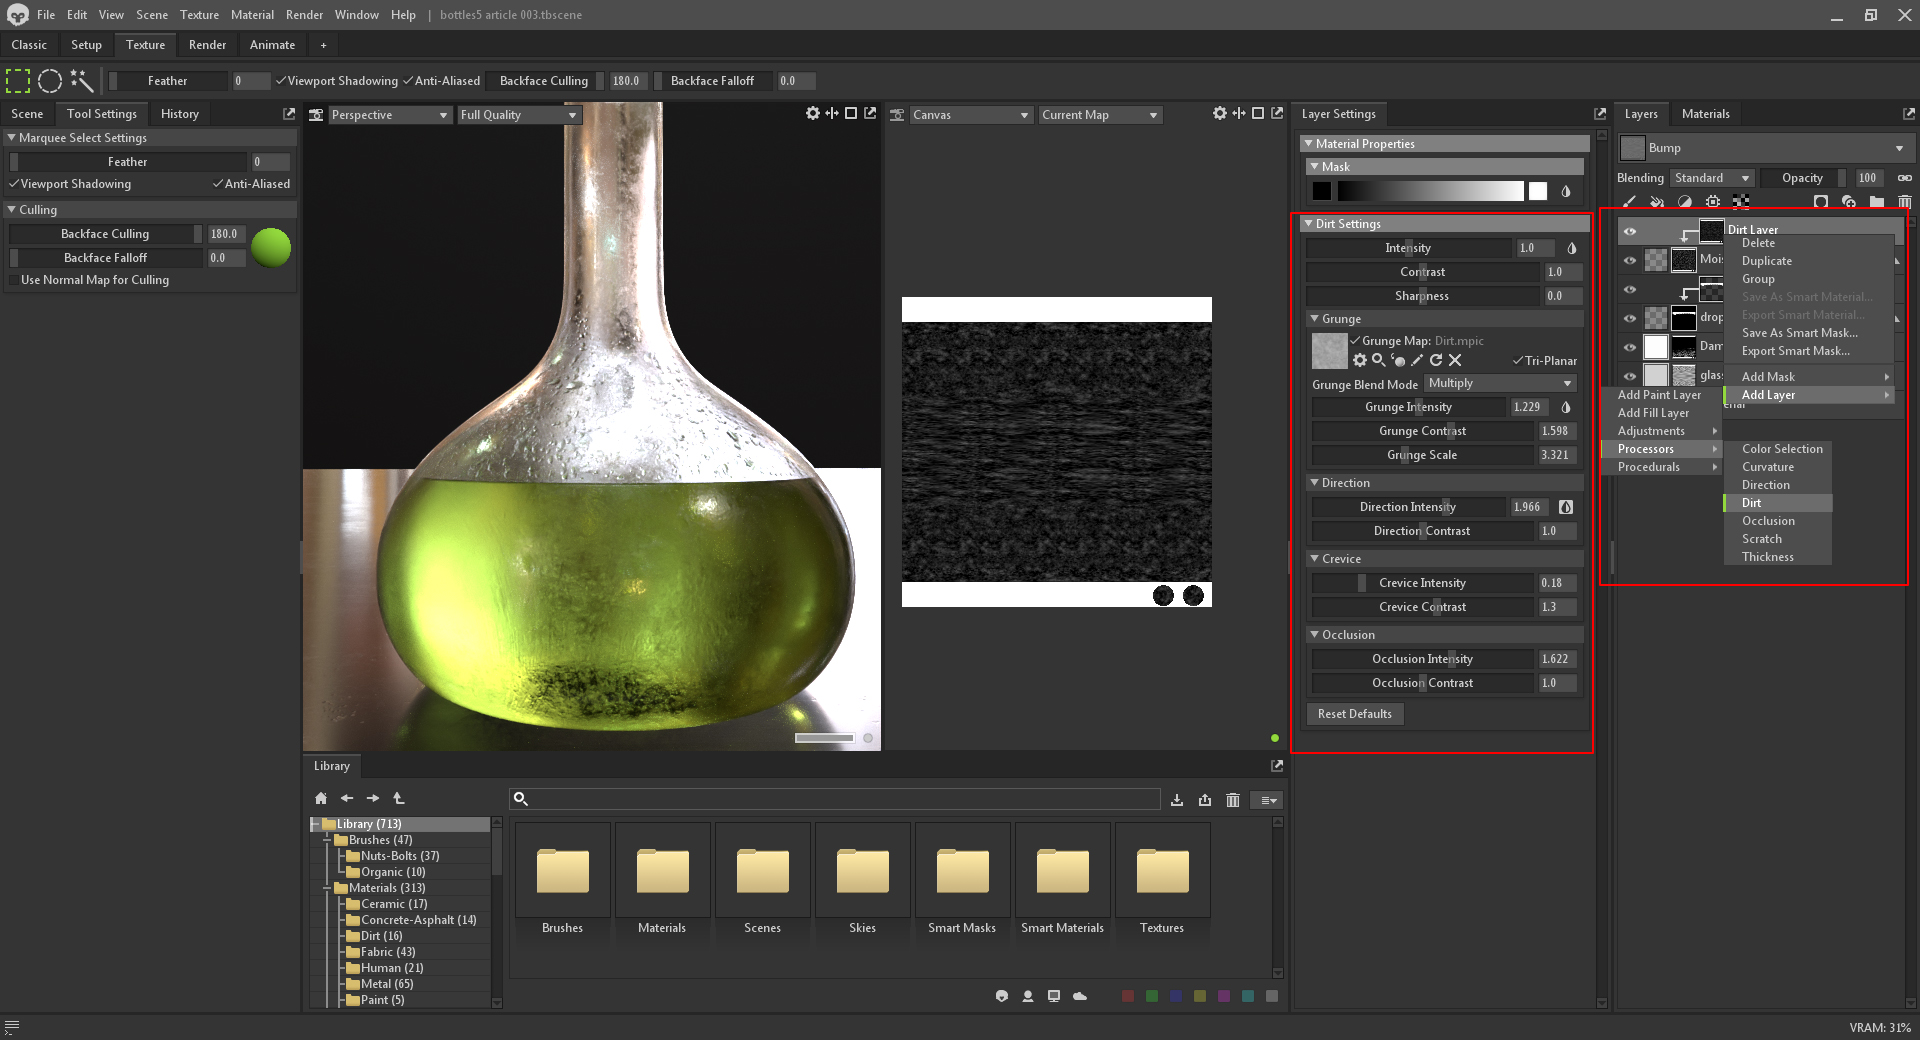
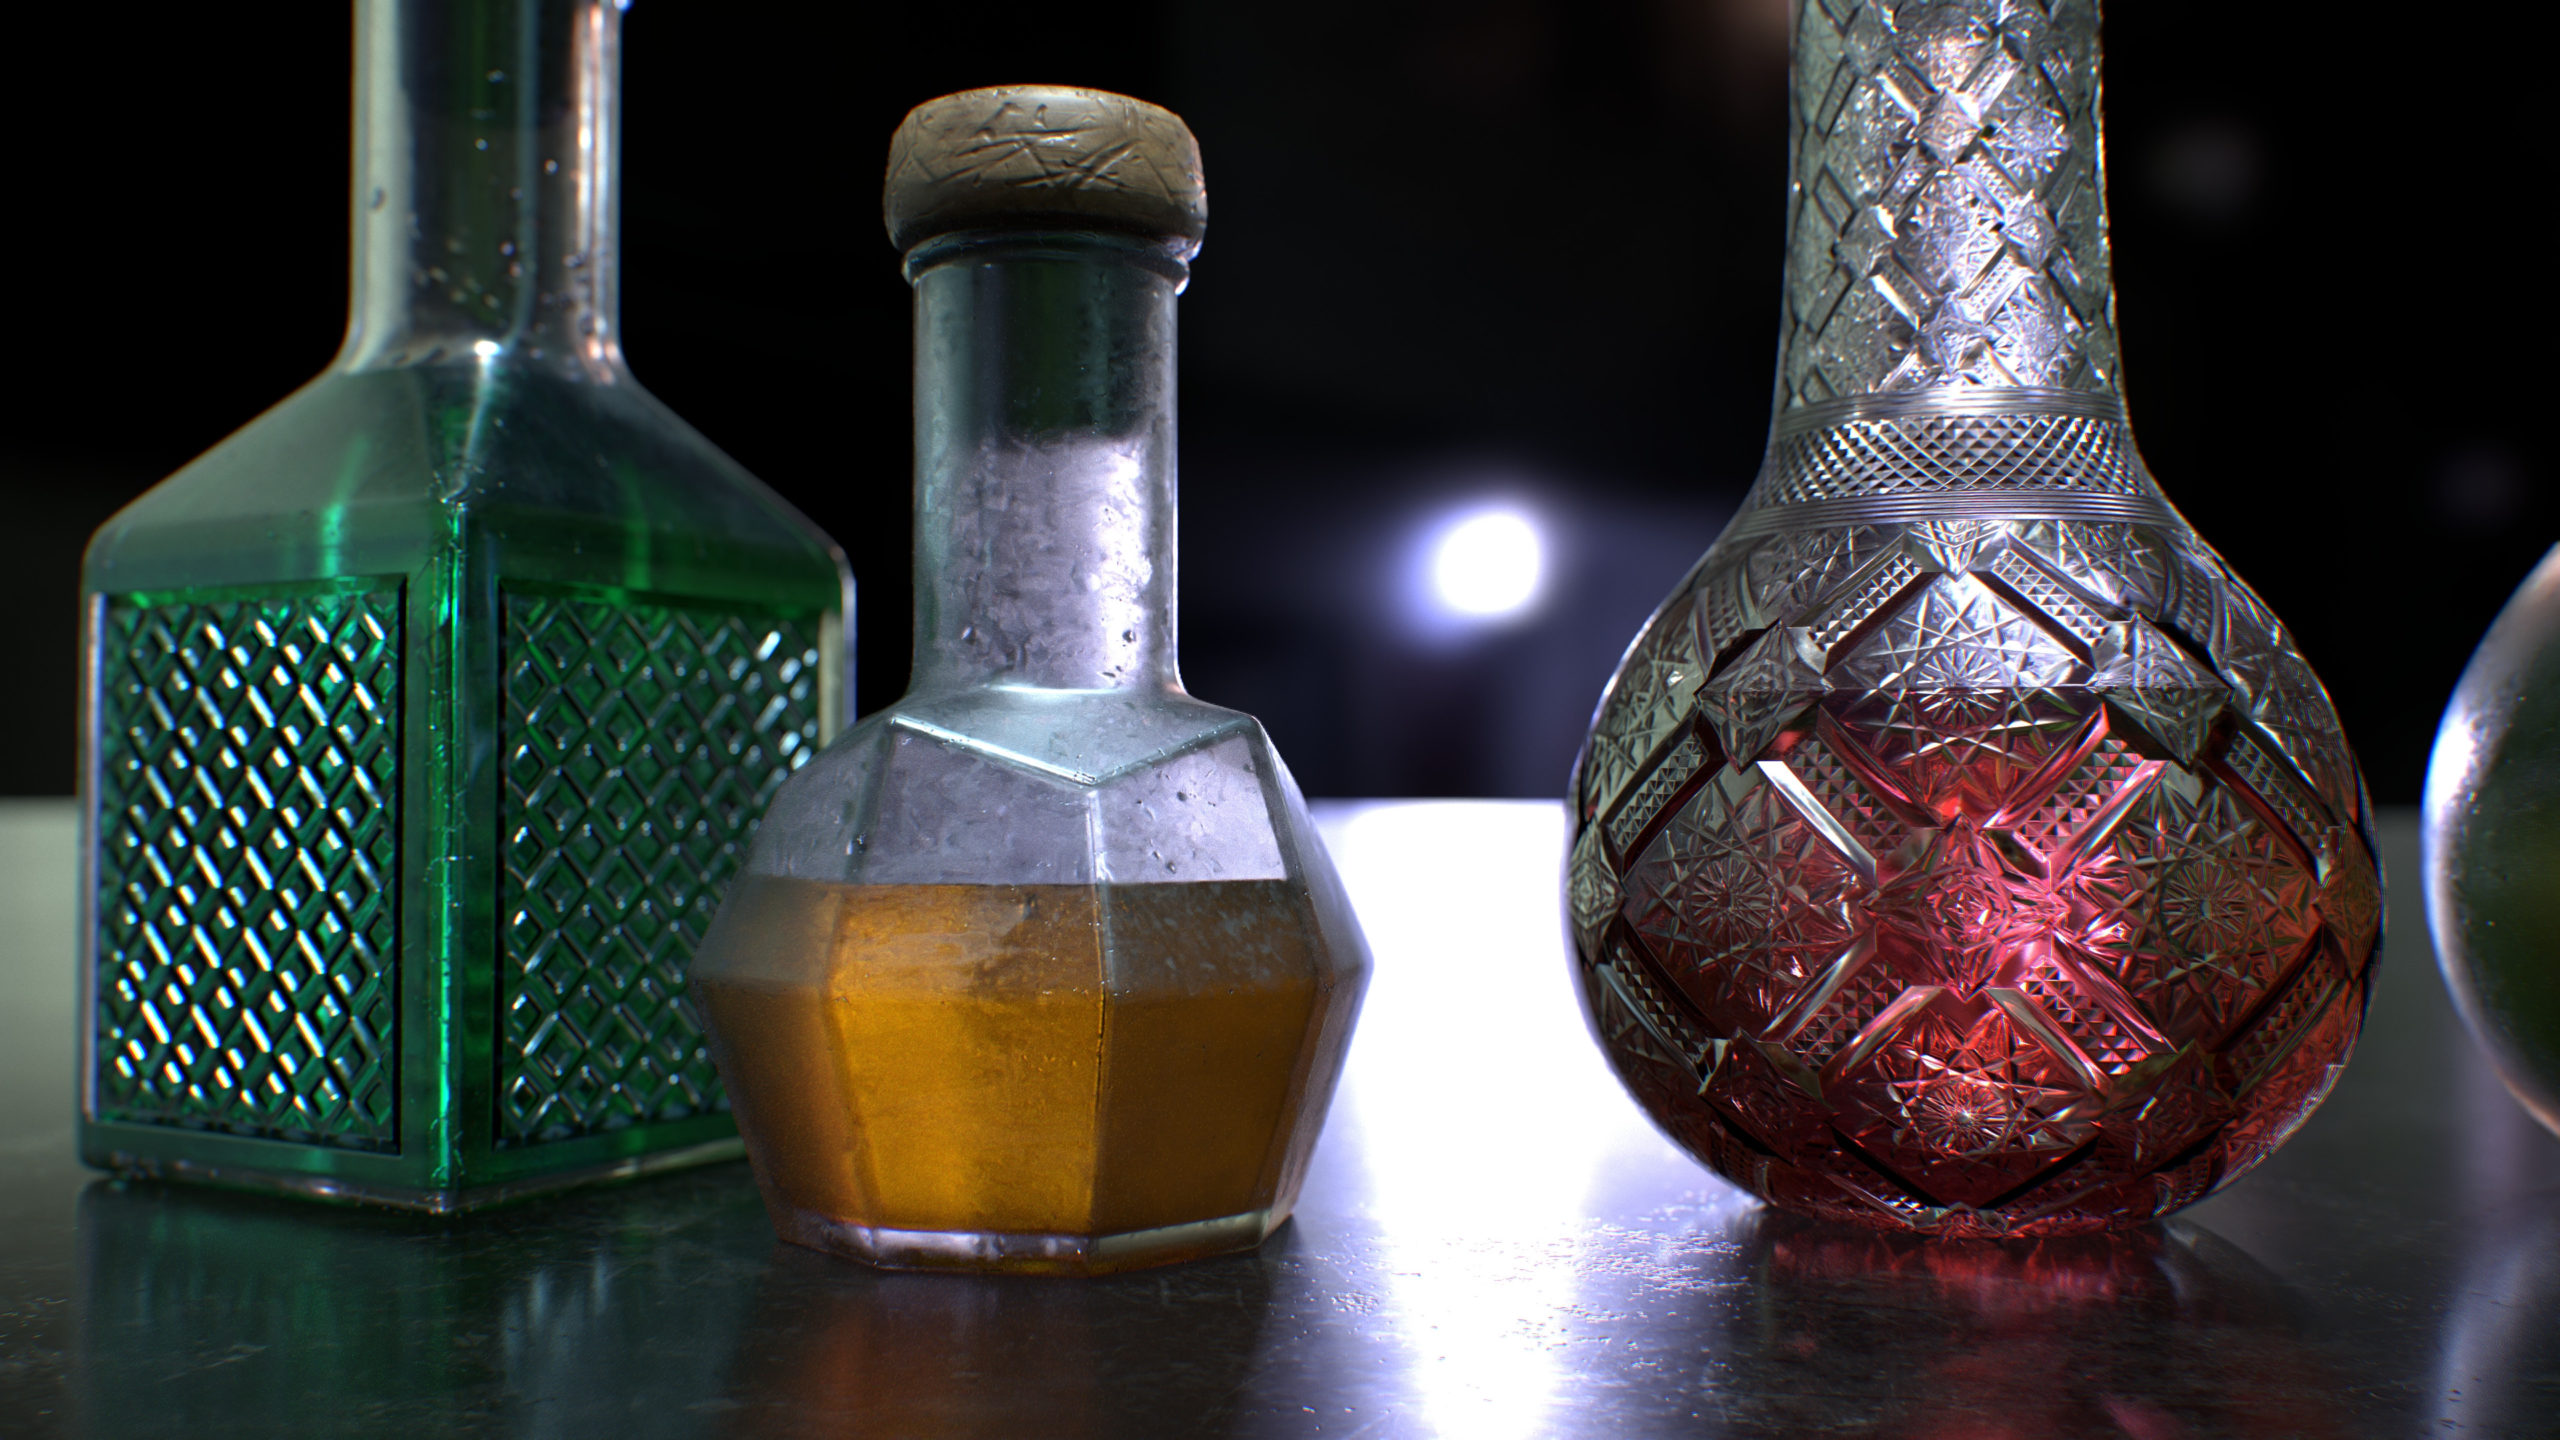
This is the final look of the bottle. I later applied the same steps for the rest of the bottles, with some differences in colors and textures.
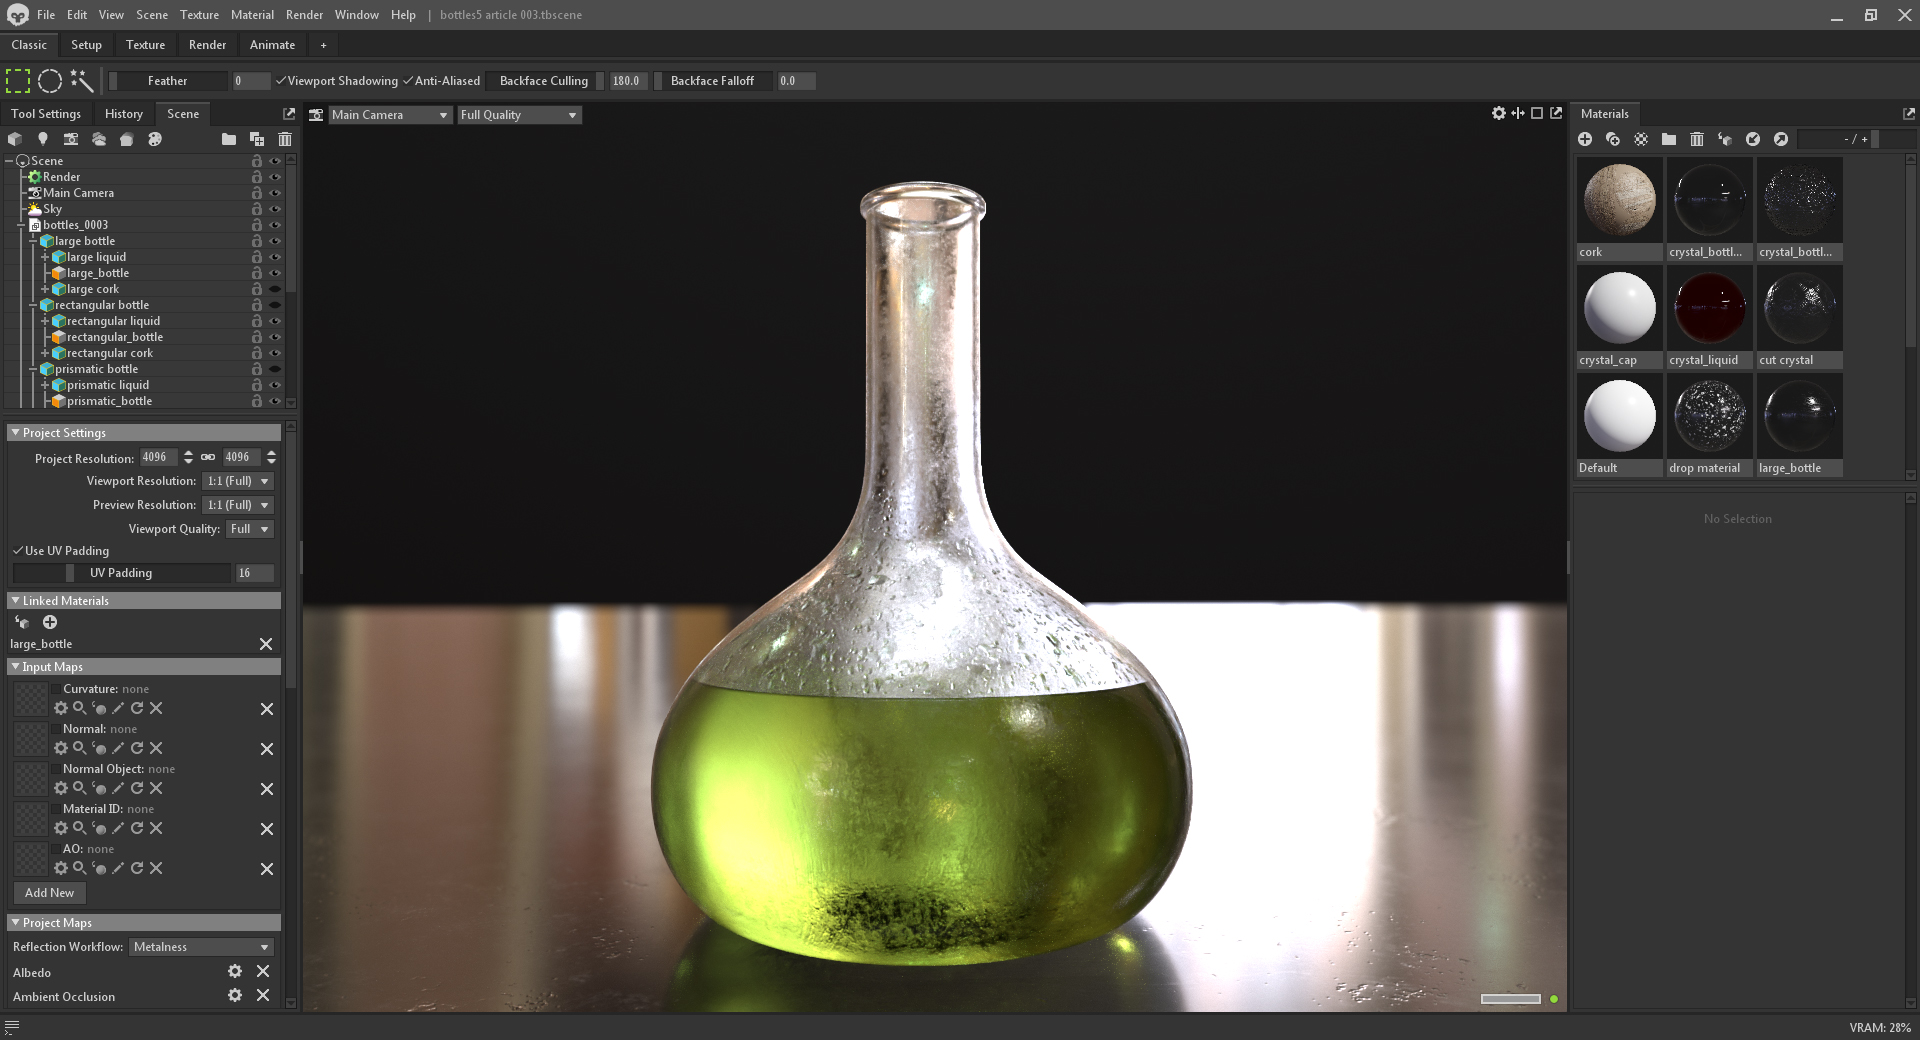
Creating a Cut Crystal Bottle
I created a procedural cut crystal pattern with Substance Designer for the last bottle and applied the normal and roughness maps on the glass’ outer material.
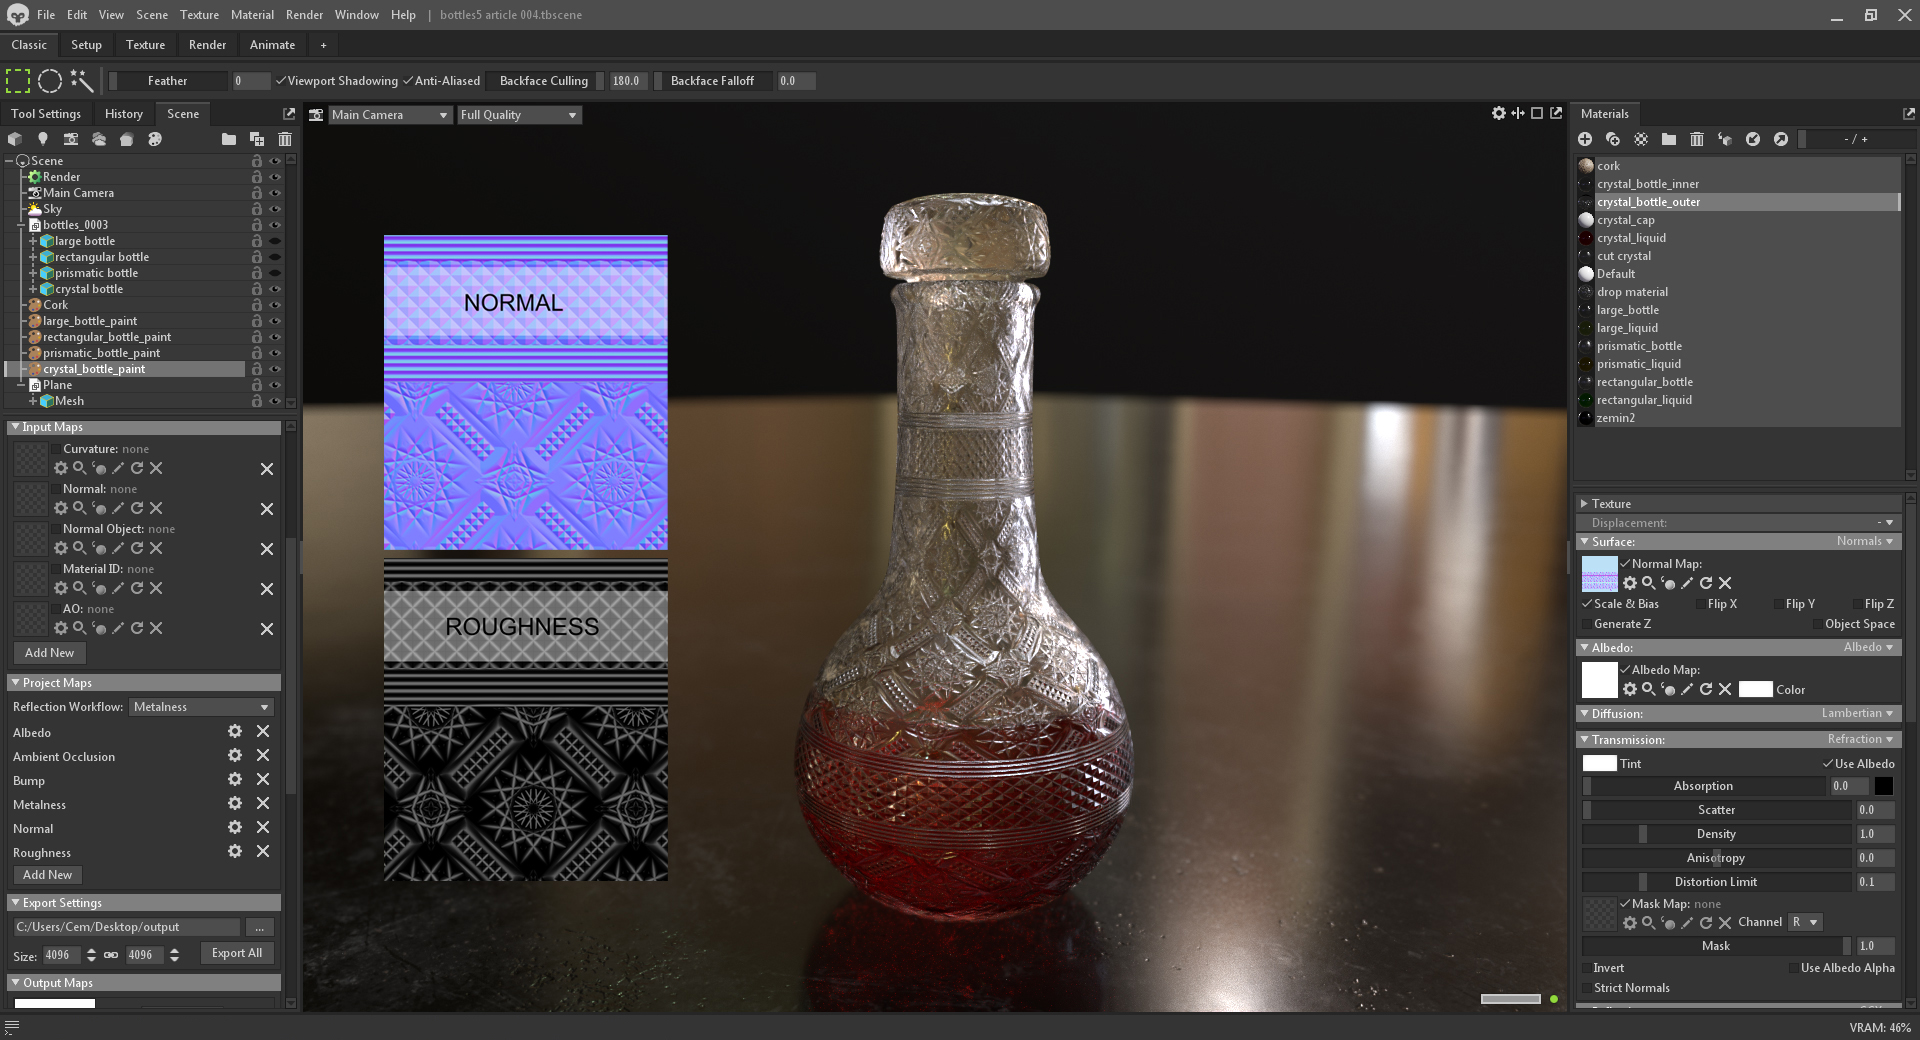
Finalizing the Render Setup
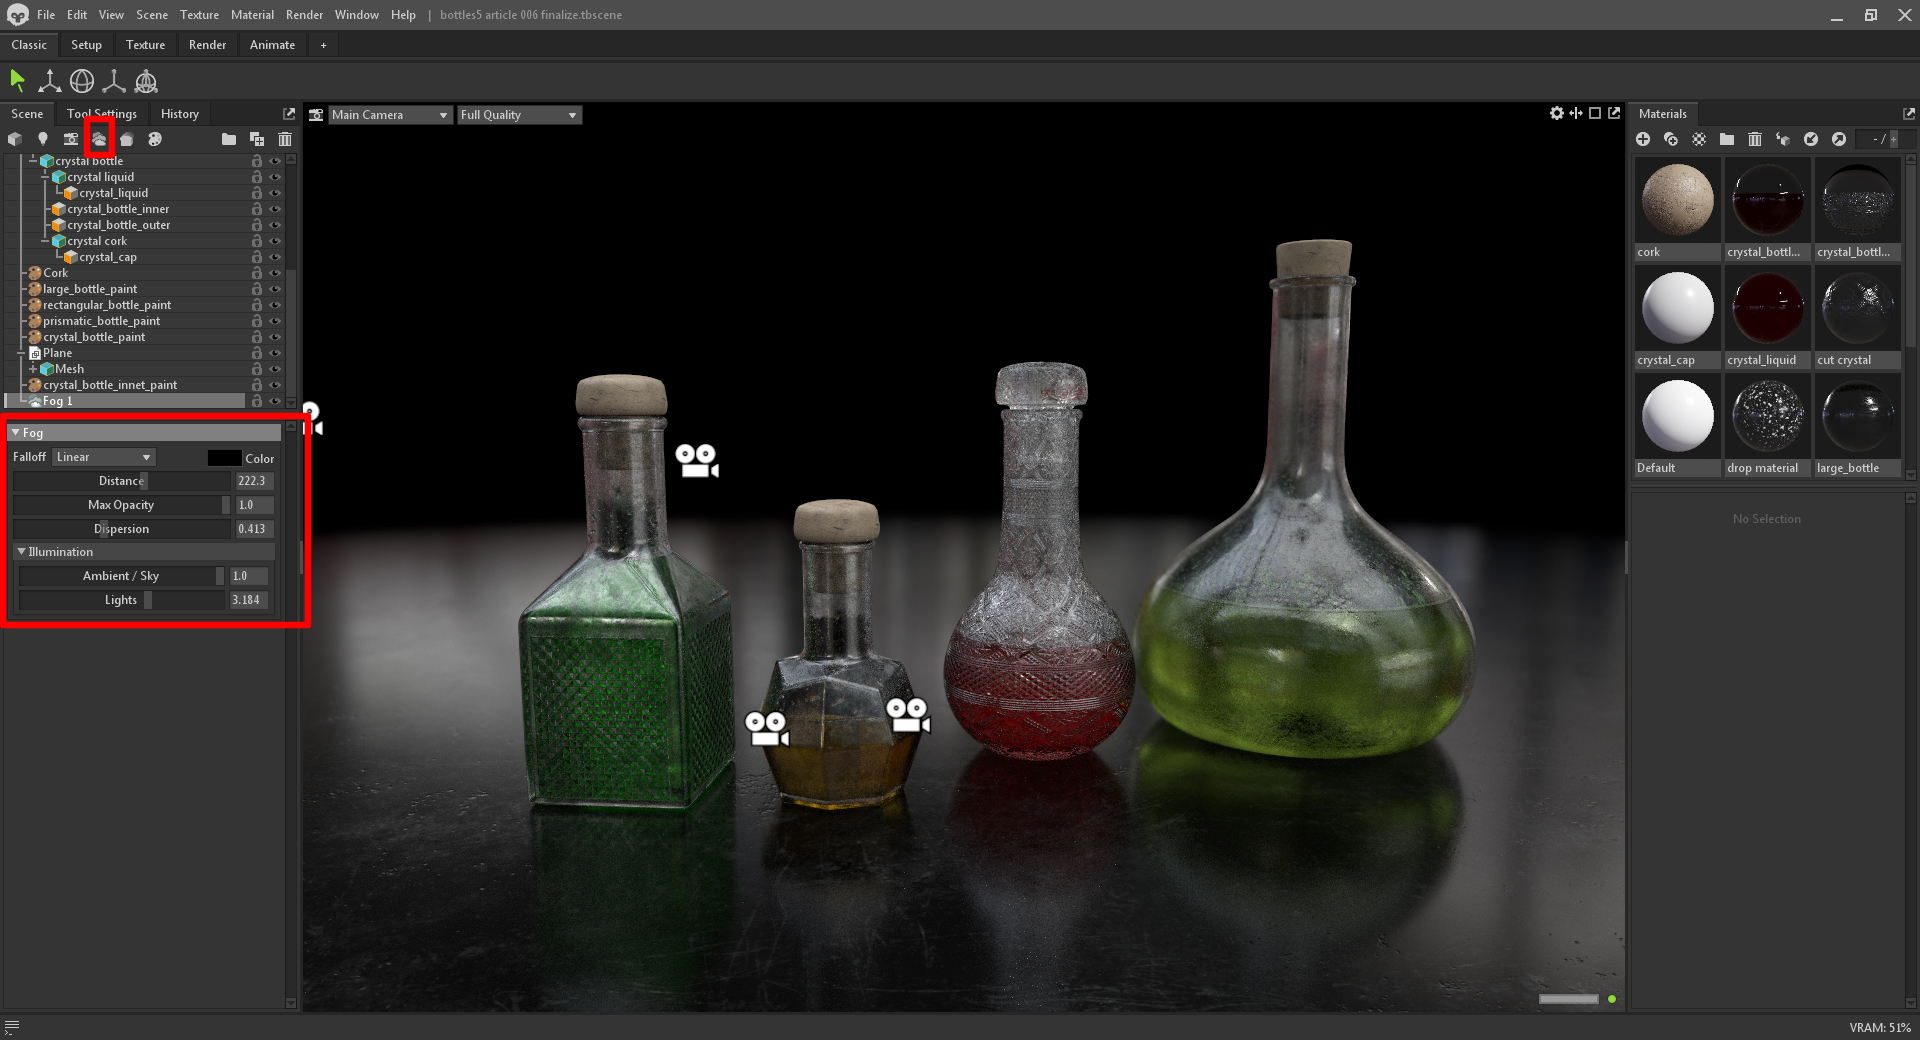
I used a large plane for the ground and assigned a high tiling value. I chose the Train Station Platform Overlook Sky from the Library and cranked up the Brightness to an ideal exposure. Since the ground has a dark reflective material, I set the Backdrop Brightness to 0 to create a black backdrop. I enabled Depth of Field in the Camera settings to blur the horizon line. Despite this step, the horizon line was still sharp.
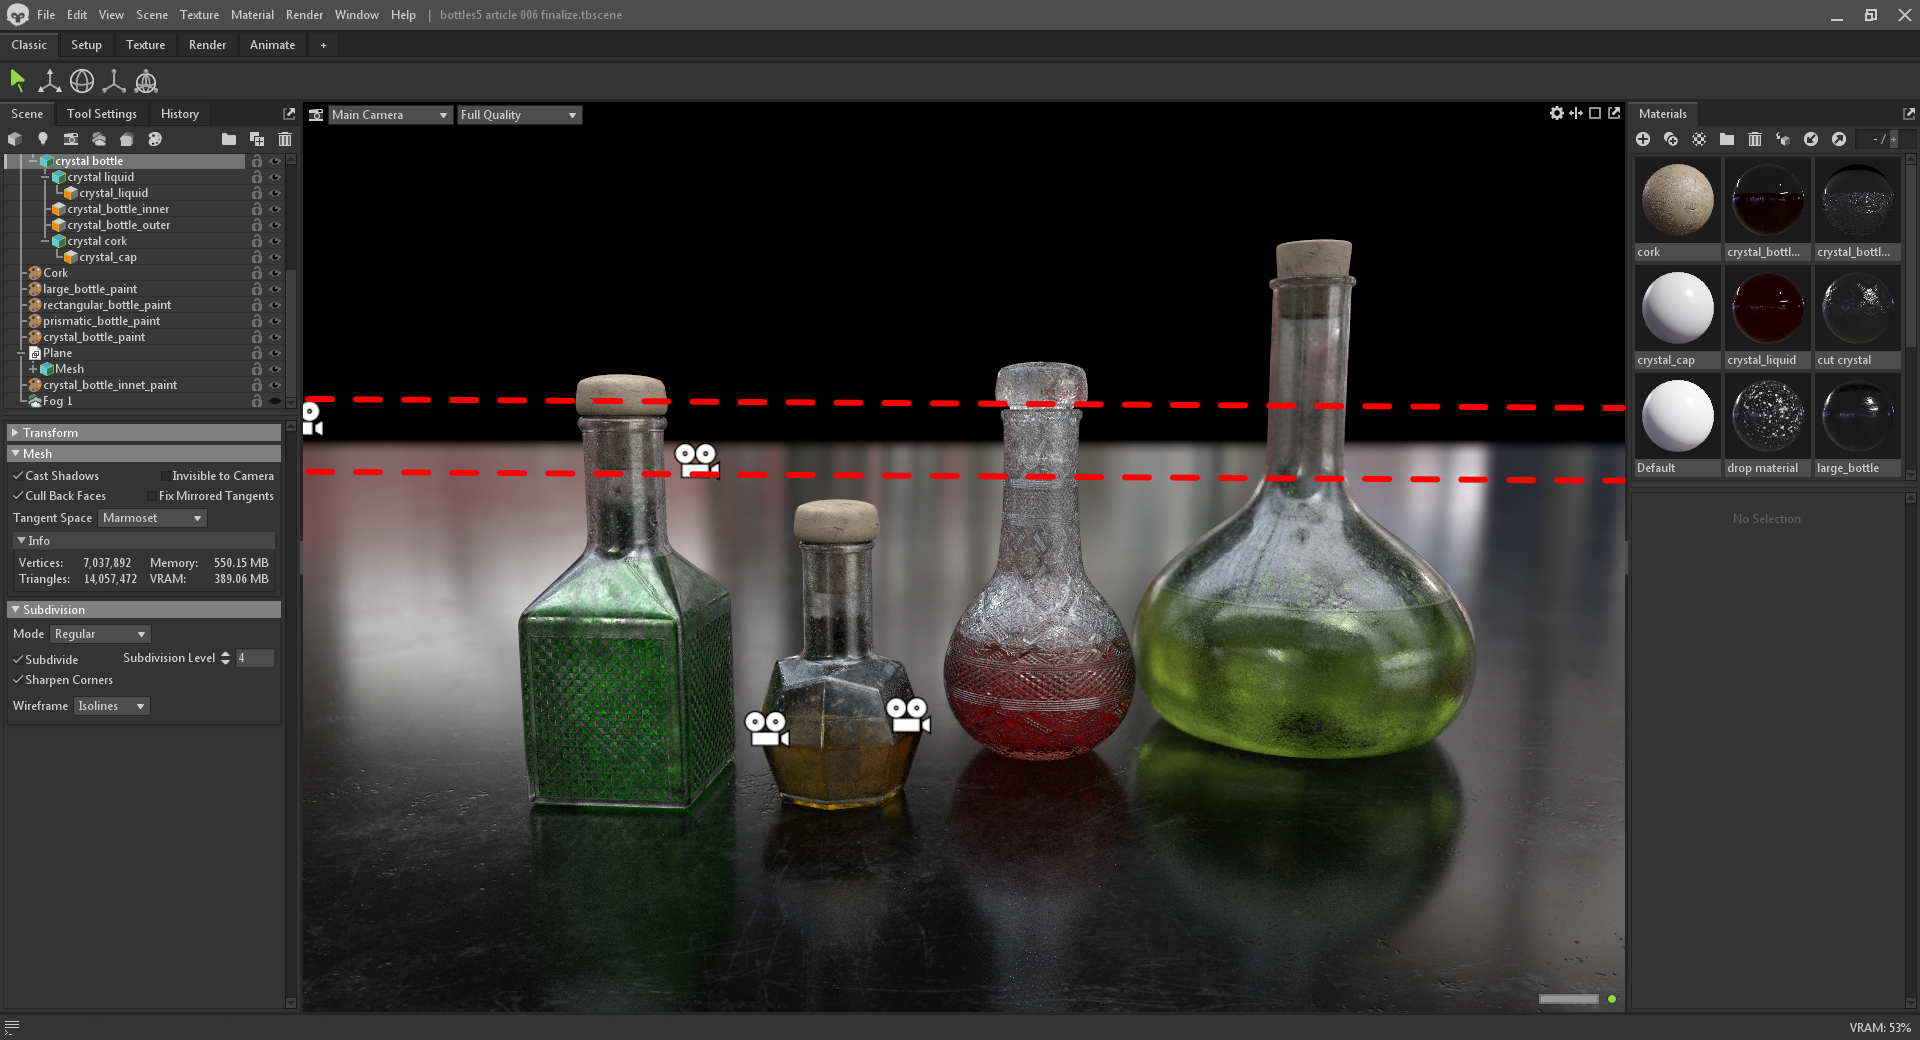
I added a Fog object and set it’s color to black, which is an easy way to further blend the scene together.
Conclusion
I hope you liked this breakdown. With the new ray tracing system, Toolbag 4 handles organic refractive effects very well and with ease. The painting tools make it extremely fun to see photorealistic results while you paint in real-time. I can’t enjoy this version enough 🙂 See you around!
We would like to thank Cem Tezcan for writing this breakdown. You can find more of Cem’s work on Artstation. Create your own ray-traced glass renders using the 30-day trial of Toolbag 4.
If you’re interested in collaborating on a tutorial or breakdown article, please send us your pitch, along with a link to your artwork, to submissions@marmoset.co.

