
INTRODUCTION
Hi guys! My name is Argyris Nochos, I am a freelance 3D generalist currently living in Greece. After several years of being a hobbyist artist while working on my PhD in Pharmaceutics, I decided to go professional in 2015. Since then, I have worked in various local studios for films, TV commercials, and in recent years, for virtual reality applications.
In this article, you will learn about my attempts at importing and rendering complex animations and simulations using Toolbag’s real-time capabilities. I will demonstrate all of my methods including the use of the Alembic format with a personal project. This project is an advertisement about a fictional, futuristic shaver called “Lycan One”, the first shaver with a nano-robotic blade. The project is broken down into two scenes. The first will have the product revealed by breaking through a pool of liquid and a concrete wall in slow motion, a very common TV ad cliché. It involves fluid simulation and dynamic fracture. The second scene explores the blade’s microstructure, where I’ll be focusing on how I achieved the “infinite nanobots” effect.
SCENE 1 – PRODUCT REVEAL
MODELING AND LAYOUT
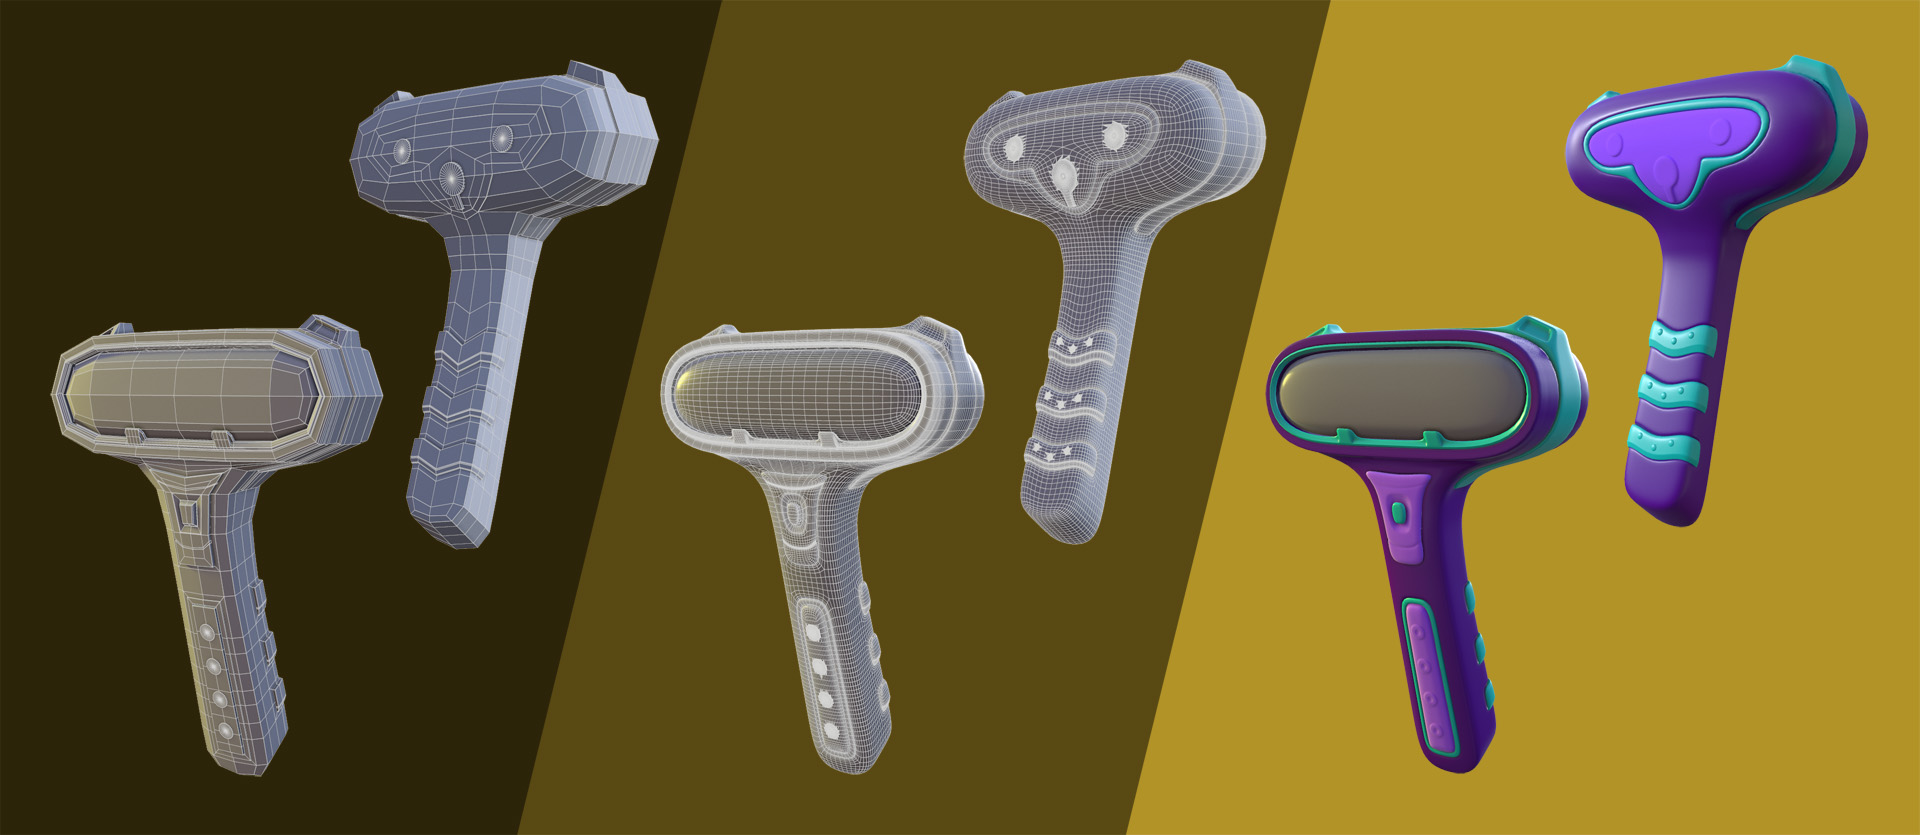
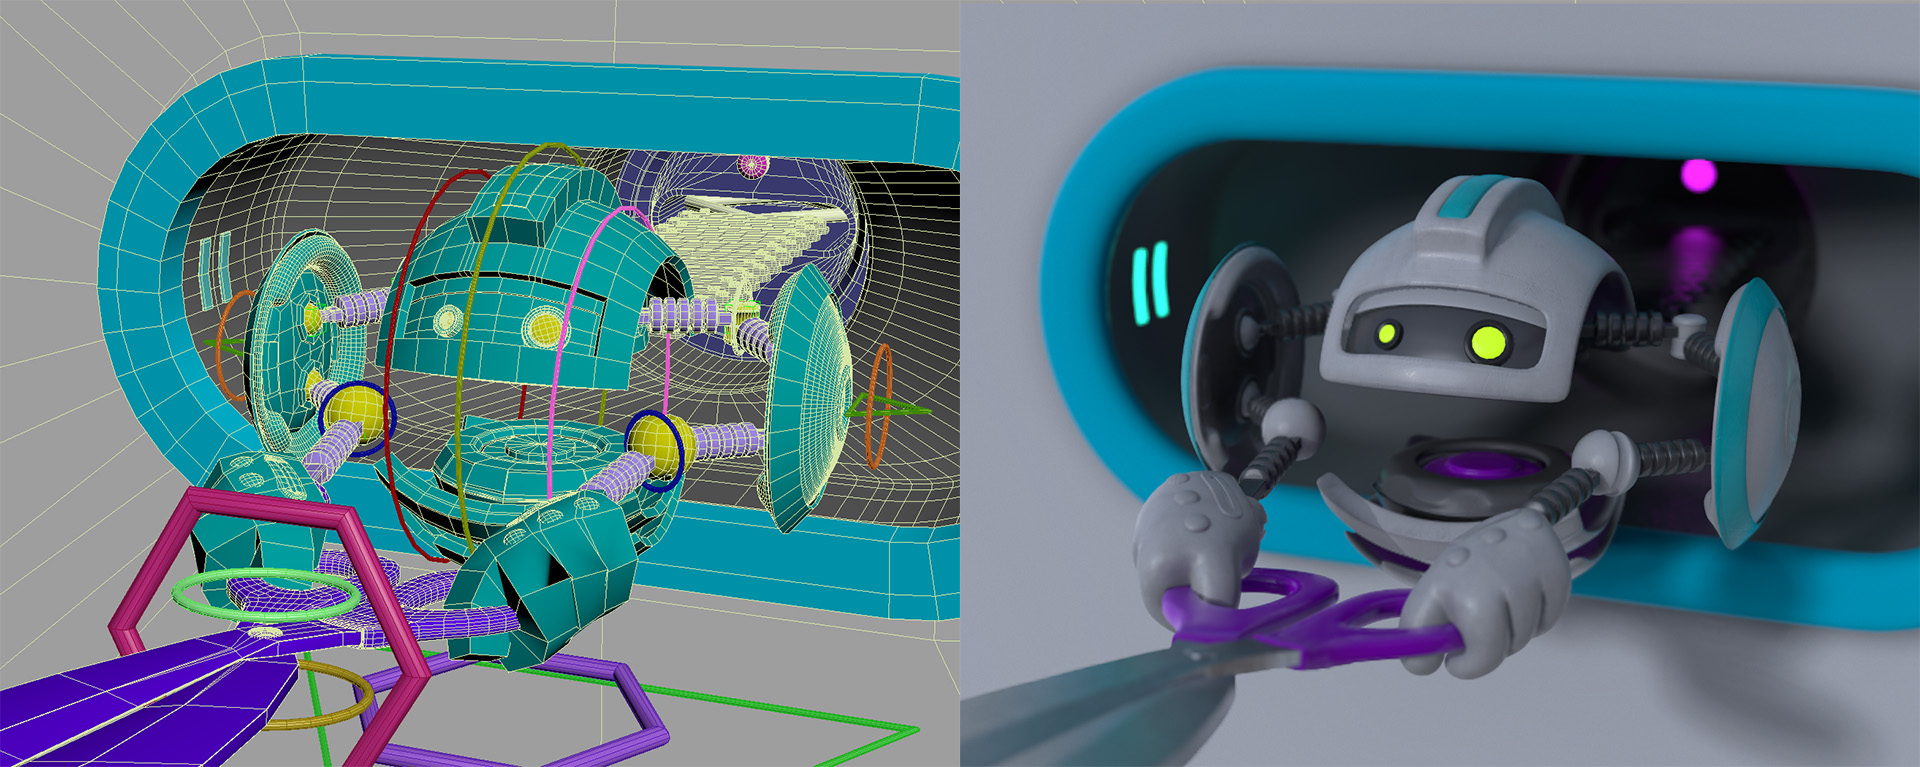
Starting out with the design of the shaver, I had no specific concept in mind, but my goal was to create something futuristic and cartoony that resembled a wolf. I explored a few forms and looked at a lot of real life shavers during the process until I arrived to this point. The base mesh was created in ZBrush with the ZModeler brush. After subdividing it, I carved some boolean details in Modo. Since this was a personal project and was treated as a television ad, I did not care much about poly counts or geometry optimization as long as it looked good in the render.
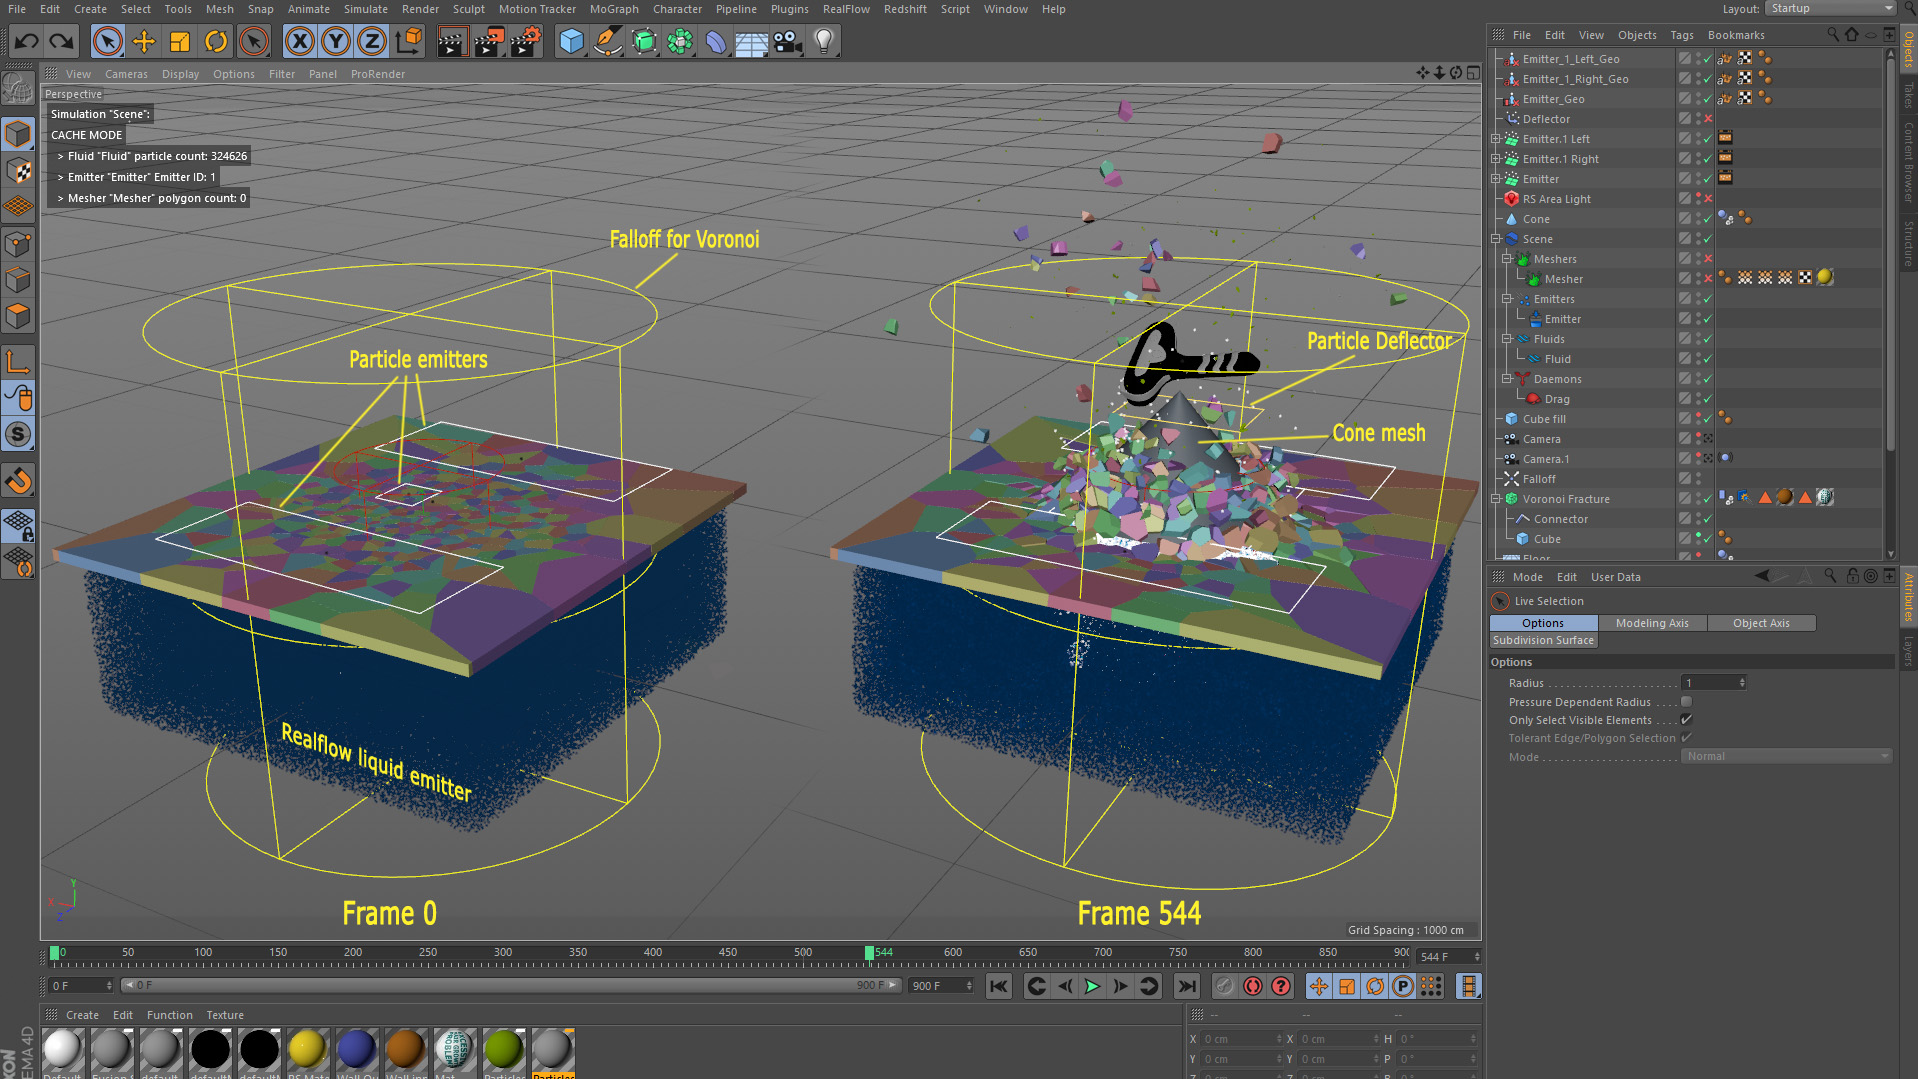
I used Cinema 4D along with the Realflow Plugin for the liquid and dynamic parts, but very similar results can be achieved with any other software that offers liquid simulation and shattering effects (Blender, Houdini, etc.). I created a box for the wall, applied a Voronoi Fracture (mograph) on it with a falloff and a connector. Under the wall, I placed another box and set it to be a Realflow Fluid Emitter. Then I animated the shaver passing through the liquid box and the solid wall in a vertical movement, and added a top down camera facing the wall. The whole idea behind the vertical alignment was to have the wall collapse into the liquid due to gravity and create an interesting splash effect. In order to create a larger shockwave as the shaver goes through the wall, I added a cone mesh following the shavers trajectory with a small delay which passed through into the camera, causing a ring of wall fragments to move with it. After a few animation tweaks, I settled with a wall fragmentation that I liked.

To achieve the slow motion effect, you’ll need to set up a camera (similar to a real one) that captures at a higher frame rate, grab a ton of frames, then play them back at a normal speed (e.g 25 or 30 fps). Alternatively, you can use a time remapping feature in your video editing software to create cool slow-downs/speed-ups. The wall shattering simulation was baked at 25 fps and I added a Realflow Collider Tag so it could interact with the liquid. I changed the frame rate of the project to 500 fps (which is 20x faster than 25fps). In order for the liquid to move convincingly, it had to be simulated in slow motion, so I reduced the timescale of the solver down to 0.05, which makes it 20x slower.
After baking and meshing the liquid simulation, I decided to add some particle emitters to act as smaller wall fragments and provide a bit more detail. There’s a main rectangle particle emitter sitting at the center of the hole and two larger emitters to the left and ride sides. I then animated both the scale of the central emitter and the particle emission numbers for all three emitters to match the rate of growth of the punctured hole. For the particles, I modeled a few fragment meshes and gave them some scale variation. Finally, I added a Particle Deflector Object and animated it to move behind the shaver to prevent particles passing through it.
EXPORT/IMPORT ANIMATION AS ALEMBIC

Alembic is a file format that allows the export of models and complex animations by baking everything at the vertex level. It’s perfect for transferring liquid and cloth simulations, as well as morphs and particles between different 3D software packages. Fortunately, it’s supported by Toolbag. However, I should warn that Toolbag, as well as most 3D applications, do not support material transfer in Alembic yet, so you’ll have to manually re-assign materials to your models. You can read more technical info at the developers website or simply believe it’s pure magic.
The export process is pretty straightforward and similar in all applications. In the case of Cinema 4D, I selected and exported all the required scene geometry as an Alembic file. Be sure to choose the Ogawa format, set the Frame Range, and check the UV’s option. When exporting particles, make sure to first bake them in the scene and check the Particles and Particle Geometry options in the Alembic options window. Direct exports of particles as Alembic did not work for me, so I imported the Alembic file to C4D and re-exported it. Before importing the Alembic files into Toolbag, you’ll need to first change the frame rate of the Scene to avoid any potential problems. Toolbag will warn you that “keyframe times will be automatically aligned to the nearest frame interval”, this is fine, so press OK and add the correct frame range. In my case, I had 500fps and frames 1-901. Then I loaded the file and started assigning materials.
MATERIALS, LIGHTING, AND CAMERA SETUP
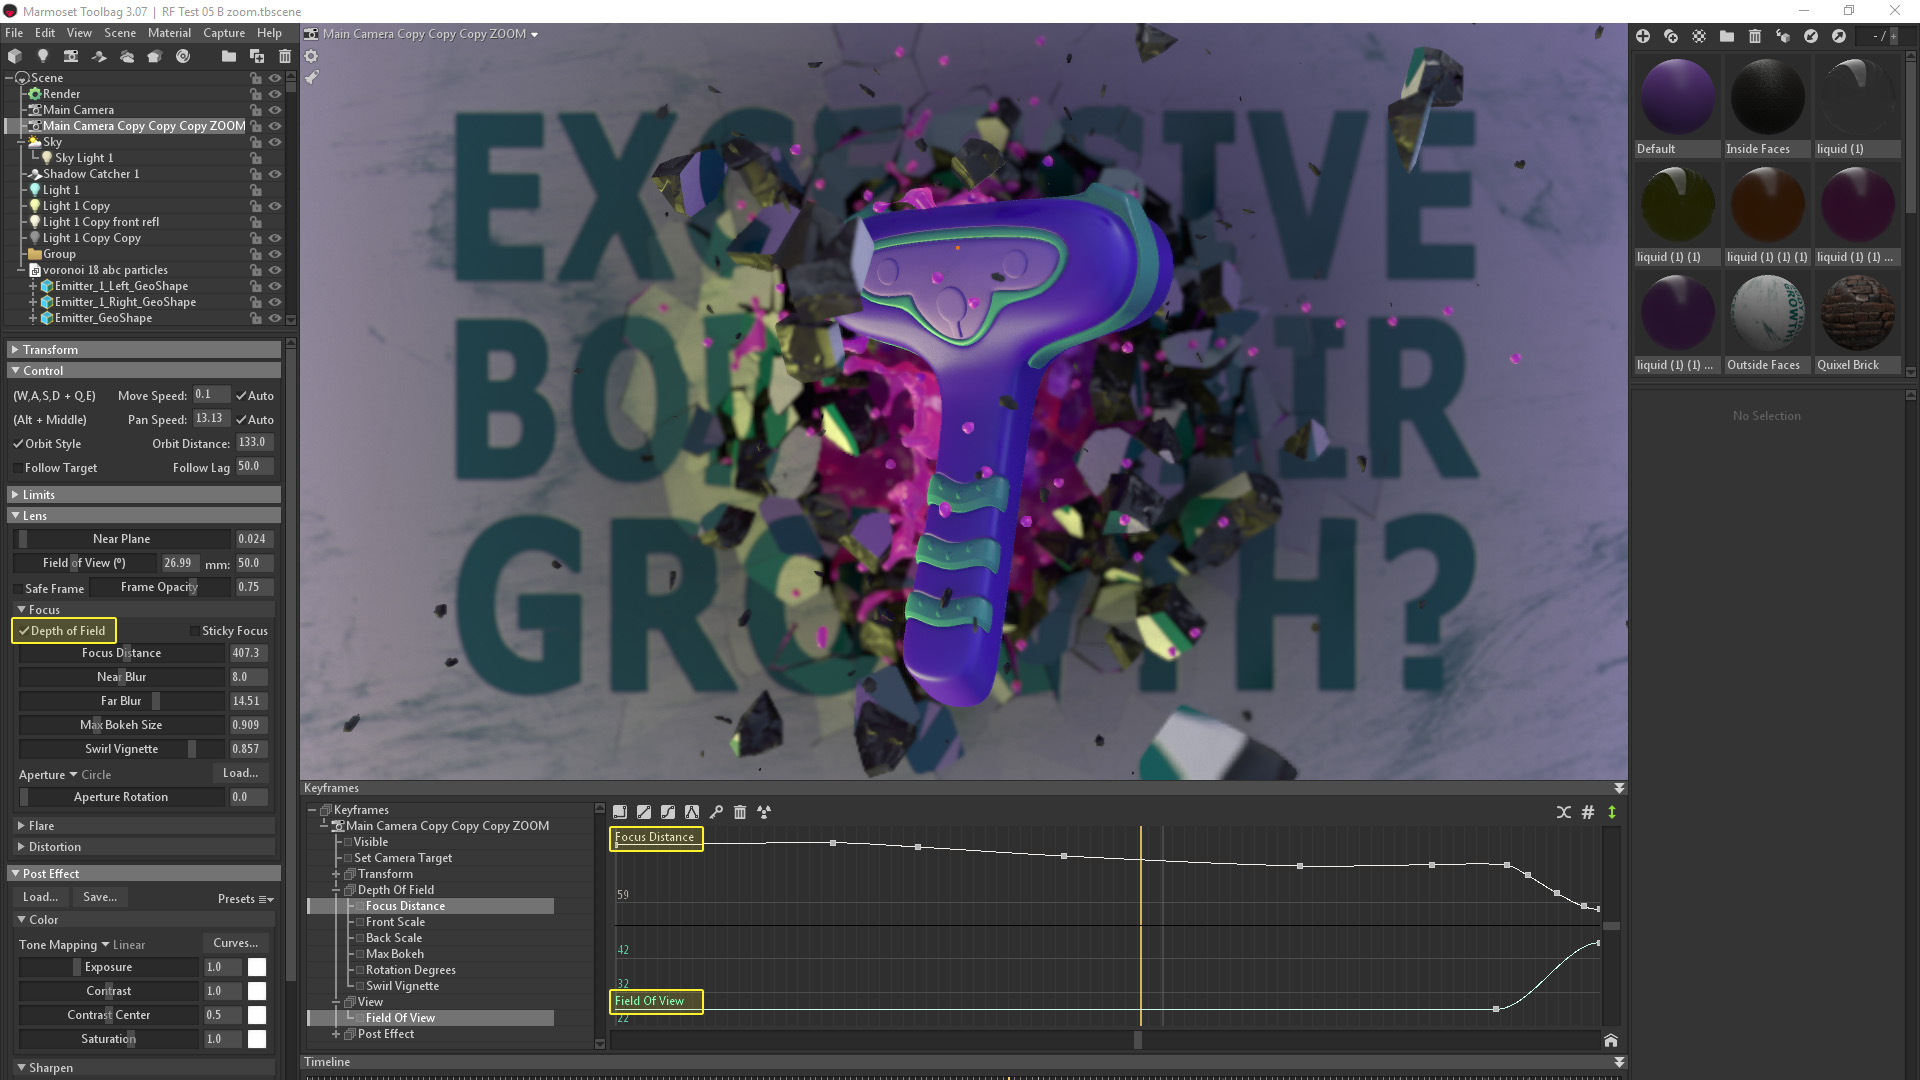
I started by creating a Camera in my scene and changed the Field of View value to 50mm. I tried to cover the whole scene without exposing the boundaries of the boxes. I could have easily exported the camera from C4D as an .FBX file, however, it was just as easy to create one in Toolbag. It must be noted that Toolbag does not support Alembic camera animations, so it must be imported as .FBX. I switched Depth of Field on in the Camera settings and tampered with the Max Boken Size settings. DoF looks amazing in Toolbag and the animated liquid can produce some very impressive bokeh in it’s reflections, but I tried to not overdo it so one can appreciate the fluid motion behind the shaver. To achieve the transition between the two scenes, I animated the camera’s position closer to the shaver’s blade and changed the Field of View value from 50mm to 28mm in order to match the one used in the second scene. Finally, I added keyframes for the Focus Distance so that the camera is always focusing on the main product.
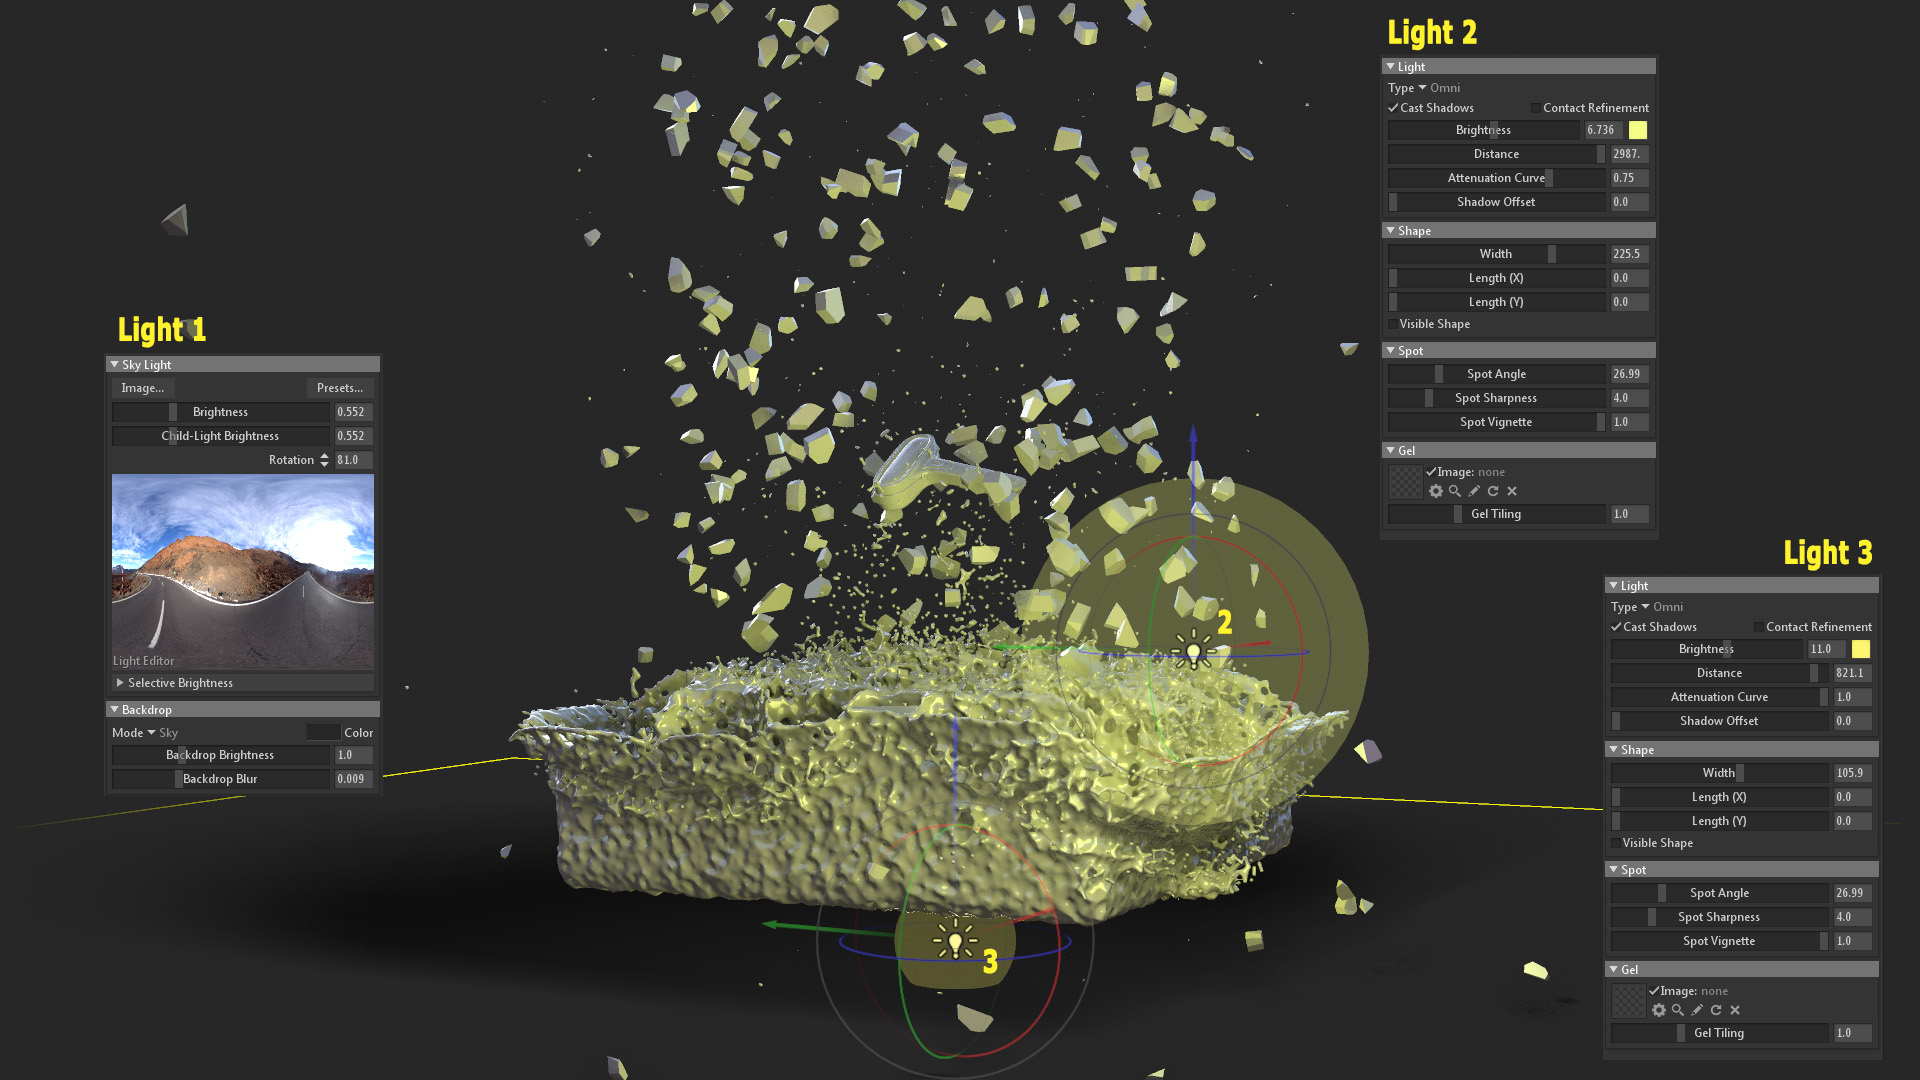
For the lighting, I chose Toolbag’s Desert Road Sky Preset, which helped produce reflections and serves as a fill light. I added a second warmer Omni Light at the lower left corner of the scene and close to the wall in order to highlight the silhouette of the wall as it breaks up. A third and final light was added in the center and behind the wall and liquid, which created a cool effect as it passed through the splashing fluid. I animated the Brightness of the third light to start from 0 when the wall is intact as to not leak any light artifacts through the cracks.


The key to achieving realism in Toolbag is to take advantage of its Global Illumination system to it’s fullest. Because Toolbag has a limited amount of voxel GI photons, it’s important to direct their focus on what appears in the final camera view. By default, Toolbag tries to fit the scene into a box of GI photons, but you can actually move the Orbit Distance setting in the Camera properties. You can enable Global Illumination under Render Settings, set the Resolution to High, and check Show Voxels.
By adjusting the Voxel Scene Fit slider to values lower than 1.2, you’ll see the voxel resolution actually increase (where the Orbit Distance is placed) until you see a black box. Assets that are placed outside this box will not receive GI, so you must adjust this according to your liking. People have asked me how I eliminated GI flickering during animation, and from my experience, the flickering happens when assets move. So the size of the scene increases/decreases and the voxel distribution automatically tries to adjust itself. To minimize this, you could just add a geometry object that is larger than the scene, but I found that just adding the default Toolbag Shadow Catcher and fitting the voxels into the objects of interest worked like a charm. In a scene like this one that displays several moving parts, I had to check the Timeline to make sure that everything within the Camera’s view received GI at all times while adjusting the Voxel Scene Fit value.

Moving on to materials. For the shaver, I used a mixture of gloss and subsurface scattering for the hard and soft plastics respectively. None of them included any textures because I wanted a very clean and shiny look for the product.

The only exception was the surface of the blade, for which I had to create a special tiling material that would be useful for the zoom transition shots. I put together a few copies of the nanobot hatch models and used Toolbag to bake repeating geometry on a plane as a tiling texture.
SCENE TWO – NANOBLADE
ASSETS PREPARATION AND SCENE OPTIMIZATION

For the second scene, I had to create two repeating geometry units; one for the skin/hair and one for the hatch/nanobot. Once again, these were primarily modeled in Zbrush and Modo, textured in Substance Painter, and rigged, animated, and assembled in 3ds Max.
After animating the nanobot, I set up a scene blockout using planes and established some camera movement. The planes acted as placeholders to define where the nanobots and skin/hair duplicate sheets would extend.
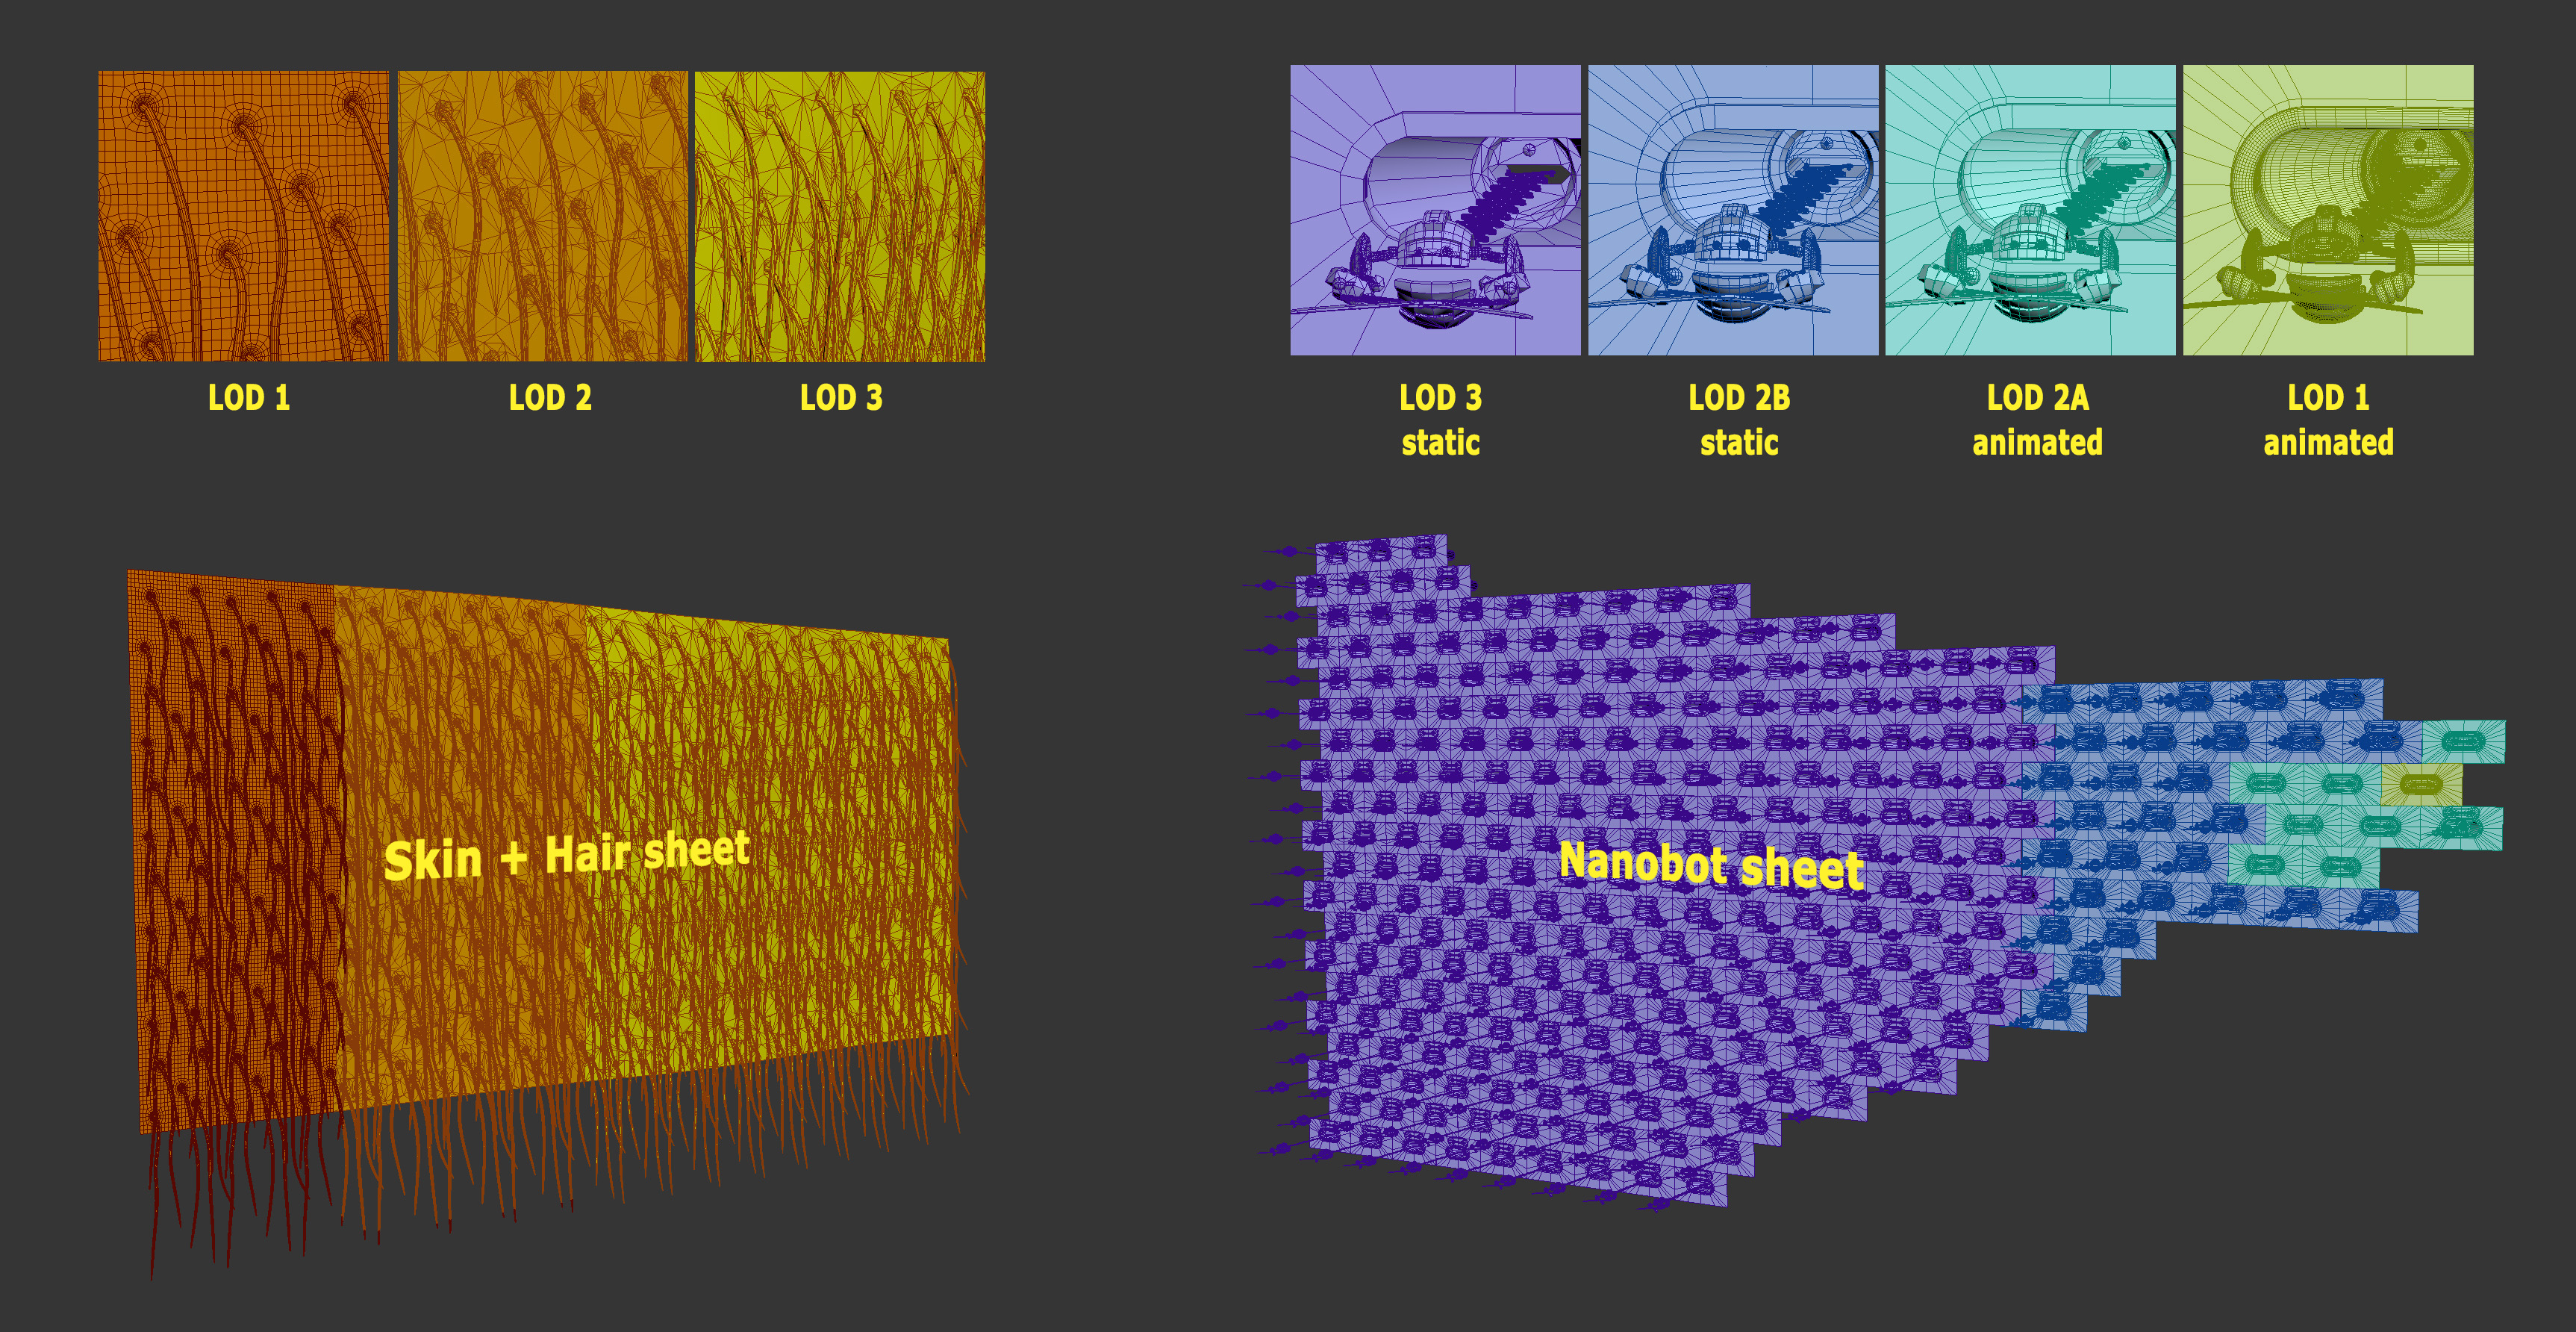
Since the scene was heavy with geometry instances, I had to use a few optimization tricks. I created LOD zones for the geometry, structured the asset sheets very tightly around the camera’s field of view, rendered in layers and composited the final sequence in After Effects. To export the scene from 3ds Max to Toolbag, I used a single .FBX file for the skin/hair sheet and seperate files for the nanobot’s different LOD’s. The nanobot closest to the camera (the protagonist – LOD 1) was exported as Alembic because I used a rigging technique for the elastic arm bones that was not supported by .FBX. All other LOD’s were exported as .FBX since, as mentioned previously, Alembic does not store materials and it would have been a lot of work to assign the materials to each of the hundreds of parts. .FBX, on the other hand, maintained the materials I had previously assigned in 3ds Max before creating instances of the bots. I should mention that the instances closest to the camera were animated and the rest remained static to prevent unnecessary weight to the scene.
PRESENTATION AND COMPOSITING

I created the close-up of the nanobot scene first and imported the camera as .FBX. I loaded one of the lower LOD’s just to gather the material reference from the .FBX file and assigned them to the assets. I used the Desert Road Sky Preset again, added a single Directional Light, and positioned it by the sun. I added quite a bit of Depth of Field to the Camera, which helped hide the lack of detail in the background bots and skin units, and animated the Focus Point to follow the star bot and keep him as the focal point. I then copied the file and used it to create the rest of the scenes; one for the mid-distance bots, one for the bots in the far back, and another for the skin sheet. For the skin/hair scene, I had to rotate the Directional Light a bit since I found the same lighting direction could not sufficiently light both the nanobots and skin. For best results, the GI was refocused for each scene file.
After rendering all 4 scenes, I utilized the technique described by Alexandre Proulx Audy to render a Zdepth pass and used it later to create a fog mask in After Effects to hide the limits of the sheets. The background is a 2D layer with a gradient ramp created in AE. Finally, for a small touch of realism, I added some vignetting. I imported a small sphere mesh into the scene, positioned it at the far back between the two sheets where a virtual light would be, and rendered it separately. In AE, I tracked the movement of the sphere and used it as the center of the flare.
CONCLUSION
I hope you made it to the end and learned something useful. A huge thanks to all of the guys and girls at Marmoset for giving me the opportunity to write this breakdown article, and to all of you for taking the time to read it. Don’t hesitate to contact me if you have any questions.
We’d like to thank Argyris Nochos for writing this breakdown article. You can find more of Argyris’ work on Artstation, Behance, and Instagram.
Bring your animation ideas to fruition using the 30 day trial of Toolbag. If you’re interested in collaborating on a tutorial or breakdown article, please send us your pitch, along with a link to your artwork, to submissions@marmoset.co.


