Introduction
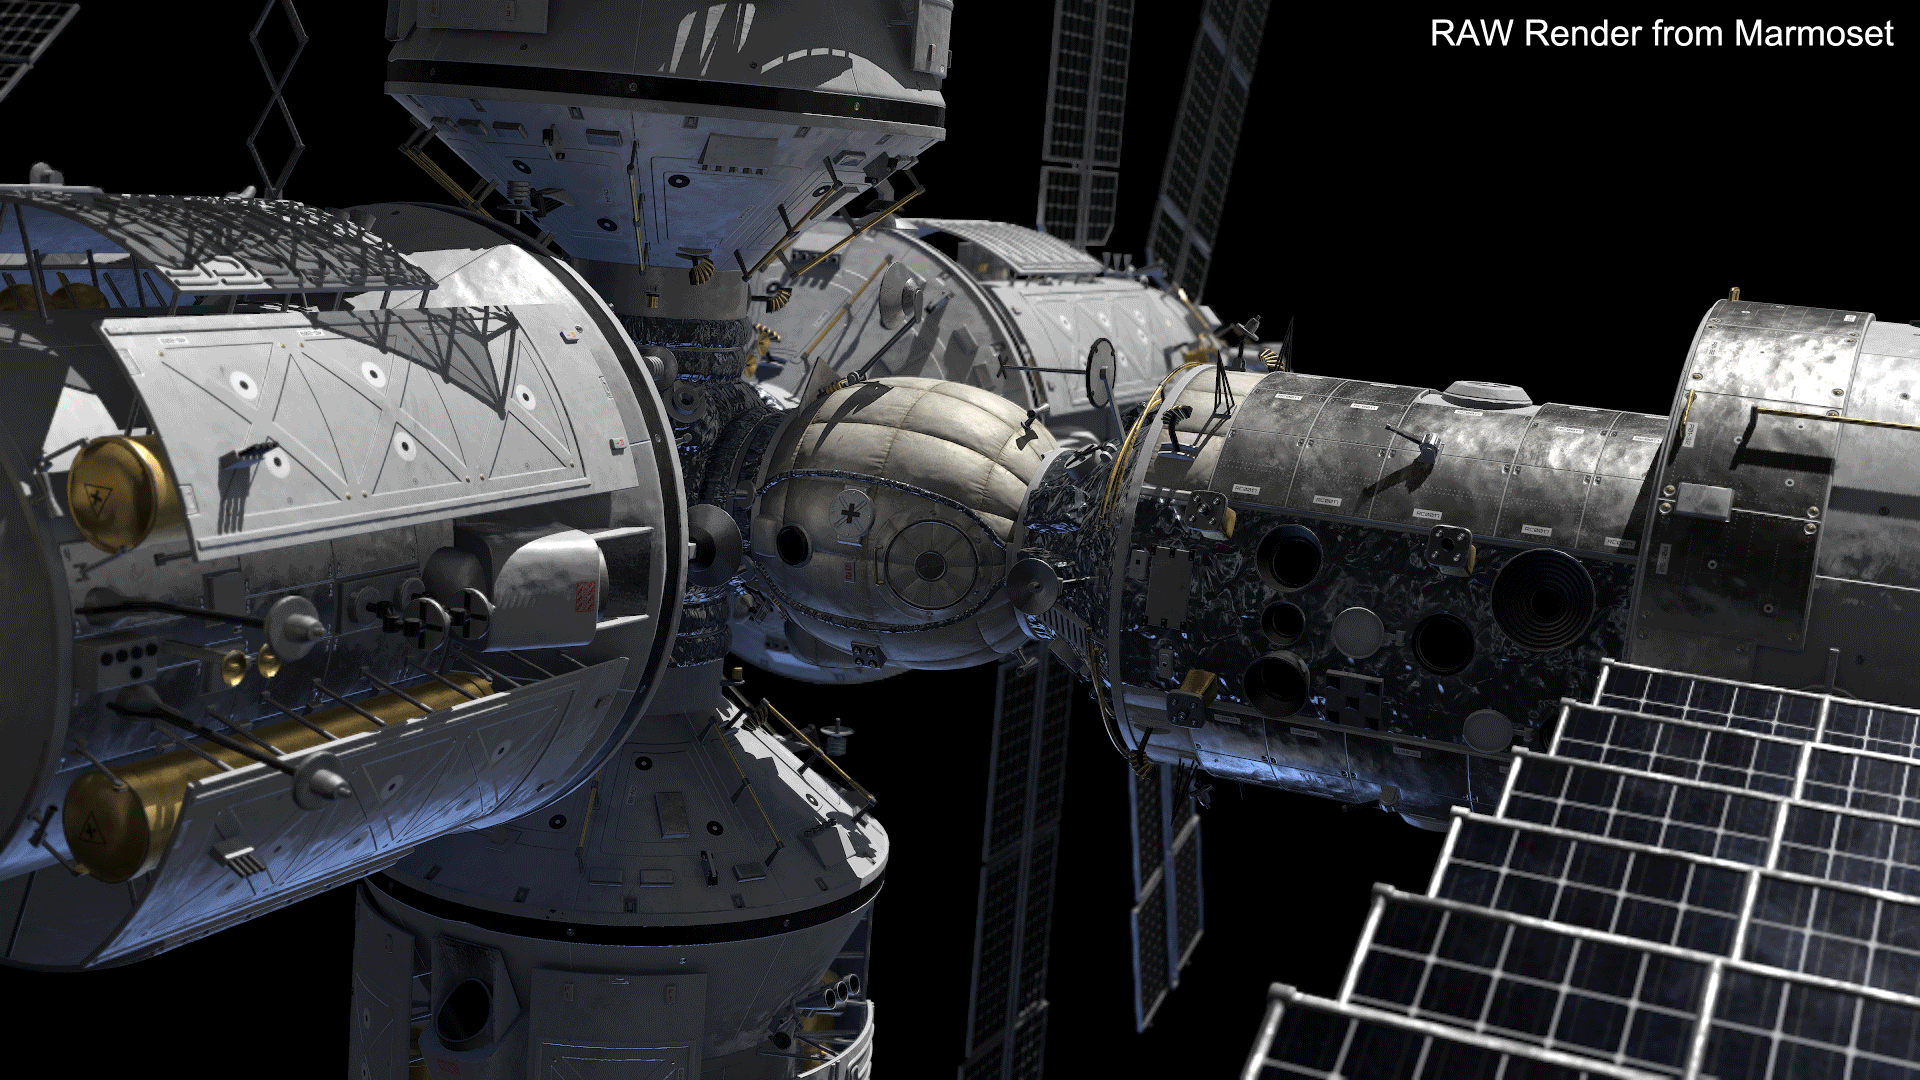
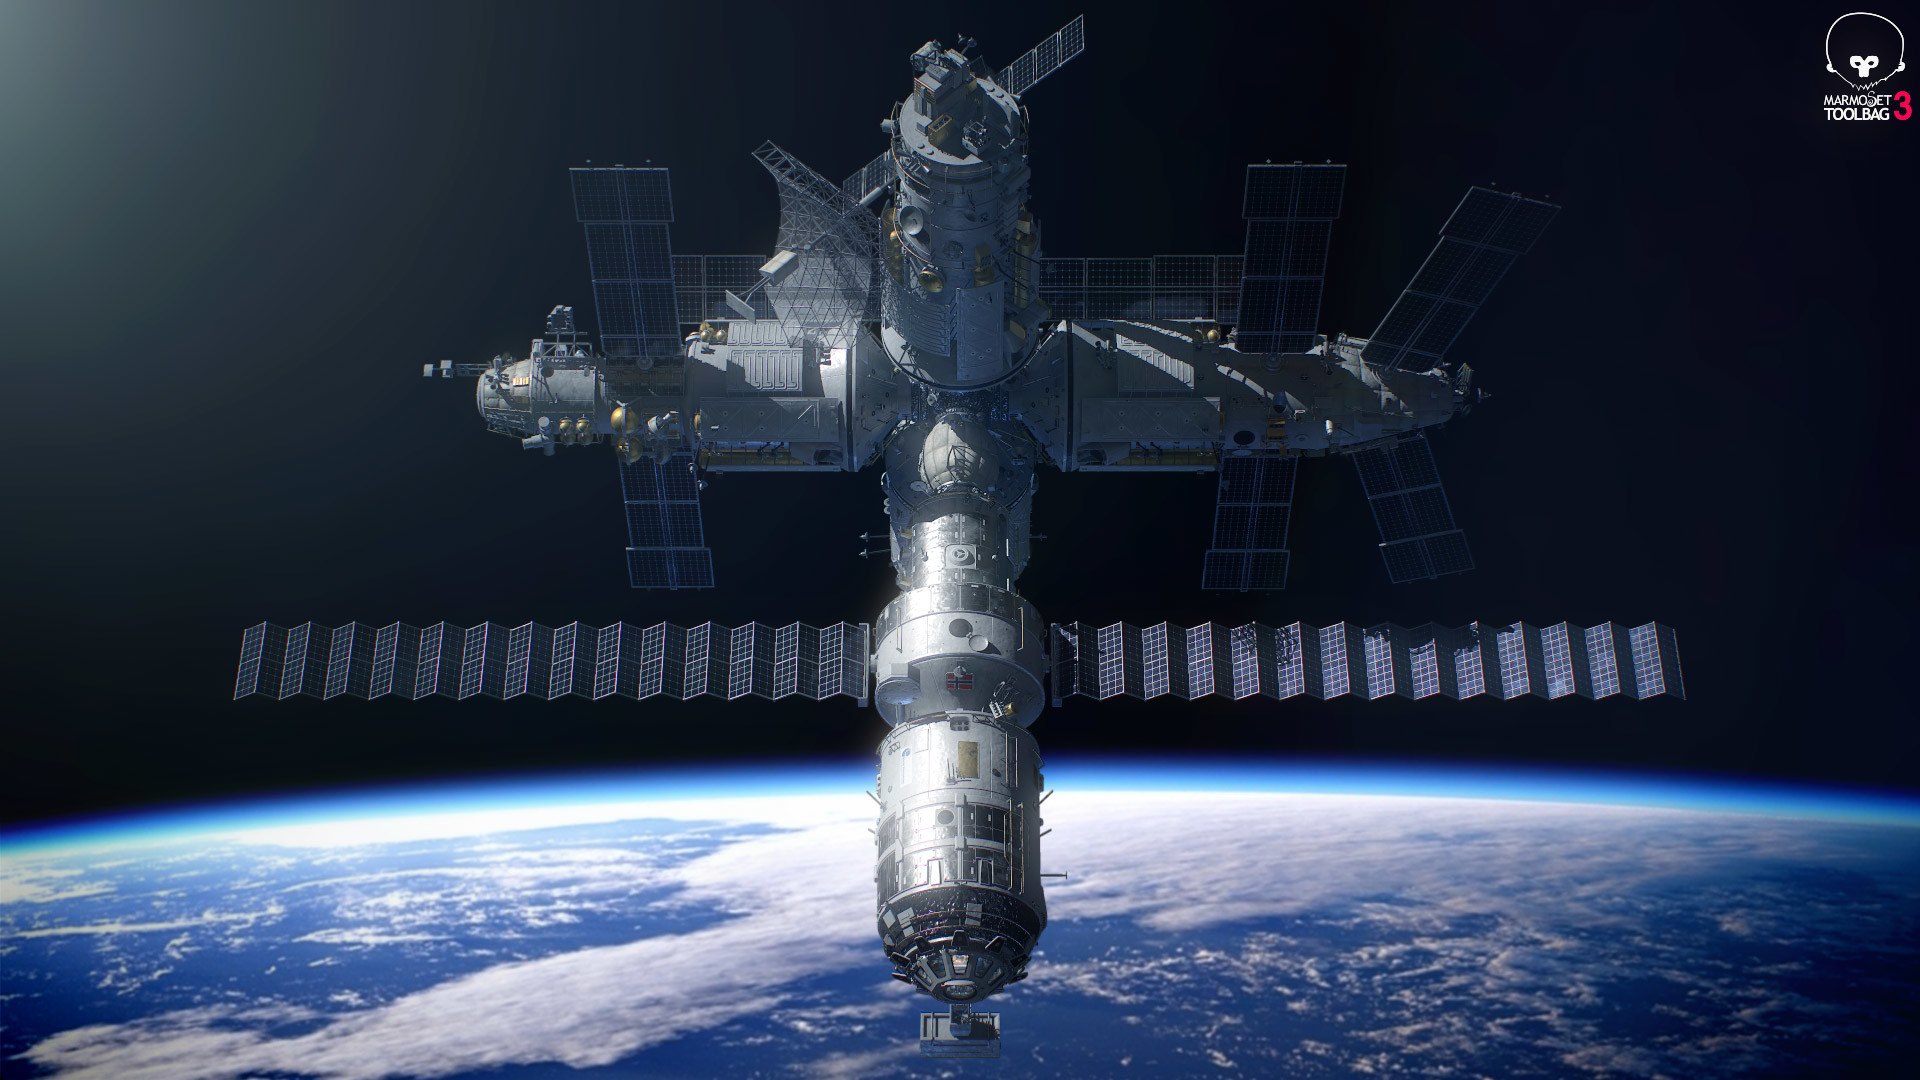
Hello everyone! My name is Gianpietro Fabre, I am a generalist TD with more than 13 years of experience creating high-end assets for feature film. I worked in many studios including Weta Digital, MPC, Double Negative and Framestore. I’ve created all kinds of assets, including characters and environments in different styles, ranging from medieval to futuristic. Over the years, I started to focus more on texturing, and am now responsible for the whole texturing team for the shows I’ve been working on. In this article, I will explain how I used Marmoset Toolbag 3 to create static renders of the International Space Station used in the short film, Flax – Sh*t in Space, produced by Bacon Oslo.
Asset Preparation
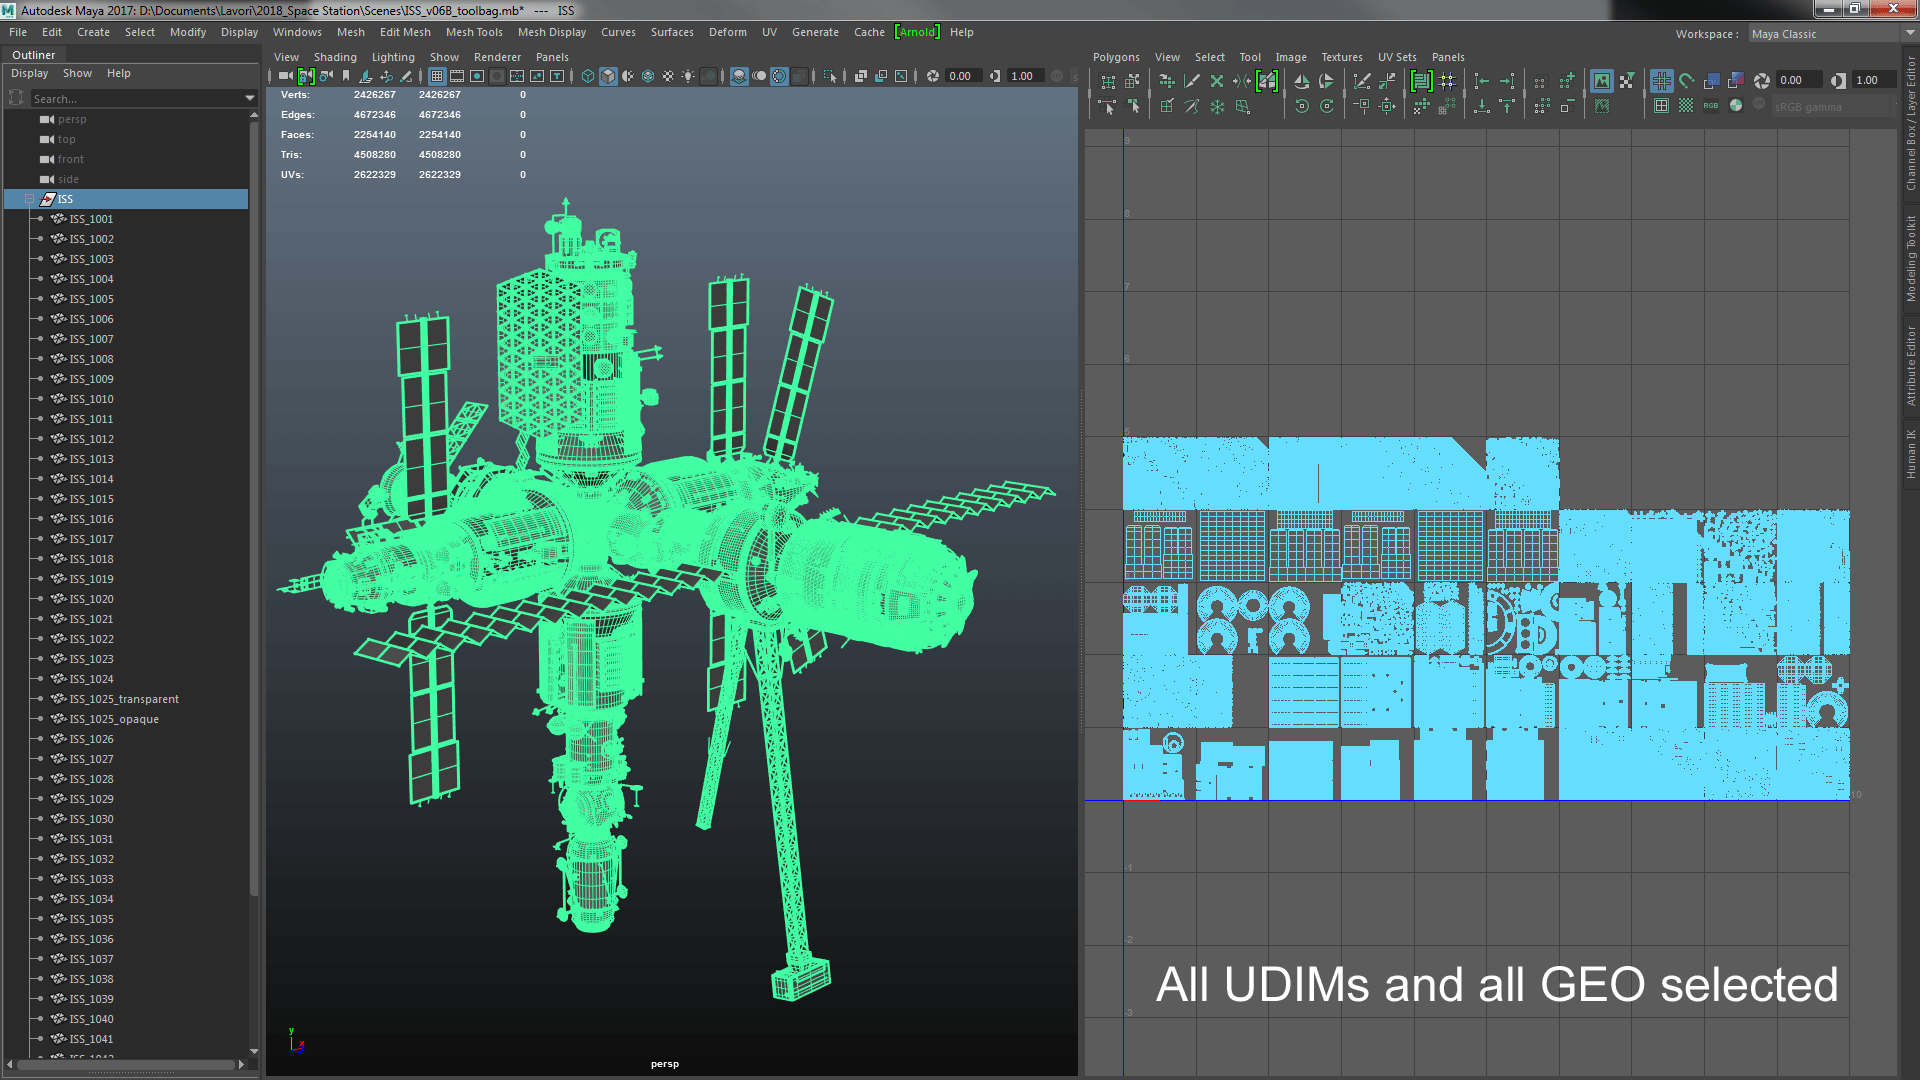
Let’s start with the one and only piece of bad news. At the moment, Toolbag 3 doesn’t support assets with UVs in multiple UDIMs, so in order to assign the textures to your asset properly, you’ll have to do a bit of preparation work in Maya or your 3D application of choice.
It’s a pretty easy task, especially in my case, where I just had one complex asset. To start, I merged all the geometry into a single object, then I selected the shells of each UDIM in the UV editor and detached them as separate meshes. My asset had 46 UDIMs, so I ended up with 46 meshes. I named them accordingly in the Outliner, so I could easily assign each shader in Toolbag. The only exception was the UDIM 1025, which had both transparent surfaces and opaque ones. I had to keep these separate, so I could later assign two different shaders in Toolbag. After splitting the geo by UDIM, you won’t need to move the UVs, because Toolbag can read them properly even if they’re outside the 0 to 1 space.
Editor’s Note: Alternatively, you can assign a unique material to each UDIM rather than separating the meshes. The material assignments will load when you import the mesh in Toolbag.
Toolbag has a very handy feature: the Reload Mesh button. So if you need to edit your original mesh after doing some work in your scene, you can overwrite the original FBX and you won’t lose anything.
Texture Preparation
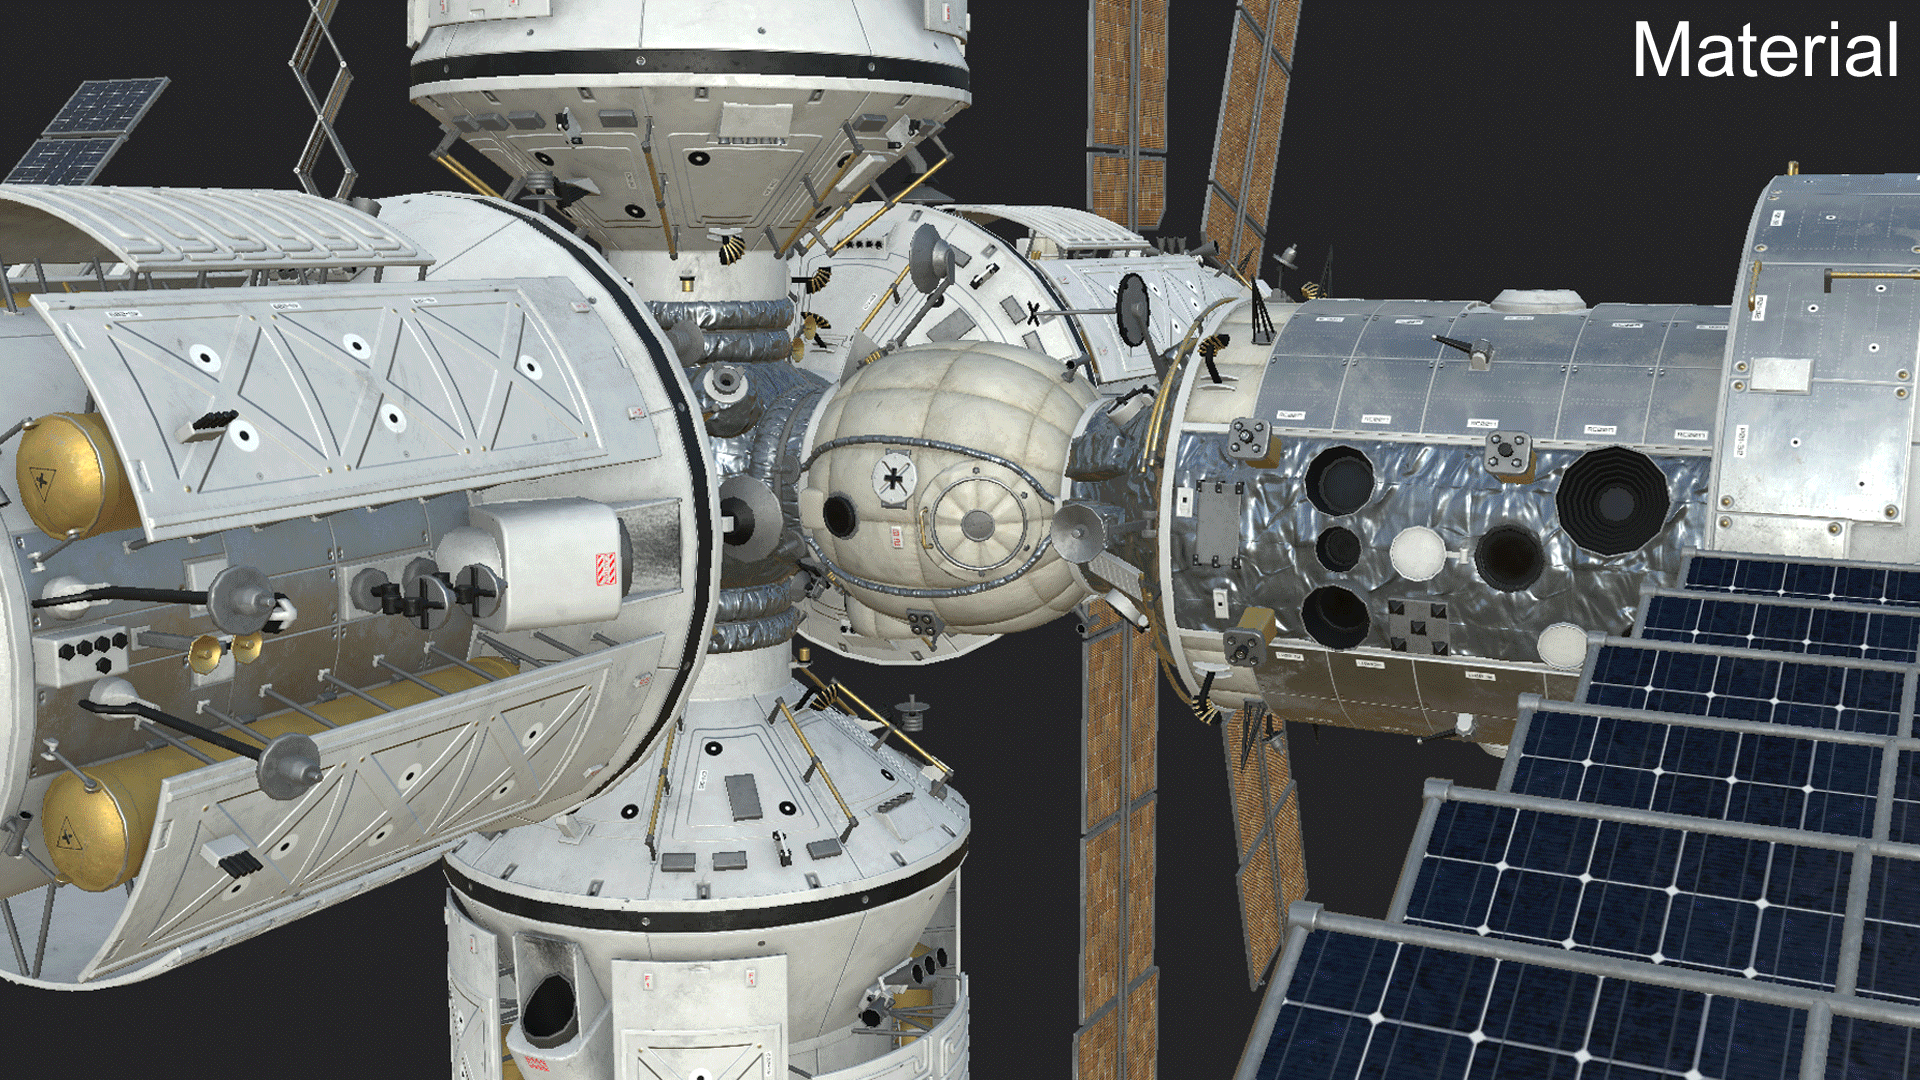
I worked on the textures entirely in Substance Painter, using the PBR Metallic/Roughness type of shading system. That’s becoming the standard pretty much everywhere, from games to feature films. Marmoset Toolbag uses that shading system too, which meant that the maps I created in Substance Painter, once imported in Toolbag, looked almost exactly the same. There are still a couple of things worth mentioning when exporting maps:

- Normal maps: Substance Painter usually keeps Tangent Normal Maps and Height as separate channels. While in Marmoset Toolbag, unless using Parallax, there is only one slot for the Normal Map. I wanted to save some memory, so I decided to export the Height and Normal Map combined.
- Opacity: The way Toolbag handles opacity is a bit different from Substance Painter, and even if I could test the values of the opacity channel in Painter, I knew I was going to tweak the values again later. So I kept all the geometry with transparent material values in a single UDIM and then exported the Opacity channel as a separate map.
- Emissive: I placed the UV shells of the interior geo in a single UDIM, mainly cards with projected photos, to give an idea of detailed interior with minimal effort. I wanted that to be constant shaded, so I exported an extra map just for that purpose.
Substance Painter doesn’t have a preset for Marmoset Toolbag for exporting textures, so I created one myself. I was trying to save some memory here too, so I merged together Metalness, Roughness and Ambient Occlusion in a single map, one texture per channel.
Scene Setup
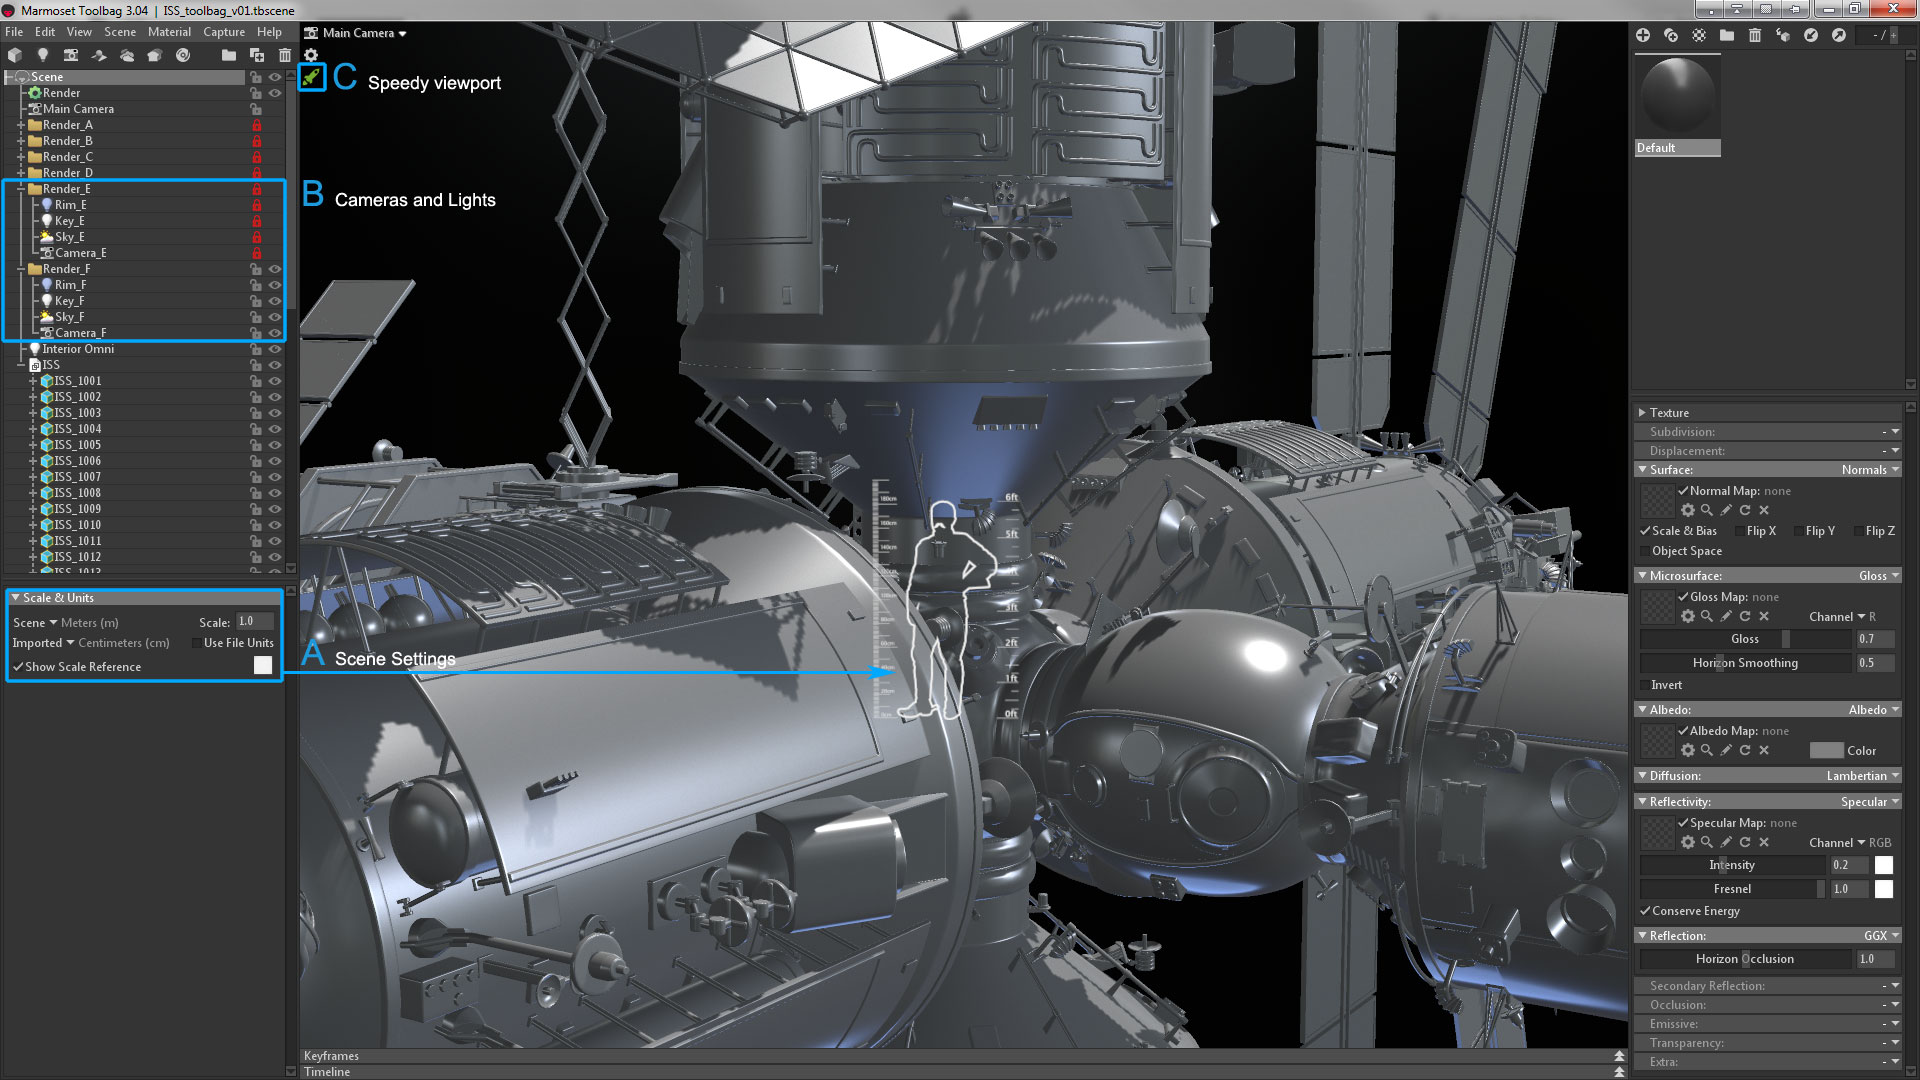
- The first thing I did after importing the model was to compare it against the Scale Reference. Many settings in Toolbag are physically based, so if the imported model has the wrong scale, most of the default values of shaders, lights and so on will be wrong. The units of an imported model can be changed in the Scene object properties.
- For showcasing the model, I wanted to produce 6 renders, each with their own camera and light setup based on the same template. So I used the Main Camera as the perspective view and created one extra camera per render, as well as a Sky Preset with unique intensity and light positions. Then I created a group for each setup, so I could quickly work on each of them and then lock it once I was happy with the result. That way I was able to keep the scene tidy and be sure I wasn’t editing the wrong camera or light by mistake.
- Toolbag has a great feature called Speedy Viewport Mode. This disables the most expensive rendering operations and allows me to work on the scene with a very responsive frame rate, while being able to render with the highest settings selected in the render options.
Shaders

This is unfortunately the only tedious part of the whole process. Having 47 meshes and 47 shaders (I separated the transparent areas from the opaque in UDIM 1024), I couldn’t find an alternative to assigning all the textures and shaders one by one.
- The good thing was that, similar to the Reload Mesh, the maps will automatically reload if you overwrite the source files. So once the maps are assigned to the materials and the materials are assigned to the meshes, you don’t have to do it ever again!
- Surface: This is where the Normal Map is assigned. You may need to tick Flip Y to get the correct result with maps exported from Substance Painter.
- Microsurface: By default, this is used as glossiness. With PBR shaders which use Metalness/Roughness, add the map, set the value to 1 and invert it. In my case, since I had a map with three separate channels, I also specified the correct channel.
- Albedo: Click on the extra parameters and tick sRGB Color Space to display the map with the correct gamma setting. This step is only necessary for color maps.
- Reflectivity: Change from Specular to Metalness, load the map, set the correct channel and that’s it.
- Occlusion: Since I had the map baked in Substance, it was better to use this one instead of calculating the occlusion in realtime in Toolbag. As usual, remember to set the proper channel.
- Emissive: It’s pretty much the same as the Albedo, with an extra parameter for intensity, which I left to the default value. Remember to tick sRGB Color Space here too.
- Transparency: Toolbag 3 has a new Refraction shader that has a lot of features and is really amazing. I only used a fraction of the options, but for what I needed it was more than enough. Since my windows were flat, I reduced the Index of Refraction from 1.6 to 1 to remove distortion. And because I needed transparent glass, I disabled the Albedo Tint. Finally, I added an Opacity Mask and left Use Microsurface checked. That way, I could have more opaque areas where dirt and dust were going to be, together with blurry reflections, determined by the Roughness map.
To make sure my materials were set up correctly, I created a test material to nail down the various settings. Once every aspect of the shader was correct, I duplicated it, renamed it, assigned the new maps, assigned it to the proper geo, and then repeated the process for all the other shaders.
Cameras
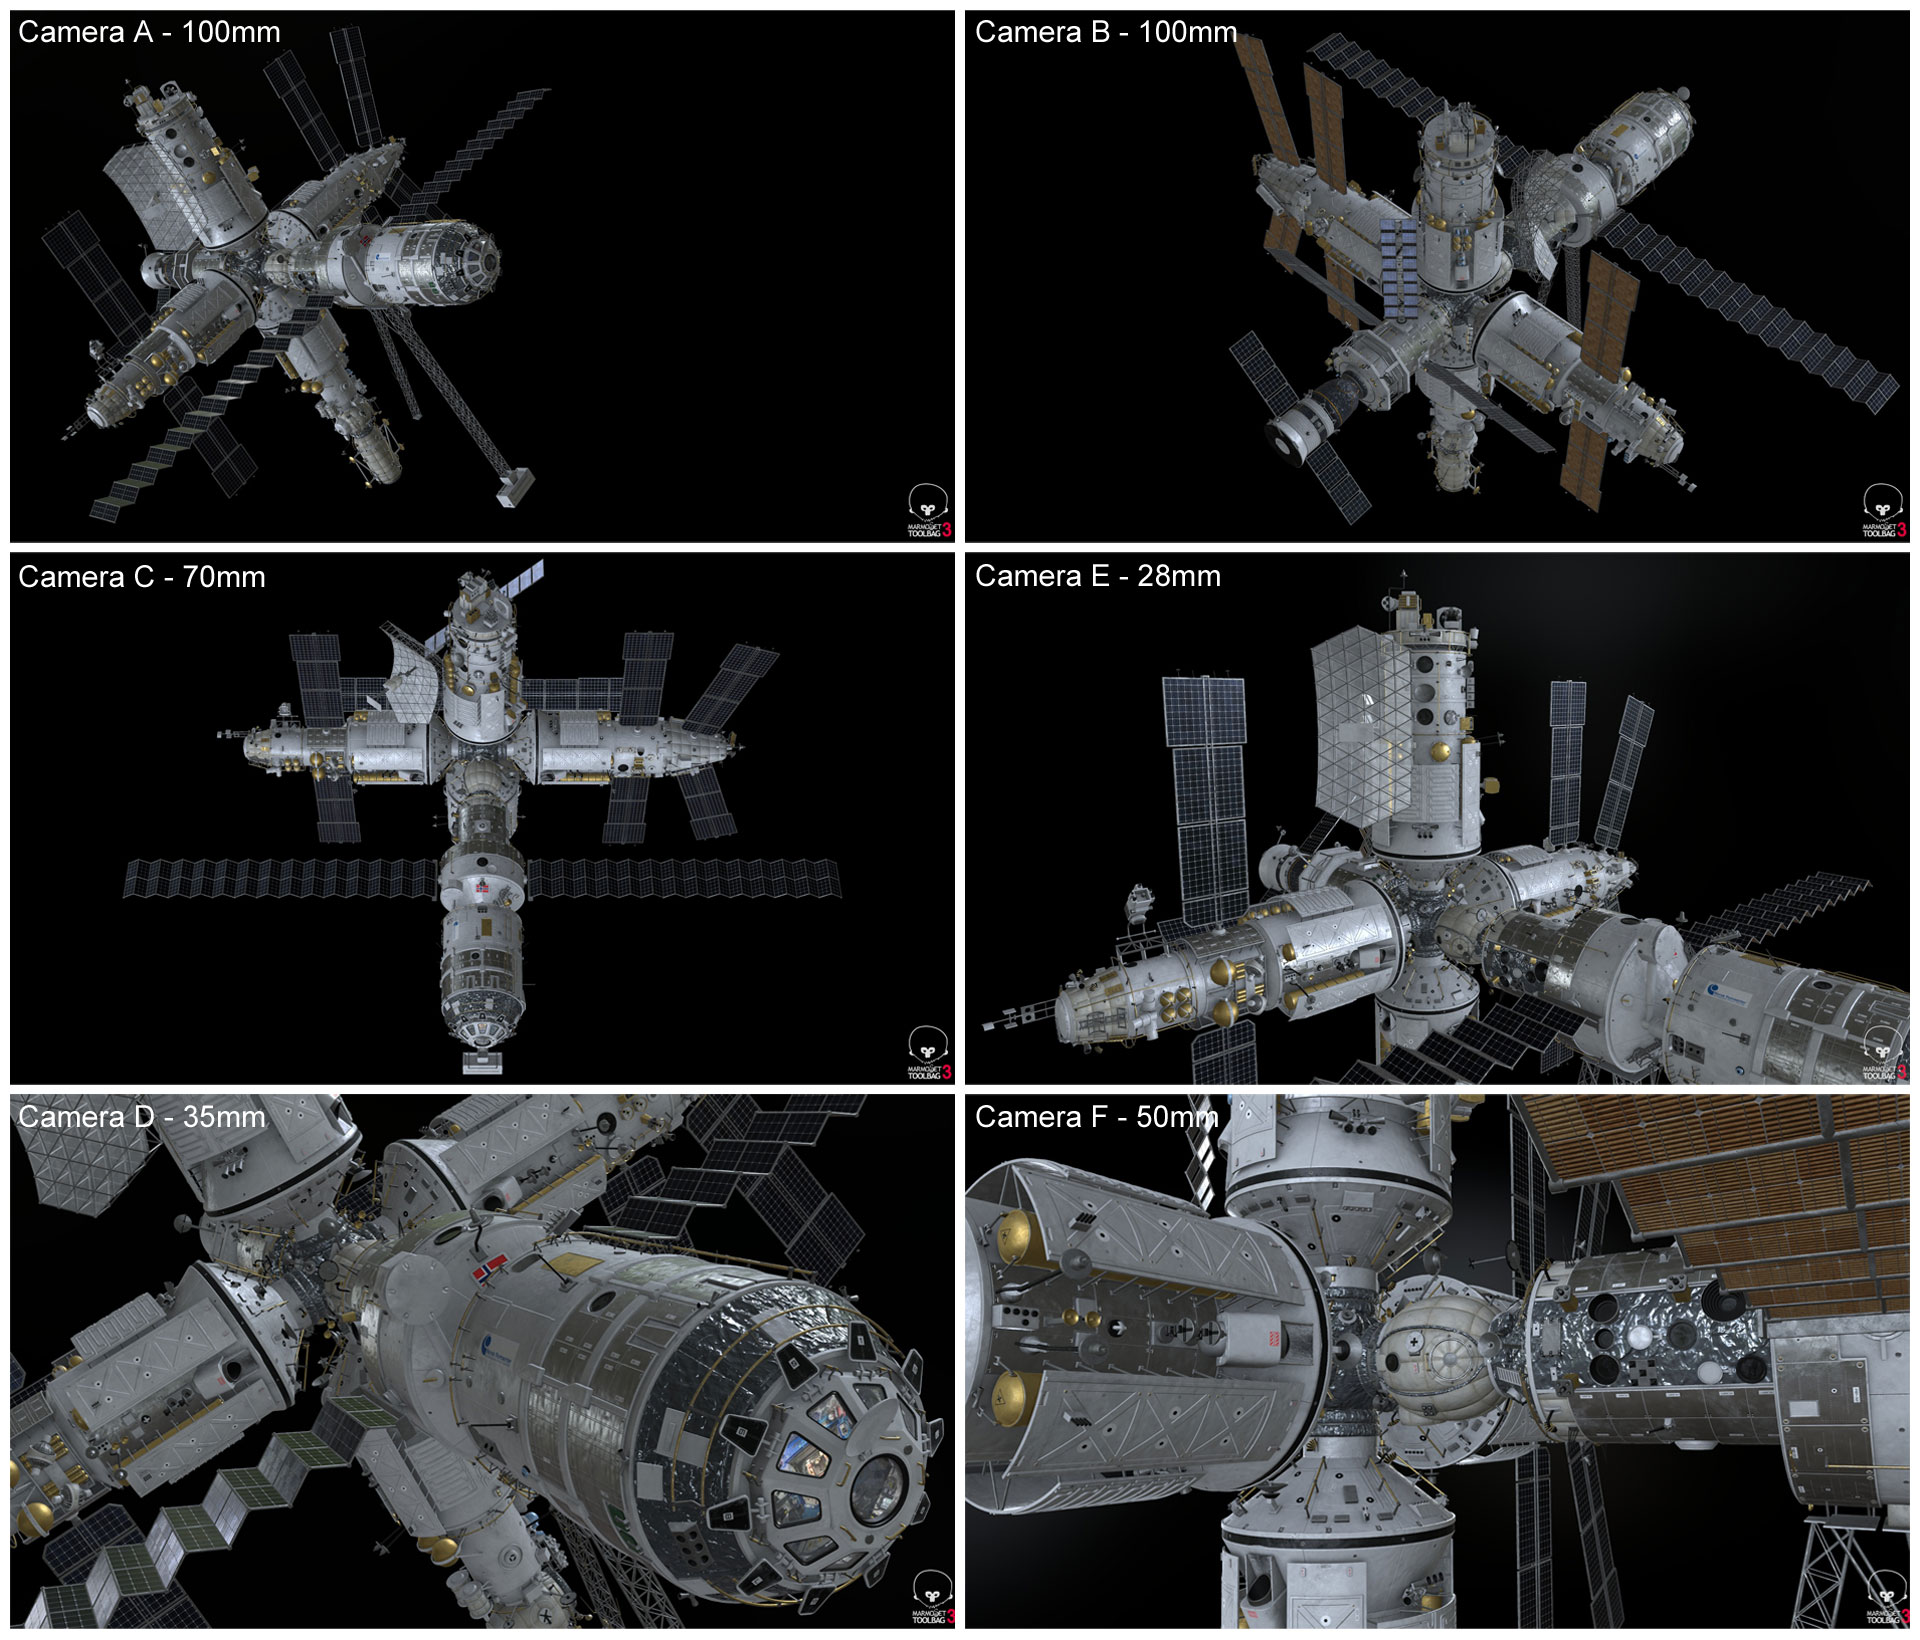
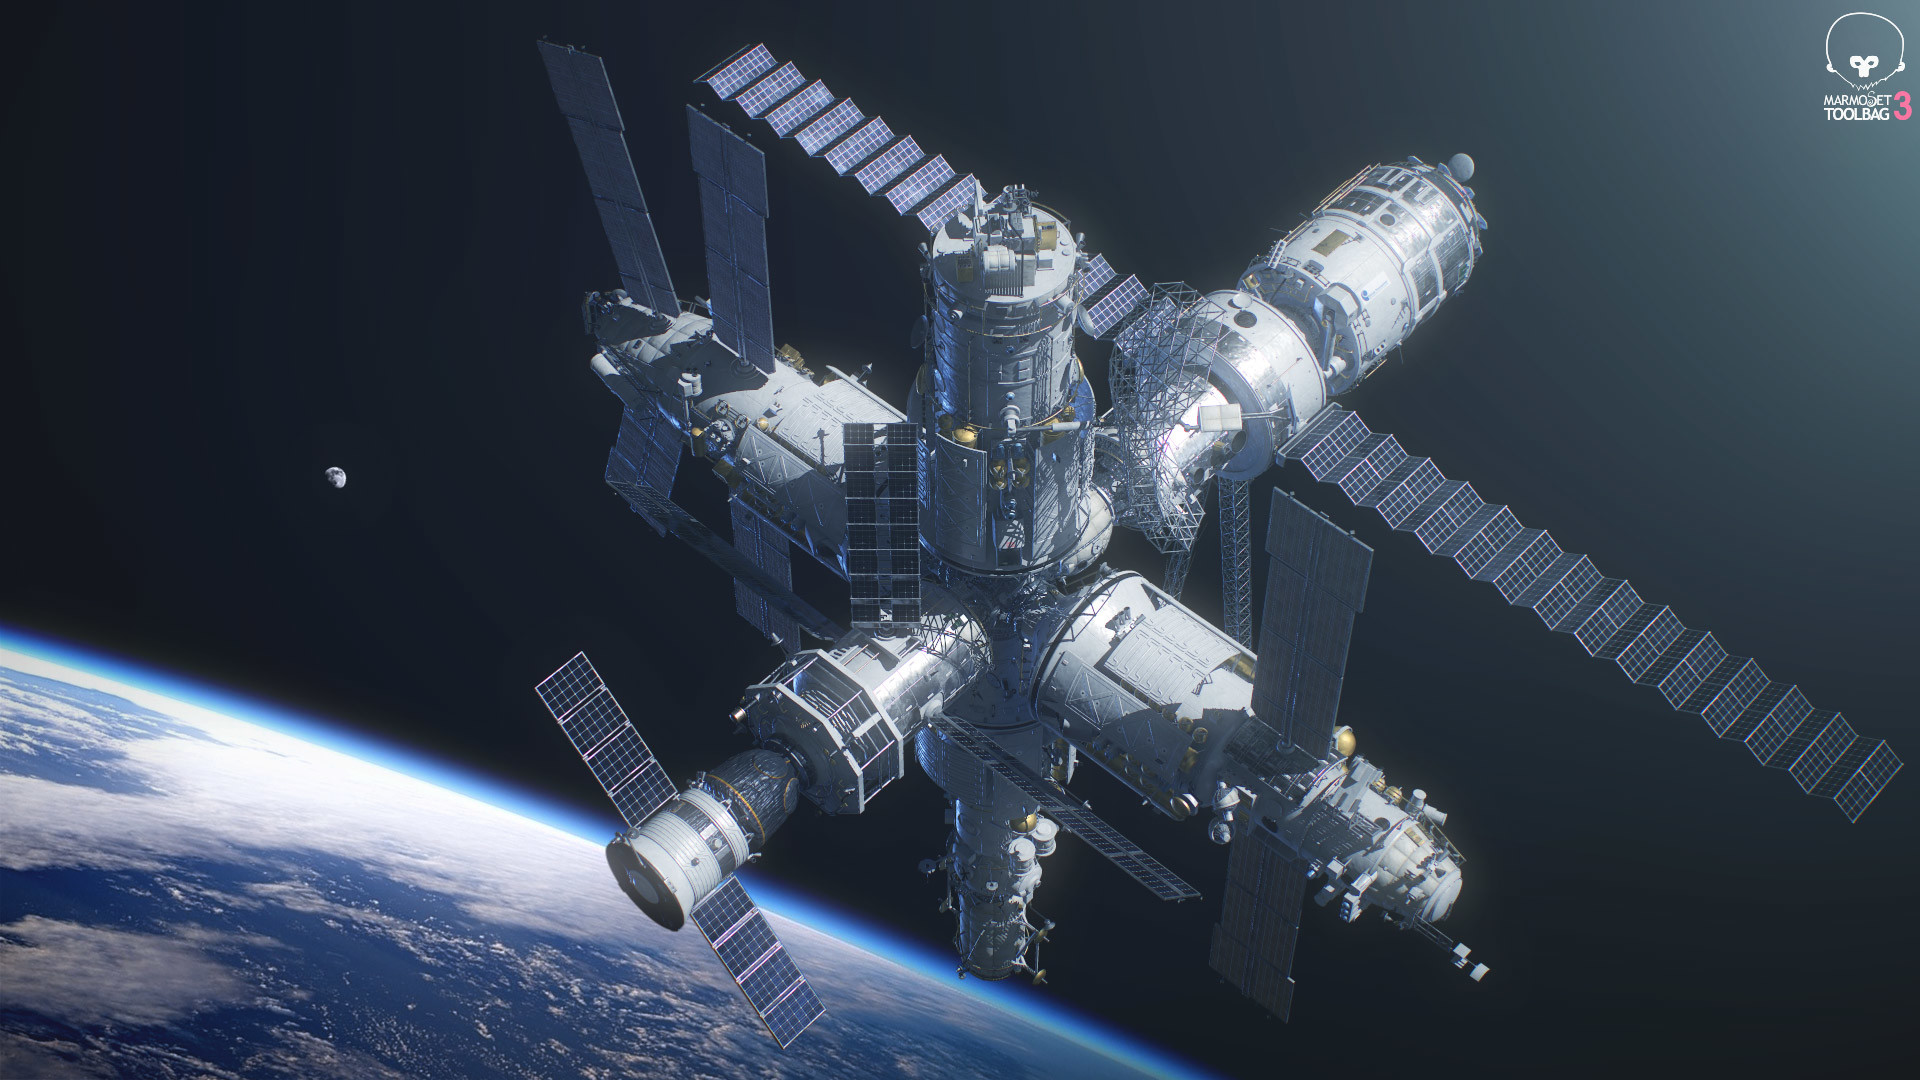
Once I set up all the shaders, the first pass was to find a proper angle and composition for each camera. I picked a neutral color HDRI from the preset library, the one named Smashed Windows Interior, which gave me a good key light with some nice reflections on the shiny panels. I rotated it (with Shift+Drag in the viewport) to get nice lighting and reflections. Then I started to play with camera angles and focal length, trying to find a good composition.I tested long focal lengths like 200mm and more dynamic ones like 35mm while trying to direct attention to the best looking areas of the ship. I saved a first batch of the renders, so I could check them over and over again and decide if I liked them or I wanted to modify something.

- I started by editing the Capture Settings, where you can determine the resolution of the capture. I enabled Transparency, so I could edit the background easily later on. Then I went to the Camera properties, and enabled Safe Frame, so I could see exactly what was going to be in the frame.
- Then I started to play with Depth of Field, which is very easy to use, but also to abuse. Adding too much depth of field in a render with a big subject will make it look smaller, and with CG renders, this is a major problem. I tried to keep it very subtle, except for the renders where the camera was very close to the ship and focused on a specific area.
- I knew I was going to add a background with Earth in Photoshop later on, so I purposely left an empty area in certain images. I also decided to leave Color Correction, Vignetting, Bloom, Flares and Chromatic Aberration for the final composition in Photoshop because I didn’t have the background available in the render, but Toolbag does an amazing job with all those effects and I’ll use them for sure in the future.
- I did apply a touch of Sharpen directly in Toolbag though, as the sliders to control Strength and the Limit are much more powerful than Photoshop.
Lights

The light setup was straightforward. After I took a look at some reference photos of the International Space Station in low orbit, I noticed that there is only one key light source (the sun), while the areas in the shade are almost black, so the ambient light is nonexistent. In some of the photos, the bottom of the ship had a mild blue tint, coming from the light bouncing back from Earth, that I thought I could use as rim light.
- I started with the Sky Light Preset I used before, trying to find good angles for the key light I was going to add later. Then I lowered the intensity a lot, trying to keep the Sky Lights ambient light only.
- I manually added the key light (Sun) in a compatible position with the existing specular highlights of the skylight. The key light was a white directional, scaled to the minimum size, so the shadows were as sharp as possible. I also ticked Contact Refinement in the shadow parameters. This usually improves the shadow details and overall quality with hard surface models that contain lots of complex shapes intersecting and overlapping each other. Very seldomly though, Contact Refinement creates some artifacts too, so it’s worth checking the results with and without.
- Finally I added a blue Omni rim light to represent the Earth, trying to roughly match where I was planning to add the photo with the Earth as background later on. I scaled up the Light Width to be huge to cast soft shadows. I also played with Distance and Attenuation Curve to illuminate only the areas of the ship closest to the light.
Another quick thing I did was to add an Omni light in the interior area of the ship, visible only in the Camera D render. That omni casts no shadows and has a very strong attenuation curve. This adds a bit of life in the interior without interacting with the surrounding geo.
Render Settings
-
-
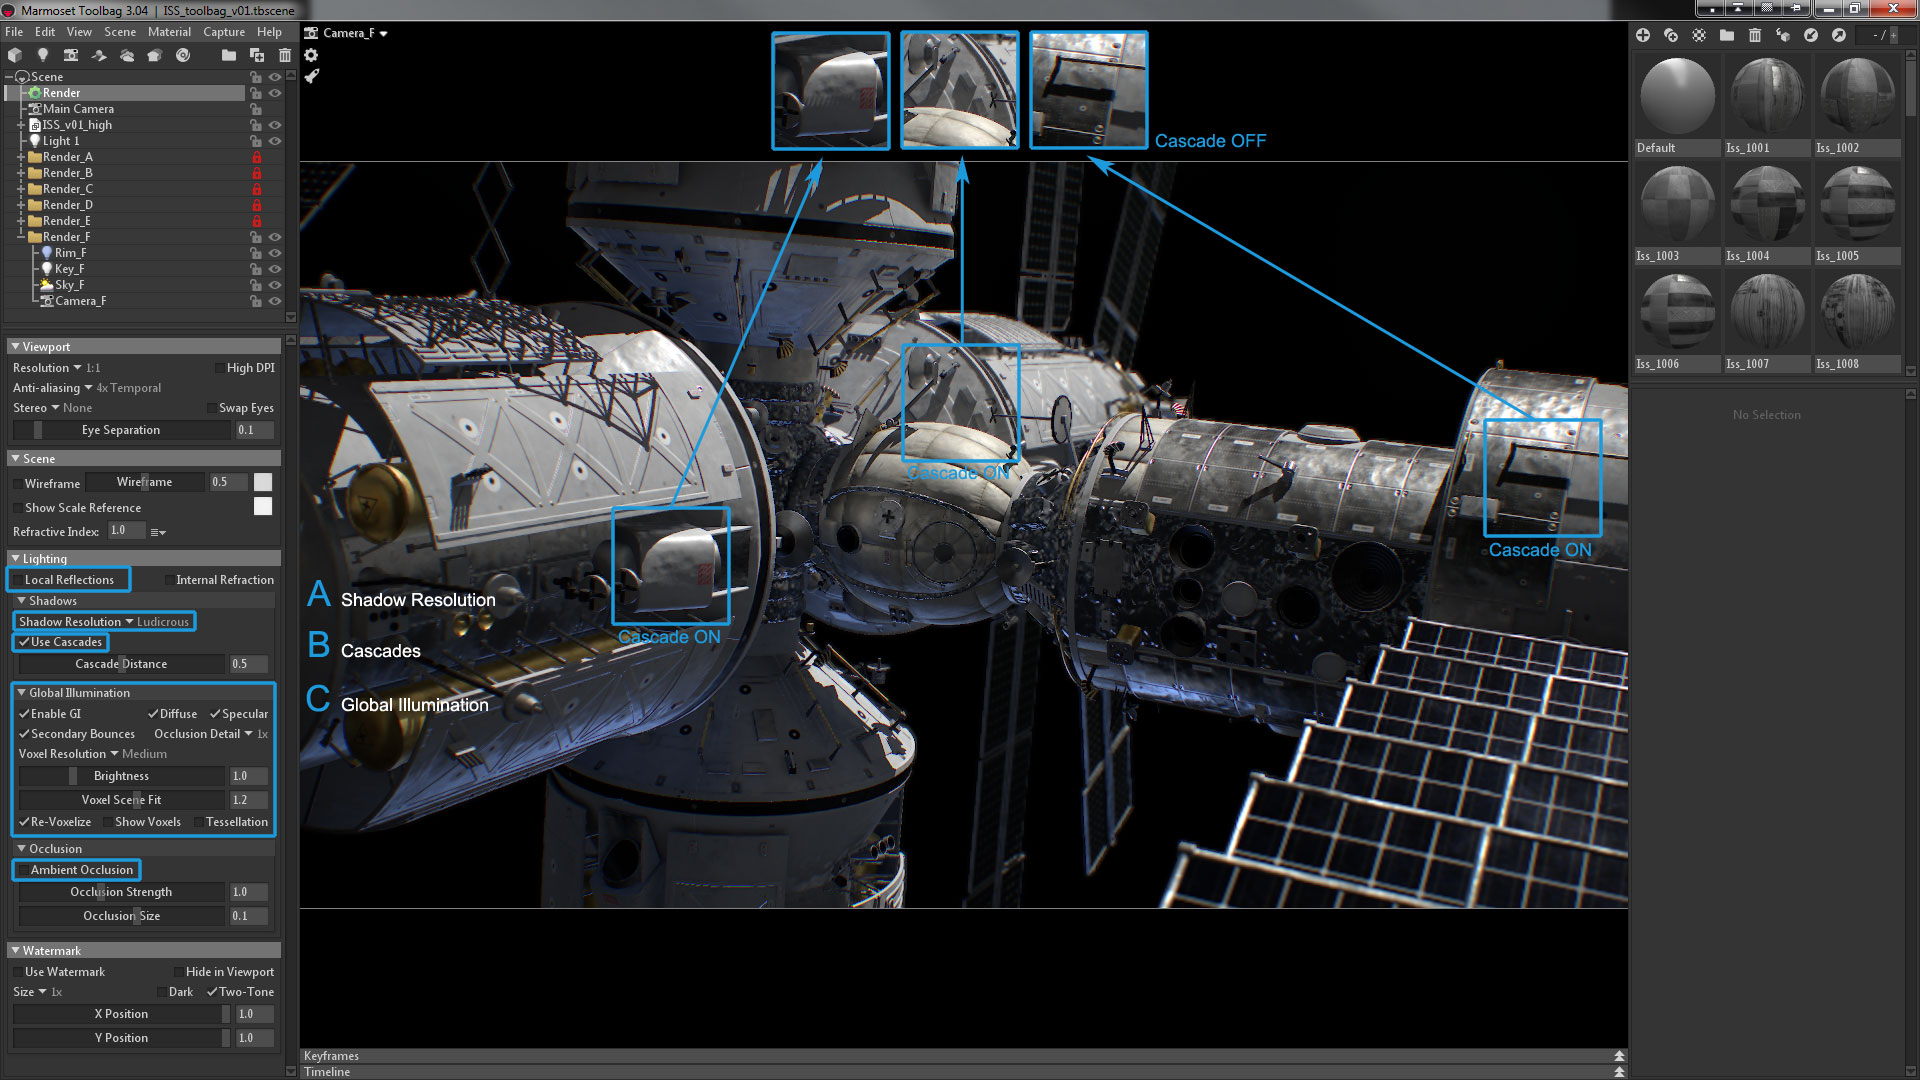
- Once the scene was set correctly, I adjusted the quality settings in the Render properties. I set the Shadow Resolution to Ludicrous, trying to reduce to the the amount of pixelation on the sharp shadows of the key light.
- I also enabled Use Cascades for the shadows as it fixed some odd shadow effects on the smaller geo details. I didn’t use Local Reflections, despite the fact that they look cool, especially with shiny surfaces like the ones I had. Unfortunately, I couldn’t get rid of the pixelation effect and I decided not to use them. I didn’t use the Screen Space Occlusion either, as I already had it in my shaders and I didn’t want to double the effect. Editor’s Note: Increasing the Sampling value in Capture Settings helps to improve the quality of Local Reflections.
- What I did use, though, was Global Illumination and it was just amazing! I left the settings pretty much untouched, only reducing the brightness slightly, and it just drastically improved the render quality.
Backdrop
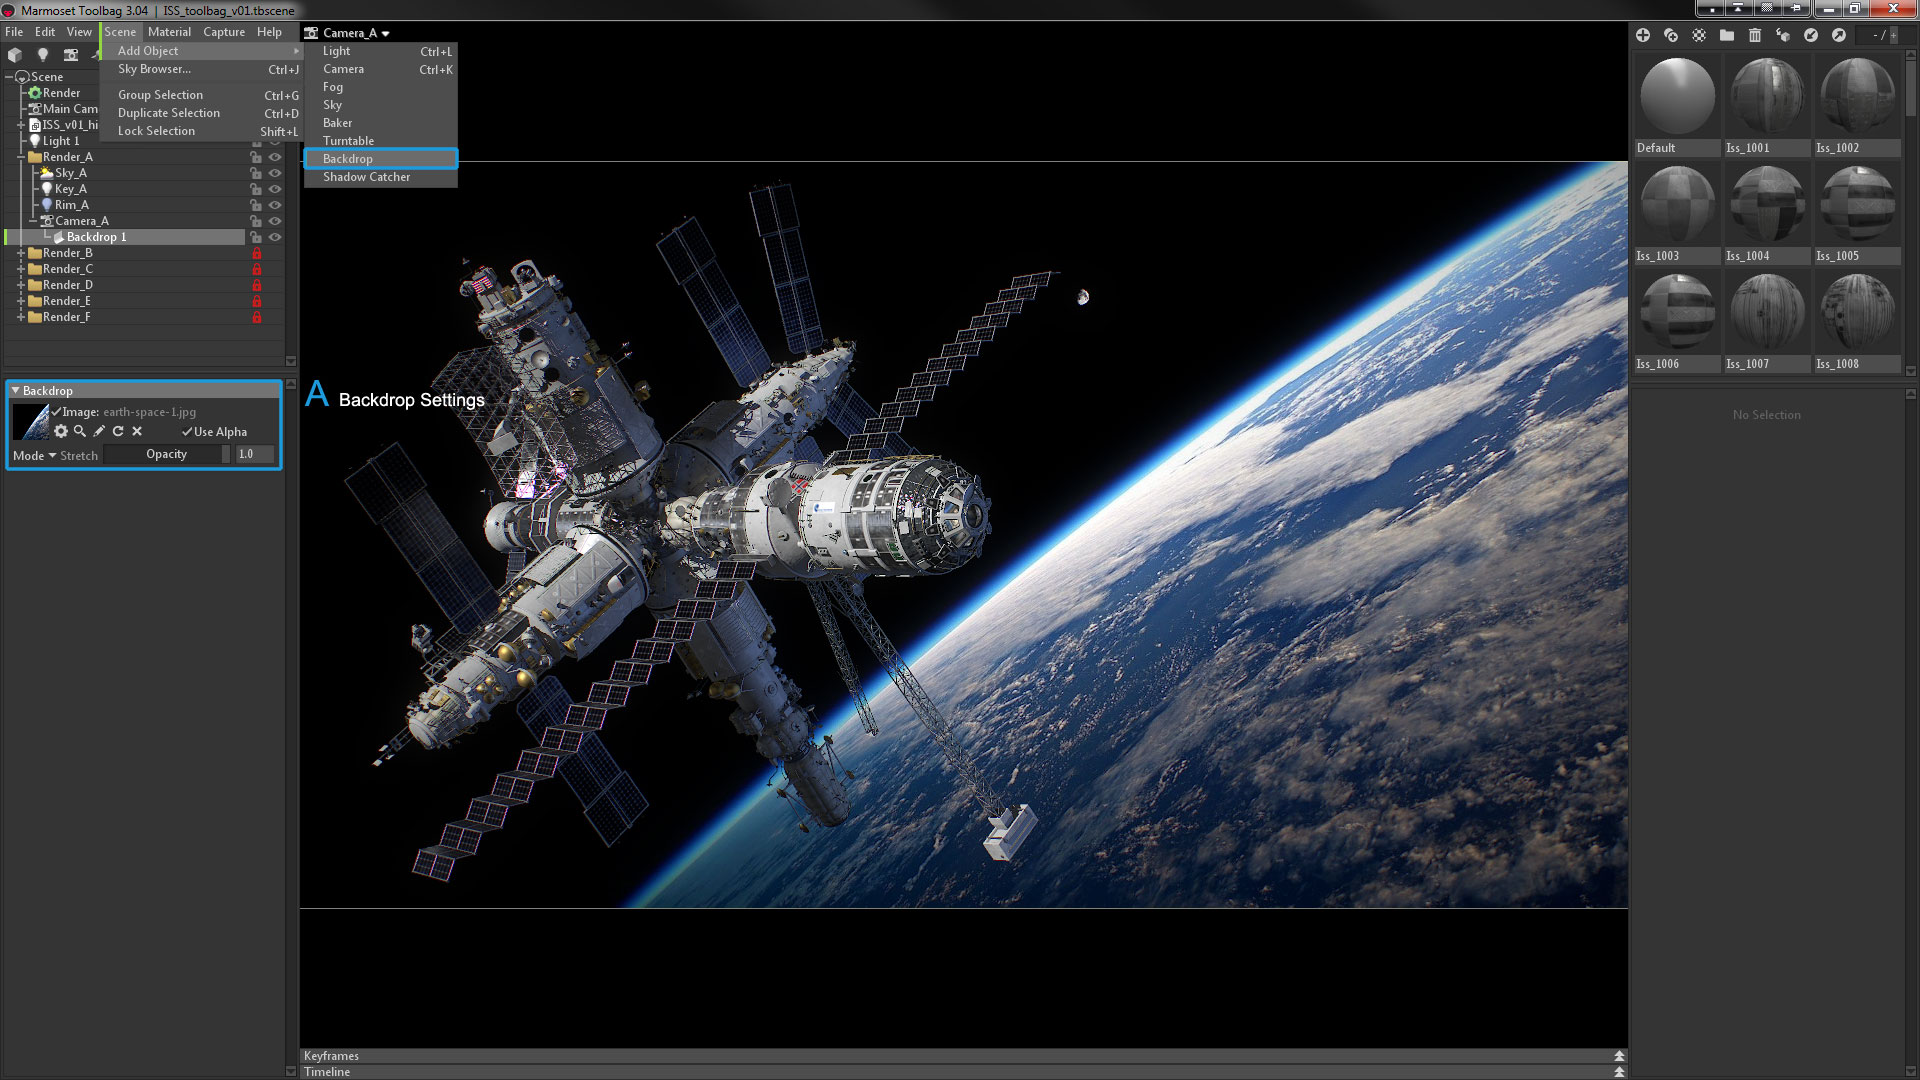
There is a clever way to handle the background of a render. Add a Backdrop directly in Toolbag and use a Shadow Catcher to get the correct shadows, and apply the Depth of Field to the background as well. This method works great for assets that are placed on the ground, and the camera must match the background. The classic example would be a car portrait.
In my case I had the opposite situation. The ship was orbiting in the void, and I had only one good photo of Earth with nice lighting that I wanted to use. I scaled and rotated the photo to match my composition, exported my renders with an empty background and stored a mask in the alpha channel. Toolbag cleverly stores the Depth of Field in the alpha channel, which is pretty cool, and it allowed me to save in .PSD format with an option to save in 16-bit too. I didn’t use 16-bit this time, but for renders that require a lot of compositing afterwards, it’s a great feature.
Composition

The last task is to import the images in Photoshop, merge the renders with the background, add some color correction to blend everything together, add some post-process effects (bloom, vignetting and chromatic aberration), and a touch of “fake” volumetric light.
- Background: The renders where I added a bit of depth of field have the blurred edges of the ship stored in the alpha channel. To blend the ship even better with the photo of Earth in the background, I created a mask from the Alpha Channel and used the “Refine Mask” tool to blur and shift the edge a bit.
- Color Correction: I just added a bit of extra blue to the shadows and cyan to the highlights, plus a bit of overall contrast, to match the background a bit better, using Color Correction and Levels adjustment layers.
- Bloom: Creating bloom in Photoshop is quite easy. Create an empty layer on top of your layer stack, merge all the existing layers into the new layer, select the highlights in the Color Range Selection tool, duplicate the selection into a new layer, set the layer mode to be “Screen”, and apply a gaussian blur. Play around with opacity and blur amount to customize the effect.
- Photo Filters: In the Filters menu, there is a filter called Lens Corrections. In the “Custom” tab, you can find options for vignetting and chromatic aberration. This is very handy!
- Volumetric light: This is a bit of a cheat, but worked very well in many occasions. Basically, I’m just adding a very soft 2D volumetric light effect, without much considerations shadows or breakups. It helps to make the location of the main light more obvious, adds a bit of imperfection, and blends even more with the layers below.
And that’s the end. If you made it this far, I wish to thank for the time you spent reading this article and I hope you found something useful. If you have any doubt or question, please get in touch!
Check out more of Gianpietro’s work on Artstation and learn how to create striking renders in Toolbag 3.
-