Toolbag 5.02 Beta is Available Now!
The Marmoset team is excited to announce that Toolbag 5.02 is now available for beta testing.
This update delivers new texturing, baking, and rendering features and tools to improve your workflow experience and scene management tasks.
Highly-requested features, such as Low to Low baking and a Hotkey Editor for customizable keyboard shortcuts, are now available! Decal Layer and Decal Projection for Vectors allow you to quickly design and apply logos, stickers, and other design elements. Sample Layers for Masks offer a flexible, non-destructive way to build mask data directly from paint and fill layers. Sync Points can now be embedded within groups, extending the utility of Smart Materials. Additional improvements include a dedicated Render Window, a Scene Search bar for quick object filtering, support for Custom Folders in the Library for better asset organization, and more.
Get a closer look at all the latest features below, and start testing the 5.02 beta build today!
Now Featuring:
For a complete list of new features, functionality, and bug fixes…
Check out the 5.02 Beta Changelog.
New in Baking
Low to Low Baking
Status: 🔴 Experimental / Work in Progress
It’s now possible to bake textures directly from a low poly mesh. You no longer need to duplicate the low poly and place it in the High slot.
To enable, go to the Bake panel and change Geometry Mode to Low to Low. In this mode, the low poly mesh uses a dual material configuration, which allows you to define the material properties on the Source material. The Result material allows you to preview the results of the bake, without having to manually juggle material assignments. Simply change the setting in the Material dropdown to switch back and forth.
Notes:
- It’s possible to blind-edit the Source material while previewing the Result material. To do this, select the relevant material in the Materials window and adjust the settings. This will trigger the baker to automatically update (when in Interactive mode).
- To bake using the bevel shader, enable Bevel in the Surface panel for the Source material.
- Keep in mind that your UVs will need to be split along hard edges when using the bevel shader. This means that if you’re defining your beveled edges with the mesh’s hard edges/mesh normals, you may need to use more UVs seams than you normally would. To avoid this, you can use unique copies of the mesh, with different mesh normals, and the High to Low Bake Mode.
- When using the bevel shader, errors may appear in surfaces that intersect. To prevent this, do one of the following:
- In the Source material for the intersecting meshes, enable Bevel Same Surface Only. This will prevent errors but will also disable bevels where the meshes intersect.
- If you want the intersection to be beveled, separate the meshes into different bake groups.
- Bake Groups may not be necessary in many cases, however, they can be useful for separating parts that will animate. You can use the Exclude When Ignoring Groups option to prevent moving parts from casting AO onto each other.
New in Texturing
Decal Layers
Status: 🟠 Near Complete
We’ve added a new Decal layer type that makes it easy to project materials and brush presets onto the surface of your mesh when working in a Texture Project.
You can add a Decal layer in the Layers window. It’s also possible to drag and drop brush presets from the Library window onto the mesh to instantly create a new decal layer aligned with the drop point.
Decal layers make it easy to apply logos, stickers, graffiti, and other design elements that require careful placement. The new decal tool allows you to click and drag along the surface of the mesh to reposition the element. Use the viewport controls to adjust the size, rotation, projection distance, and falloff, too.
Decal Projection for Vectors
Status: 🔴 Experimental / Work in Progress
Vector layers have a new Decal projection mode that allows you to create shapes on a virtual plane that are projected onto the mesh. Now it’s easy to non-destructively design logos and complex mechanical parts with precision.
To enable Decal projection for a selected Vector layer, look to the Layer Settings > Style panel, and set Vector Space to Decal.
In this mode, you can draw vector shapes on a virtual plane with grid snapping. Working on the grid makes it easy to create precise shapes and perform boolean operations for complex mechanical designs. Since the shapes live on the grid and are not aligned to your 3D mesh, moving and editing them is more stable, allowing you to design in isolation and then position the element without altering or changing the shape of the vectors.
The new decal tool works with projected vector layers too, making it a breeze to place designs on the surface of any mesh.
Notes:
- Tube and Solid mode work, but Brush is currently unsupported. However, it will be available later.
- Symmetry only works in decal plane space (mirrored on the grid) at the moment. We plan to add support for mesh symmetry as well (mirrored in 3D space).
Smudge Tool
Status: 🟠 Near Complete
A Smudge tool is now available for Paint layers. Now you can easily mix colors, blend shapes, and create stylized effects.
Smudging works over UV seams and UDIM tile borders. You can also smudge over geometry borders, blurring or smoothing textures between different objects.
Tile Strips
Status: 🟠 Near Complete
We’ve developed a Tile Strip system to make modular vector tube shapes with start, middle, and end tiles. Now you can create preset design elements like straps, shoe laces, snakes, feathers, and anything else you can dream up with a start and end.
To create a Tile Strip for a selected Vector layer, navigate to the Layer Settings > Material Projection panel, and set Projection Method to Tile Strip. Next, load your texture maps.
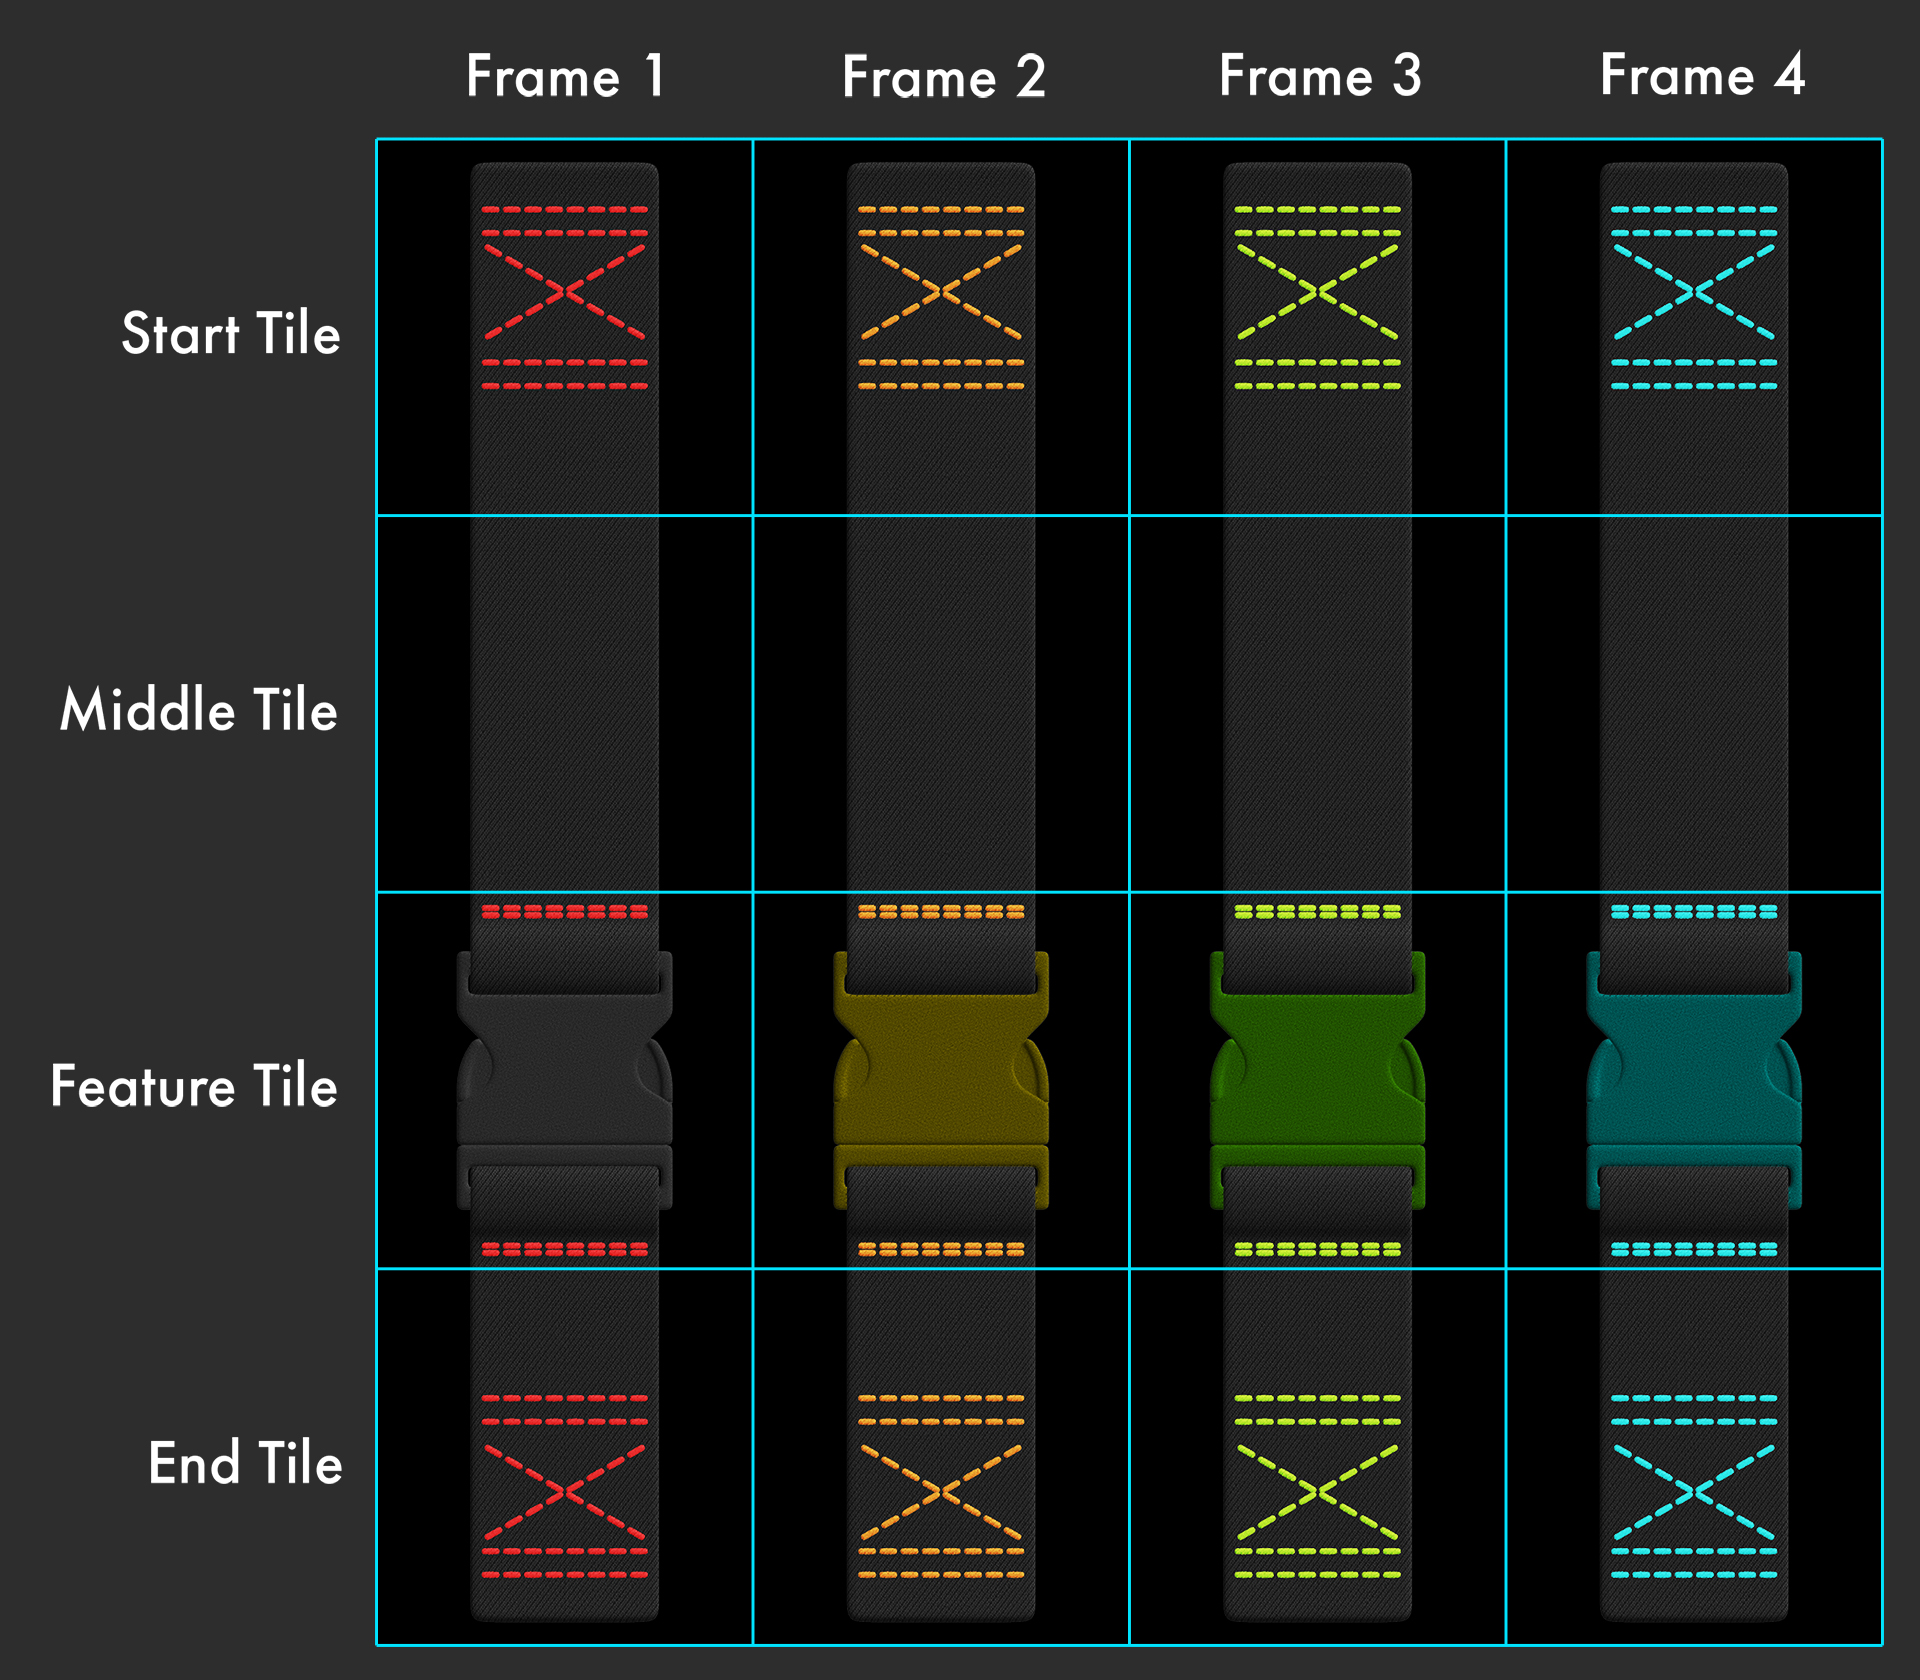
Making use of a sprite sheet layout, Tile Strips can be authored with distinct, interchangeable elements. The start and end tiles are placed automatically, while the midsections can be customized with a configurable number of unique elements. Each tile can also have variations, and you can use the new Tile Strip tool to configure the placement of each element and variation.
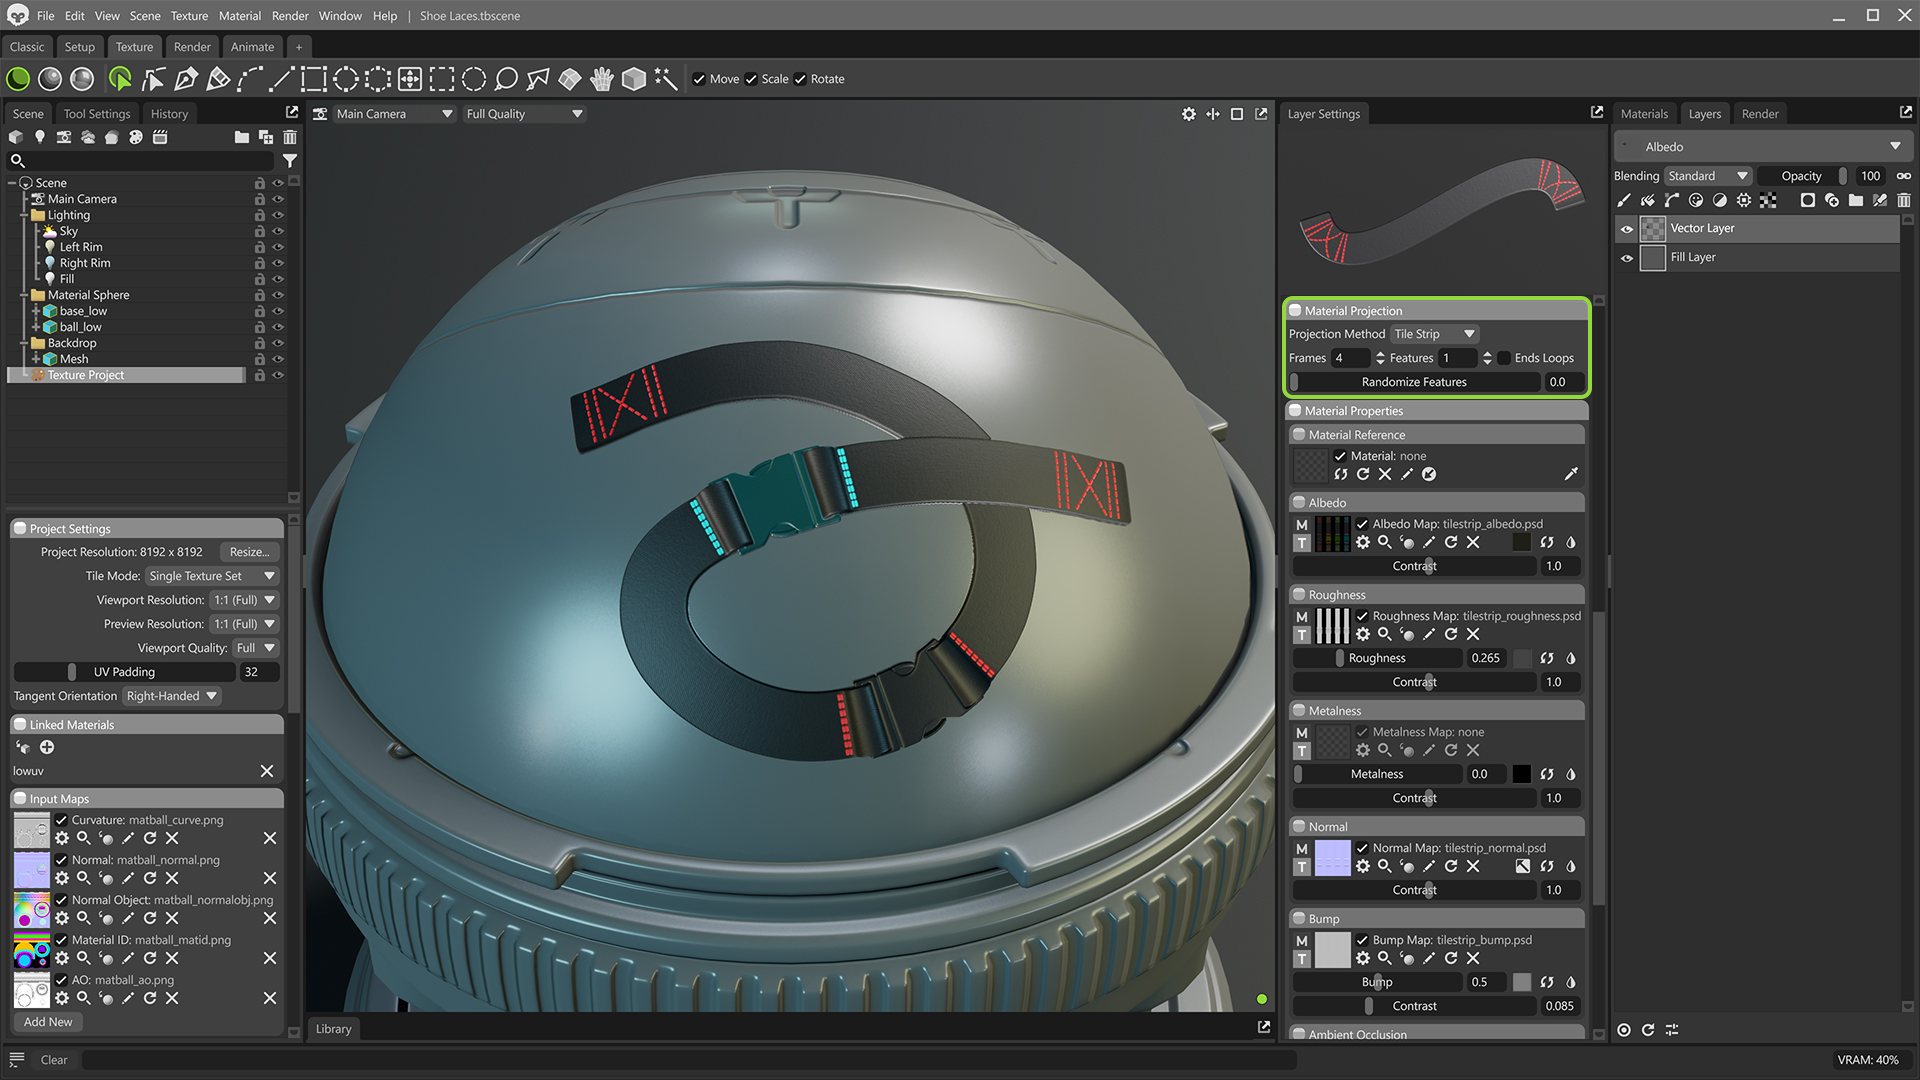
For tile strip textures to work, you need a Start, Middle, and End tile at minimum. Feature Tiles are optional, and you can create as many of them as you want. Simply ensure they’re arranged between the Middle and End tiles, and the number of Features is set in the Material Projection panel.
- Start Tile: This is the first tile in the series.
- Middle Tile: This tile will repeat between the Start and End tiles.
- Feature Tile: This tile can be placed anywhere between the Start and End tiles.
- End Tile: This tile is the last in the series.
Variations can be created by adding additional columns to the tile sheet and defining the number of Frames.
Tile strips automatically update as the length of the vector shape changes, too. We’ve improved the taper settings to allow for more control over the taper distance and falloff for both the start and end of the tubes, which is especially useful in Tile Strip mode.
Note: To help you get started with Tile Strips, we’ve added the following example presets to the Library:
- Library/Brushes/Fabric-Details/
- Lace Boot
- Strap Braided Leather
- Strap Nylon
Tube Mode for Paint Layers
Status: 🟠 Experimental / Work in Progress
We’ve added a new Tube brush mode for Paint layers that mimics the drawing style of Vector Tube mode. This enables you to paint brush strokes with profiles, and will expand the functionality of brush and vector presets in the future.
To enable Tube mode on a brush, set the brush’s Alignment to Tube in the Tool Settings > Projection panel.
Tube mode gives artists the full collection of vector tube settings, now integrated in the brush tool. This includes support for tapering, warping, and profiles to change the bump and displacement as you brush.
Artists can also enable the new Tile Strips projection method for their tube brush in the Layer Settings window.
Sample Layers for Masks
Status: 🟢 Complete
Sample Layers for Masks lets you quickly turn any layer’s content into a mask, giving you more creative control when making materials. When dragging layers from the primary color stack into masks, the layer’s content is now converted to a mask.
For Paint layers, this means you can draw a shape and use it as a mask by duplicating or moving the layer. For Fill layers, there’s a configurable and non-destructive interface to select how the mask is generated. The texture content from various maps, such as albedo, roughness, etc., can be used.
This feature makes it quick and easy to generate grunge maps from any of the 700+ material presets currently available in the Toolbag library.
Sync Points in Groups
Status: 🟢 Complete
We’ve unlocked Sync Points! No longer are they restricted to the root level of the layer stack.
Now you can place Sync Points in groups and parent them to other layers. This means sync points can be saved in Smart Materials, allowing for even smarter preset effects that adapt to the geometric features built up in the layer stack.
We’ve added an Isolate option that, when enabled, allows the sync point to interact only with other layers in the group. This can be handy if you have a layer in a group that is driving a mask effect, and you don’t want the layer’s contents to influence layers outside of the group.
New in Rendering
Ray-Traced Fog
Status: 🔴 Experimental / Work in Progress
The fog effect has been revamped to work with Ray Tracing render mode. This brings support for god rays or light shafts, and produces more realistic atmospheric effects as light scatters through the fog volume.
To use ray-traced fog, add a Fog object to your scene and switch the renderer to Ray Tracing. We’ve added additional controls that make it easier to customize where the fog appears. Height limiting and falloff options allow you to create locational effects like ground fog. Multiple fog volumes can be added, allowing you to mix subtle atmospheric fog with areas of dense fog.
Notes:
- Fog anisotropy can be controlled in the Render object. This setting applies globally for all fog objects in the scene.
- Ray-traced fog, like subsurface scattering, generally needs a higher sample count to resolve cleanly and produce good image quality.
- Some of the features that we’ve added for RT fog, like the falloff controls, are not implemented in Raster mode yet, so you may see significant differences between the rendering modes. We intend to improve this in the future.
- Light shafts or god rays can be tricky to set up and will be more subtle in RT mode than Raster. To accentuate the effect, try placing direct light sources near the blocking object and using a dark background.
Ray Tracing VRAM Improvements
Status: 🟢 Complete
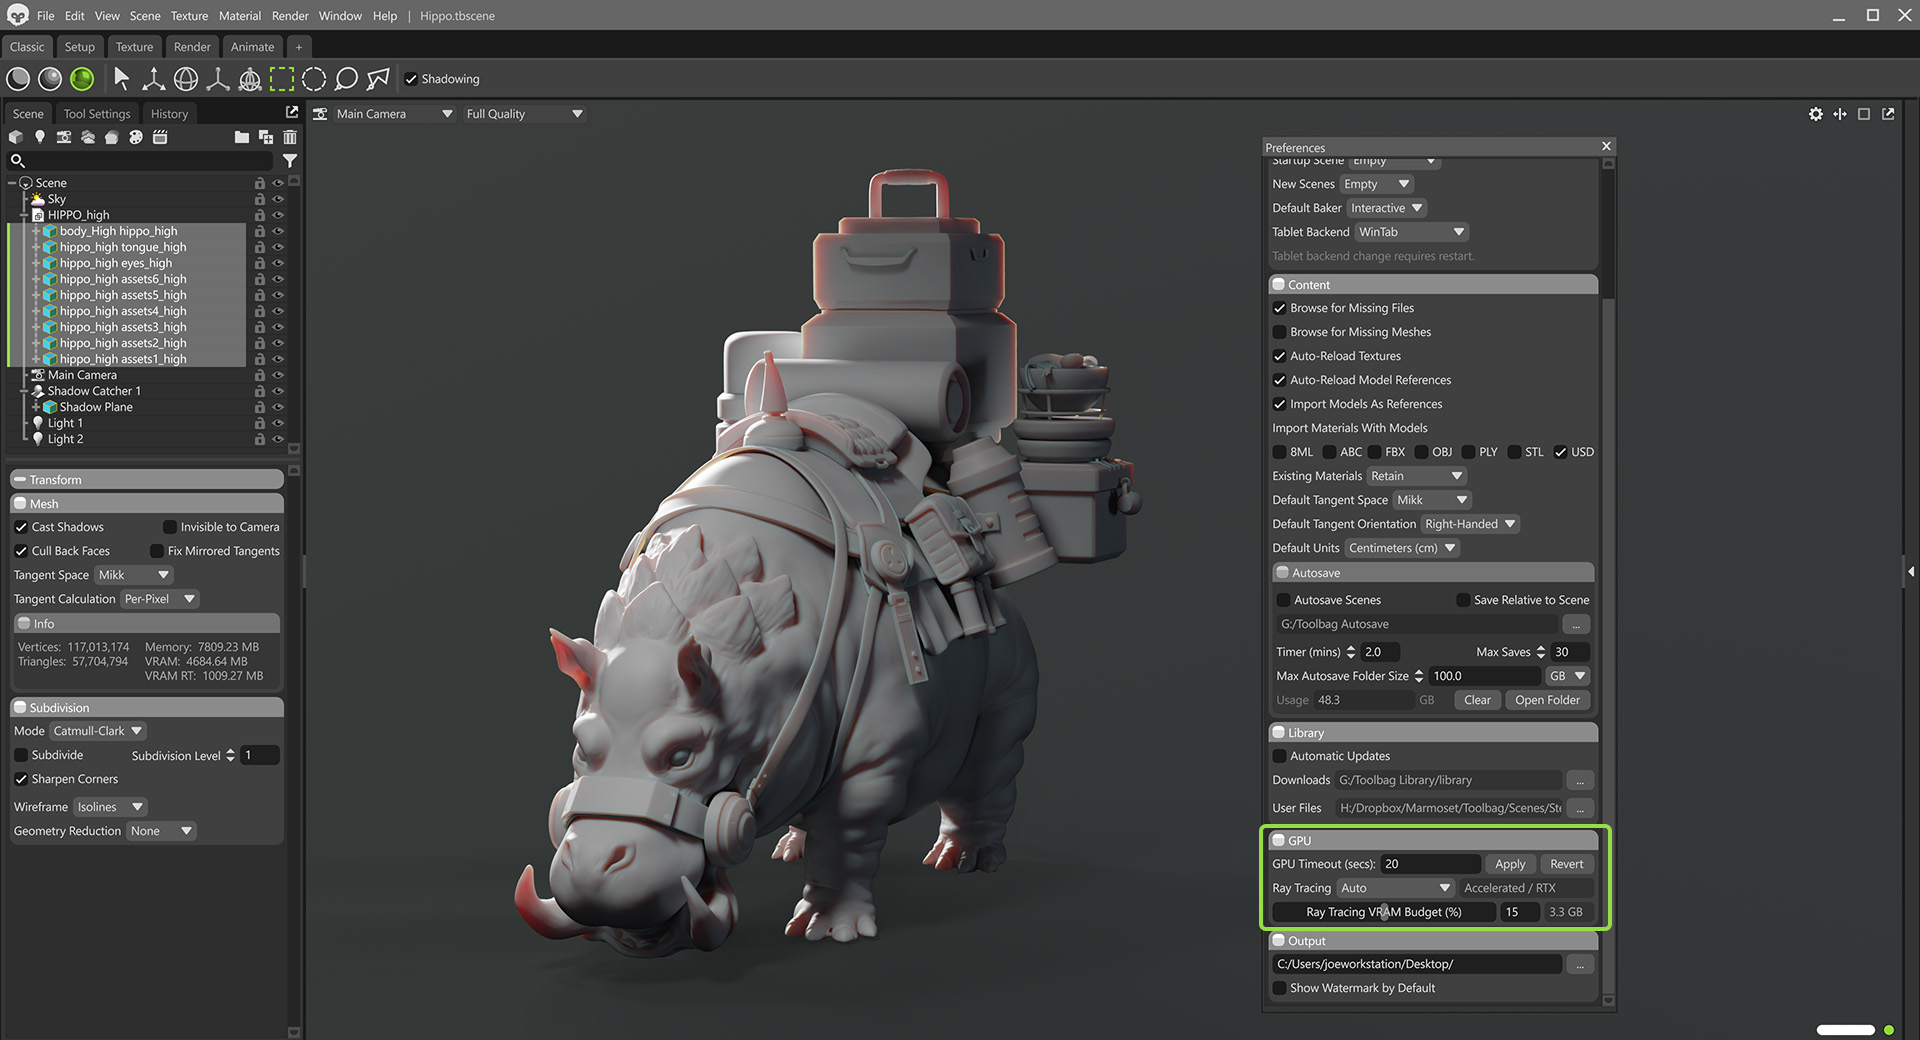
We’ve introduced some changes to how the ray tracing backends work to improve VRAM use and stability for dense scenes with tens or hundreds of millions of triangles. The backend will automatically switch and compress the ray tracing acceleration data in cases of high VRAM use. You can define how much VRAM is dedicated to the ray tracing data.
Notes:
- The new settings can be found in Edit > Preferences > GPU.
- Auto mode automatically selects the ray tracing backend depending on the complexity of your scene. For scenes with very high polygon meshes, the Generic backend will be used, with a variable level of compression for the raytracing acceleration data. This will generally mean a lower frame rate, but less VRAM use and a more stable experience.
- You can adjust the Ray Tracing VRAM Budget to set the threshold where the backend will automatically switch.
- A lower threshold value will generally mean lower VRAM usage, but also lower frame rate.
- Auto is now the default mode. If you don’t want the backend to automatically switch, you can select the Accelerated / RTX or Generic modes directly.
- Changes to the ray tracing backend no longer require an application relaunch, they will apply when you close the Preferences window.
- These changes should improve performance and stability when baking with dense meshes as well.
Scene & UI
Multi-Select & Edit Scene Objects
Status: 🟠 Near Complete
It’s now possible to select multiple scene objects and adjust their settings simultaneously.
To interact with multiple objects, multi-select matching types in the Scene window, and easily make mass changes to meshes, lights, cameras, etc. This can be especially useful if you have numerous meshes and need to apply subdivision to all of them, for example.
Note: Multi-Select and Edit is not supported for Texture Projects and Layers, but works for most scene object types. Materials in your Material window are also not currently supported for Multi-Select and Edit, however, we plan to introduce this in a later build.
Render Window
Status: 🟢 Complete
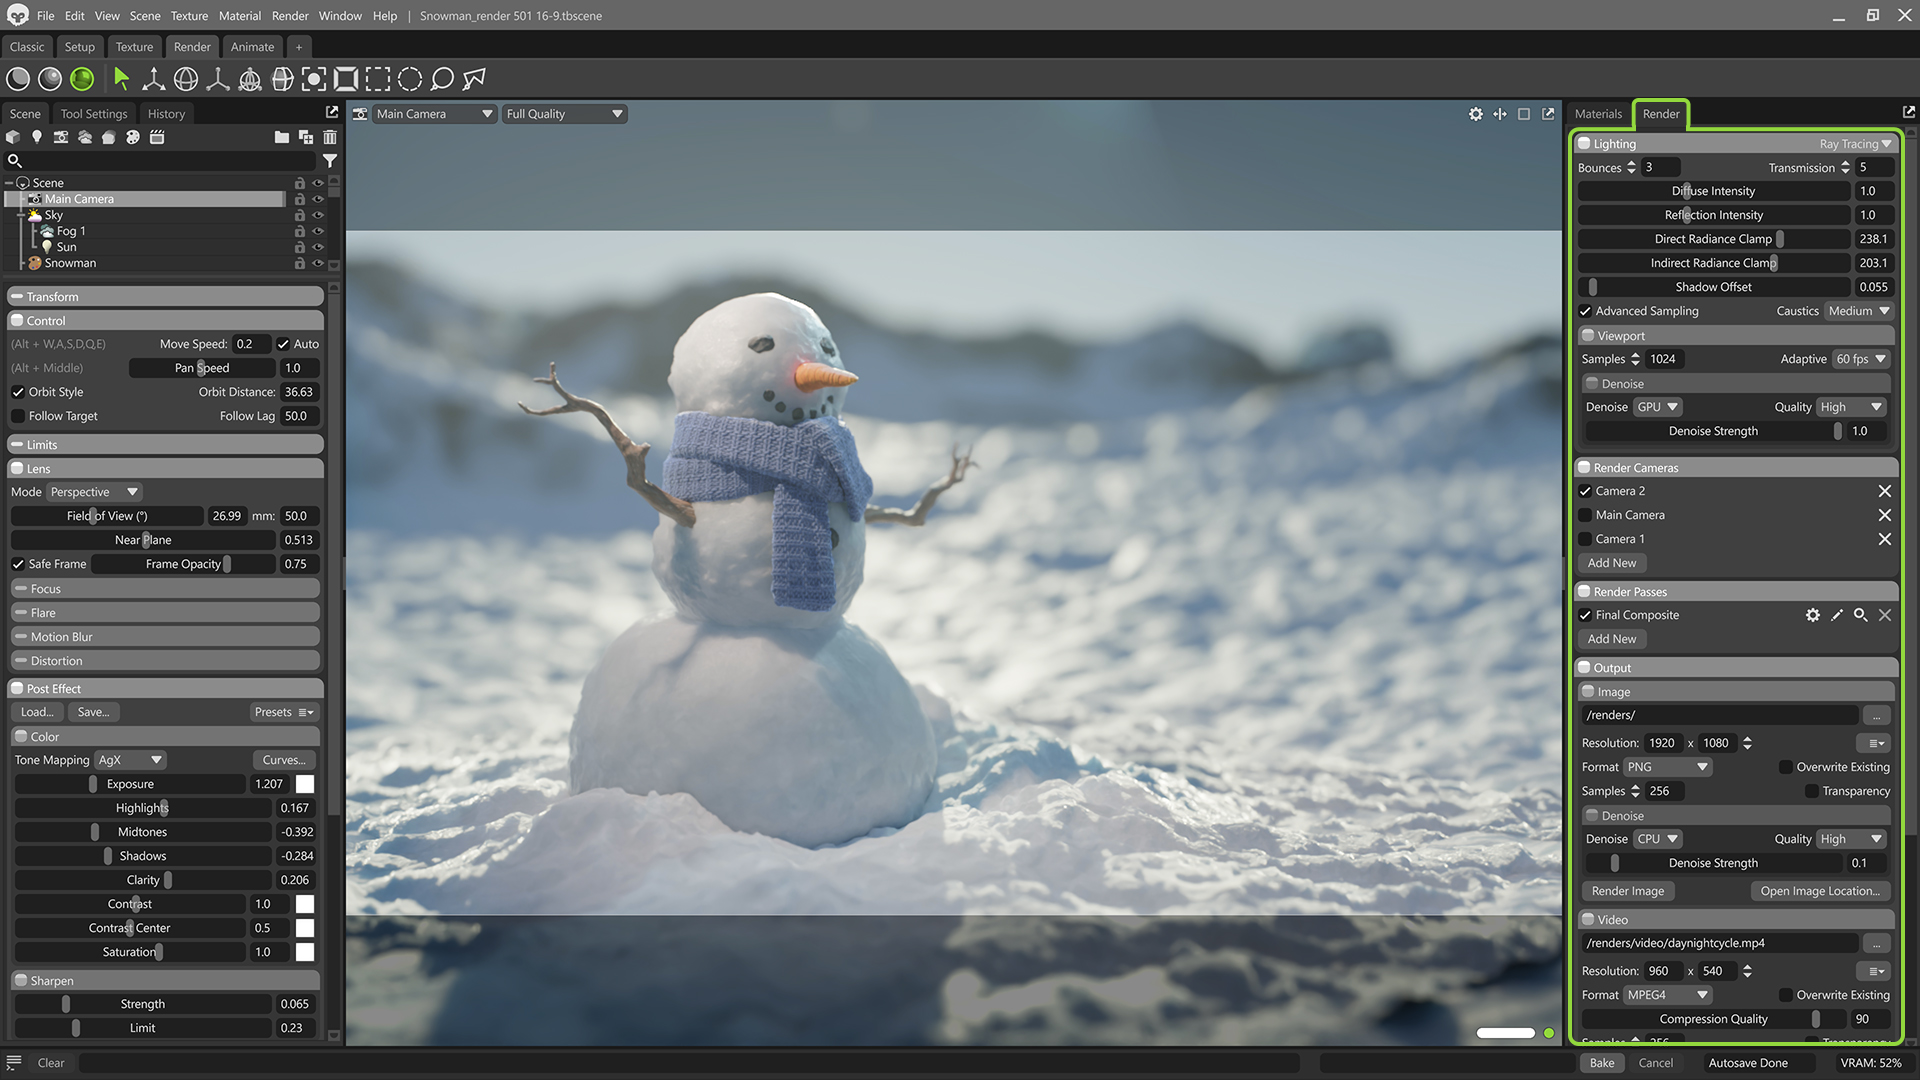
The render settings have been moved to a dedicated window. Now it’s easier to, for example, have the object properties and the camera settings visible while adjusting the render settings.
Scene Search
Status: 🟢 Complete
We’ve added a search bar to the Scene window to make it easy to find objects in complex scenes. You can search for specific terms or filter by object types.
Hotkey Editor
Status: 🟢 Complete
We’ve added a Hotkey editor to make it easy to find and customize shortcuts.
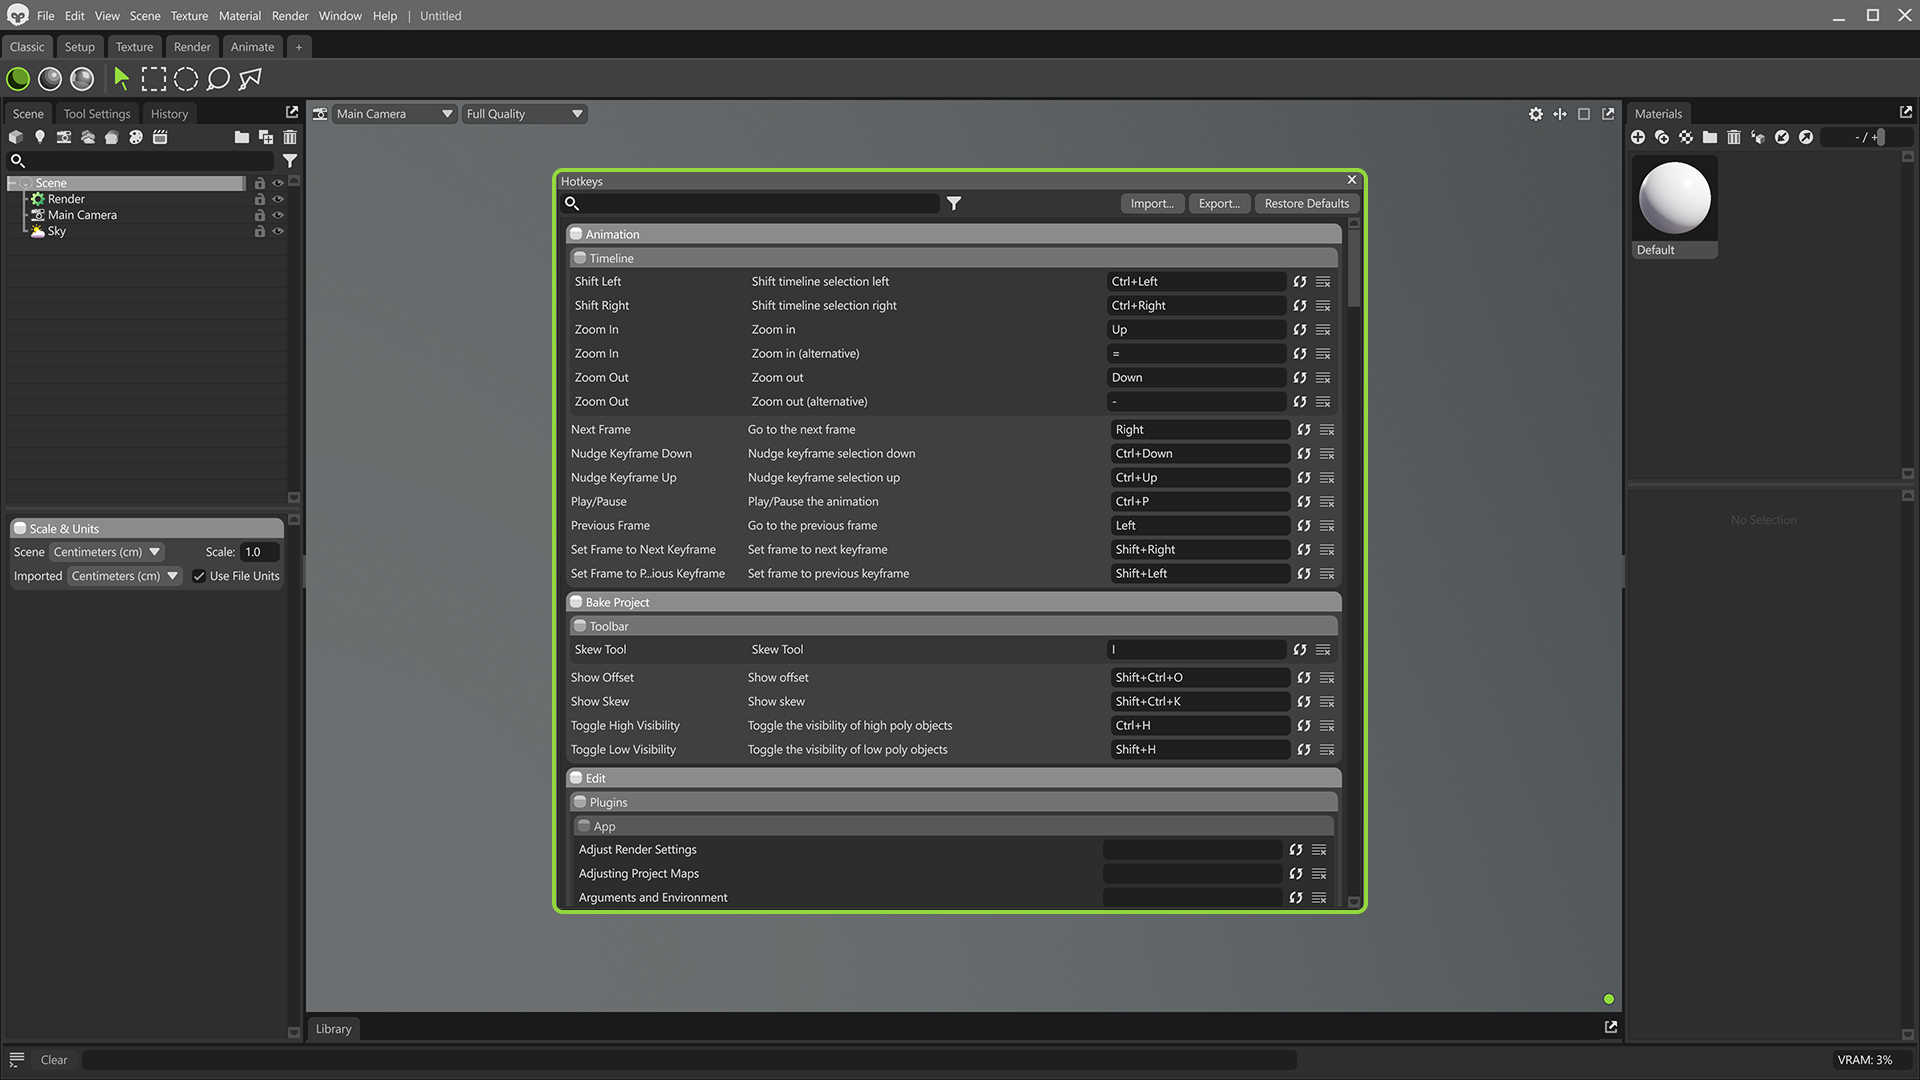
You can customize hotkeys by going to Edit -> Hotkeys. Hotkeys can be imported, exported and reset in this window. You can unbind or reset individual hotkeys as well. If you attempt to bind an existing shortcut, the editor will ask if you want to overwrite the existing entry.
Library Custom Folders
Status: 🟢 Complete
You can now create custom folders in the Library window, making it easier to save and organize your personal assets. Local user assets can now be saved to any folder and moved between folders.
The new buttons in the Library window allow you to create and delete custom folders. You can also rearrange custom assets by dragging and dropping them into the appropriate folders.
We’ve also made mass importing easier with an Apply to All checkbox to speed up the process when importing dozens of images or other files of the same type.
It’s important to note that there are some limitations:
- It’s not possible to rearrange first-party content (assets and folders) as they reference the file structure on Marmoset’s asset server.
- File imports must be done through the Library interface as well, so Toolbag can process the files and create the required metadata.
- Copying folders or files directly into the Library folder structure from the OS is not recommended or supported.
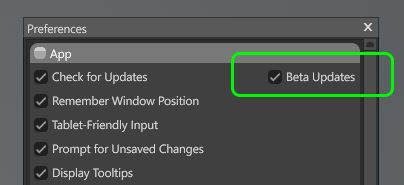
Access the Toolbag 5.02 Beta
Beta Testing Reminder:
⚠️ Beta releases are likely to contain bugs and may have unstable features on certain machines or production pipelines. Beta releases are not recommended for live production pipelines or active educational environments.
That said, we encourage you each to get started testing the latest Toolbag beta on your personal projects. Please don’t hesitate to share your feedback by sending it directly to our support inbox, support@marmoset.co, or get involved in the community discussion on our official Marmoset Discord.

