
Introduction
Hello, my name is Yulia Sokolova, I’m a freelance Character Artist and Tutorial Instructor. I’ve been working on some amazing projects for Disney, Envato, and mobile games studios. At the moment, I’m focusing on creating 3D characters and looking forward to new exciting career opportunities in game development or animated movies.
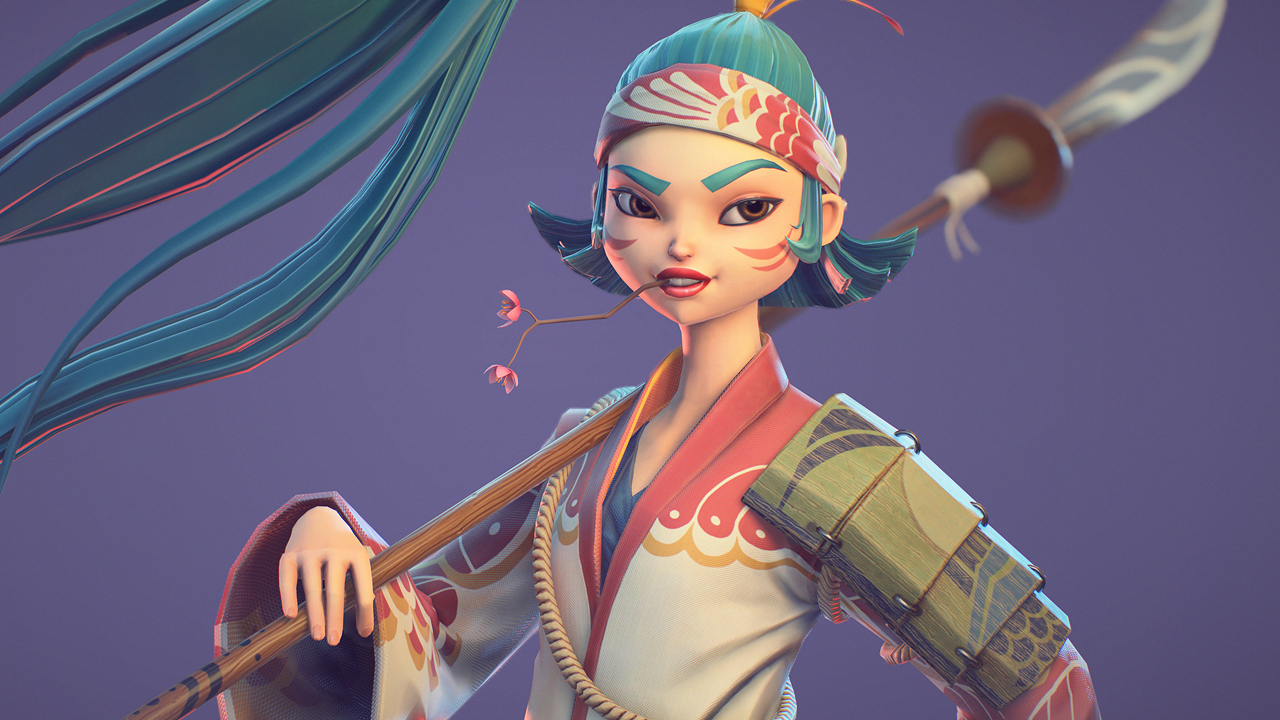
In this article, I’m going to share my process for rendering my Samurai character in Toolbag 3 and discuss how to create beautiful presentation shots for your portfolio. This character is based on a concept by Kati Sarin S. and I highly recommend checking out her amazing work here.
Sculpting & Modeling

The high-poly version of this character was sculpted from scratch in ZBrush. I usually stick to this approach with all of my personal pieces. I use primitive shapes when sculpting stylized characters. This has a lot of advantages, as it allows me to experiment with silhouette and proportions without boundaries set by a readymade base mesh. However, you shouldn’t rely solely on your memory, so always remember to collect a good amount of reference before you start. For this purpose, I use Pinterest.
Texturing
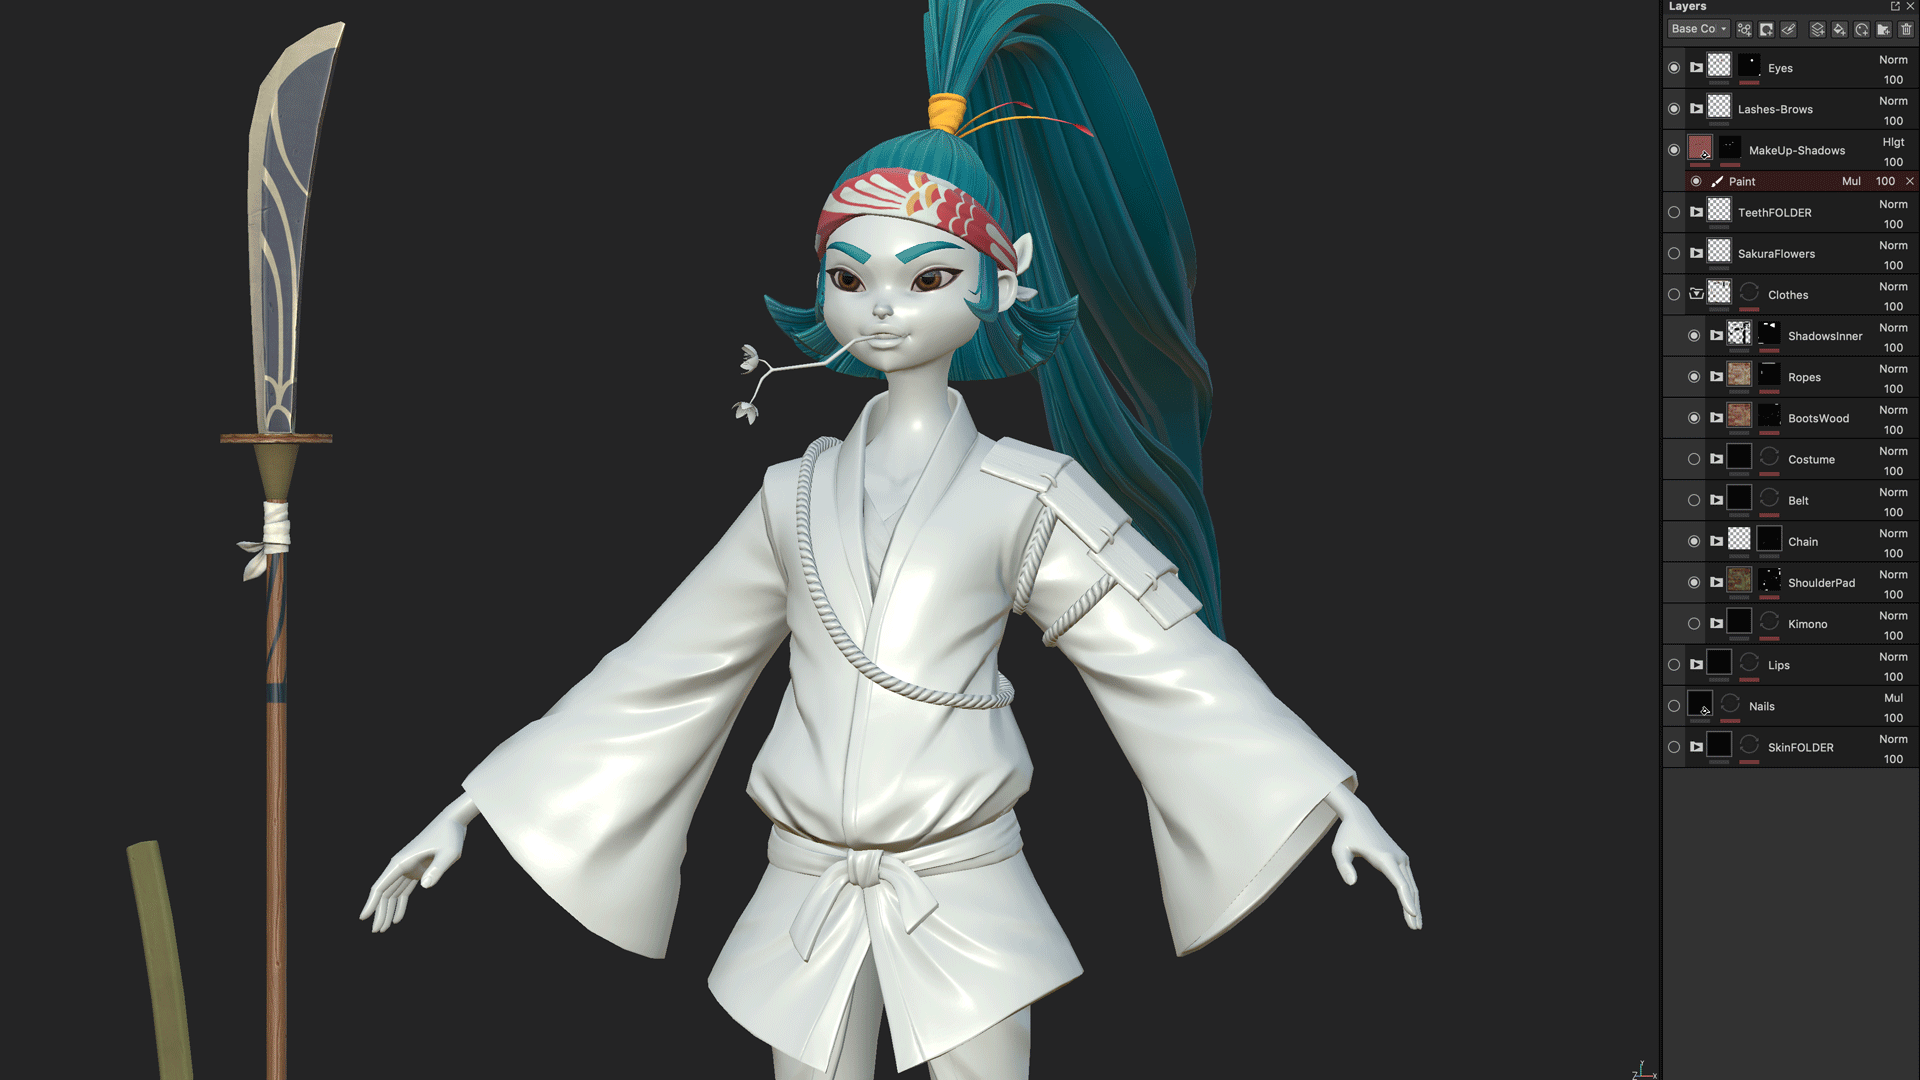
After the low poly model was ready and retopologized, I imported it into Substance Painter and started the process of baking and texturing. I tried various approaches to achieve a hand painted look using the PBR features of the program. I highlighted the peaks and darkened the valleys a lot which helped to emphasize the edges of clothing folds and wood grain. All of my textures are exported in a 4K resolution.
Scene Setup
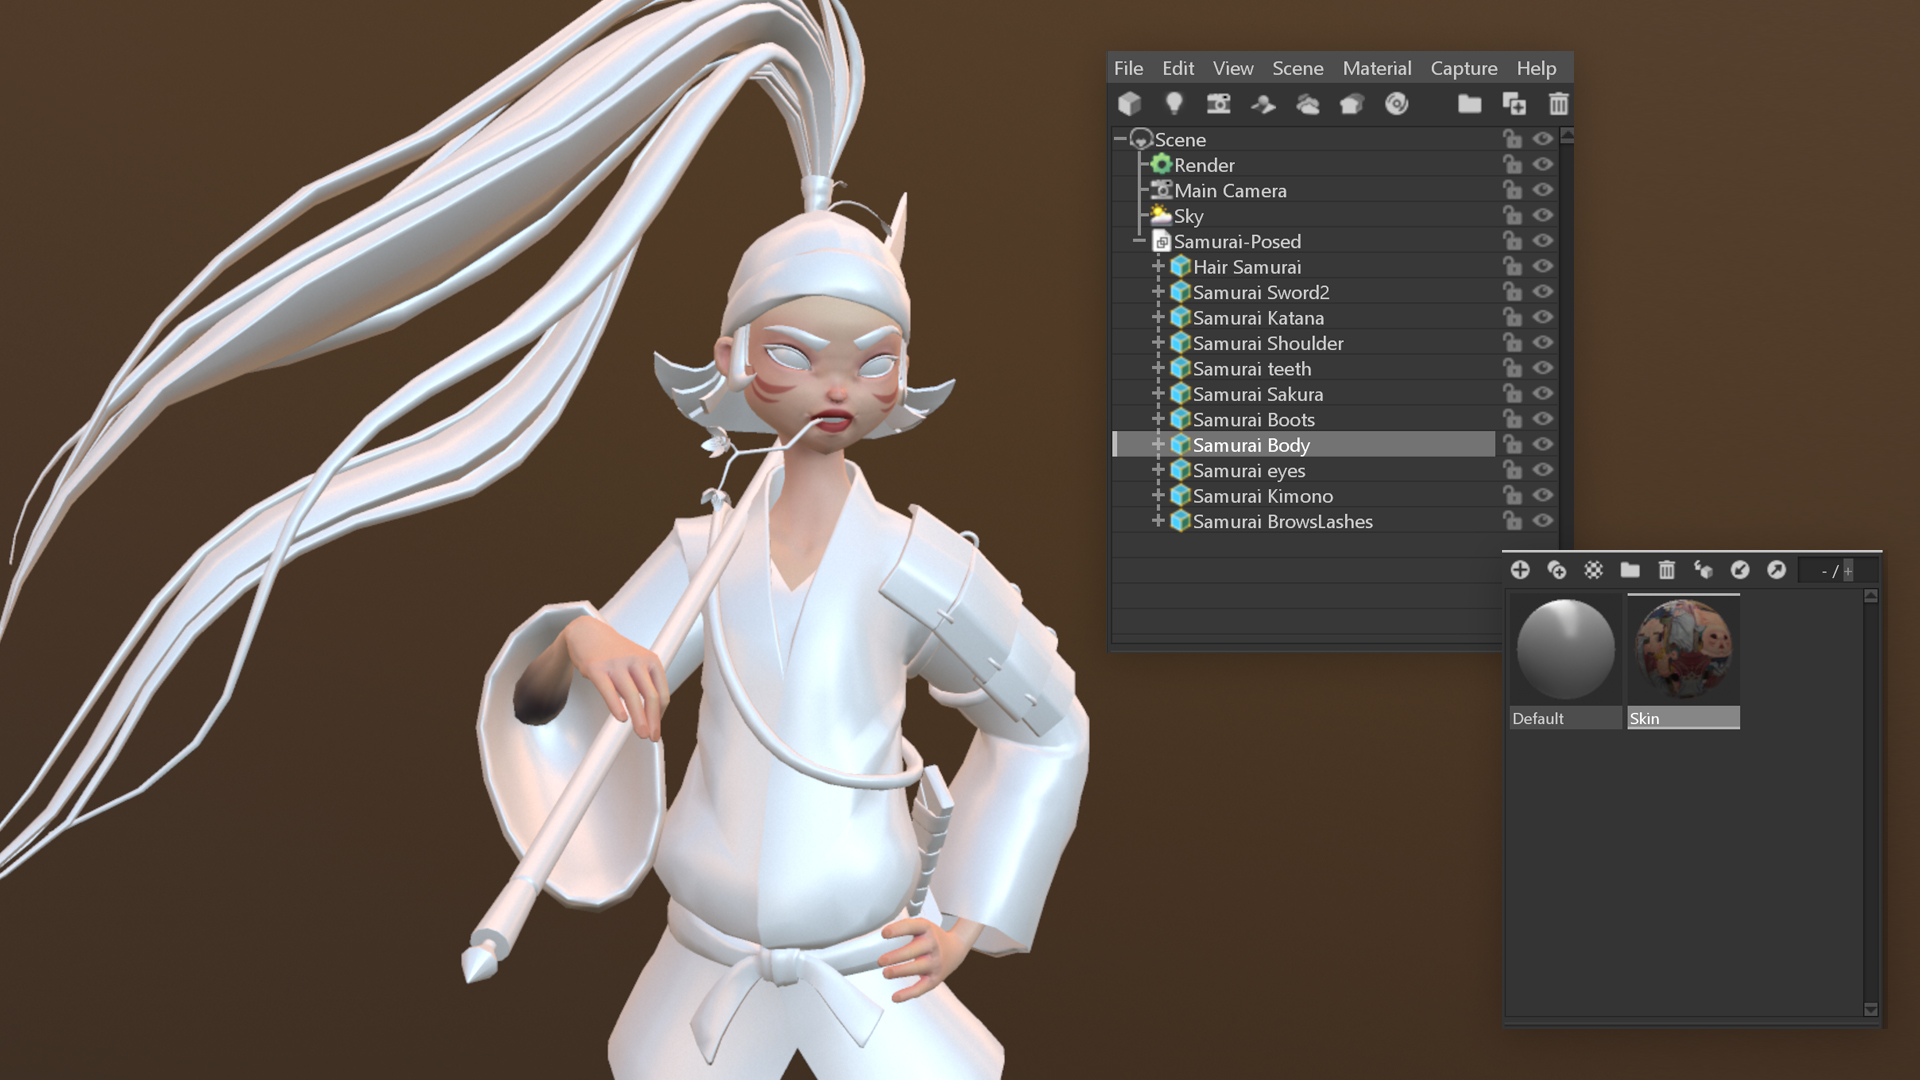
Now that the textures were ready, it was time to jump into Toolbag! It handles low poly and high poly meshes smoothly, rendering both at high speed. In my case, I was creating a game-ready model, so I worked with a low poly .obj. What’s great about Toolbag is that it preserves all of your mesh groups according to how they were organized in your modeling software package. This makes it easy to create a number of materials and apply them to different parts of your character.
Skin
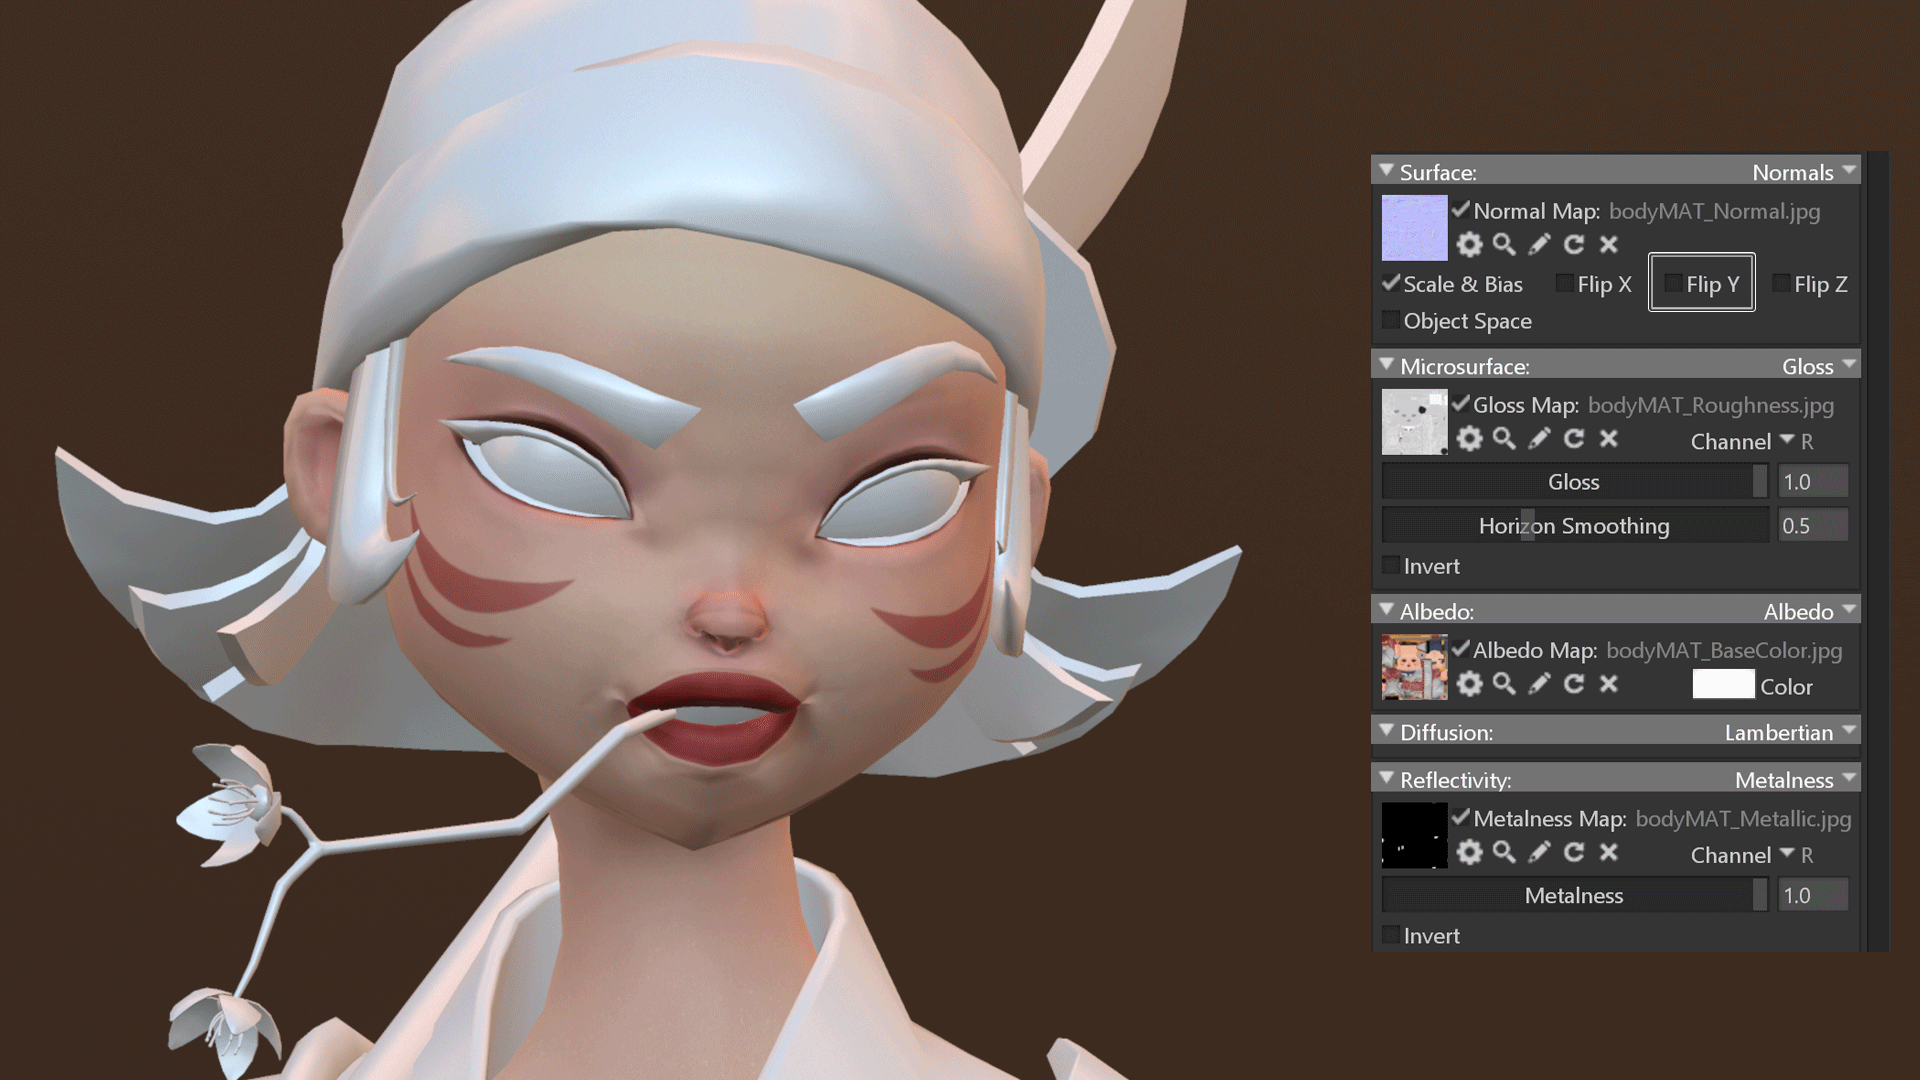
Let’s apply some materials, starting with skin. I started by creating a new material, applying the textures, and dropping the material on the relevant skin meshes. If you’re working with DirectX format of Normal maps instead of OpenGL, don’t forget to Flip Y in the Normal Map module, otherwise you’ll get weird shading on your model. The same applies for the Gloss module, which includes the Roughness map (editor’s note: a Roughness Microsurface module was added with Toolbag 3.05) . I checked the Invert box to invert the map and make the surfaces glossy. The next element to set up is Reflectivity: I set it to Metalness, as I’m working with the Metallic Roughness template in Substance Painter and created a Metalness map.
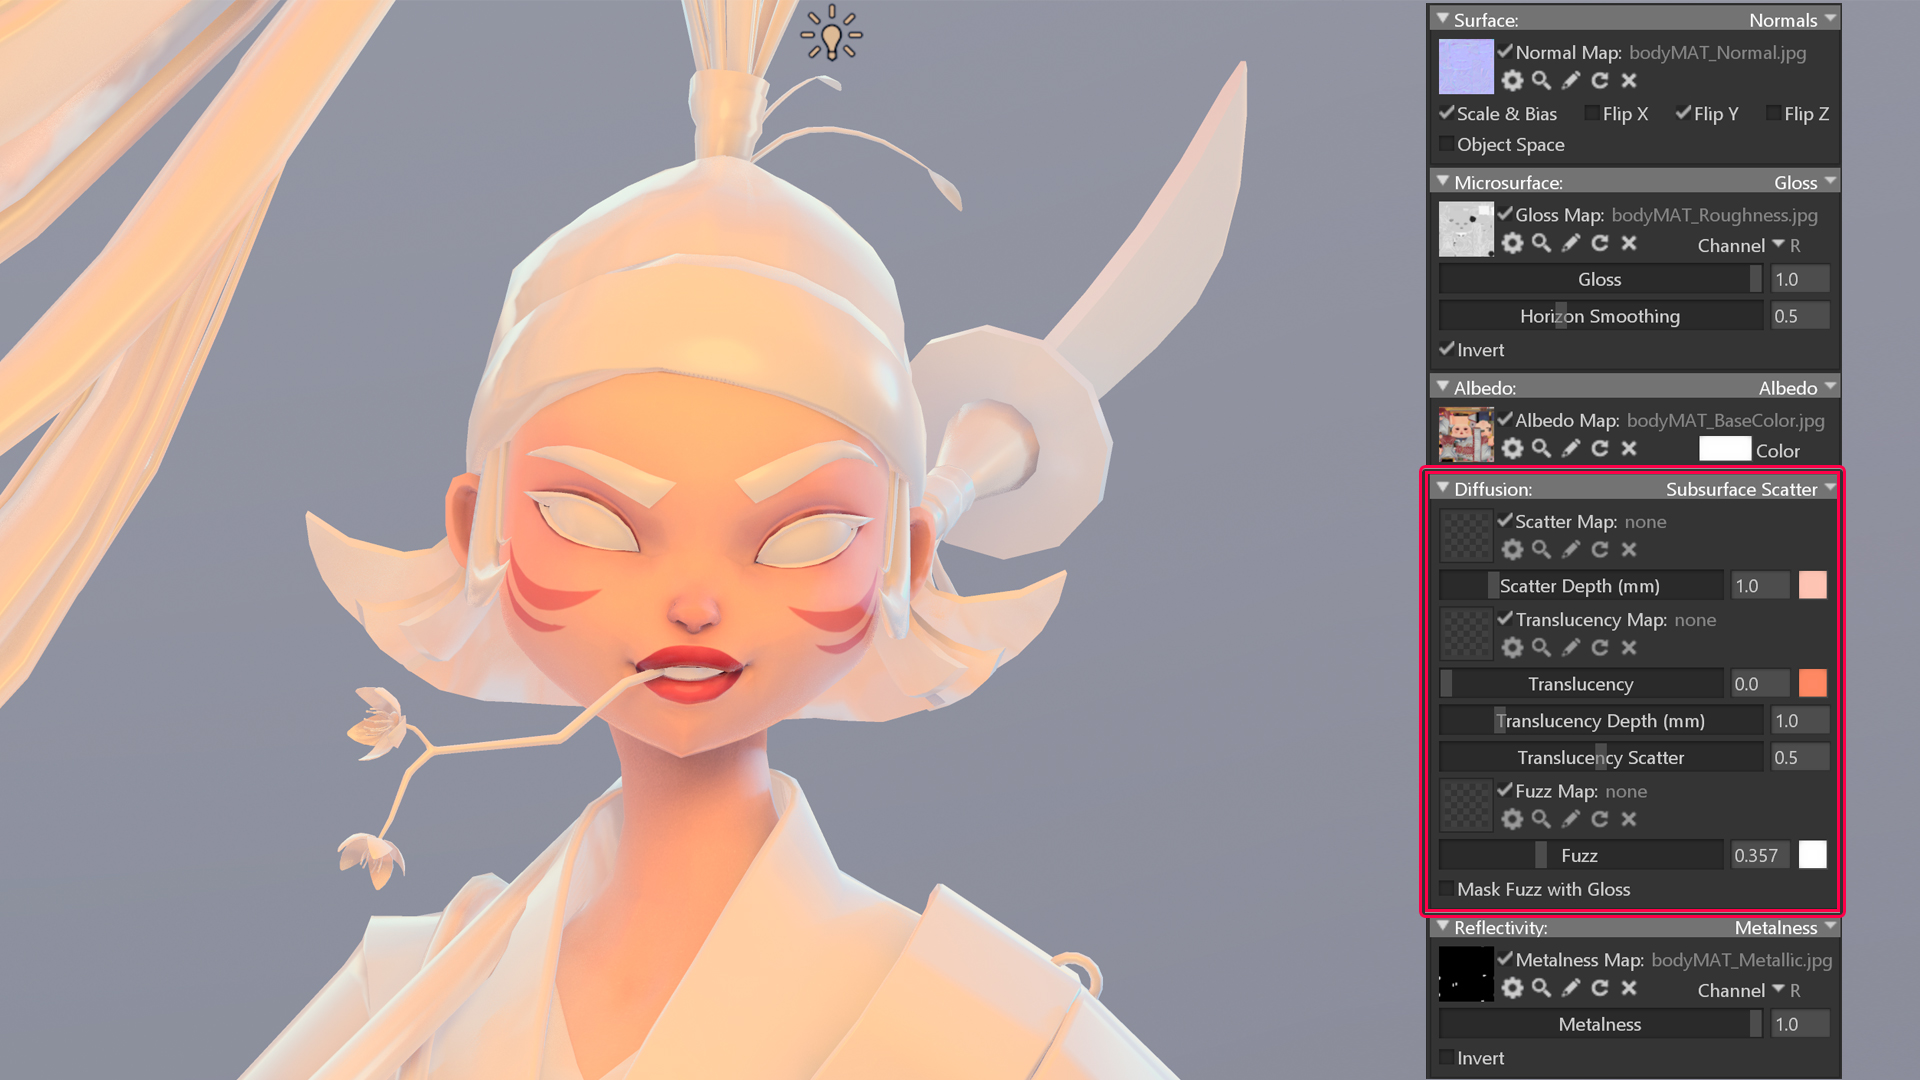
Next, I set the Diffusion to Subsurface Scatter and played with the parameters to see how they would affect my model. Each character will have its own settings, as the size of the mesh and the style of a character play a great role in this case. So the best decision would be to max out the parameters one by one and see how they work, adjusting the sliders down to the desired level. Additional maps can also be imported here to achieve a more realistic and detailed result. However, in my case I tried to keep things simple due to the style of this character. I adjusted the Fuzz Map slider to add more volume and light to the face. This function is typically used to highlight peach fuzz on the skin when making a photo-realistic model, but it can give a nice effect when used on hair or clothes, depending on the desired visual result. Once I was happy with how the skin looked, I created new materials for the body, hair, weapon, and everything else.
Lighting
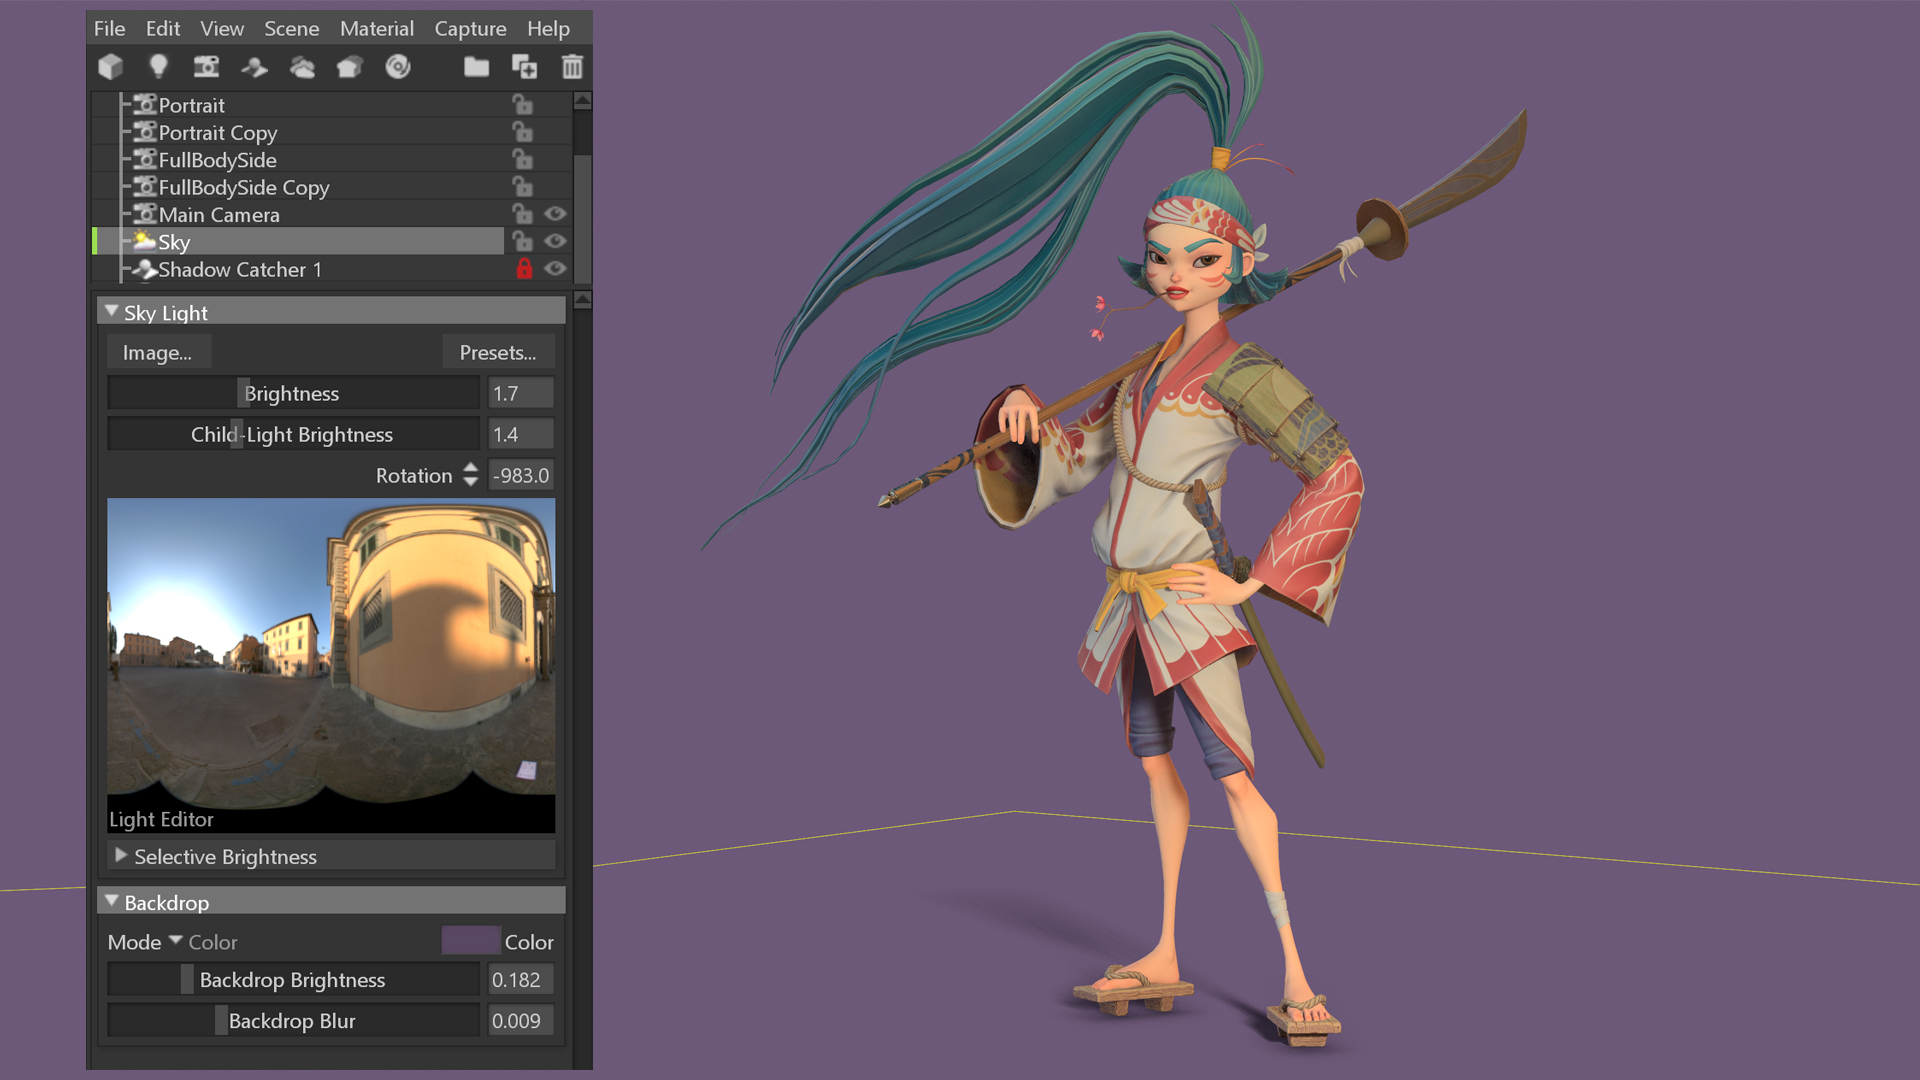
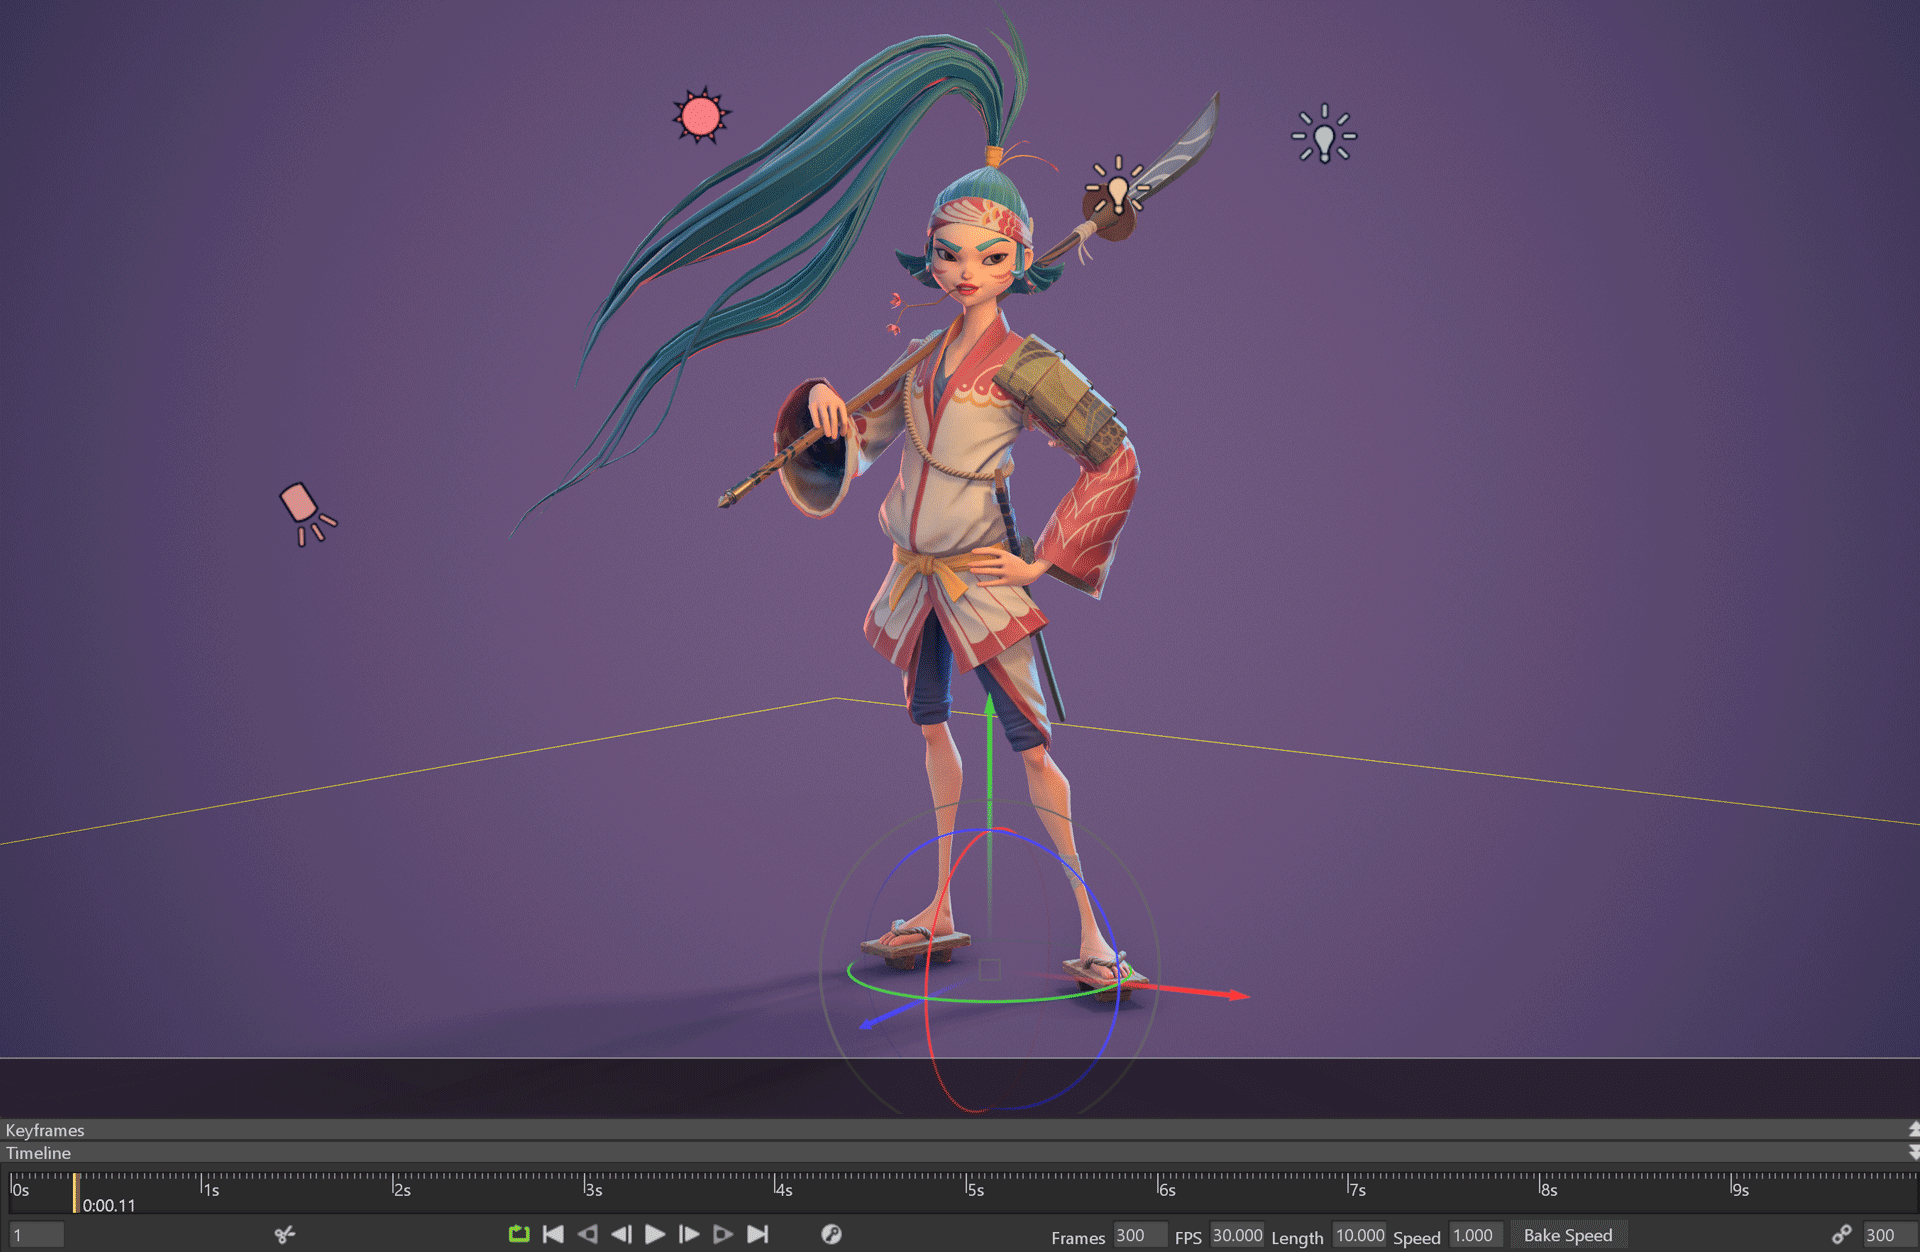
I’m now going to show my lighting setup for the scene. I chose the Pisa Courtyard Sky Preset, since I wanted to fill my scene with a soft, warm, yellow-tinted light. I set the Brightness to 1.7 and changed the Mode to Color. I selected a dark purple background color to make the model stand out and create a nice contrast with the clothes and hair. I added a Shadow Catcher to the scene (click the Shadow Catcher icon above the Scene list, or go to Scene > Add Object > Shadow Catcher) to create a ground plane for my character to cast shadows onto.
Here is a list of lights I created for my scene:
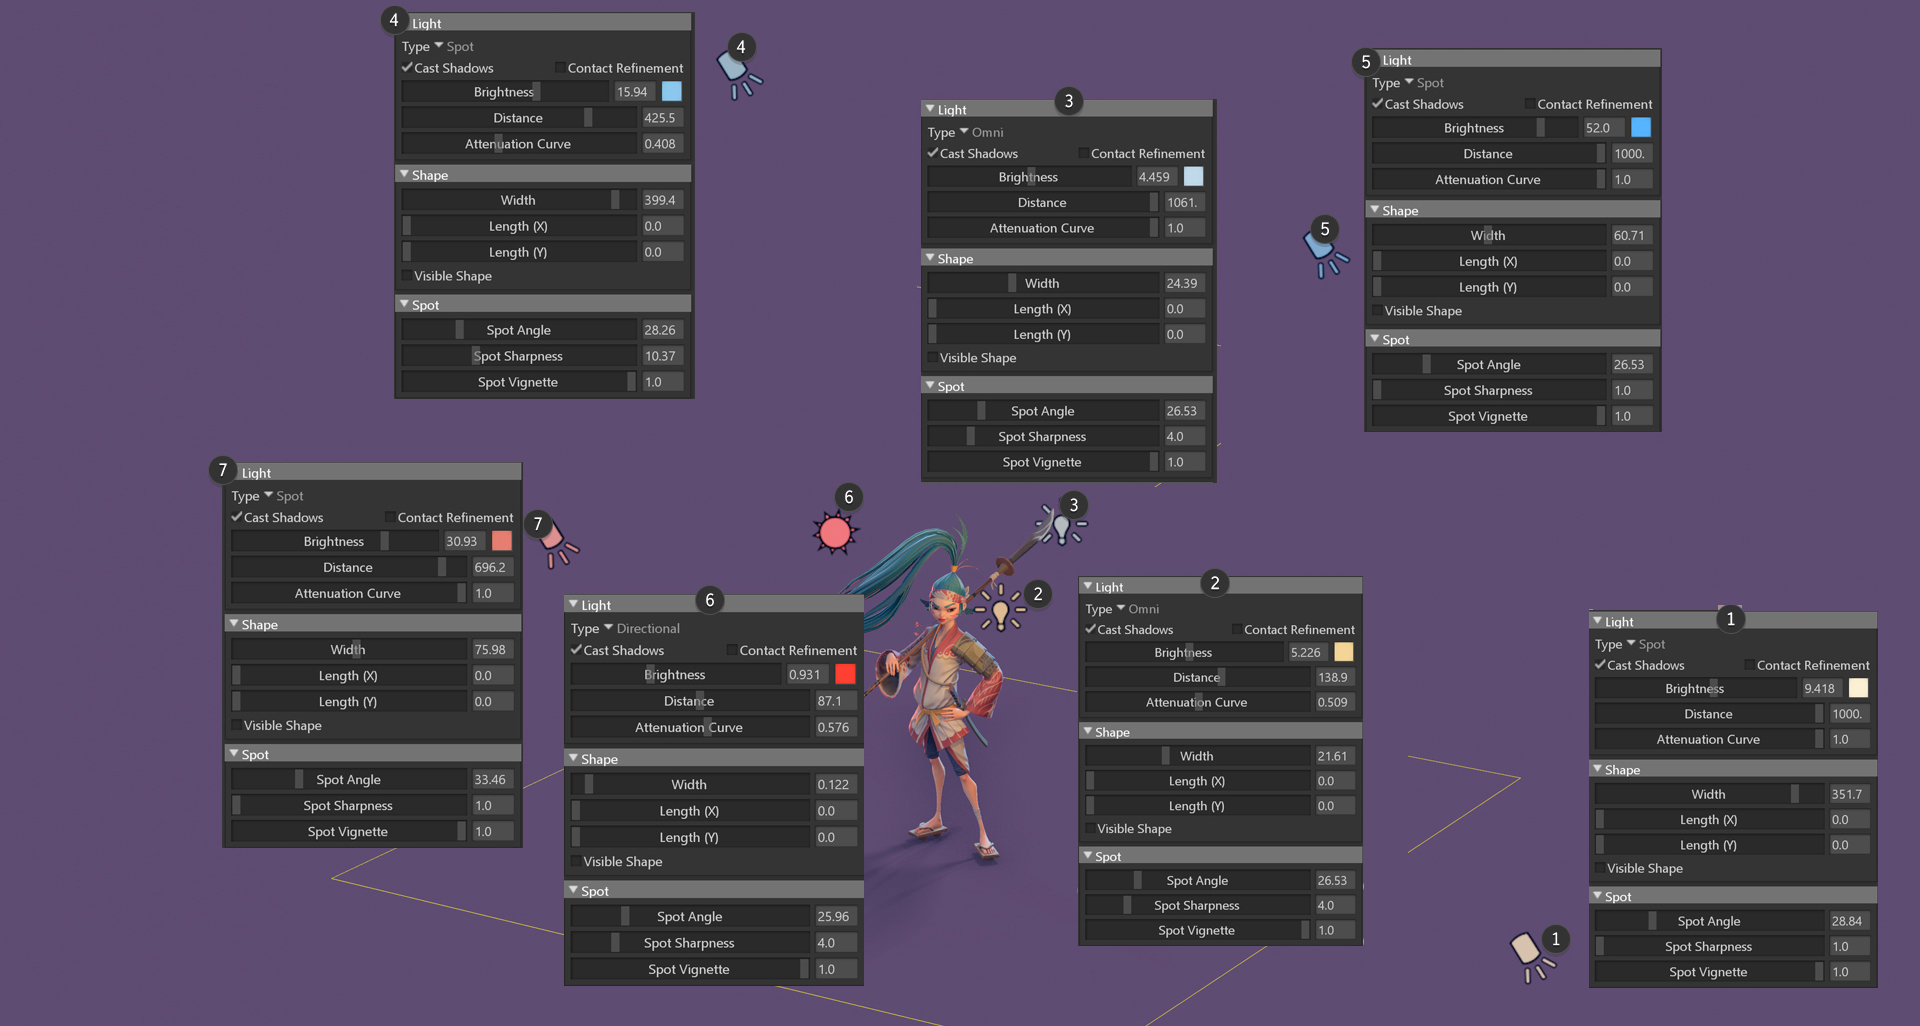
- I added a light yellow Spot Light at a far distance to create a warm ambient illumination. This will be my Key light. I adjusted the Brightness and Width sliders to make the figure bright enough, but not overexposed. You can get rid of jagged edges on the shadows by increasing the Width slider.
- I added an Omni Light very close to the character’s face. I made it a yellow color and adjusted the parameters so that it illuminated the face to emphasize it as the focal point.
- I added another small Omni Light next to the blade of the spear in order to create a highlight.
- I added a blue Spot Light above the character to create a rim light on top of the hair. This way, I detach the character from the background and emphasize her silhouette.
- An additional blue Spot Light was added to create a rim light along the left side of the body.
- A red light placed behind the character to create an opposing rim light on the right side of the character.Another red light placed to the top right of the character to create another opposing rim light. This created a nice contrast with the blue rim lights.
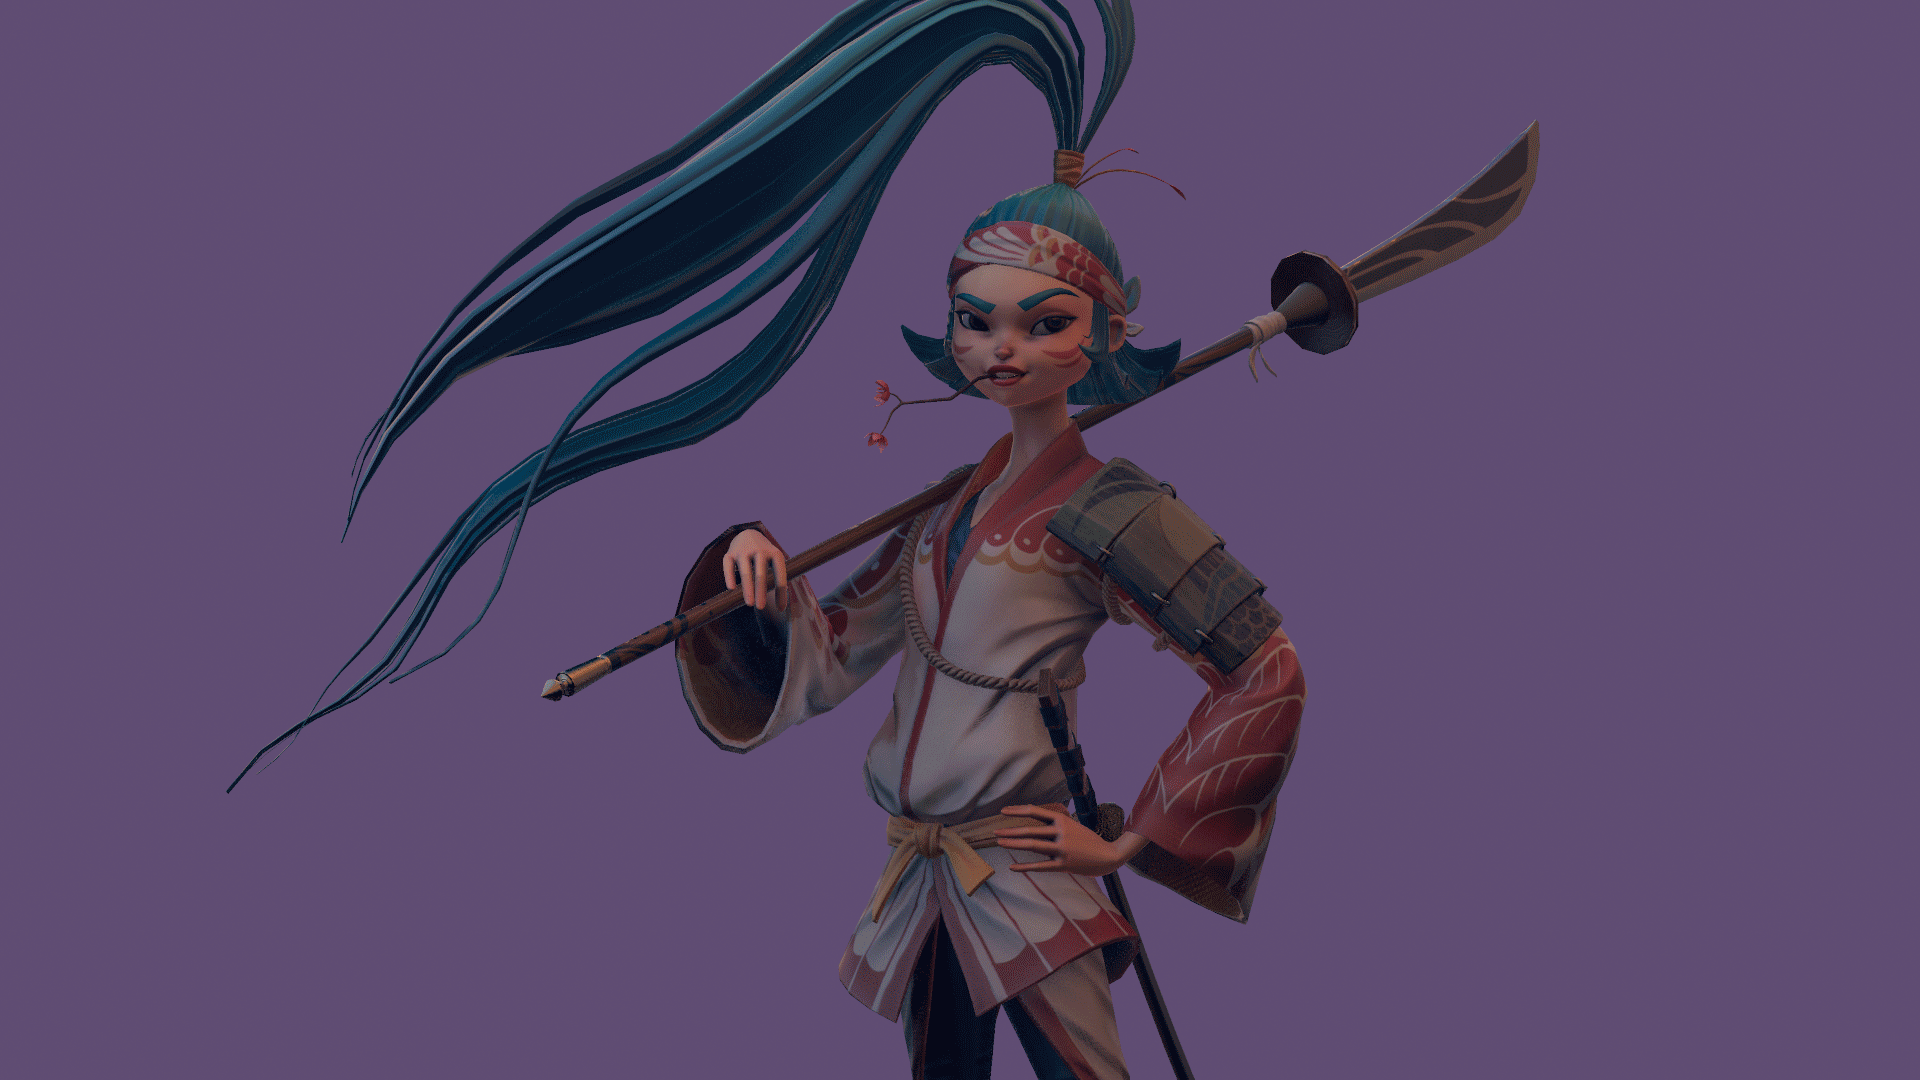
This is how the scene looked with all of the lights.
Post-Processing

Now let’s see what cool features are hidden in the Camera settings. I duplicated (Ctrl+D) the Main Camera so I could easily go back to the default settings.
- I set my Field of View to be a high value in order to minimize distortion. It works the same way as a telephoto camera lens, meaning there’s less perspective which is better for preserving the proportions of the character. However, you can always decrease the value to exaggerate the perspective, which can be an interesting effect from certain angles.
- I set my Tone Mapping to Reinhard to achieve a warm effect. The Filmic (Hejl) option is great too, giving a nice cinematic effect.
- I used the Curve Editor to tweak the contrast as well as the Red and Blue channels. This helps make the colors less dirty.
- The Safe Frame checkbox was enabled in order to see the working area that will be captured in the final render. This helps to determine composition.
- Finally, I added some subtle Vignette to darken the corners and a light Grain effect to create some noise.
Once I was happy with all of the settings, I created a Turntable (Scene > Add Object > Turntable) for my character that allowed me to rotate her and create renders without having to move the lights or the camera.
Portrait Camera
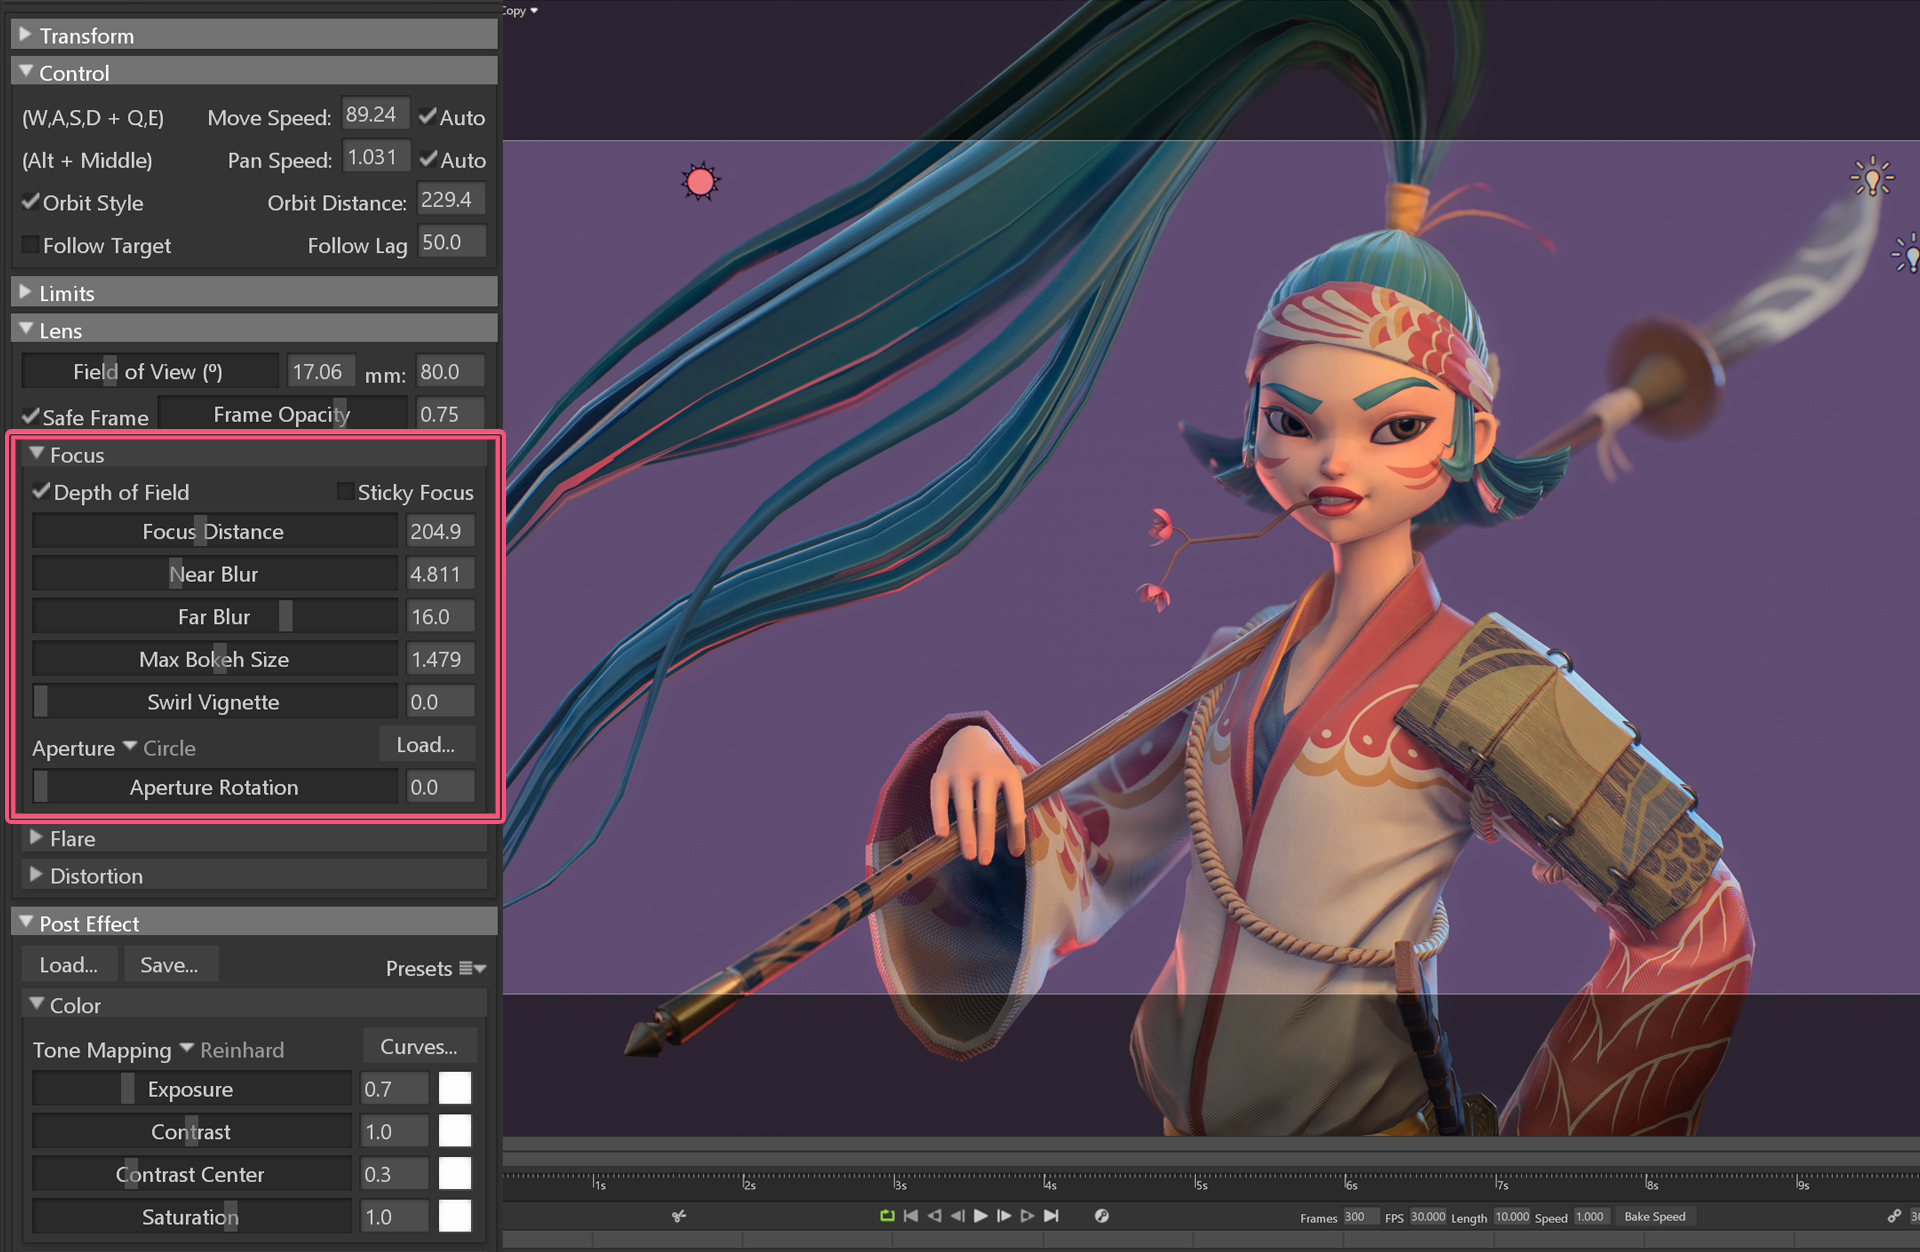
The next camera I set up was a Portrait camera for close-up renders. I copied my previous camera with all of it’s settings, zoomed in, and enabled the Depth of Field parameter in the Focus menu. I clicked my middle mouse button on the nose of my character to set the focus point for the Depth of Field effect. I played with the Near Blur and Far Blur values here to achieve a nice bokeh effect in the background. The Depth of Field effect has additional controls for Max Bokeh Size and Aperture in the Focus menu. I used a Turntable again to capture portrait shots from various angles.
Capturing the Final Renders
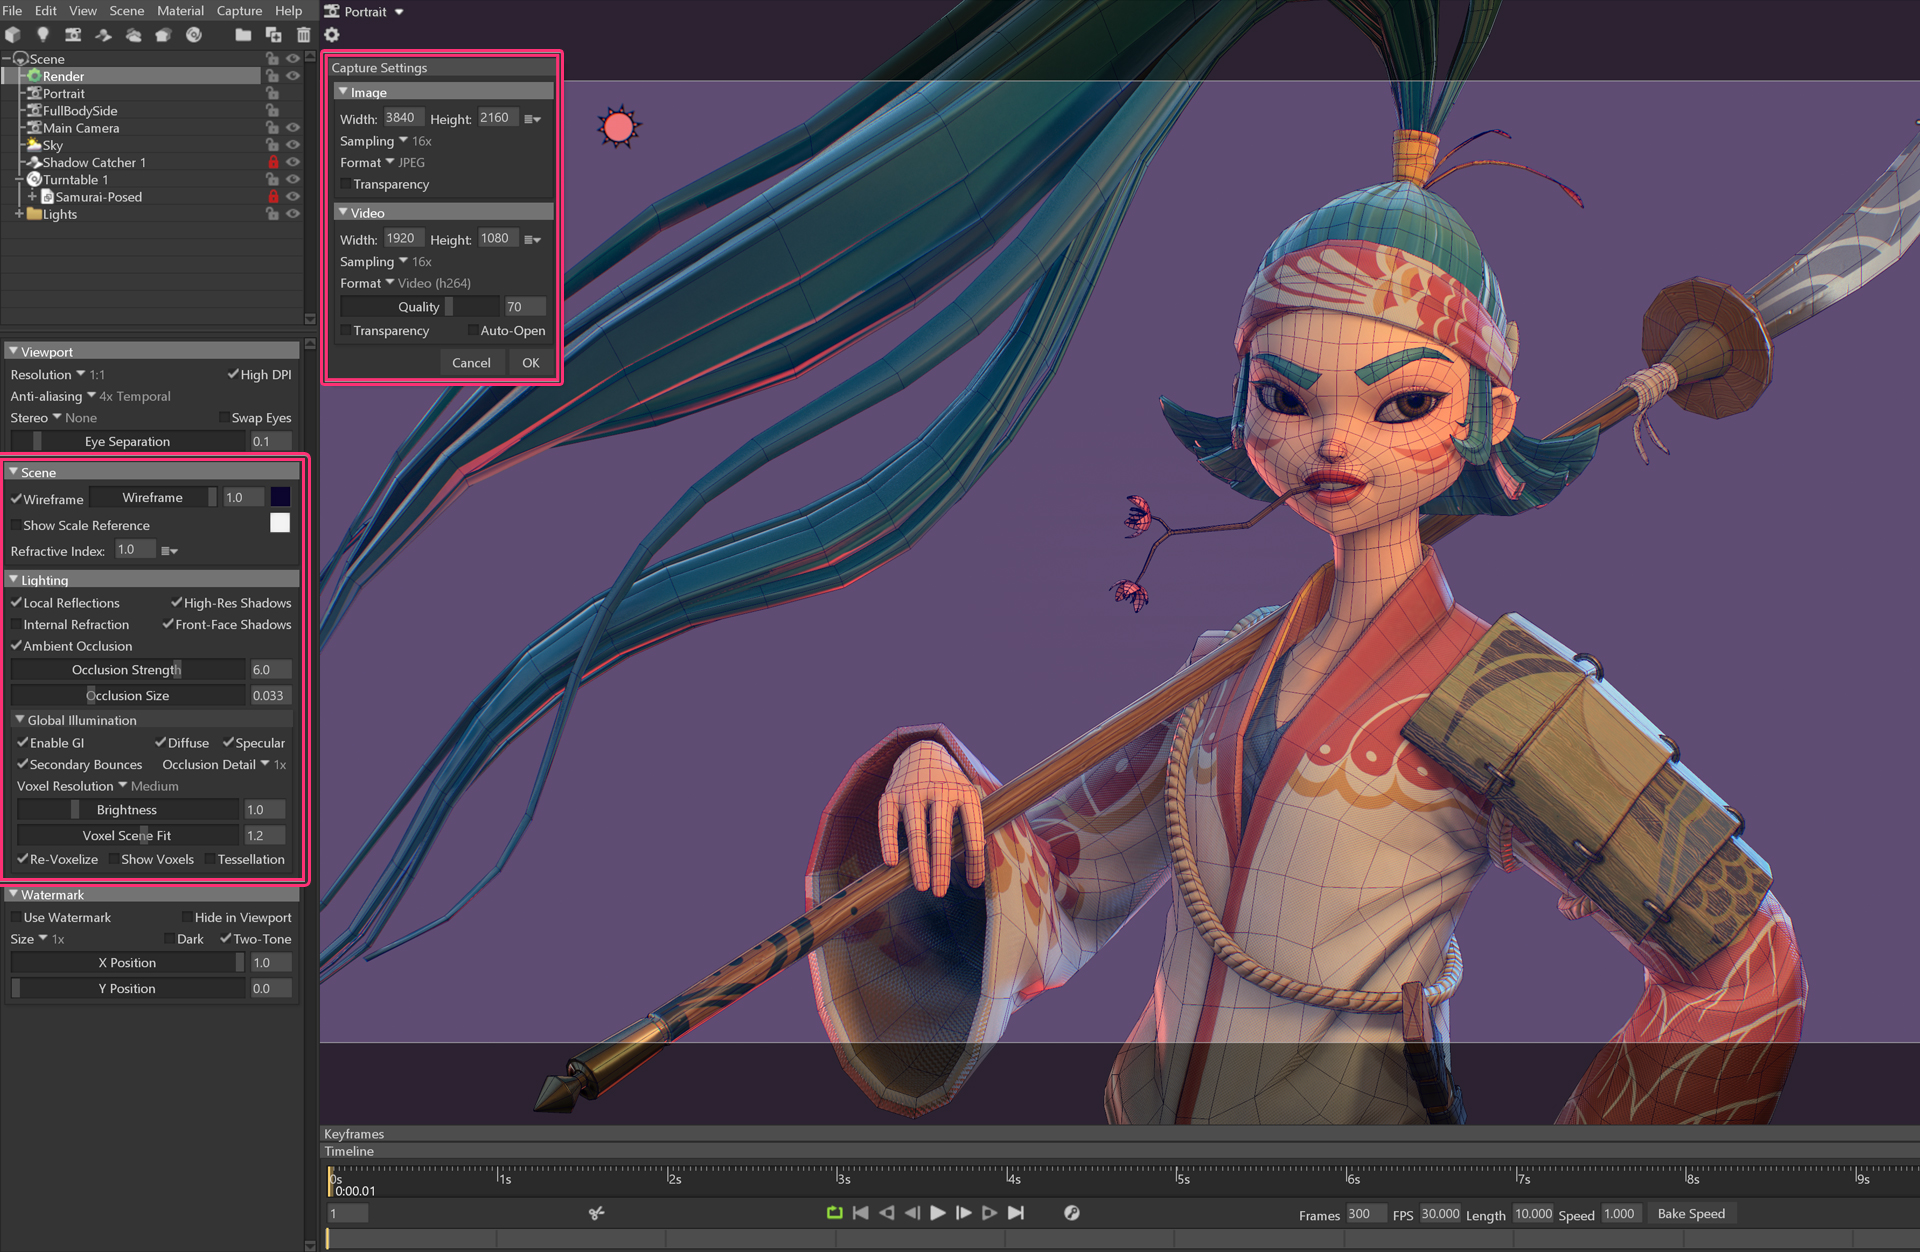
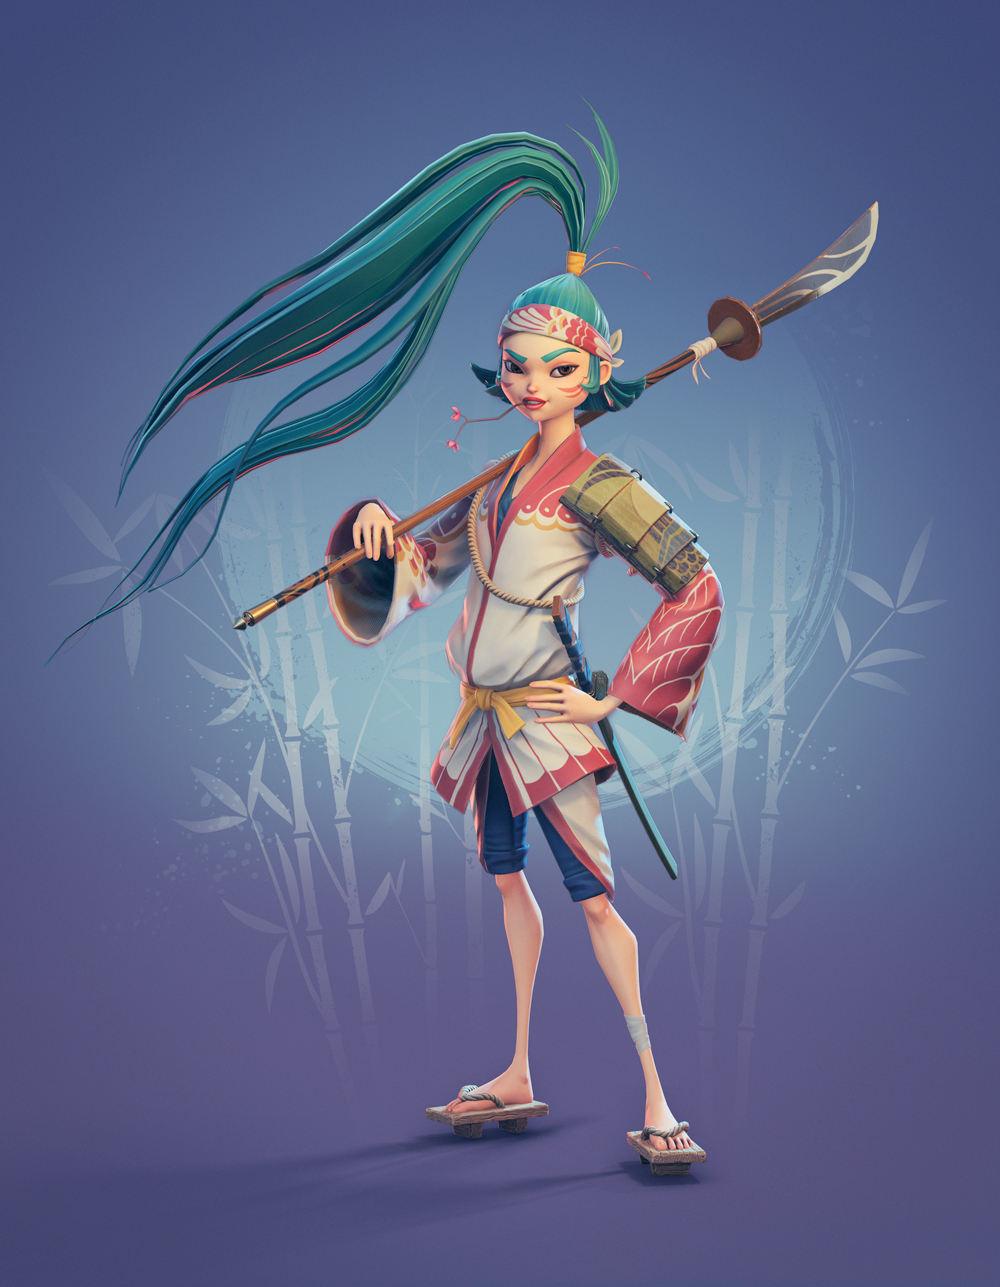
The last step was to finalize the render setup. I went to the Render properties (click on the gear icon in the Viewport or find the render object in the Scene list) and enabled Local Reflections, Ambient Occlusion, and Global Illumination. I do this right before exporting since they can slow down the scene while making adjustments. You can check the Wireframe option here to create some wireframe shots of your character. Last but not least are the Capture Settings. Open the menu by hitting Capture > Settings or Ctrl+P and adjust the dimensions of your Image. If you’d like to export a render with a transparent background, you can set the Format to PNG or PSD and check Transparent. For the final full body render of my Samurai, I’ve added a simple background in Photoshop and brightened up the colors a bit. Once you’re ready, press F11 to export your image. I repeated this process for each camera that I’ve set up.
Conclusion
And there you have it! That was all of the information about how I set up my Samurai scene. Thank you for reading. I hope you’ve discovered some tips and tricks that will be useful for rendering and presenting your characters in Toolbag. And a huge thanks to the Marmoset team for requesting to write this article!
We’d like to thank Yulia Sokolova for writing this breakdown article. Check out more of Yulia’s work on Artstation, Instagram, Twitter, and Facebook.
Capture your own stylized characters using Toolbag’s free 30 day trial. If you’re interested in collaborating on a tutorial or breakdown article, please send us your pitch, along with a link to your artwork, to submissions@marmoset.co.


